Embed A Tweet In Your Blog Post

Twitter logo

Twitter has recently added a feature that lest us to integrate or embed any tweet in to the web pages by generating HTML code for that particular tweet.Blackbird Pie lets you embed tweets into any web page by generating static HTML tweets for posts.

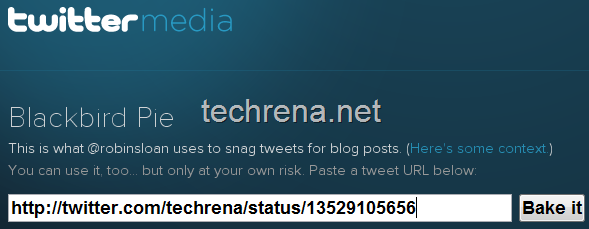
1. Go to Blackbird Pie and enter the full Twitter tweet URL there (as you see in the screenshot) and click Bake it.

Blackbird Pie enter Tweet URL

2. It will now generate an embeddable HTML code along with a preview to show how that particular tweet will look on your site after embedding.

twitter blackbird pie tweet preview

If you are not familiar with working on HTML code, avoid editing the code as far as possible.Just use copy and paste.

Don’t forget to follow  @Techrena on twitter.

In Pictures: Google’s New Design

google official logo

Back in April 2010, we have notified all our readers about the changes to the then current Google home page version.This is now being officially announced by Google and has been rolled out to the most of the users worldwide.Previously the users used to get the new version (while in testing) only when they were using Google Chrome.But now it has been expanded to other browsers as it gets official status.We are posting some of the pictures of Google’s design depicting what’s has been changed.

Official Pictures:

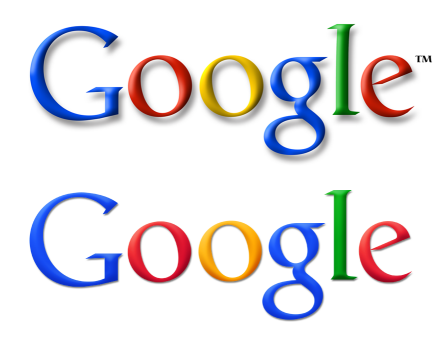
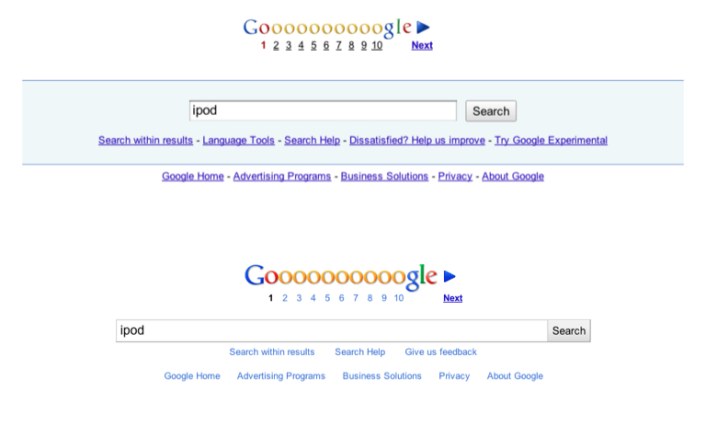
Logo design: Old Vs New

The new Google logo compared to the old one is much lighter, brighter and simpler.

Google new official logo

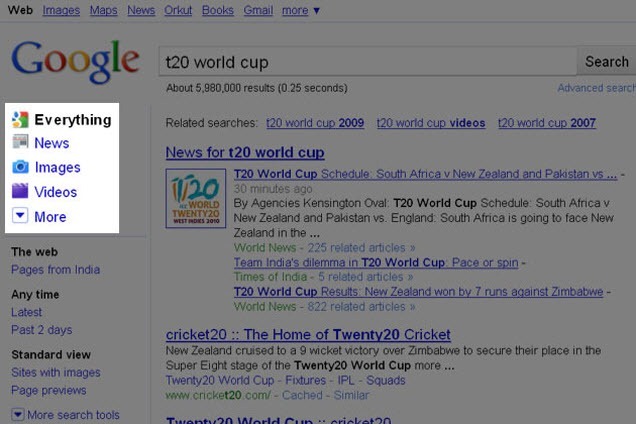
Search Options Panel:

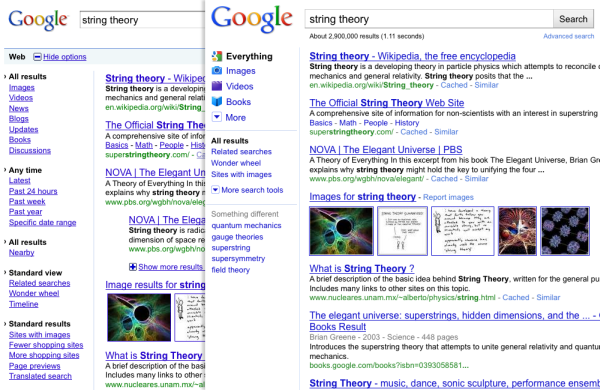
The left Search Options Panel is now more or less a visual treat.The font size of the items has been increased and small thumbnails have been added before each item in the panel.Clicking on More search tools would expand the panel and bring in more search tools.

Google left panel comparision
Footer:

The blue shading and the underlines under the links have been removed and the width of the search box has been increased while lightening the color.

Google footer comparision

Varying Search Options:

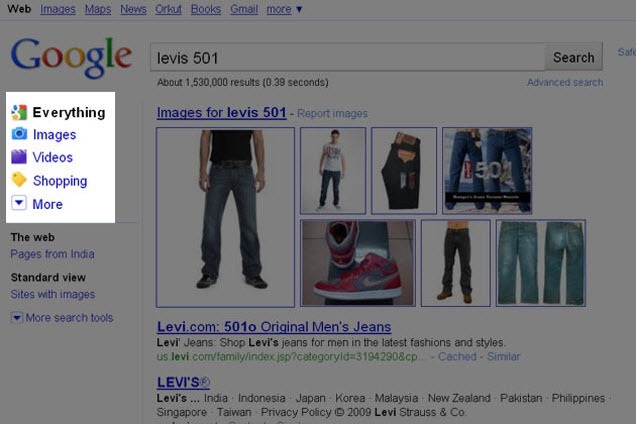
The categories in the left hand side Search Options panel would be different for different types of search queries.For instance, as shown below, the categories appearing would be different for a search query like “T20 World cup” than when you do a search for “Levis 501”.

Here’s an example of how Google search result page turns out for the above said queries.

Google would more likely return news results for these sort of sports or events related queries.
Google result for sports query

You would be more likely to see images/videos and shopping results for these sort of queries.

Google results fot shopping query

Do you welcome these changes? how do you feel about these new changes?

Tip: Close All Your Open Applications At Once In Windows

Windows logo

Are you the one who extracts the most of the multitasking from your computer by simultaneously opening too many applications and switching back to one another.But when it comes to closing all application, it’s a bit difficult to close the each application one by one , isn’t it?

What about closing all the open application windows at once with a single click ? Yes, that’s what the tiny program “CloseAll” from ntwind has too offer.

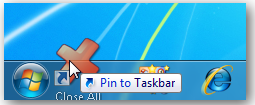
Just download the latest version of CloseAll from the links given at the bottom of the post and extract it to the program files (C:\Program Files\) on your hard disk.For easier access drag the CloseAll.exe to your desktop or Quick Launch Bar pin to the taskbar in your Windows 7.

CloseAll drag to taskbar

Now just click on this shortcut to close all application windows that are currently open.You calso make use of the advanced option to exclude certain programs to be closed by CloseAll, by adding a exclusion list,

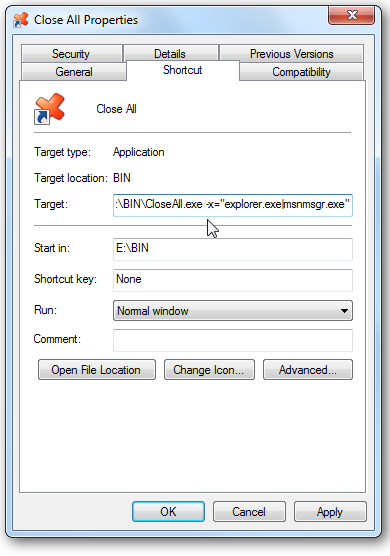
to add a simple exclusion list, go to the CloseAll shortcut properties and go to Shortcut tab, find Target under this tab.Add -x="app-to-exclude.exe": for example:

-x="explorer.exe|firefox.exe|msnmsgr.exe"

CloseAll properties

Click OK and save the settings.So now if you click CloseAll, all application windows except the Windows Explorer, Firefox and MSN Messenger will be closed.

Download CloseAll (Zip file, 36 KB)

Tip: Make Taskbar Previews Load Faster In Windows 7

Windows logo

Taskbar thumbnail previews take a bit of time to appear when you hover your mouse cursor over any taskbar icon in Windows 7.This delay if set by default to 400 ms by the OS.However, if you want to change the delay time so that the taskbar thumbnail previews load faster, here’s the tutorial that you need to follow.

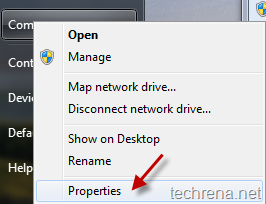
1. Go to Start Menu, right-click on Computer and select Properties

my computer properties in windows 7

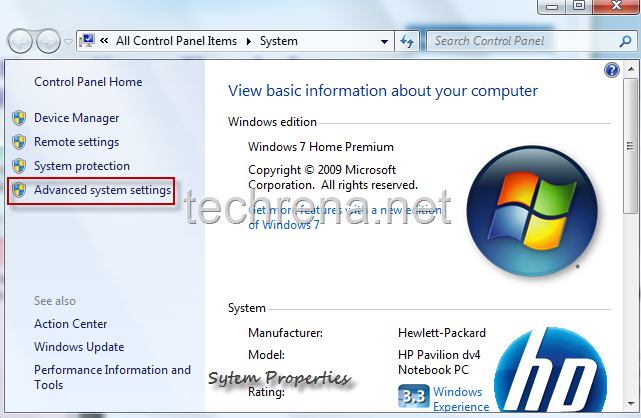
This will open the System Properties window, click on Advanced system settings.Alternatively you can use Windows + Pause/Break shortcut key to open the same.

System_properties_windows7

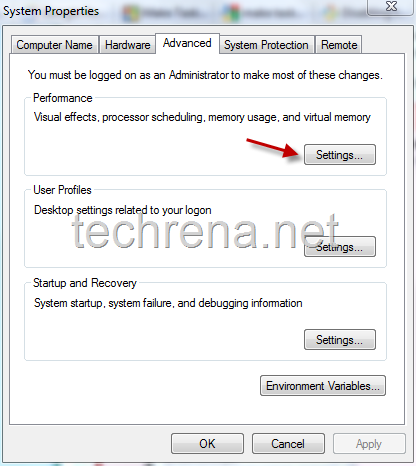
2. Now under the System Properties, go to Advanced tab and click Settings under Performance.

Advanced Settings in System Properties

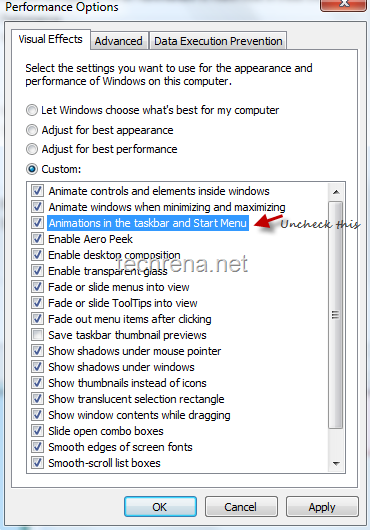
3. This will open up Performance Options windows, now there, uncheck “Animations in the taskbar and Start Menu”.

Performance Options under Visual Effects in Windows7

This option should be deselected since, you may not see much  difference after trying out this tutorial if you keep this option checked.

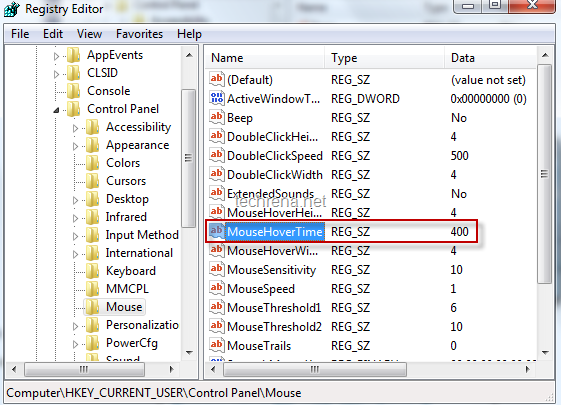
4. Now go to registry editor by typing regedit in the run command (shortcut: Windows + R).Navigate to

HKEY_CURRENT_USER > Control Panel > Mouse

Find the entry “MouseHoverTime” under it.

Mouse Hover Time in Regedit
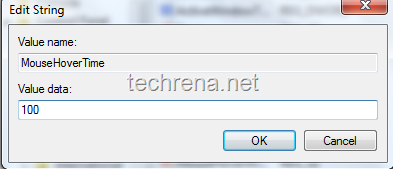
5.You will find a default value of 400 against it in the Data filed.Change this value to something like 100 or even less that that.

Edit MouseHoverTime string value

That’s it, now you have decreased the Mouse hover time which in turn will make the taskbar thumbnail previews to appear more faster.

You can subscribe to our RSS feed via email for more tutorials under Windows 7.

How To Uninstall All Your Windows 7 Games

Windows logo

Windows 7 much like the previous versions of Windows (Windows XP, Windows Vista), has some wonderful preloaded games in it.The games include Chess Titans, FreeCell, Hearts, Internet Games, Mahjong Titans, Minesweeper, Purble Place, Solitaire, Spider Solitaire.For some reasons, if you want to disable or unstill any game or all the games that came with your Windows 7, here’s the procedure you need to follow:

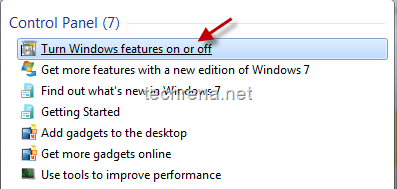
1. Go to Start menu and type “Windows Features” in the search, click on the first result under the section Control Panel.You can alternatively go to Control Panel> Programs> Turn Windows Features on or off option.

turn windows features search

Programs and features in Windows 7

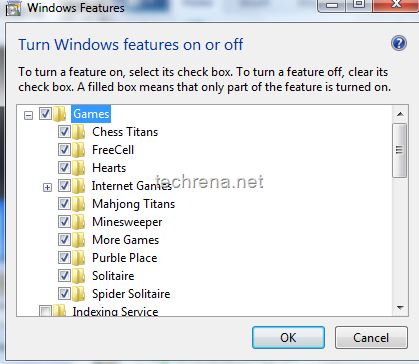
2. Under the Windows Features window, click expand button to see all the 11 games that came with your Windows 7.You can uncheck any desired game to uninstall it from your Windows or you can uncheck entire Games section to unstill all your Windows 7 games.

Games in Windows features turn on or off

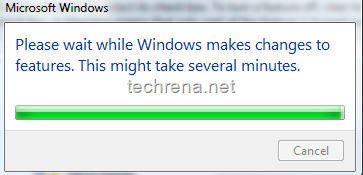
Click OK to apply the changes, wait for few minutes for the changes to effect.

Applying changes to Windows features

3. You can go to your Games Explorer by typing games in the Windows 7 start menu search and you can see the games that are currently available in your Windows.If you have disabled all the games by unchecking the Games folder in the Windows Features section, you will no longer find any games here.

Synchronize Windows Clock With Internet Time Server

Windows 7 clock

Windows Clock as you all know is really got a makeover ever since Windows Vista has arrived and is really appealing to many Windows users, who earlier were using other software like Google Gadgets to see a analog clock  on their desktop instead of default Windows Clock.

Do you know that you can actually synchronize your Windows clock with several internet time servers if you have an internet connection.

This tutorial is based on Windows 7 and Windows Vista based systems.(Although it’s till valid for Windows XP).

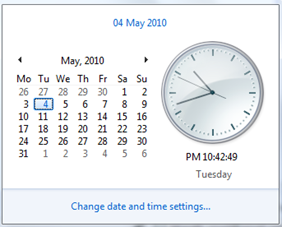
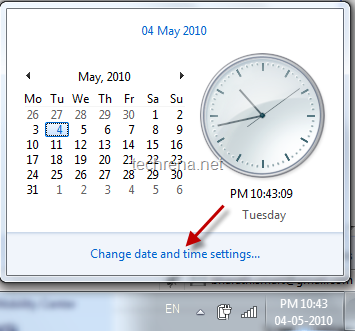
1. Open the Windows clock popup from your taskbar.Click on Change date and time settings.

change date and time settings in windows

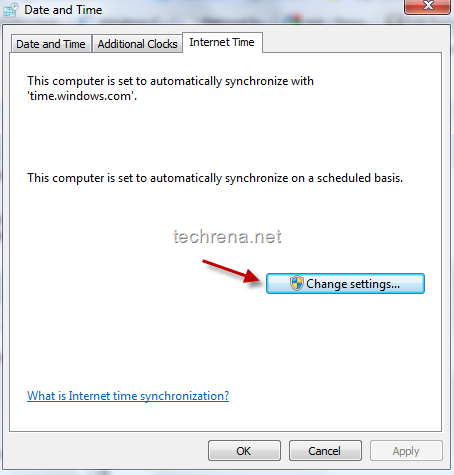
2. In the Date and Time settings window, go to “Internet Time” tab.Click on Change Settings.

change windows clock settings

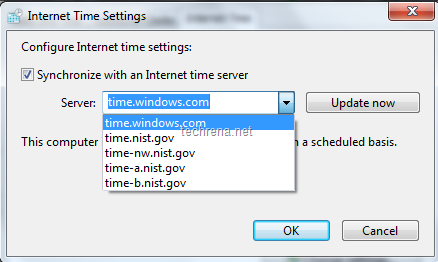
3. Check “Synchronize with an Internet time server”.You can either choose windows time servers or NIST servers.Click Update Now.

Internet time settings windows clock

You have configured your Windows clock to synchronize automatically with the internet time servers.

Wake Up, Google !

Google Adwords logo

Before you read this, I want to let you all know that I’m a big fan of a Google and I can’t even imagine the life without Google, so much is its impact on the worldwide netizens.As an avid internet user, Google works great for me and it saves my time, warns against visiting sites that are spreading malware, offering me a free mail and what not, I enjoy every bit of their services.

Now as a webmaster/blogger too, I reiterate the same what I have said in the above paragraph.Majority of the websites or blogs on the internet are still surviving on Google’s SE traffic.

Unfortunately people there are some people who are trying to exploit the Google’s services which have got a tremendous global internet reach among the internet users.The most exploited services being Adsense, Adwords.I’m afraid Google is just relaxing a bit allowing off late.Google is just becoming the toy in the hands of the bad people.Adsense arbitrage, MFA sites all these are just small examples of the dreadful exploitation.

I just observed two things today while browsing (screenshots added) today and here is why I think it’s for Google to wake up and tighten the screws.

#1. Link selling or link buying is completely against the Google Webmaster guidelines but still valid according to Google Adwords/Adsense, funny? Why should Google be promoting the link selling websites through Adwords and Adsense.Look at the following screenshot  that I’ve taken from a leading technology blog.Obviously the author of the blog has no choice to block them until he really sees such ads himself.

Backlink selling ads in Adsense

#2. Try Googling for “adsense” (in Google.co.in).Just notice what you see in the sponsored links on the right hand side of the page.

Buy an adsense account ad

Adsesnse account for Rs.500/- ($10)? WTF? I went and checked out to find out what that site is all about.Well, it is violating every rule in the Google’s book.Even one of my friends blogged about this adsenseindia.tk scam last week, consider someone who just wants to know about Adsense lands up on this page through the sponsored links and pays them for an Adsense account? He gets cheated right? It’s a complete scam and even if you get an account from there, it would be banned sooner or later.

I know that anyone can create a Adwords or Adsense account and setup ads like these.But keeping such advertisers in the network will definitely going to haunt Google in the long run.Go clean the mess, Google.

Create A Facebook Page For Your Website [How To]

facebook_logo

Facebook is undoubtedly the no.1 social networking site in the world.According to Alexa data, it’s next only to Google.It is very much true that majority of the traffic to the most of websites on the internet comes through Google mainly.Similar it is always essential for the website owners to look at sites like Facebook also as traffic sources for their blogs, provided they offer pretty good lovable content that the users on the Facebook like to read.Facebook has made it easier for all the webmasters to integrate Facebook into their sites easier courtesy the Facebook “Like”.

If you are a webmaster the you may be want to know how to create a Facebook page for your website or blog.So we are coming up with thus tutorial that will guide you to create a page for your site in Facebook in 10 simple steps.

Steps:

#1. Go to Facebook.com and login with your ID.If you don’t have an account yet, you must be living in another world, just come back to our world and signup for Facebook now.

#2. Go to Facebook create new page link.

#3. You will now find 3 options:

  • Local business
  • Brand, product, or organization
  • Artist, band, or public figure

Choose the 2nd option, and select “Website” from the drop-down menu.

#4. Give your page a name and click “Create Official Page”.

#5. Now you have created a simple page which is just having name nothing else.So we need to start editing the info about your website.

#6. Add a picture to your website page and edit other information as well from the Info tab.

Change facebook page picture
edit facebook page

#7. Go to page settings> find a section Notes under Applications.Click on Notes to open and edit notes.
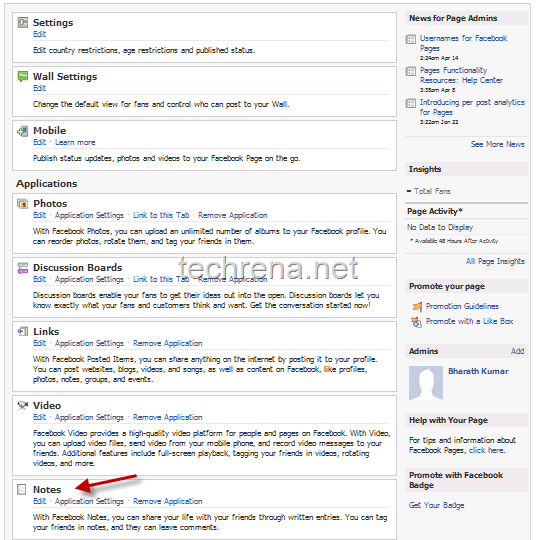
Notes in Facebook page settings

#8. Under the Notes settings, click on Import a blog.
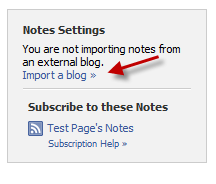
Notes settings in facebook page

Enter your blog URL in the Web URL field (you can even enter your blog’s RSS feed address) and click Start Importing.
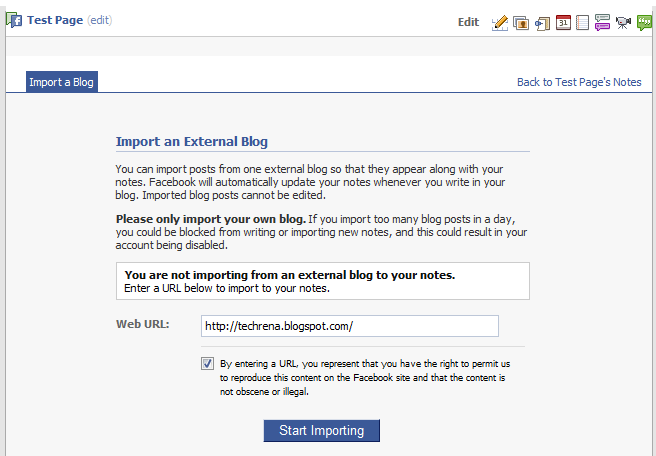
Import a blog in Notes settings in Facebook page

#9. Now you will be shown the preview of the imported blog.Click Confirm Import to finish this step.

Facebook page blog import preview

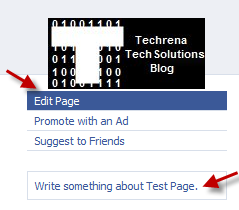
#10. Now you are done with creating a page for your blog.You can also click on “Write Something about your page” link as shown in step #6 to write a brief introduction to your site page.Now your page looks like this, add yourself to the Facebook page by clicking the Like button.
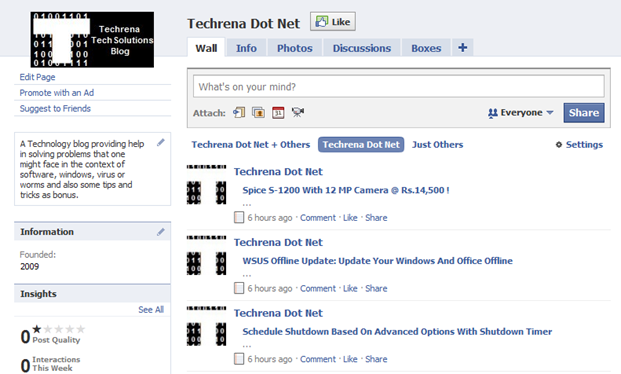
techrena.net facebook page

May be you should also start following our blog in Facebook by clicking the Like button or by visiting Techrena Dot Net Facebook page.

Turn Off New Geolocation Feature In Google Chrome

google chrome logo

The latest beta (developer) version of Chrome, Google Chrome 5.0.375.23 Beta (Official Build 45690) is coming with a inbuilt geolocation feature that lets any website know the location of your computer once you allows access to track your physical location.(See the screenshot below).

Geolocation in Chrome
Well, this may be useful in many ways for websites that offer services based on your location, like Google Maps for instance.This feature gets activated when you click the small little circle at the upper left corner of your browser in Maps.

However if you are worried about your privacy, you shouldn’t allow access at the first place.If you have allowed access initially and later want to rollback and deny access to Google maps to track your location, you should follow the following steps:

Turning Off Geolocation In Google Chrome:

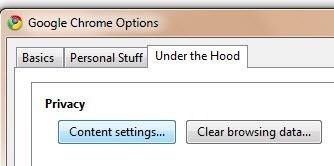
1. Click on the wrench chrome tools menuand click Options.

2. Go to Under the Hood tab

3. Under Privacy, click Content settings

Chrome options under the hood

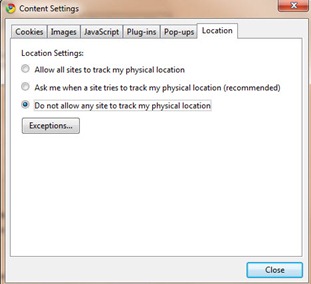
4. Go to Location tab in the Content Settings

5. Choose “Do not allow any site to track my physical location”.

Chrome Content Settings

6. Close the settings windows.

That is it, Chrome won’t track your location to websites from now on, hope this small tutorial has helped you.For more tutorials and updates from us, you can subscribe to Techrena RSS feeds via email.

Find Techrena.net On Facebook, Twitter & Google Buzz

techrena logo

Ever since we have launched this blog, we have been striving continuously striving to helping you out in your day-to-day computer and internet use.We have recently celebrated first birthday anniversary of techrena.net jubilantly on March 27, 2010 at Hyderabad.

As we grow our blog, it’s our first priority to make it easy for our readers to connect with our blog in all possible ways.You can either subscribe to our RSS Feed (or receive via email), you can follow Techrena on Twitter or on FriendFeed or on Google Buzz.

If that isn’t enough for you, we have just created a Facebook page, adding which to your profile makes it much easier to connect to Techrena.net directly from your Facebook profile.Just click on the “Like” button that you see on our Facebook and you are good go to.Alternatively you can also find a Facebook Like Box apperaing on the sidebar, where you can find the Like button along with the number of connectors to the site right now.See you all on Facebook !