[Tip] Change Internet Explorer 9 Search Provider

IE9 logo

If you have already downloaded and installed the Internet Explorer 9 (IE9) on your computer, you might well be aware that there’s no search sidebar in IE9. IE9 lets you search directly from the address bar so much so in the similar way Google Chrome does. You can also see the suggestions as you type (along with suggestions) in the address bar. But the problem here is by Bing set as the default search engine by default and most of the beginners will have tough time in figuring out how to change this default search engine to their liking, say Google. Here is a small tutorial explaining you the exact procedure to follow to change the default search engine in the Internet Explorer.

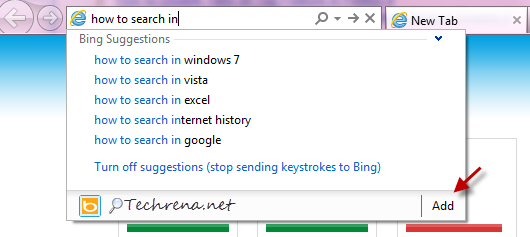
1. Type your search query in the IE9 address bar and click on “Add” button that you can see under the search suggestions (from Bing by default).
Bing search suggestions in IE9

Icon of your current search engine is shown at the extreme left below the suggestions. As you can see from the above screenshot, it is Bing in my case and it should be in most of the cases as well.

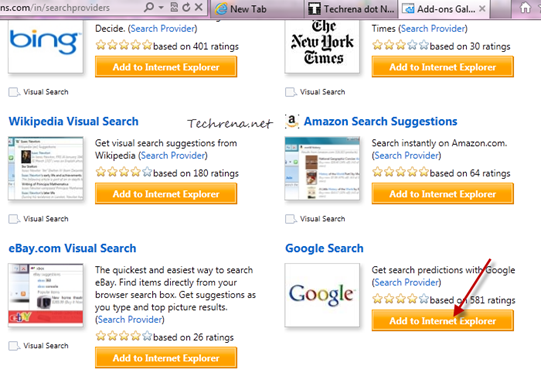
2. You will now be taken to IE add-ons gallery page where you will find a whole lot of available search providers.
Search providers IE add-ons gallery

Locate your favorite and click on the “Add to Internet Explorer” link present next to it. All of the search providers listed there offer search suggestion as well.

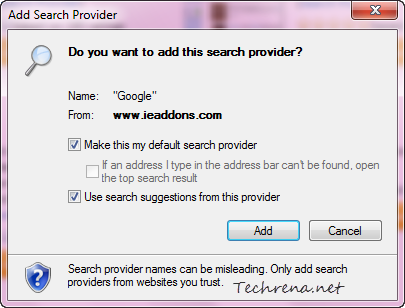
3. In the new window that pops up, choose both the options (“Make this my default search provider” and “Use search suggestions from this provider”) and click the “Add” button.
Add search provider IE

That is it. We have successfully change the search provider in the Internet Explorer 9. And as you can see Google is my default search engine now!
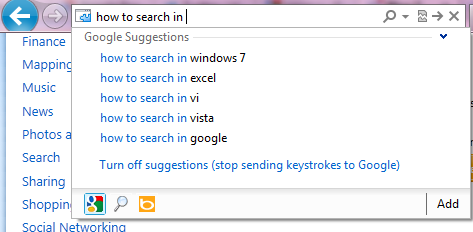
Google search in IE9 address bar

Related: Download Internet Explorer 9 RC

Android 3.0 Honeycomb Wallpapers

Honeycomb Wallpapers

Android 3.0 tablet-centered version, Honeycomb is finally set for a debut with Motorola XOOM tablet which goes for sale from February 24, 2010. Meanwhile, let’s celebrate the occasion with some wonderful Honeycomb wallpapers. There are 9 high resolution wallpapers, shipped along with the final SDK build for developers. We have got together all to a zipped file (2.86 MB in size) that you can download from the link added at the bottom of this post. The marching Androids (bots), blue crystals and lotus are my favorites. What are your favorite ones? Download and share with your friends and spread the love for Android.

Download Honeycomb wallpapers [Zip file, password: techrena.net]

The US National Broadband Map

National broadband map

You are moving to a new place in the United States and are in need of getting a new internet connection but not sure about who provides the best internet (better term may be ‘faster internet’) ?
No more worries, we now have a solution in the form of the ‘National Broadband Map’ here. It came from none other than the Federal Communications Commissions (FCC) of the Obama administration.

The National Broadband map for the United States (developed by the National Telecommunications and Information Administration) is a national broadband map containing data for thousands of broadband providers with more than 25 million searchable records and the results will be delivered in a map. You just have to key in your ZIP code or even street name along with ZIP code for even better localized result. The National Broadband map will then show you all the different Internet Service Providers along with the actual speeds that they are offering in your area.

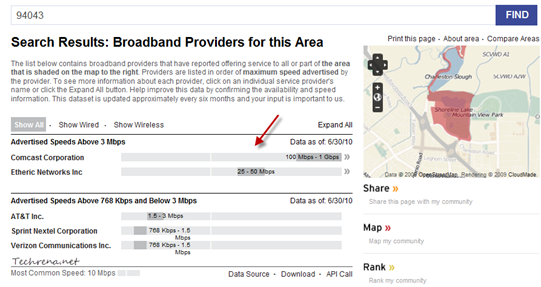
National broadband map USA

As you can in the screenshot above, I have around five different broadband providers to choose from for my query (ZIP Code 94043 in California) and you can see that Comcast is the fastest broadband provider in this area when compared to Etheric Networks (which is also offering decent speeds), AT&T, Verizon and Sprint. You can quickly get to know about availability of a particular ISP in your area (anywhere in the United States), or compare the available providers without needing to enter their websites or view the overall broadband connectivity map of the U.S.

Visit National Broadband Map

[via]

[Download] Windows 7 Service Pack 1 (KB976932)

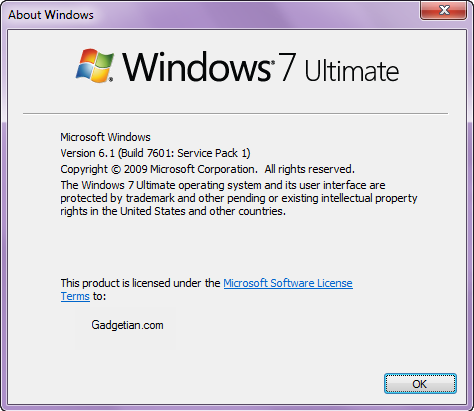
Windows 7 SP1 update

Microsoft has released the Windows 7 Service Pack 1 (SP1) RTM for everyone. Windows 7 SP1 was earlier released for MSDN and TechNet subscribers last week. Starting today users of Windows 7 and Windows Server 2008 R2 can download the the Service Pack 1 (SP1) via Windows Update (as KB976932) when it becomes available to them. Most of the Service Pack 1 contains updates most of which have already been released through Windows Update.

You can either download the SP1 for Windows 7 or Windows Server 2008 R2 through the Windows Update or also from the direct links from Microsoft Download Center, made available by Microsoft (added at the bottom of this post). The advantage with downloading and installing Service Pack 1 through Windows Update is that it automatically detects the updates that have been installed previously on your Windows 7 and downloads only the ongoing updates that are not yet installed on your computer.

The build number of the final RTM is 7601.17514.101119-1850 and it does indicate the build has been compiled on November 19, 2010. The SP1 (KB976932) package includes client-side support for RemoteFX and Dynamic Memory two new features that are enabled in Windows Server 2008 R2 SP1.

If you have installed a pre-release version of Windows 7 or Windows Server 2008 R2 SP1 (like Beta or Release Candidate versions) on your machine, you must uninstall them before proceeding further with installing the Windows 7 Service Pack 1 final RTM version.

Download:

Windows 7 SP1: 32-bit (537.8 MB) | 64-bit (903.19 MB)

[Via] [Image credit]

[Tip] Disable Built-In PDF Viewer In Google Chrome

google chrome logo

Google has started shipping the Google Chrome browser with a built-in PDF viewer since the release of Chrome 8. Even when you install native PDF readers like Adobe Reader of any other applications to view the PDF files on your system, Google Chrome will automatically disable the browser PDF plugins and enable the built-in PDF viewer. But the built-in PDF viewer in Chrome has got some limitations compared to a standalone PDF viewer. If you want to disable the built-in PDF viewer in Chrome, follow these steps:

1. Type about:plugins in the Google Chrome address bar and hit Enter.

about:plugins in Chrome

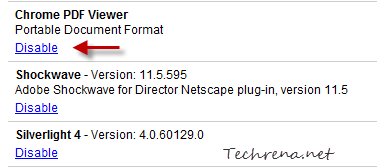
2. All the plugins installed in the Google Chrome will now be shows in the window. Scroll down the list until you locate “Chrome PDF Viewer”.

Chrome PDF Viewer plugin settings

3. Click on the “Disable” link under the “Chrome PDF Viewer”.

Google Chrome’s built-in PDF Viewer will now be disabled and all the PDF files from now on, will be opened using the external PDF reader plugin that you have installed. In case you want to activate the built-n PDF Viewer in future, just follow the step-1 and click the “Enable” link under “Chrome PDF Viewer”.

[Tip] Import Delicious Bookmarks To Google Bookmarks

Delicious to Google Bookmarks

Delicious, the popular social bookmarking service was in news in December 2010 when Yahoo said that it would ‘sunset’ the bookmarking web service which made the users think that Yahoo was trying to shut down the service. Later it turned out to be a rumor when Yahoo! clarified that it wouldn’t be shutting down the service but they would be selling Delicious. And so many Delicious importers uprose ever since the ‘sunset’ rumors surfaced. Now it’s Google’s turn! Google has launched a new Delicious Bookmark importer service to enable the Delicious users to import their bookmarks to the Google’s own bookmarking service. The usage is straightforward:

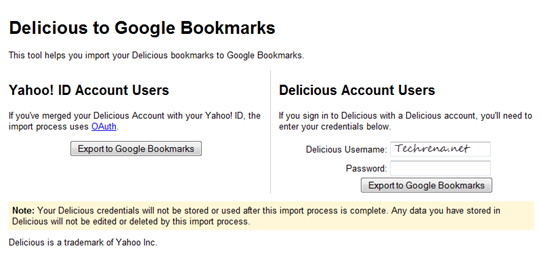
1. Login to your Google account and open this Delicious import page.

Delicious to Google Bookmarks import

2. Just provide your Delicious login credentials or login through your Yahoo! account in case if you have merged your Delicious account (the importer uses the oAuth process in this case).

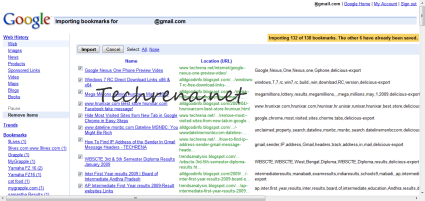
Delicious Bookmarks Imported To Google Bookmarks

Select the ones that you want to import and click the “Import” button and that is it. You should now have all of your Delicious bookmarks (favorites) in your Google Bookmarks.

[Tip] Disable The New Photo Viewer In Facebook

Facebook logo

Facebook has recently introduced a new Photo Viewer (called ‘Photo Theater’) last week. It has become a topic of debate among the Facebook users since then with most of them not supporting the initiative from Facebook to introduce the new theater version of the Photo Viewer. The new Photo Viewer is all about popup slideshow covering up almost the entire Facebook page in black background. If you are one of those that doesn’t like this annoying Photo Viewer, you might want to disable it and revert back to the good old Facebook Photo Viewer. These are the set of workarounds to get rid of the new Facebook Photo Viewer.

Facebook new photo viewer

Using F5:

Facebook appends the URL of a photo in Facebook with this “&theater” parameter to the URL to trigger the new Photo Viewer instead of the old one (You can manually delete the “&theater” tag from the URL and hit enter to load the photo in the old viewer). But it is found that refreshing the page loads the same photo in the old Photo Viewer. So all you have to do is to press F5 button and the photo should load again in the old Photo Viewer instead of the new one and you will see the rest of the photos in the album in the old Photo Viewer. However, this is not a permanent solution, and you might want to automate the things for you, and this is why you should scroll down to the next workaround.

Facebook old photo viewer

Using Browser Extensions:

If you are using Firefox, you should first install the Greasemonkey add-on and then use the following Facebook Photo Theater Killer script. This script works in Google Chrome too. Alternatively, if you are on Google Chrome, you can install Revert Facebook Photo Viewer extension for this purpose.

Activate 2-Step Verification Process For Your Google Account To Make It More Secure

Google 2-step verification

Google had previously announced the new 2-step verification for Google apps users. The same is now being rolled out to all the Google account users. The 2-step verification would make your Google account more secure by verifying you are the real owner of the account that you are trying to access. You can verify your authentication by using a smartphone, or via a SMS text code that you receive similar to how you do it while making online banking transactions or even you could use a landline to verify your identity through a voice call in case you don’t have a mobile phone with you.

How To Enable 2-Step Verification In My Account?

To set up the 2-step verification, login to your Google account and navigate to the Manage Account page, and if the feature has been enabled for you, you should see a “Using 2-step verification” link under Security column in your Personal Settings.

Google account personal settings

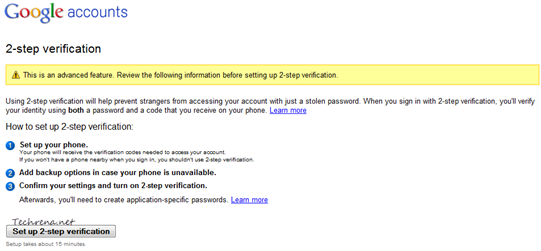
And the whole setup should take about 15 minutes. You will see this page on the next screen:

google 2-step verification setup

Click on the “Set up 2-step verification” to continue and complete the setup process. It involves 3 steps: 1. Setting up your phone 2. Adding backup option when your phone is unavailable 3. Confirm your settings

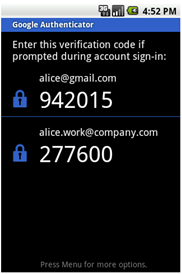
If you have a smartphone, you can install Google Authenticator application from (available for Android, iPhone and BlackBerry devices).

Google authenticator screenshot

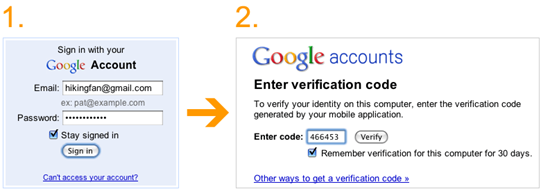
The application generates a verification code that is required in the second step during the sign in. You can also check the “Remember verification for this computer for 3 days” option and you don’t need to re-enter the code again for the next 30 days. In case you don’t have a smartphone, you can receive the verification code through a text message or through a voice call as well. You can also generate application specific passwords to sign in to non-browser based applications that use Google account like mobile Gmail, Picasa or AdWords Editor. But all these are advanced options and might confuse you. For now you have completed the 2-step verification process and you have added more security for your Google account and lets not bother too much about the advanced settings.

[via] Official Google blog

[Tip] How To Delete Explorer File Search History In Windows 7

Windows 7 has enhanced search feature that enables users to search for files and folders present in the computer efficiently. The search is faster, more accurate and fetches the results in seconds. Windows Explorer saves and remembers these search terms along with locations of the files and visitors for future use.

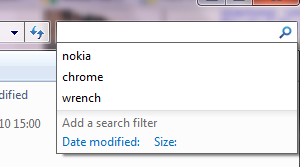
Windows 7 search history

These items will be shown when you start typing the part of the search term of location of a file or folder.While this is pretty useful you might also want to have a choice to delete them when you don’t want them to show up in the Windows Explorer location bar on in the search bar.

The Easy Way:

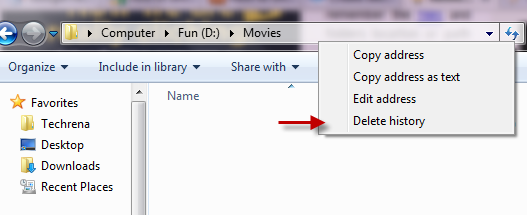
In the Windows Explorer window, right-click on the location bar or address bar when it is out of focus and choose “Delete history” from the context menu. This will delete all the files and folders search terms history that were typed in the location bar and search bar. This should delete the file history in your Windows 7.

Delete file folders history in Windows 7

Alternate Method:

The same can be achieved using Registry Editor as well. Type regedit in the Start Menu search and open the Registry Editor from the results or press Windows button + R to open the Run command and type “regedit” and hit OK to open the Registry Editor.

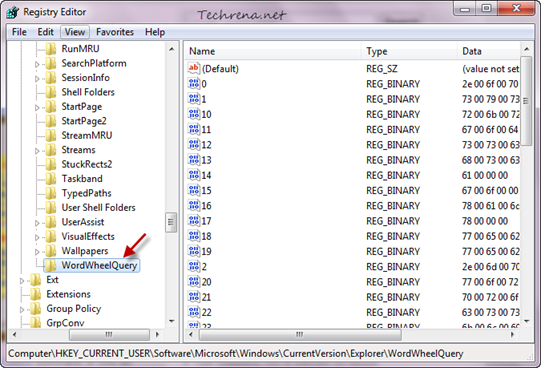
In the Registry Editor, navigate to the following path:

HKEY_CURRENT_USER\Software\Microsoft\Windows\CurrentVersion\Explorer\WordWheelQuery

Files and folders histoy registry editor Windows 7

and delete all the entries (each one corresponds to a search term) present inside this sub key. That is it. Now all your history related to files and folders would be deleted.

[Tip] Hide Your Facebook Updates From Specific People

Facebook logo

Facebook can be a place for lot of fun.  It has some annoyances too. It all depends on how you use it. Have you ever wondered whether you can post a private post or status update on your post that appears only to certain people and is hidden from other friends? Advanced users of Facebook might very well be aware of how to do this. But if you are relatively new user or never had a clue that such a feature existed in Facebook that allows to set a private post or status update on your wall, read the following guide to quickly learn how to do this:

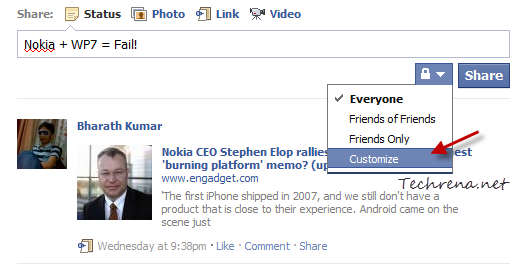
1. Login to your Facebook account, and start post your status update. Click on the small “Padlock” button that is placed just before the “Share” button.

Facebook private status update

Click on the “Customize” button that appears in the dropdown menu list.

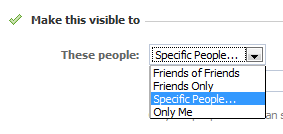
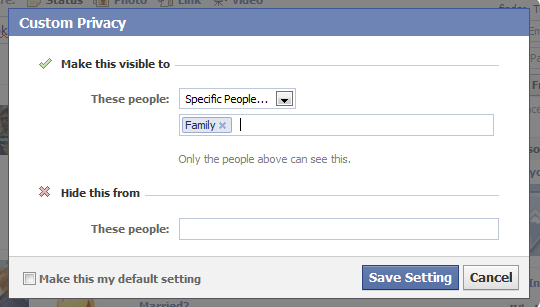
2. In the next window, you will be presented with privacy options for your current status update. As you want only specific people to see your status update, choose “Specific People” from the list under “Make this visible to”.

Facebook status update to specific people

3. You can either choose your friends from Facebook manually or you can create custom friends lists to choose from. To create a friend list quickly, go to your Facebook friends edit page and create a list with your specific friends. If you had already done that, you must now be able to choose a list by typing in the name of the list.

Facebook post visibility

4. Now your status update will only be visible to the people from your chosen list. Or if you want status update to be hidden from few selected friends of yours, you need to enter the names of those friends or friend list under “Hide this from” as in the previous case.

Facebook status update privacy

Click the “Save Setting” button once you are done. Your status update will now be visible to specific people or friends and will be hidden from other friends. You may also check the “Make this my default setting” option to set it as your default setting for other future updates.