[How To] Disable Restart Your Computer Notification After Installing Windows Update

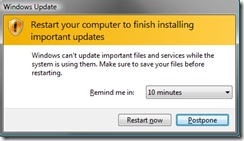
Microsoft Windows automatic updates provides maximum protection against latest security threats and fixes bugs discovered later. Well it is advisable to enable automatic updates or at least install them manually whenever any new update is released. The only annoying thing about Windows Automatic Updates is that it starts displaying a notification to restart your system in regular intervals once it finishes installing the updates.

This notification is even more annoying in Windows XP where we don’t have the option of increasing the time interval.

Windows_XP_Restart Windows-7-restart

Now we can disable this notification. The methods are given below:

1. By using Local Group Policy Editor (gpedit.msc)

Note: Local Group Policy Editor which is not available in Home versions of Windows

Open Local Group Policy Editor. Press Start + R, Type gpedit.msc and Enter.

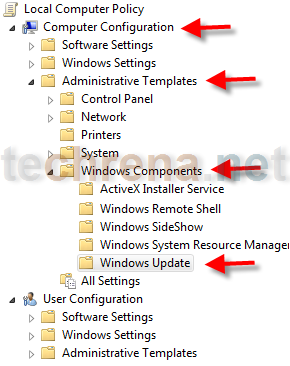
Now go to in the left pane :

Computer Configuration—>Administrative Templates—>Windows Components—>Windows Update

Windows_update

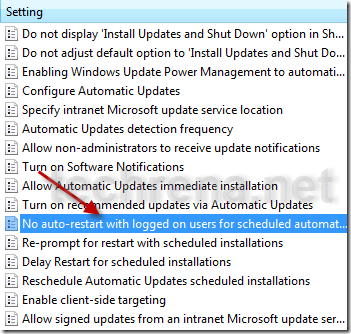
In the Right Pane Double Click on:

No auto-restart with logged on users for scheduled automatic updates installations

no_auto_restart

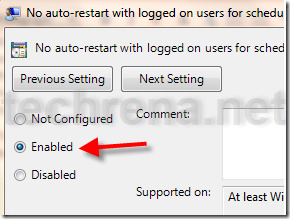
Click on Enabled and press OK.

enable_no_auto_restart

Now the notification has been disabled permanently.

2. By using wuauserv command

Note: This method is applicable for all versions of Windows XP, Vista and Windows 7.

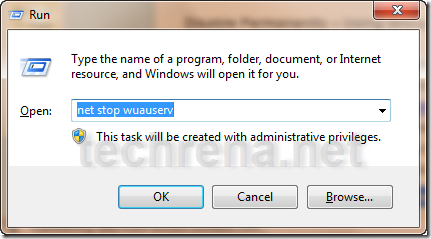
Press Start + R, Type net stop wuauserv and Enter.

net_stop_wuauserv

Stopping_windows_update_service

It will stop the Windows Update service for the current session. It will start again after the system restarts. It is important to note that you have to use this command only after Windows has finished installing the updates and when it starts notifying to restart. Do not stop the service while installing the updates.

If you want to start the service Type net start wuauserv and Enter.

This method stops the notification temporarily, only for the current session.

We hope that now you will not have to press restart later again and again and get hold of the annoying message.

You can subscribe to our RSS feed via email for more tutorials under Windows.

[How To] Disable or Enable Registry Editor In Windows 7

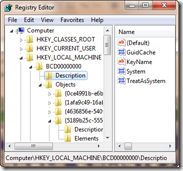
regedit

With viruses trying to attack your system and change the registry, why don’t we try disabling the registry editor now itself before the viruses do it?

Yes, this question is a clear one and why don’t you disable the registry editor by yourself before someone changes your registry and mess with your computer.

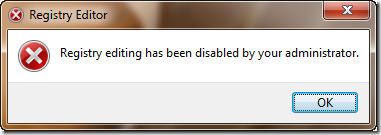
regedit_disabled Well we have a lot of methods to disable or enable the registry editor. Some of the easiest ones are given here.

1. Disable or enable Registry Editor using Registry Enabler & Disabler 3

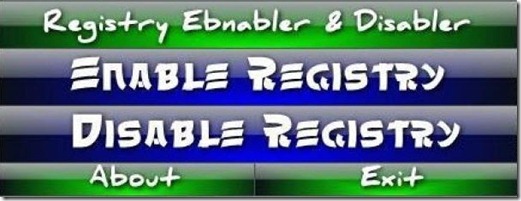
Registry Enabler & Disabler 3 is a freeware which can be used to enable or disable Windows Registry editor. It is a safe program.

Download: Registry Enabler & Disabler 3

Size: 276 KB

Registry_Enabler_Disabler_3

By using this program, you can directly enable or disable the Windows registry editor.

2. Disable or enable Registry Editor using Local Group Policy Editor

Press Start + R and type gpedit.msc and press Enter.

In the Local Group Policy Editor go to the location:

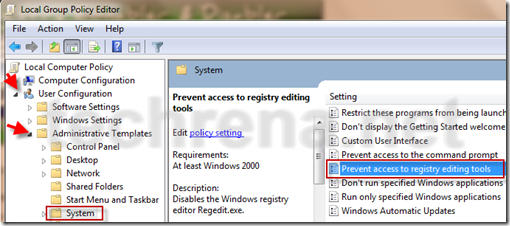
User Configuration—> Administrative Templates—> System

Under System, find Prevent access to registry tool. Double click on it and set Enabled to disable access to registry editor.

disable_registry_editor

Set it to Disabled to enable access to Registry Editor.

Note: Local Group Policy Editor which is not available in Home versions of Windows

3. Enable Registry Editor Using VBS script.

This method is given in techrena.blogspot.com. To read more visit:

How to enable Registry Editor (REGEDIT)

You can subscribe to our RSS feed via email for more tutorials under Solutions.

[How To] Remove Trojan.Vundo.H or Vundo.H Virus

danger

Trojan.Vundo.H also known as Vundo.H is a back door trojan horse program  that will activate corrupt infected local and network computers and download further malware programs onto the system. The Trojan.Vundo.H trojan horse is considered at severe security risk that can alter registry files and radically slow down computer speed.

Though popular anti-virus programs like AVG can detect the virus, it is found that some special anti-spyware program is needed to remove this virus application

Trojan.Vundo.H  infects and alters certain registries which include:

* HKEY_CLASSES_ROOT\CLSID\{39458c53-4dae-471a-a480-e3bc0b1d7dd9}
* HKEY_CLASSES_ROOT\CLSID\{65d46614-611d-4af2-aa13-a34fc317a96e}
* HKEY_LOCAL_MACHINE\SOFTWARE\Microsoft\MS
* HKEY_LOCAL_MACHINE\SOFTWARE\Microsoft\dslcnnct

Some of the known infected files by Trojan.Vundo.H are given below:

* C:\WINDOWS\SYSTEM32\ugohwe.dll
* C:\WINDOWS\SYSTEM32\subapade.dll
* C:\WINDOWS\SYSTEM32\edapabus.ini
* c:\WINDOWS\SYSTEM32\voriyeji.dll
* C:\WINDOWS\SYSTEM32\pefedamu.dll

Removal of Trojan.Vundo.H program:

It is very difficult to remove the virus program manually, though it is possible. To monitor the activity and registries of the program we can use Hijack this. To know more follow step 2 in this post.

After a detailed research we have found that this spyware virus can be removed using the spyware program: Spyware Doctor with AntiVirus 2010 for Windows. You can download the program from the link below:

Download: Spyware Doctor with AntiVirus 2010 for Windows

Size: 34.9 MB

Run a full scan and remove the Virus files.

You can subscribe to our RSS feed via email for more tutorials under security.

Google Nexus One Online Marketing Failure

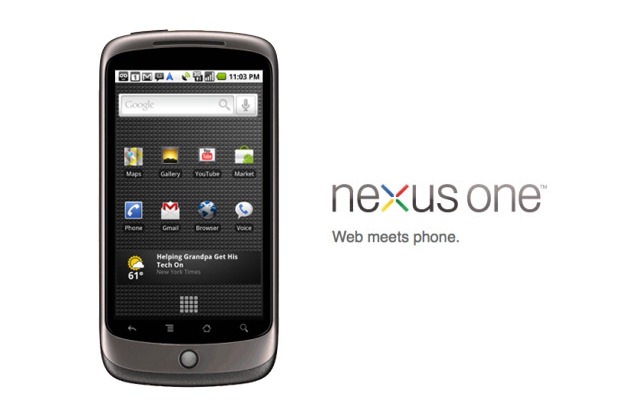
Google is closing down the online store for its Nexus One smart phone. The move comes just four months after Google launched the touch screen Nexus One to compete with Apple’s iPhone and Research in Motion’s Blackberry.   in a strategic shift that signals the failure of its bid to market the device directly to consumers on the Web.

google-nexus-one-smart-phone

This move is an effect of marketing failure of Google’s bid to market the device directly to consumers online. It’s because we as a customer likes a hands-on experience before buying a phone.

Nexus One sales have lagged well behind the iPhone. In just 74 days, 1 million units of the original iPhone were sold, compared with about 135,000 Nexus Ones in the same time frame.

But Google Android has the potential to be the No. 1 or No. 2 player in its market, Google insisted.

Download Microsoft Windows Malicious Software Removal Tool KB890830

microsoft Windows Malicious Software Removal Tool

The Microsoft Windows Malicious Software Removal Tool May 2010 edition is available for download now. This tool can detect and remove prevalent malicious software like Blaster, Sasser, and Mydoom.

It is advisable that everyone who uses Windows to install this update. This Update is applicable to Windows 2000, Windows 7, Windows Server 2003, Windows Vista, and Windows XP.

Windows Malicious Software Removal Tool – May 2010 (KB890830)

Download size: 1.2 MB (Through Windows Update)

Update type: Important

After the download, this tool runs one time to check your computer for infection by specific, prevalent malicious software (including Blaster, Sasser, and Mydoom) and helps remove any infection that is found. If an infection is found, the tool will display a status report the next time that you start your computer. A new version of the tool will be offered every month. If you want to manually run the tool on your computer, you can download a copy from the Microsoft Download Center(Link Given Below), or you can run an online version from microsoft.com. This tool is not a replacement for an antivirus product. To help protect your computer, you should use an antivirus product.

You may need to restart your computer for this update to take effect.

Manual Download from Official Microsoft Site:

Download size: 9.7 MB

Download: Click Here (From Official Site) – Update: Link expired

Also read about Windows Malicious Software Removal Tool KB890830 for April 2010, and you may also want to read about other updates released by Microsoft in May 2010: KB978542, KB978213.

[How to] Repair Install Windows XP without Data Loss

Have you ever faced any problem like ntldr file missing during the start up of Windows XP? During the cases of critical Windows file gone missing or corrupt, Windows will not Boot and hence cannot start. What will you do in such case where your data is at stake?

There may be many solutions available, but repairing Windows using the Windows XP setup CD will be the best. In repair install your data will be intact and no data loss will occur if everything goes right.

If you install a new copy of Windows then some of your data will be lost.

What is Windows XP repair Install?

In Repair install, all the Windows files and registries will be copied to your Hard drive from the Windows XP installation CD. The installed program files and personal data on your hard drive will not be affected in most cases.

How to perform Windows XP repair Install?

Requirements:

Your Windows XP installation CD and key

Follow the steps below:

1. Insert the Windows XP CD to your Optical Drive and Start your computer.

Make sure that the computer boots from the installation CD. If it is not booting from the CD try changing your boot options in the BIOS.

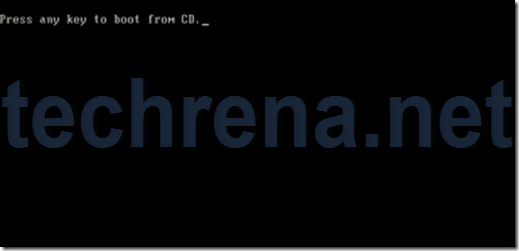
While booting from the CD, press any key to start the process.

boot_from_xp_cd

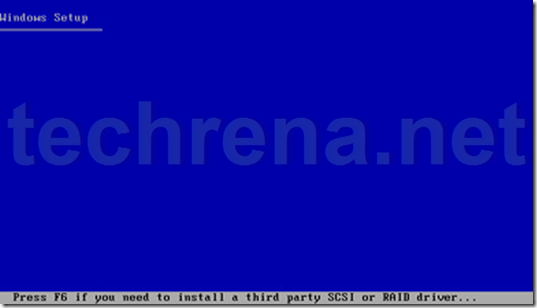
Xp_setup

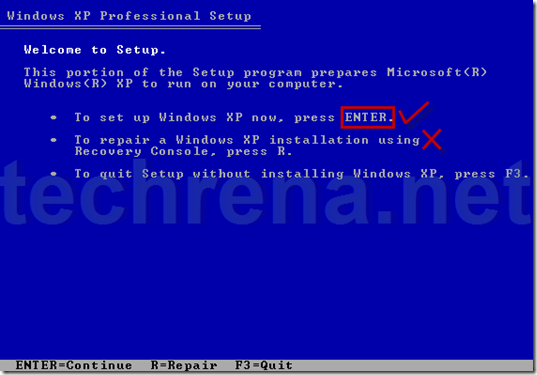
2. Press ENTER to set up Windows XP.

Do not press R. It will start, Recovery Console which is not desirable.

Welcome_ro_setup

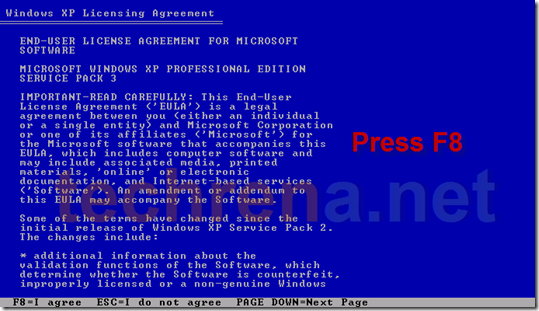
3. Press F8 to Agree the License Agreement.

F8_agreement

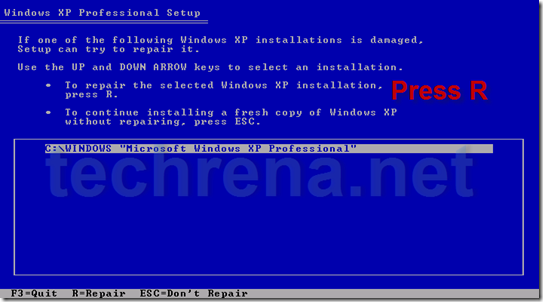
4. Press R to start the recovery install

Select the currently installed Windows XP location which you want to repair. Press R to repair the installation.

repair_xp

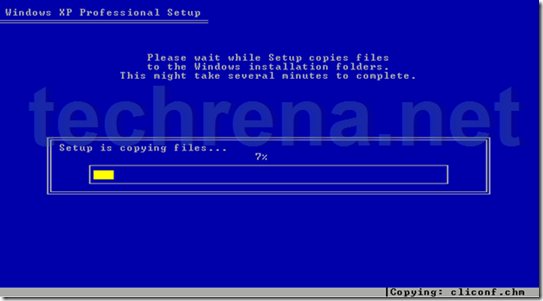
Now it will copy the files.

copying_files

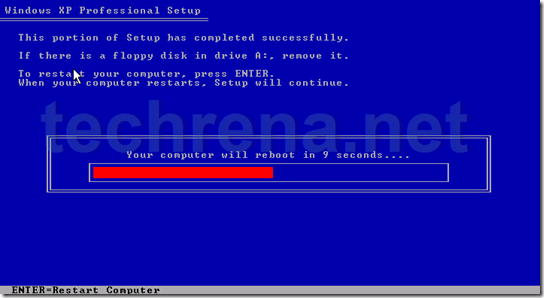
5. Press ENTER to reboot or else wait until it reboots by itself

Setup will continue after restart.

reboot

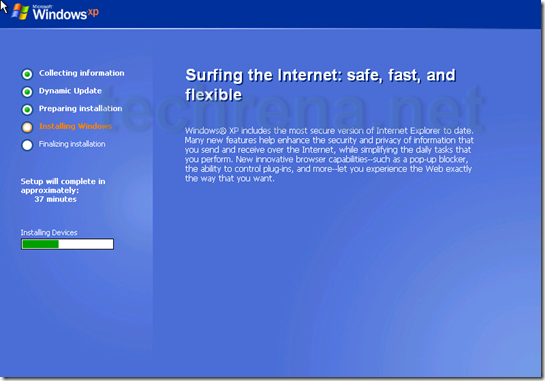
6. Do not boot from the CD after start up

After booting up from your hard drive it will continue installation. Follow the normal installation process.

installing_windows

After successful installation, your computer will restart once again. It may take some time during the first startup.

first_boot

Now your desktop should be accessible. In case of any problem do leave a comment.

You can subscribe to our RSS feed via email for more tutorials under Windows.

[How To] Stop or Disable Hotlinking and Bandhwidth Theft using .htaccess file

We found out that many of our copyrighted popular posts have been copied by many of the bloggers. But with so many traffic hungry bloggers around, it is impossible to track and warn each of the bloggers.

Now, our main concern is that many of our copyrighted images are not only copied to other blogs but also hotlinked. This is a serious issue with every popular blog where hotlinking results to bandwidth theft. Now if you are having similar problems of hotlinking or not, you should disable hot linking for sure.

What is Hotlinking or Inline linking?

Inline linking (also known as hotlinking, leeching, piggy-backing, direct linking, offsite image grabs) is the use of a linked object, often an image, from one site into a web page belonging to a second site. The second site is said to have an inline link to the site where the object is located.[wikipedia]

This is when you insert an image to your blog from an image URL of someone else’s site instead of uploading the image to your server. Many people with limited server storage size tend to do this.

How to stop Hotlinking and Bandwidth theft using .htaccess file?

In order to disable hotlinking follow the steps below:

1. Open your .htaccess file by saving it.

.htaccess file is present in the public_html folder of your blog. This can be accessed by using the ftp client like FileZilla. Hope all webmasters know this. Save the file and open it using notepad.

dot_htaccess

2. Add the code to disable hotlinking of your images

Add the following code to your .htaccess file and save it back to your public_html folder.

RewriteEngine On
RewriteCond %{HTTP_REFERER} !^http://(.+\\.)?yoursite\\.com/ [NC]
RewriteCond %{HTTP_REFERER} !^$
RewriteRule .*\\.(jpe?g|gif|bmp|png)$ http://imagehostsite/warning.jpeg [L]

Change the orange colored code according to your need as shown in the example below.

Example: [Click to Enlarge]

disable_hotlinking

The RewriteCond can be added according to your purpose. If you have any other blog where you want to use the images, then add another line with the site’s address as we have done in the example.

Important notes:

1. Backup your .htaccess file before doing the changes.

2. in the RewriteRule line, you cannot use a warning image uploaded to your site because the warning image itself will be blocked. So upload the image to some other servers like blogger or other image hosting sites

3. The RewriteCond can be added according to your purpose. If you have any other blog where you want to use the images, then add another line with the site’s address.

Now after performing the changes, you can check the other site where your images are hotlinked. An example is given below where our most popular post Reset Windows XP, Vista, 7 Password Using USB Drive or CD was copied.

hotlinking_blocked

Hope you have seen something like ours. Any feedback will be appreciated.

You can also see how to protect your wordpress internal files using .htaccess.

You can subscribe to our RSS feed via email for more tutorials under Blogger Tips.

Speed Up Windows Boot Up and Startup Using gpedit and DPS

In Windows PC, slow boot up and slow startup is one of the major problem we face. During the starting of Windows, it may take a lot of time to come to the logon screen and then to the desktop. This kind of problem is common in PCs which are older and a lot of programs are running.

One method we have already posted to speed up your Windows PC is by using MSCONFIG. Here, we will be solving the slow boot up problem using Windows Boot Performance Diagnostics of Diagnostic Policy Service(DPS).

Diagnostic Policy Service (DPS) will detect Windows Boot Performance problems and attempt to determine their root causes. These root causes will be detected and corrective actions will be taken to solve the problems.

Follow the steps below to enable Windows Boot Performance Diagnostics.

1. Open Local Group Policy Editor

Press Start + R and Type gpedit.msc and press Enter. Incase of

2. Go to Windows Boot Performance Diagnostics

In the Left Pane of  Local Group Policy Editor go to the location:

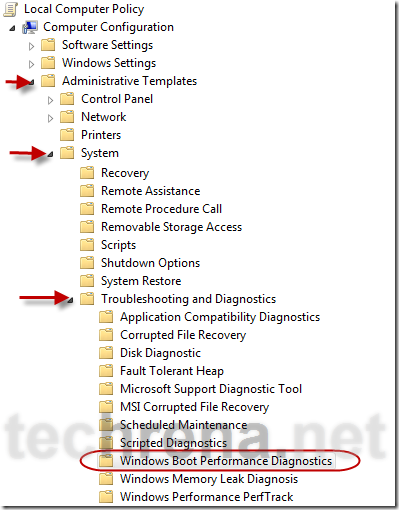
Computer Configuration—>Administrative Templates—>System—>Troubleshooting and Diagnostics—>Windows Boot Performance Diagnostics

Windows_Boot_Diagnostics

3. Open Configure Scenario Execution Level of Windows Boot Performance Diagnostics

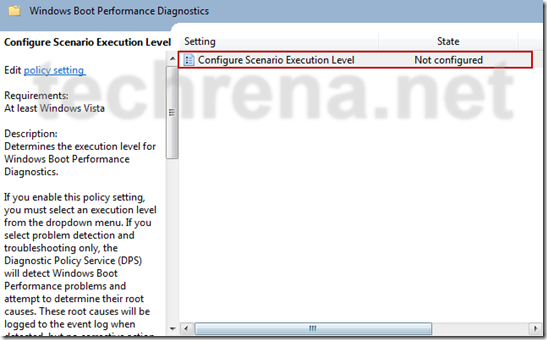
Now in the right pane Double Click on Configure Scenario Execution Level.

Configure_Scenario_Execution_Level

4. Enable Windows Boot Performance Diagnostics

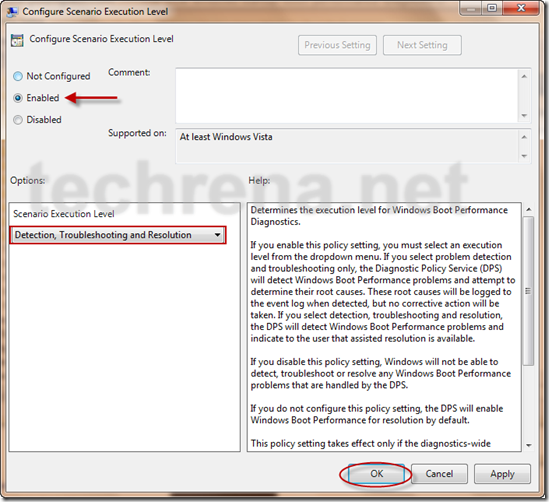
Now Click on Enable and Select Scenario Execution Level as Detection, Troubleshooting and Resolution. Click OK

Enable_Windows_Boot_Diagnostics

If you select Detection and Troubleshooting only then  the root causes will be logged to the event log when detected, but no corrective action will be taken.

Now Windows Will Diagnose your Startup problems and try to fix them for a faster boot and startup.

Important Notes:

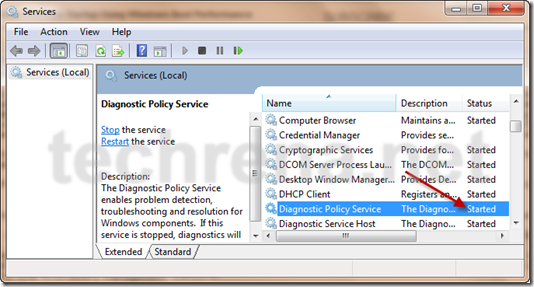
Note 1: Windows Boot Performance Diagnostics is a part of the Diagnostic Policy Service(DPS). So DPS should be running in your computer in order to successfully diagnose the problems. To check whether the service is running or not, Press Start + R and Type services.msc. Check out for Diagnostic Policy Service.

services

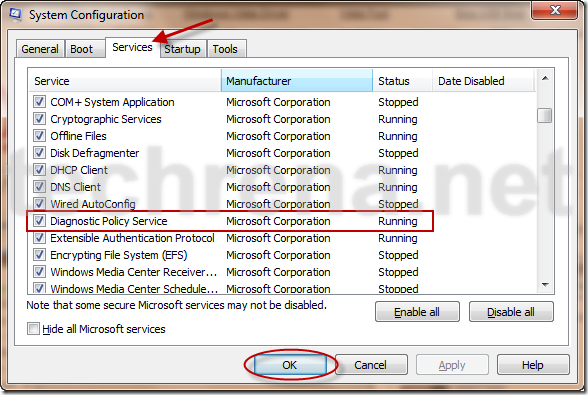
Incase if it is not started, you have to start it using MSCONFIG. To do that, Press Start + R and Type msconfig. Go to Services tab and Check Diagnostic Policy Service. Press OK.Note 1:

msconfig

Note 2: This service is available only in Windows Vista and Windows 7. And Local Group Policy Editor (gpedit.msc) may be available only with versions like Professional or higher.

You can subscribe to our RSS feed via email for more tutorials under Windows.
[How to] Pin or Unpin The Contents Of a Folder in Windows 7 Taskbar

Have you ever thought of adding a shortcut of your favorite folder in the taskbar. Well you can do it in Windows 7. Here we will show how to pin a folder in the Windows 7 taskbar.

Any folder can be pinned to the task bar as a New Toolbar in the Task bar of Windows 7 with a small or large icon and with or without text of the folder name.

Point to be noted:

When we pin a folder, we can see only the only the contents of the folder in the task bar. It is like the folder is already opened and displayed in the taskbar. So it is not that the folder’s shortcut is pinned to the task bar, but its just that the shortcut of the contents of the folder is created in the taskbar.

Now just follow the simple steps below to pin the contents of a folder to the task bar.

Pin a folder to the taskbar.

Add a new toolbar in the task bar:

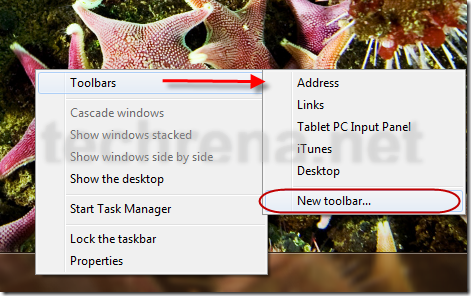
Right Click on the taskbar, go to Toolbars and select New toolbar.

Add_new_toolbar_taskbar

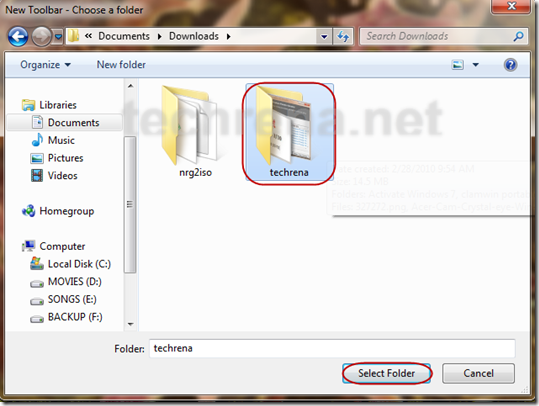
It will ask to select the folder. Select the parent folder which you want to add so that the contents of the folder is shown in the taskbar.

select_toolbar_folder

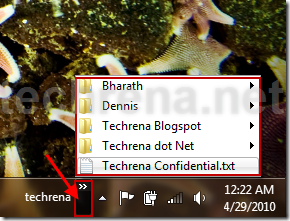
Now you can see the folder name in the taskbar with its content.

taskbar_toolbar_opened

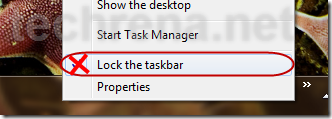
Unlock the Taskbar to modify the positions and settings if its locked

Right Click on the taskbar and select lock taskbar to uncheck it.

unlock_taskbar

Changing the settings of the toolbar:

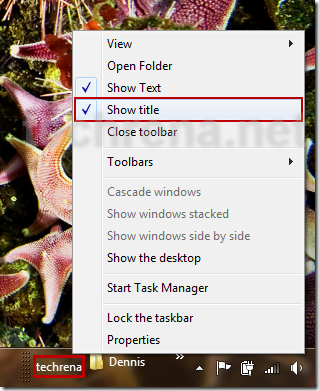
If you don’t want to name of the folder to be displayed but only the contents, then right click on the folder name in the taskbar and uncheck Show Title.

Show_Title

If you want to move the toolbar to the left side, yo have to drag the divider to extreme left to the Start menu.

Drag_divider_to_leftToolbao_divider

If you want to move it back, drag it back to right.

Now, if you want to show bigger icons of the content in the toolbar, Right click on the toolbar, go to view and select Large Icons.

View_large_icons

Now after doing all the changes you can lock the taskbar again if you wan to.

Unpin the folder from taskbar:

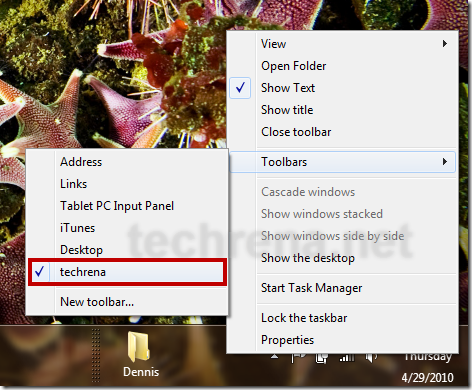
Now to unpin the folder, right click on the taskbar and go to Toolbars and unselect the folder name. You can also right click on the toolbar and select close Toolbar.

close_toolbar

Now you have successfully learnt how to pin and unpin a folder to the taskbar in Windows 7.

The Nokia E72 Turns White and Releases Firmware Update for all E72

nokia logo

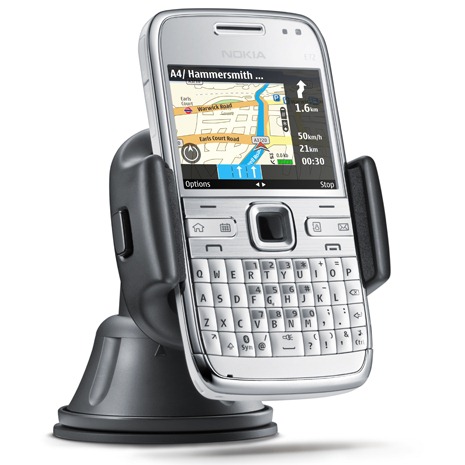
The Nokia E72 is now available in white and Nokia is releasing a new firmware update for all Nokia E72 handsets.

The E72 is a slim 10mm thick phone which includes one-touch access to calendar, contacts, and (push) email. Instant messaging options include Ovi, Google Talk and Yahoo! Messenger. The 5-megapixel Camera, integrated AGPS and a 3.5mm headphone jack are also some of the other exciting features of E72.

Nokia E72 White

The New Nokia E72 White Buzz

The new Nokia E72 White is not only a change in the color but there are few exciting accessories included inside the box like Nokia BH-216 Bluetooth headset and Nokia C-313 jeweler.  Above the change in the outer color, the phone will also be in white on the inside with an exclusive white theme and a personalized homescreen.

The Latest Firmware Update Buzz

The Firmware update includes an upgrade to latest version of Ovi Maps with free walk and drive navigation, improved social networking with the ability to share your location on Facebook with your friends and the ability to check the weather where you are and where you’re headed. There’s also general stability and performance improvements to Email, Calendar, Contacts and Browser. Plus internet radio has been bundled into the update along with free Lonely Planet and Michelin guides.

The latest available firmware release for Nokia E72 is 031.023. This new update is available to all Nokia E72 handsets through Nokia Software Updater.