Details: Microsoft Security Bulletin MS10-031 (KB978213)

Windows Update

Microsoft Security Bulletin MS10-031 (KB978213)

The Microsoft Patch Tuesday has arrived once again, this time Microsoft has come up with two critical patches (MS10-030 and MS10-031) addressing various vulnerabilities that could allow remote code execution without user consent.We have already covered about MS10-030(KB978542) in an earlier post, now let’s talk about MS10-031.

This new security update KB978213 resolves a privately reported vulnerability in Microsoft Visual Basic.Similar to the latest vulnerability found in Outlook Express & Windows Mail (addressed in MS10-030), this particular vulnerability too could allow remote code execution, especially when an user with admin user rights logged on and runs the Visual basic for Applications, through the above said vulnerability, the attacker can pass a specially crafted file to the VB for apps runtime, allowing the attacker to take the control of the victim’s computer, the attacker now gains most of the admin rights, he may install new programs, or view/change/delete user sensitive data or he may even create a new user with full administrative rights.

This update has been rated “Critical Update” for all versions of MS Visual Basic for Applications SDK and other third-party apps that use MS VBA.

Rated ‘Important Update’ for: Microsoft Office XP, Microsoft Office 2003, and the 2007 Microsoft Office System

Affected software include: Microsoft Office XP Service Pack 3, MS Office 2003 Service Pack 3, 2007 Microsoft Office System Service Pack 1&2.

You should install this critical update patch without delay.You may also be interested in downloading Visual Studio 2010 to keep your Visual Basic up-to-date.
To receive more update about Windows Updates, subscribe to our RSS feed via Email.

Microsoft Windows Security Update KB978542 (Bulletin MS10-030)

Windows Update

Microsoft has released a new critical security bulletin “Microsoft Security Bulletin MS10-030” on May 11, 2010 addressing vulnerability in Outlook Express and Windows Mail that could allow remote code execution (KB978542) for Windows XP, Windows Vista and Windows 7.

outlook express logo

This new windows security update KB978542 addresses a privately reported vulnerability in Microsoft Outlook Express, Windows Mail & Live Mail which could allow remote code execution if the mail client user visits a malicious e-mail server setup by the attacker.Then the attacker may successfully exploit this vulnerability to gain the same rights as that of the mail client user, this could be even worse if the client user has administrator user rights.

Security Update KB978542 Rating:

Microsoft Outlook Express – Critical

Windows Mail – Critical

Windows Live Mail –  Important

Update Type: Important

Date Published: May 11, 2010

Download and Install this important security update to keep your Windows up-to-date.

KB978542 Direct Download Links:

Windows 7 x64 – Windows6.1-KB978542-x64.msu (3 MB)

Windows 7 32-bit  – Windows6.1-KB978542-x86.msu (1.8 MB)

Windows Vista – Windows6.0-KB978542-x86.msu (1.8 MB)

Windows Vista x64 – Windows6.0-KB978542-x64.msu (3 MB)

Windows XP –  WindowsXP-KB978542-x86-ENU.exe (1.3 MB)

For more details on this bulletin, read MS10-030

This critical update is part of Microsoft’s Patch Tuesday (May 11, 2o1o) patches.Read about MS10-031.Also read about previously released bulletin from Microsoft, MS10-018

[How to] Repair Install Windows XP without Data Loss

Have you ever faced any problem like ntldr file missing during the start up of Windows XP? During the cases of critical Windows file gone missing or corrupt, Windows will not Boot and hence cannot start. What will you do in such case where your data is at stake?

There may be many solutions available, but repairing Windows using the Windows XP setup CD will be the best. In repair install your data will be intact and no data loss will occur if everything goes right.

If you install a new copy of Windows then some of your data will be lost.

What is Windows XP repair Install?

In Repair install, all the Windows files and registries will be copied to your Hard drive from the Windows XP installation CD. The installed program files and personal data on your hard drive will not be affected in most cases.

How to perform Windows XP repair Install?

Requirements:

Your Windows XP installation CD and key

Follow the steps below:

1. Insert the Windows XP CD to your Optical Drive and Start your computer.

Make sure that the computer boots from the installation CD. If it is not booting from the CD try changing your boot options in the BIOS.

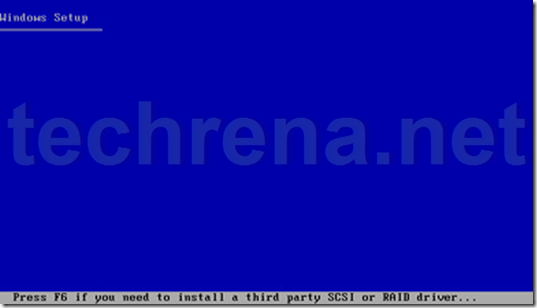
While booting from the CD, press any key to start the process.

boot_from_xp_cd

Xp_setup

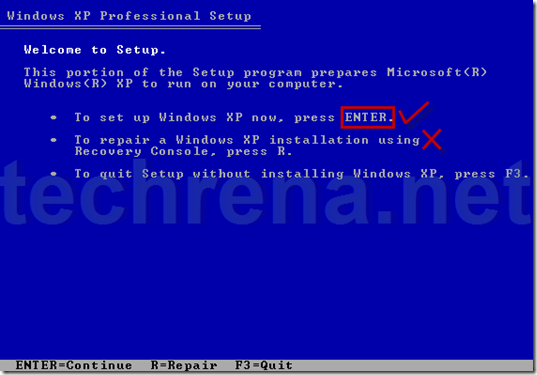
2. Press ENTER to set up Windows XP.

Do not press R. It will start, Recovery Console which is not desirable.

Welcome_ro_setup

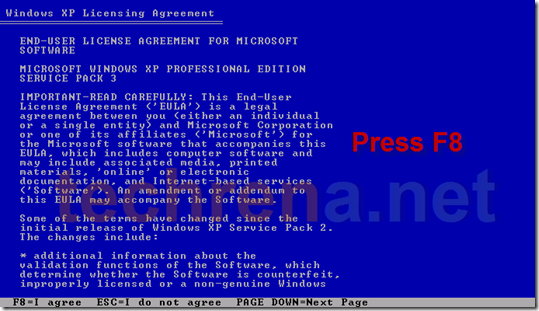
3. Press F8 to Agree the License Agreement.

F8_agreement

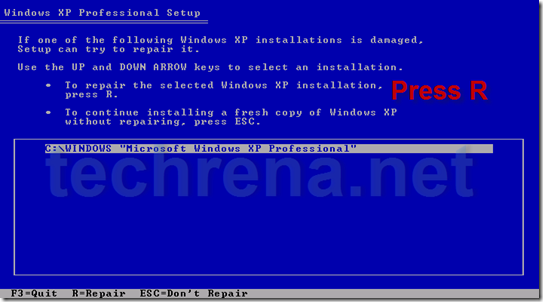
4. Press R to start the recovery install

Select the currently installed Windows XP location which you want to repair. Press R to repair the installation.

repair_xp

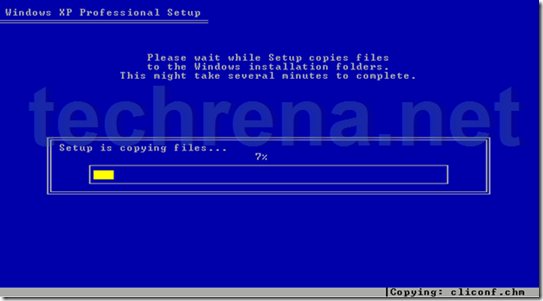
Now it will copy the files.

copying_files

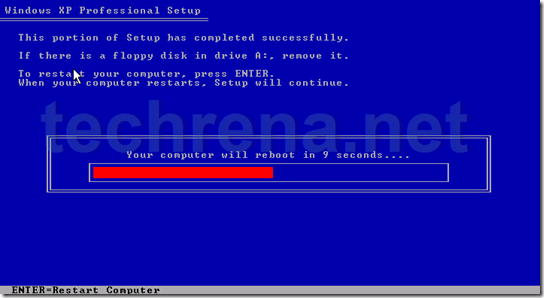
5. Press ENTER to reboot or else wait until it reboots by itself

Setup will continue after restart.

reboot

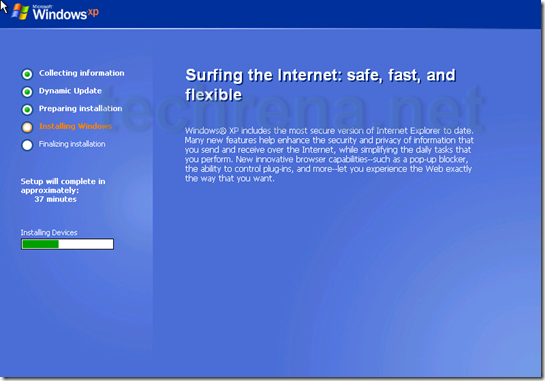
6. Do not boot from the CD after start up

After booting up from your hard drive it will continue installation. Follow the normal installation process.

installing_windows

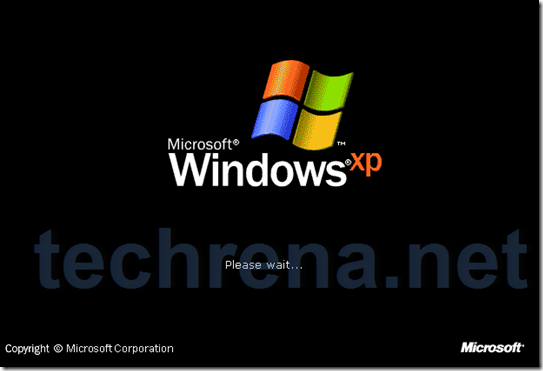
After successful installation, your computer will restart once again. It may take some time during the first startup.

first_boot

Now your desktop should be accessible. In case of any problem do leave a comment.

You can subscribe to our RSS feed via email for more tutorials under Windows.

Speed Up Windows Boot Up and Startup Using gpedit and DPS

In Windows PC, slow boot up and slow startup is one of the major problem we face. During the starting of Windows, it may take a lot of time to come to the logon screen and then to the desktop. This kind of problem is common in PCs which are older and a lot of programs are running.

One method we have already posted to speed up your Windows PC is by using MSCONFIG. Here, we will be solving the slow boot up problem using Windows Boot Performance Diagnostics of Diagnostic Policy Service(DPS).

Diagnostic Policy Service (DPS) will detect Windows Boot Performance problems and attempt to determine their root causes. These root causes will be detected and corrective actions will be taken to solve the problems.

Follow the steps below to enable Windows Boot Performance Diagnostics.

1. Open Local Group Policy Editor

Press Start + R and Type gpedit.msc and press Enter. Incase of

2. Go to Windows Boot Performance Diagnostics

In the Left Pane of  Local Group Policy Editor go to the location:

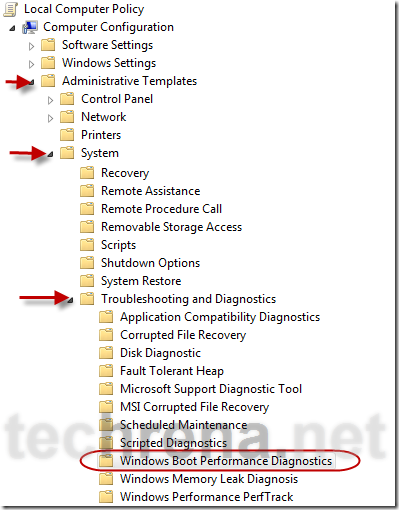
Computer Configuration—>Administrative Templates—>System—>Troubleshooting and Diagnostics—>Windows Boot Performance Diagnostics

Windows_Boot_Diagnostics

3. Open Configure Scenario Execution Level of Windows Boot Performance Diagnostics

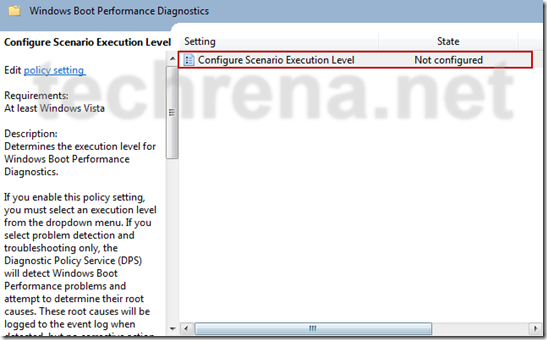
Now in the right pane Double Click on Configure Scenario Execution Level.

Configure_Scenario_Execution_Level

4. Enable Windows Boot Performance Diagnostics
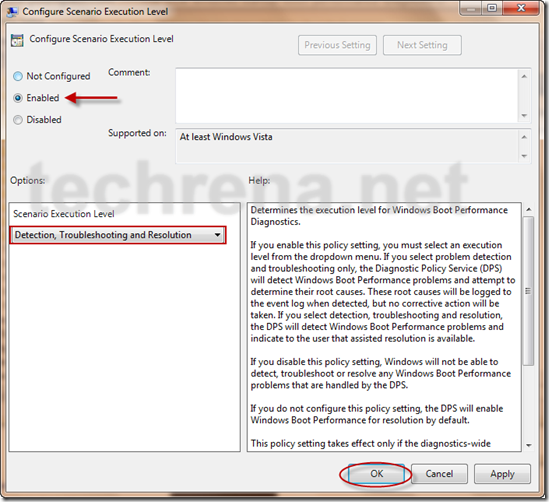
Now Click on Enable and Select Scenario Execution Level as Detection, Troubleshooting and Resolution. Click OK

Enable_Windows_Boot_Diagnostics

If you select Detection and Troubleshooting only then  the root causes will be logged to the event log when detected, but no corrective action will be taken.

Now Windows Will Diagnose your Startup problems and try to fix them for a faster boot and startup.

Important Notes:

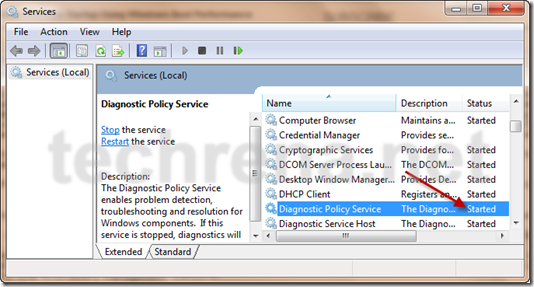
Note 1: Windows Boot Performance Diagnostics is a part of the Diagnostic Policy Service(DPS). So DPS should be running in your computer in order to successfully diagnose the problems. To check whether the service is running or not, Press Start + R and Type services.msc. Check out for Diagnostic Policy Service.

services

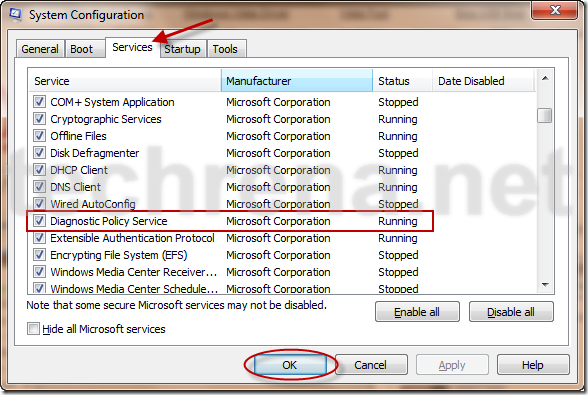
Incase if it is not started, you have to start it using MSCONFIG. To do that, Press Start + R and Type msconfig. Go to Services tab and Check Diagnostic Policy Service. Press OK.Note 1:

msconfig

Note 2: This service is available only in Windows Vista and Windows 7. And Local Group Policy Editor (gpedit.msc) may be available only with versions like Professional or higher.

You can subscribe to our RSS feed via email for more tutorials under Windows.

Tip: Make Taskbar Previews Load Faster In Windows 7

Windows logo

Taskbar thumbnail previews take a bit of time to appear when you hover your mouse cursor over any taskbar icon in Windows 7.This delay if set by default to 400 ms by the OS.However, if you want to change the delay time so that the taskbar thumbnail previews load faster, here’s the tutorial that you need to follow.

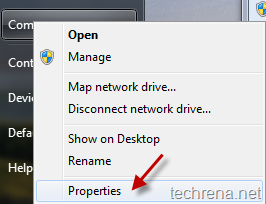
1. Go to Start Menu, right-click on Computer and select Properties

my computer properties in windows 7

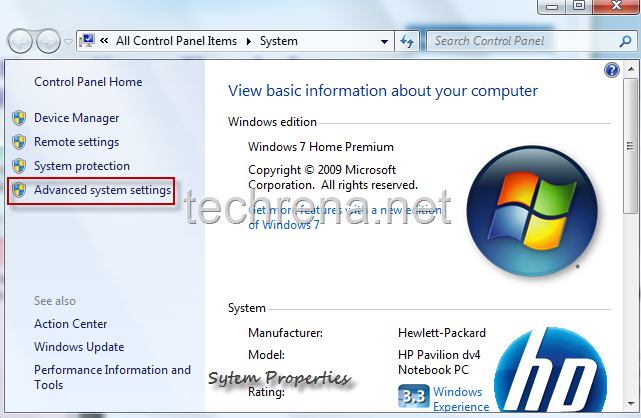
This will open the System Properties window, click on Advanced system settings.Alternatively you can use Windows + Pause/Break shortcut key to open the same.

System_properties_windows7

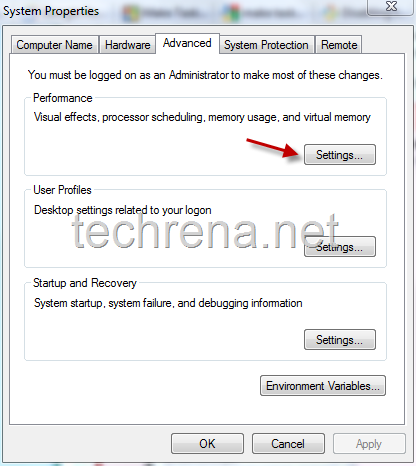
2. Now under the System Properties, go to Advanced tab and click Settings under Performance.

Advanced Settings in System Properties

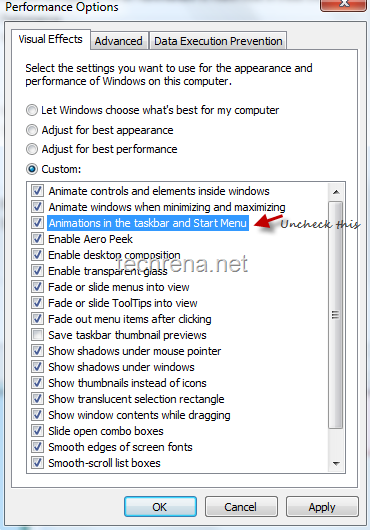
3. This will open up Performance Options windows, now there, uncheck “Animations in the taskbar and Start Menu”.

Performance Options under Visual Effects in Windows7

This option should be deselected since, you may not see much  difference after trying out this tutorial if you keep this option checked.

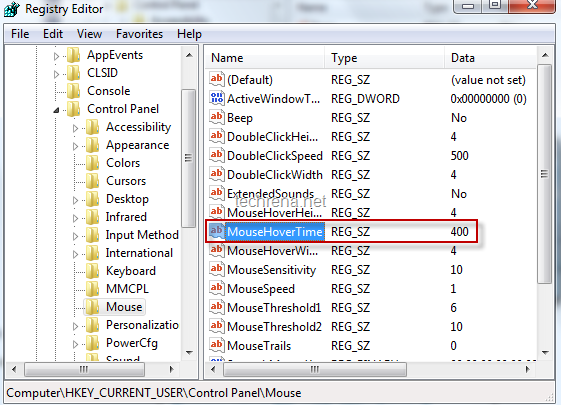
4. Now go to registry editor by typing regedit in the run command (shortcut: Windows + R).Navigate to

HKEY_CURRENT_USER > Control Panel > Mouse

Find the entry “MouseHoverTime” under it.

Mouse Hover Time in Regedit
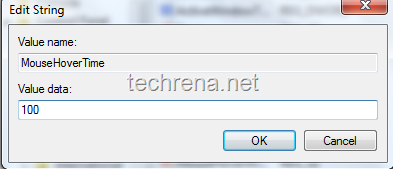
5.You will find a default value of 400 against it in the Data filed.Change this value to something like 100 or even less that that.

Edit MouseHoverTime string value

That’s it, now you have decreased the Mouse hover time which in turn will make the taskbar thumbnail previews to appear more faster.

You can subscribe to our RSS feed via email for more tutorials under Windows 7.

How To Uninstall All Your Windows 7 Games

Windows logo

Windows 7 much like the previous versions of Windows (Windows XP, Windows Vista), has some wonderful preloaded games in it.The games include Chess Titans, FreeCell, Hearts, Internet Games, Mahjong Titans, Minesweeper, Purble Place, Solitaire, Spider Solitaire.For some reasons, if you want to disable or unstill any game or all the games that came with your Windows 7, here’s the procedure you need to follow:

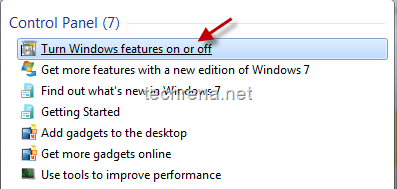
1. Go to Start menu and type “Windows Features” in the search, click on the first result under the section Control Panel.You can alternatively go to Control Panel> Programs> Turn Windows Features on or off option.

turn windows features search

Programs and features in Windows 7

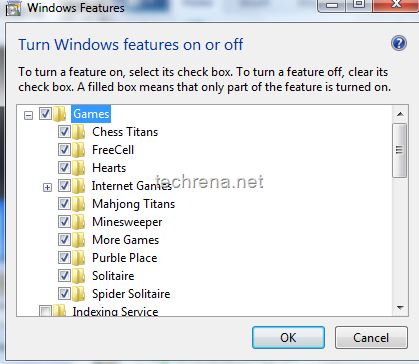
2. Under the Windows Features window, click expand button to see all the 11 games that came with your Windows 7.You can uncheck any desired game to uninstall it from your Windows or you can uncheck entire Games section to unstill all your Windows 7 games.

Games in Windows features turn on or off

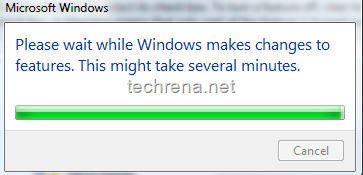
Click OK to apply the changes, wait for few minutes for the changes to effect.

Applying changes to Windows features

3. You can go to your Games Explorer by typing games in the Windows 7 start menu search and you can see the games that are currently available in your Windows.If you have disabled all the games by unchecking the Games folder in the Windows Features section, you will no longer find any games here.

Synchronize Windows Clock With Internet Time Server

Windows 7 clock

Windows Clock as you all know is really got a makeover ever since Windows Vista has arrived and is really appealing to many Windows users, who earlier were using other software like Google Gadgets to see a analog clock  on their desktop instead of default Windows Clock.

Do you know that you can actually synchronize your Windows clock with several internet time servers if you have an internet connection.

This tutorial is based on Windows 7 and Windows Vista based systems.(Although it’s till valid for Windows XP).

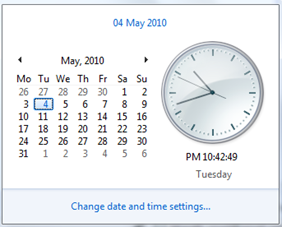
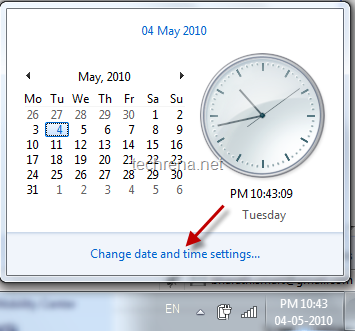
1. Open the Windows clock popup from your taskbar.Click on Change date and time settings.

change date and time settings in windows

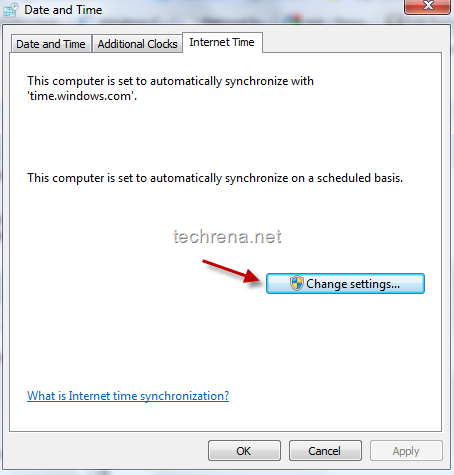
2. In the Date and Time settings window, go to “Internet Time” tab.Click on Change Settings.

change windows clock settings

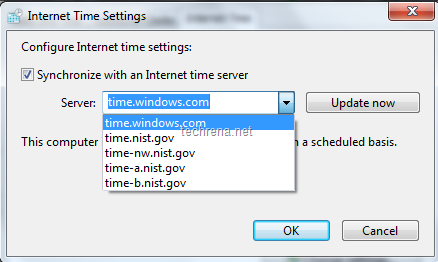
3. Check “Synchronize with an Internet time server”.You can either choose windows time servers or NIST servers.Click Update Now.

Internet time settings windows clock

You have configured your Windows clock to synchronize automatically with the internet time servers.

Backup Your Windows Registry In Simple Steps [How To]

Windows logo

It is always essential to backup a copy of the windows registry before performing any operation that involves the editing of one or more keys in the regedit.This tutorial aims at making it easier for you to do a complete registry backup in simple steps:

Method-1: Using Windows Registry Editor

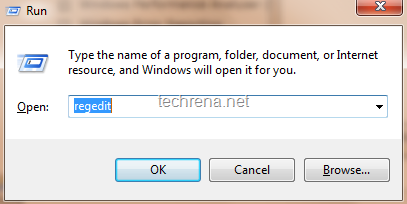
1. Open run command by pressing Start button windows start button+ R.Type regedit and click OK.

regedit run command

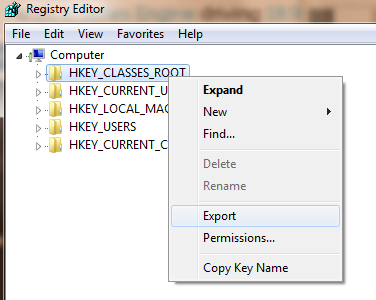
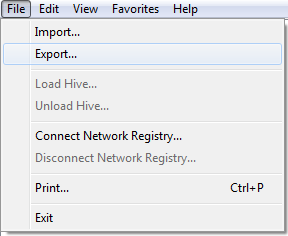
2. The Registry Editor will open up.Select the keys or sub keys which you want to export, right-click on it and choose Export.You can also export the make the backup the entire Windows registry by going to File>Export but it’ll only add to the file size.In my case, when I saved the entire registry editor backup, it was around 20 MB.

Export regedit keysexport option in regsitry editor

3. Save the registry backup to your local drive.

save regedit backup file

Method 2: Using ERUNT

ERUNT stands for The Emergency Recovery Utility for NT can be used in Windows NT/200-/2003/XP, Windows Vista & Windows 7 to backup the entire registry editor.

Download ERUNT for here and follow the following steps:

1. Run the ERUNT

ERUNT save backup

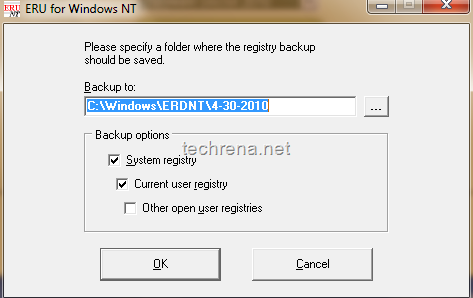
2. Set the location where you want to save the entire registry backup file and click OK.

ERUNT in action

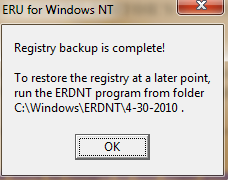
Click OK on the dialog box which you’ll see when the registry backup operation is completed.

registry backup complete in ERUNT

With this, The registry hives (Config, SAM, Security, Software, System) gets backed up on the path that you have selected.

All the 2 methods mentioned above will work on Windows XP, Windows Vista and Windows 7.

[How To] Configure AutoPlay In Windows 7

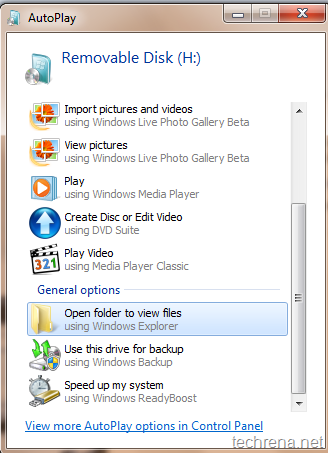
AutoPlay in Windows 7

We are here with yet another tutorial.In this tutorial, I’m going to discuss about how to disable AutoPlay in Windows 7 and Windows Vista.[AutoPlay for CDs/DVDs and AutoRun for USB flash drives or for any removable flash drives.]

AutoPlay (and AutoRun) is disabled by default in Windows 7 and Vista.That’s why Windows gives you an option to choose the possible actions that you  can take without directly playing the DVD in media player.Start reading the following tutorial to learn how to enable or disable AutoPlay .

Tutorial: How to enable/ disable AutoPlay

Covers: Windows 7/ Vista

User level: Intermediate

Complexity: Easy

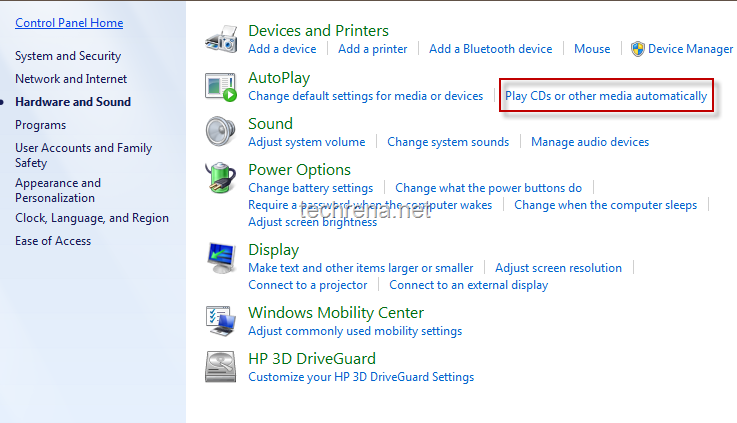
1. Go to Control Panel, and choose “Hardware and Sound” options.

Under AutoPlay, click  Play CDs or other media automatically.

Autoplay in Hardware and Sound

2. Now AutoPlay options window will open.Under uncheck under “Choose what happens when you insert each type of media or device” to completely disable AutoPlay globally for all types of devices.

choose_autoplay_options

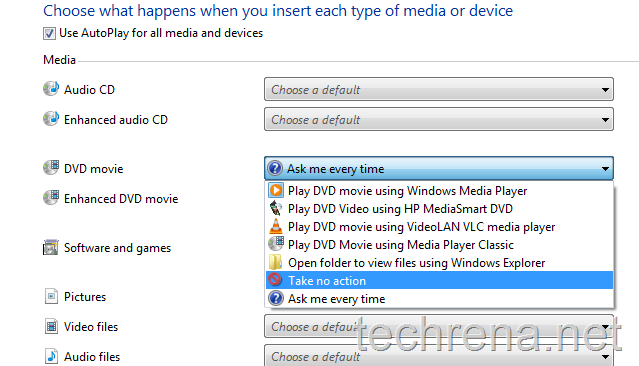
3. If you want to disable AutoPlay for particular devices like  DVD movie instance, select the “Take no action” under the DVD Movie options.

disable_autoplay_for_single_type

Likewise you can also configure auto play for USB devices and other plug and play devices.

Using Group Policy Editor [For Business/ Ultimate Editions] :

This methods works only for Business and Ultimate versions of Windows 7 and Windows Vista.

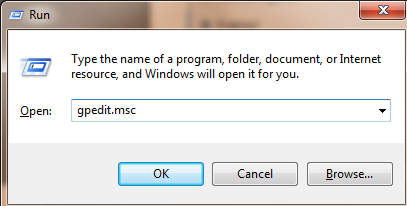
Go to run command by pressing Start button + R.Type gpedit.msc in the text field and click OK.

gpedit run command

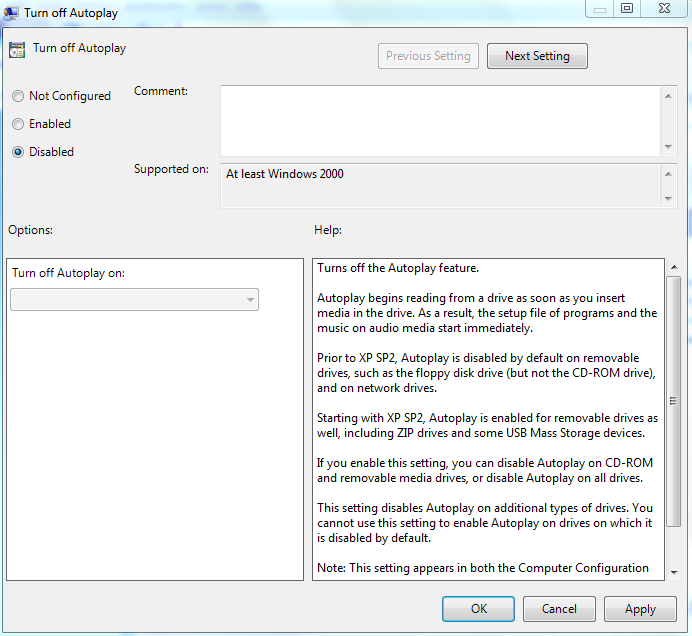
From the Group Policy Editor window, navigate to Computer Configuration\ Administrative Templates\ Windows Components\ Autoplay Policies\ Turn off Autoplay, you will see the “Turn off Autoplay” window as in the screenshot.

To enable the AutoPlay, just change the value of “Turn off Autoplay” to Disabled.

autoplay gpedit enable settings

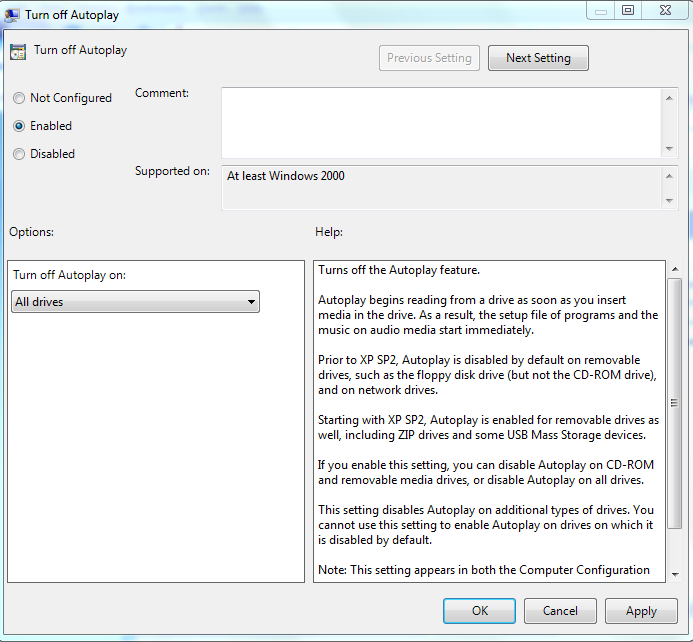
If you want to completely disable the AutoPlay for all types of devices for default, change select the value Enabled under Turn off Autoplay.

disable autoplay gpedit settings

[How To] Enable Automatic Updates In Windows 7

Windows logo

This is a small tutorial dealing on how to enable or disable automatic updates in Windows 7 or Windows Vista.This is basically intended for beginners who have just installed Windows 7 or Windows Vista in their systems and looking for assistance.

User level: Beginner

Complexity Level: Easy

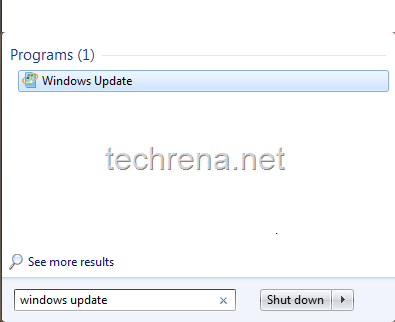
1. Go to Start menu and type windows update in the search box.Click the Windows Update program in the search result.

windows update start menu search

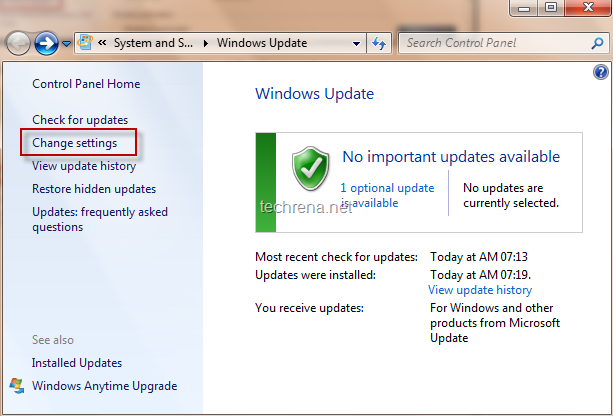
2. Now the Windows Update window will be opened.On the left pane, find “Change Settings” and click on it to open the Windows Update Settings page.

windows update page

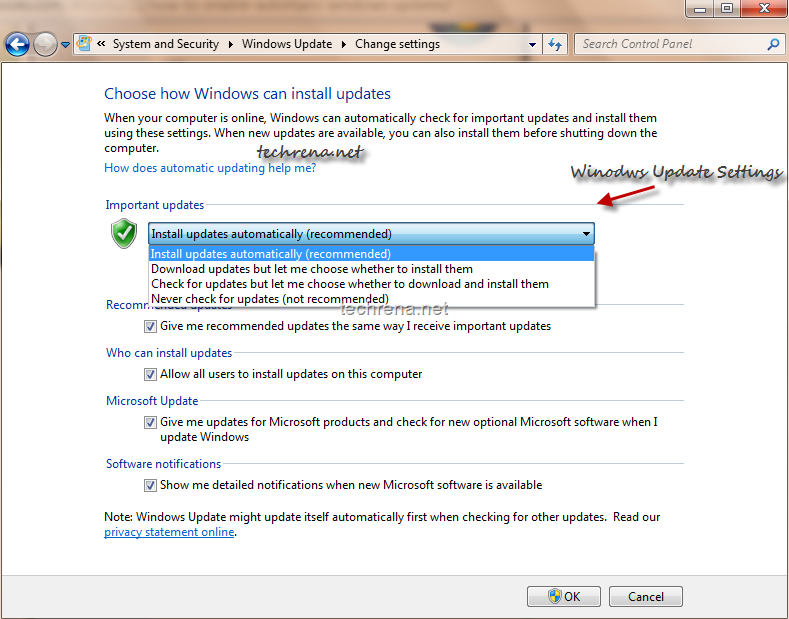
3. In the Windows Update Settings window, as you can see there are basically 4 options to choose from.

  • #1 Install updates automatically (recommended)
  • #2 Download updates but let me choose whether to install them
  • #3 Check for updates but let me choose whether to download and install them
  • #4 Never check for updates (not recommended)

change windows update settings

It is always recommended that you choose the option #1 “Install updates automatically” to install updates that address various vulnerabilities and keep your Windows up-to-date.

Option #2 is also OK, given that it makes your Windows to download the updates automatically as and when they are available but will install them without your permission.

Options #3 and #4  are recommended only if you are using an interconnection with limited data usage (like  using mobile phone to connect to internet).If these options are chosen, your Windows will not automatically download or install the updates.