[How To] Disable Session Restore In Firefox

firefox logo

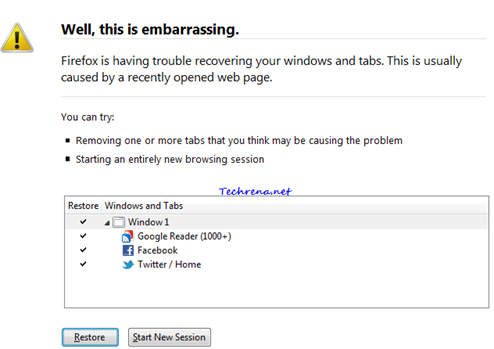
Firefox has a pretty useful “Session Restore” feature that lets you recover the opened sites when the browser crashes all of a sudden. In the latest version (Firefox 3.5+), Firefox has even allowed the users to restore only a certain number of tabs that were open just before the Firefox had crashed.

Session restore prompt in firefox

Even though highly useful and recommended, you might want to disable this feature for your very own reasons. With a little bit of effort, session restore can be disabled altogether from Firefox.

In this tutorial, let us see how to disable the session restore feature in Firefox via Firefox configuration settings page.

Steps:

1. Launch Firefox.

2. Type about:config in the address bar and press enter.

3. Accept the warning (This might void your warranty..) and proceed to the next page (click I’ll be careful, I promise!)..

This might void your warranty

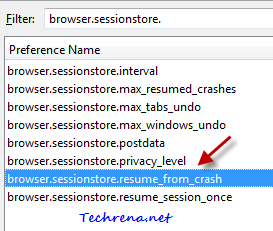
4. Type “browser.sessionstore” in the Filter and look for the entry “browser.sessionstore.resume_from_crash”.

session restore firefox settings

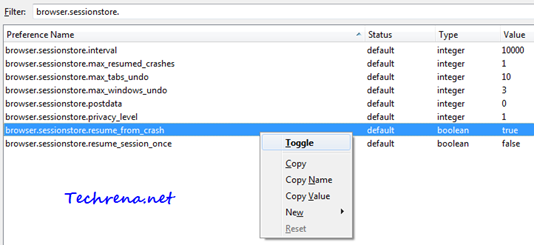
5. By default, the boolean value will be “true”. Right-click on the entry and choose “Toggle” to set the value to “false”. Close and restart the Firefox.

Browser session restore settings in firefox

Now you have disabled the Session Restore feature in Firefox. You will not be asked to restore the last opened tabs after the browser crash, instead the homepage will be opened.

[Tip] Remove Unnecessary Items In Firefox Right-Click Context Menu

Firefox context menu

One main reason for Mozilla Firefox to get popularity among the internet audience is the comfort ability of adding our favorite add-ons from a host of add-ons available at Mozilla add-ons gallery. But sometimes when you install an add-on, they also add some items to your context menu in Firefox. When you go on installing more add-ons, the number of context menu (which appears when you right-click on any webpage inside the browser) items will become so huge that you can’t even spot the correct menu item at the first sight.

Wouldn’t it be good if we have a control over this context menu items and customize it and remove the unnecessary items from the context menu ? You can actually do it for yourself in two ways. The first and easy option would be to grab an add-on that lets you manage your context menu items. The second way of working around this needs a more of your effort and time. I’m here briefing both the methods, but I strongly suggest you to use the first method, second method is only for those enthusiasts out there who don’t like simple solutions Smile

Method-1:

1. Download Menu Editor Firefox add-on (currently works with Firefox 2 &3) , click “Add to Firefox” and allow it to be installed on your Firefox and restart the browser.

Add to firefox

2. Hit Ctrl + Shift + S button to open the Menu Editor options dialog.
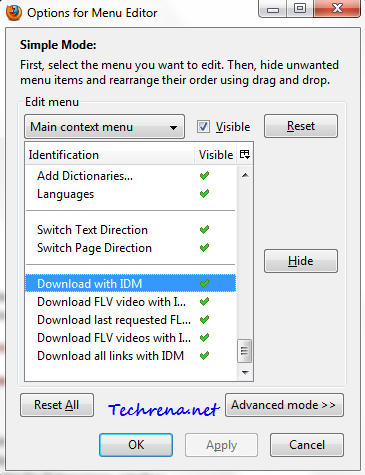
Menu editor options

3. Change the items in the menu editor options as you wish (you can click “Hide” button to remove it from the context menu). Alternatively you can rearrange the items to change their order. You can make use of this to Chrome-like options menu for context menu. In Chrome as you know, “Open link in new tab” comes ahead of “Open link in new window” option (reverse in case  of Firefox). You can use this add-on to change your Firefox context menu look similar to that of Chrome and other browsers.

Firefox new tab optionsFirefox new tab options after using addon

4. Click Apply to apply the changes and click OK to close the dialog box.

You will see the changes once you restart your Firefox.

Method-2:

1. Press Start button + R to open “Run” command window and key in %Appdata% in the field and press Enter.
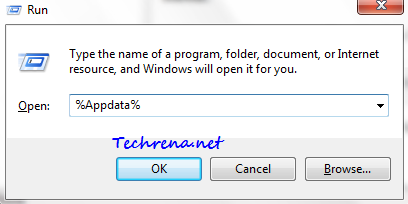
Run command

2. A new window will open containing a lot of folders. Navigate to Mozilla > Firefox > Profiles > <default profile folder> > chrome folder.
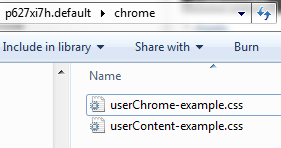
userChrome.css examples

3. Create a new file called userChrome.css (notice the uppercase ‘C’)inside the chrome folder.

userChrome.css file

4. Open the file userChrome.css in any text editor and add the following lines to it:

#id1, #id2 { display:none !important; }

5. Replace each of the identifiers #id1, #id2,.. with one of the selectors from this Firefox context menus list.

For instance, if you want to disable “View Page Source” and “View Page Info” items from your context menu, you should use the following code:

#context-viewsource,
#context-sep-viewinfo {
  display: none !important;
}

Similarly if you want to remove “Set As Wallpaper…” and “Set as Desktop Background…” menu item in the context menu, that appears when you hover on any image on a webpage, you should use the following code:

#context-setWallpaper,
#context-setDesktopBackground {
  display: none !important;
}

To remove the “Open Link in New Window” menu item, use:

#context-openlink {
  display: none !important;
}

And you can use your custom based on the selectors from the Firefox context menus list.

If something goes wrong just close the browser and delete the userChrome.css file from the chrome folder.

[How To] Block A Website Using Content Advisor In Internet Explorer

site blocked

Blocking certain websites that may not suit the audience mainly in the case of children or workers has always been one such compulsory feature. In case you haven’t spotted yet, there’s one such option in Internet Explorer too. Here are the steps to block any website in Internet Explorer using IE’s content advisor.

Steps:

1. Go to Tools > Internet Options in the Internet Explorer.

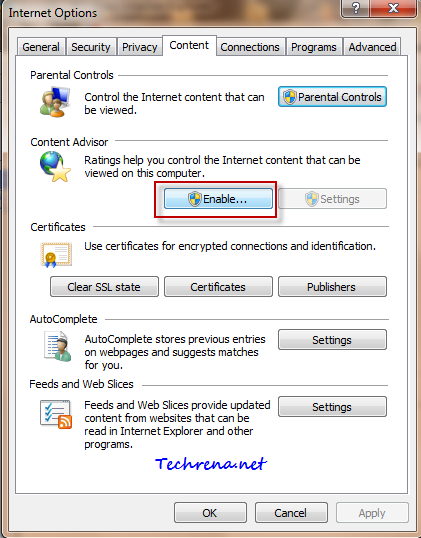
2. Go to “Content” tab under the Internet Options. Find “Content Advisor” under this tab. By default it would be set default. Click “Enable” option opposite to it.

Content advisor in Internet Options

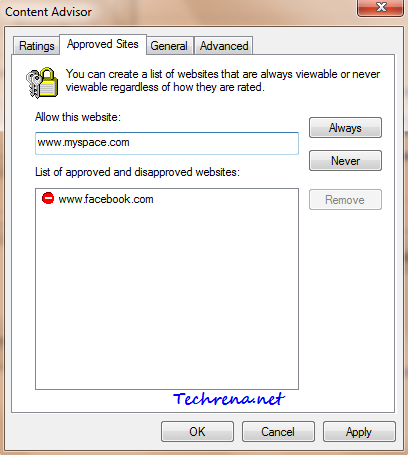
3. Go to “Approved sites” tab in the Content Advisor window. Type the URL of the website that you want to block in the text box and clock “Never” button. See the screenshot below:

Approved sites in Content advisor

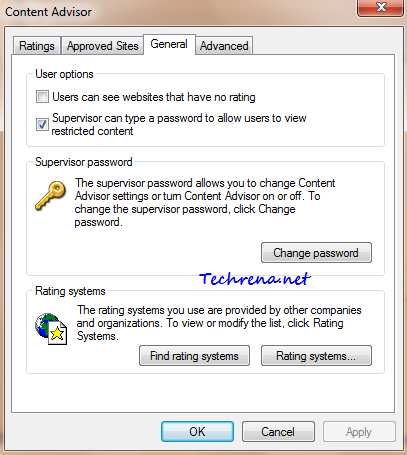
4. Click “Apply” once you are done and then go to “General” tab. Here you can choose whether to password protect the blocked sites that you added. Once configured, click “OK’ to close the window.

Content advisor General options

You will now be asked to enter the supervisor password for the content advisor settings.

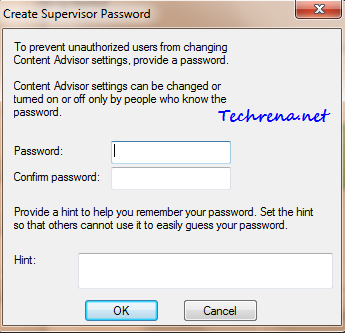
5. Create a supervisor password and add a hint (recommended) which is helpful in case you forget the password in future. Close the window once you have done that.

Supervisor password for content advisor

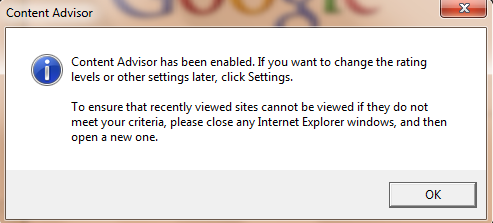
Content Advisor settings done

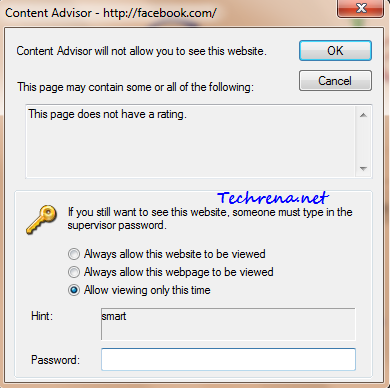
6. Now try to open any website that you have added in the block list. You will see the following prompt window, asking for you to enter the supervisor. User can view the website only if he knows the supervisor password.

Content advisor prompt window

7. You can disable the content advisor any time by clicking the “Disable” button under the “Content Advisor”. You will however need to authorized to do that by validating through the supervisor password.

For more tips on software, subscribe to Techrena’s RSS feeds via email.

[How To] Disable Firefox Taskbar Tab Previews

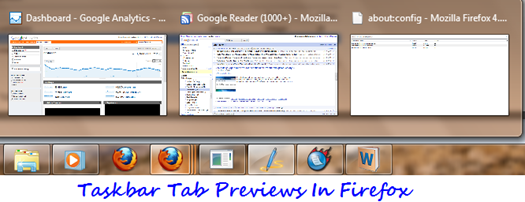
Multiple tasbar tab previews

Taskbar tab previews is a great feature introduced in Windows 7, with the help of which you can access any opened tab right from your taskbar without opening the browser. This feature was first meant for Internet Explorer only, but later it was adopted by almost all the browsers.

Even though this is a great feature, however it may sometimes annoy you particularly when you open a lot too may tabs in the browser. That’s why we posted a tutorial on how to disable the multiple taskbar tab previews in IE, Firefox and Google Chrome. Now that Firefox 4 is coming with this taskbar tab previews feature enabled, we thought we’d revisit and bring to your attention if you are looking for a way to get this feature disabled in your Firefox. Follow the steps carefully:

Steps:

1. Type about:config in the Firefox address bar.

2. Accept the warning message and proceed (Click “I’ll be careful, I promise) to the configuration page.

Firefox about:config warning

3. Type

browser.taskbar.previews.enable

in the filter and look for the entry with the same name as shown in the following screenshot.

Firefox 4 taskbar previews config
4. Change the value to “false” by double-clicking. That’s it. You will only see a preview of the one (active) tab preview instead of the multiple taskbar tab previews.

Firefox taskbar tab previews disabled

You might also want to read our tutorial on how to enable All Tabs Preview in Firefox.

Firefox 4.0 Beta 1 & Beta 2 Builds Available For Download

Firefox 4.0 Beta 1 Screenshot:

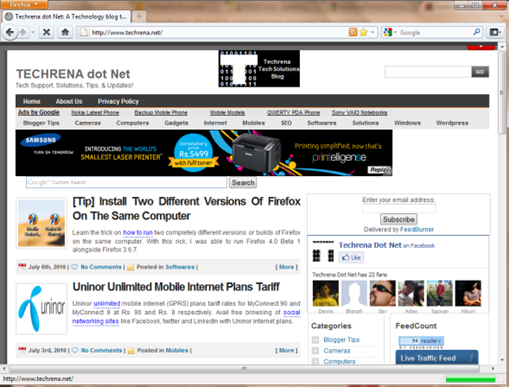
Firefox 4 beta 1 screenshot

Mozilla has recently unveiled a new Beta version (yeah, it’s still buggy and under testing) of  upcoming Firefox version, Firefox 4. Users can get a rough idea about how the upcoming Firefox 4x versions would be by installing this beta version of Firefox. You can download Firefox 4.0 Beta 1 and Firefox 4.0 Beta 2 Pre Build from the Mozilla’s directory of nightly builds links for which are posted at the bottom of this post.

Changes in Firefox 4.0 Beta :

1. New User Interface simple in line with Windows Aero in Windows 7 and Windows Vista also supports the new Glass translucency effect. This version  supports multiple tab previews much like in Internet Explorer 8.

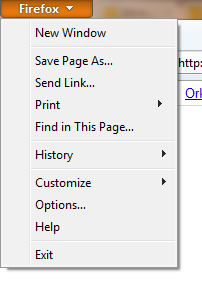
2. The menu bar has been repositioned at the top most left of the windows, which you might have seen in the latest Opera browser too.

Firefox 4 menu

3. Another change includes the change in the position of the tabs. Until Firefox 3.6, the tabs are used to be placed below the address bar, which is not the case in this new version. Tabs are neatly placed above the address bar like Google Chrome.

Firefox_4_address_bar

Download Firefox 4.0 Beta:

Update:Download from Firefox Beta page (available for public download)

[Tip] Install Two Different Versions Of Firefox On The Same Computer

firefox logo

Today I wanted to install and test the latest Firefox 4.0 Beta 1 version on my laptop where I had already installed Firefox 3.6. I didn’t want to loose all my customised addons and other preferences that I have been using in Firefox 3.6, at the same time I should also test the latest Firefox 4 beta version. The option to use portable version of Firefox, is obsolete here. So in short, my PC should have both the Firefox builds installed and should be able to run both independently. I looked for a possible solution, and I think I was successful in  accomplishing the task, hence I’m sharing it here:

Steps:

1. First download and install the new Firefox version (Firefox 4.0 Beta 1 in this case). Don’t worry Firefox will keep your old installation as such and will install Firefox 4.0 Beta 1 in a separate folder.
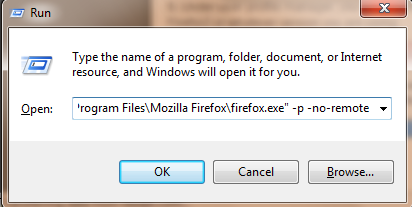
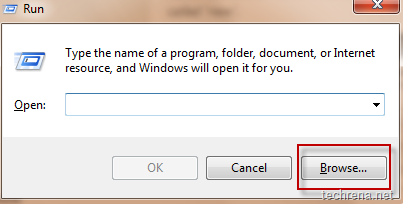
2.  Now go to run (by pressing Windows button + R) command, and click “Browse”.

run windows browse

3. Locate the “firefox.exe” from the program files and click “Open”. It will show

"C:\Program Files\Mozilla Firefox\firefox.exe" [If you are not able to see backslashes “\”, see the image below:

Firefox.exe shortcut path

in the run command filed.

4. Just append “-p -no-remote” to it and click OK.

run program path

It will open Profile Manager.

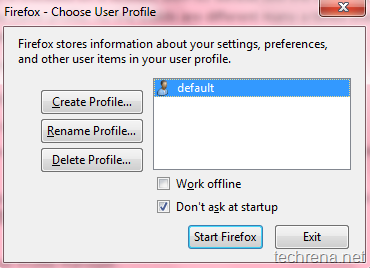
5. Under user profile manager, you will just find an entry called “default”. Rename it to something like Firefox3 or whatever version you are using.

Firefox User Profile Manager

6. Now create a new profile (something like “Firefox4”) through the “Create Profile" Wizard”.

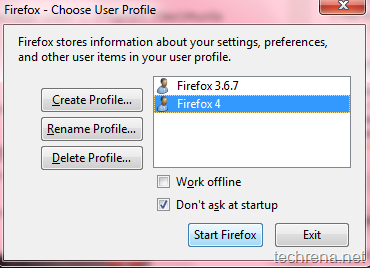
7. So by now you will have two user profiles for Firefox.

choose user profile

8. Now create two separate shortcuts for both the versions on your desktop.

Firefox desktop shortcuts two different builds

Right-click on the shortcut for the older version and under shortcut target append the following line:

-p Firefox3 -no-remote

[ replace “Firefox3” with whatever your profile name that you had given].

So the shortcut will look like this after editing:

Firefox 3.6 shortcut profile name

Add the following line to the shortcut for the new version (Firefox 4.0 Beat 1 here):

-p Firefox4 -no-remote

[Replace “Firefox4” with whatever profile name that you have chosen]

The shortcut now appears as shown:

Firefox 4 Beta shortcut with profile name

Save the shortcuts and give them appropriate names so that you can distinguish them.

Now you can use these shortcuts to open either of the Firefox versions at ease. However, please be noted that you cannot run the two different versions/builds at the same time.

The trick involved here is all about using Firefox user profiles.Without using profiles, if you try to open the Firefox 3.6 version with Firefox 4.0 beta 1 also installed, then it’ll only going to launch Firefox 4 instead of the other.

Enable/Disable Auto Fill Or Auto Complete In Firefox

AutoFill Firefox

Firefox by default is coming up with AutoFill or Auto Complete feature in location bar (address bar), but for some reasons if you see it disabled in your Firefox, you can enable it in the following steps:

1. Type about:config in the address bar.

about: config firefox

2. Just accept the “This might void your identity” warning to proceed to the about:config settings page

3. Under the Preference Name, filter the entries by typing “Autofill” in the filter bar.

Autofill in browser urlbar

4. Change the value field to “false” to enable the Auto Complete feature in the browser URL bar.

Just set the value back to “false” to disable the auto-fill feature in the location bar.

Run Multiple Versions of Firefox On Your PC

firefox logo

How I can run two (or multiple) versions of Firefox on my computer?”

This is the common questions asked by many of the Firefox, especially web developers who need to test their applications in various versions of Firefox.

It also might be a case that you liked an earlier version of Firefox and just want to run it as the secondary version (it’s always recommended to run the latest updated version to avoid any security risks).

While this question has no absolute solution, I’m posting a tip that at least gives us a chance to run two different versions of Firefox (but still won’t serve the purpose fully).

Update: Read How To Run Two Different Versions Of Firefox On The Same Computer, the updated version

One way we can two different versions of Firefox is to install and use a Portable Edition of the Firefox. Just install the version of the Firefox that you want to use on portable device, install it on your USB flash drive. Plug it in and start using the portable version. However you please note that you cannot run these two versions simultaneously. Supposing that you have installed a new Firefox v3.6 on your PC and a portable version 2.0.0.20 on your USB disk, if you are running Firefox v 2.0.0.20 from your USB and you click on the Firefox icon shortcut to open a new window, you will be surprised to see that it’s the v2.0.0.20 that runs and not v3.6 and vice-versa.

Download Firefox Portable Edition

Change Address Bar Search Provider In Firefox

Firefox logo

Address bar search is the feature that allows you to search for a keyword entered in the address bar (location bar) without entering the search engine homepage. Firefox by default will look for the keyword entered in the address bar in Google search as it is usually set as the default search engine to manage address bar keywords.

However, you might want to change it to suit your personal interest. It may sometimes can also be a case of hijacking: You install some programs that they change your search bar address bar search provider without asking for your permission (ex: so many toolbars like Alexa, Yahoo etc.). For some reasons, if you want to change the Firefox address bar search provider, you can do it by following the steps below:

1. Type about:config in the Firefox address bar. You will be presented with a warning, if you are using Firefox 3.5 + version, just click “I’ll be careful, I promise”!” to continue to the about:config page.

Firefox_about_config_warning

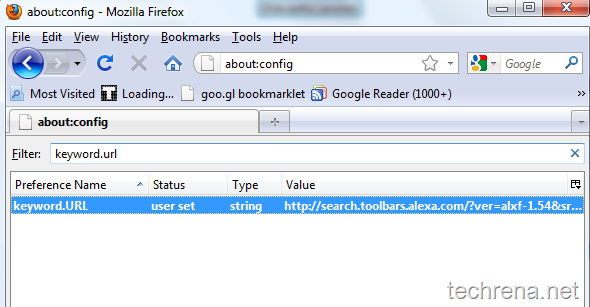
2. In the Filter search box, type “keyword.url” and the result returns only one result as shown in the screenshot below.

keyword.url_firefox

And as you can see here, the address bar search engine provider in my case has been changed to Alexa, when I installed it’s toolbar sometime back. Now I want to change it to a different provider, back to Google may be, or Bing? Well I can even test how it works with Twitter search.

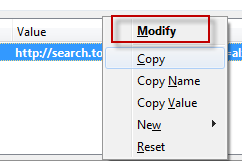
3. Right-Click on the field value and click “Modify”.

change_firefox_keyword.url_string_1

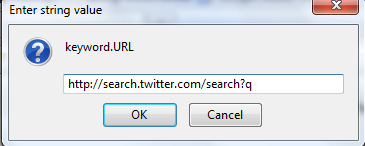
You will now be asked to enter a string value for the keyword.URL, choose the values according to the provider, as listed in the table below.

change_firefox_keyword.url_string

List of  string values of various search engines:

Google http://www.google.com/search?ie=UTF-8&oe=UTF-8&sourceid=navclient&gfns=1&q=
Yahoo http://search.yahoo.com/search?p=
Bing http://www.bing.com/search?q=
Ask http://www.ask.com/web?q=

Click OK to save the settings and checkout the result yourself with typing a keyword in the address bar of the Firefox.

Mozilla Firefox 3.6.4 RC Available For Download

firefox logo

Mozilla Firefox has announced the public release of the release candidate (RC) build of Firefox 3.6.4.

This RC release of Firefox 3.6.4 fixes various issues found in the previous beta releases of Firefox 3.6.4.

Since the launch of Firefox 3.6.4 Beta, Mozilla has started to include a new feature that runs plug-in in separate process keeping them out of the main browser process (Out-Of-Process Plugins feature), which is now being called as “uninterrupted browsing”.It means that if any of the plugins Adobe Flash, Apple Quicktime or Microsoft Silverlight, it won’t affect the main Firefox browser process.

Users who are using the previous betas of Firefox 3.6.4 should receive this Firefox 3.6.4 build 6 (RC) as an automatic update.If no issues are found during testing of this RC version, this build (build 6) will be officially released as Firefox 3.6.4 final.

Direct Download Link:

Firefox 3.6.4 RC (Windows – 7.7MB) Update: Link expired

All other Platforms (Mac, OS X, Linux)