How To Stop Internet Explorer To Stop Asking You To Remember Passwords ?

AutoComplete passwords

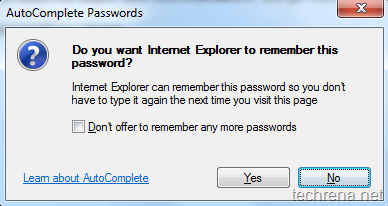
Microsoft Internet Explorer has a default “AutoComplete Passwords” feature that lets you save passwords for different login pages while browsing the internet. But if you are using a shared public computer with many users working on it, you might want to disable this feature for privacy concerns. Follow the steps below to make Internet Explorer stop asking for you to remember passwords.

Steps:

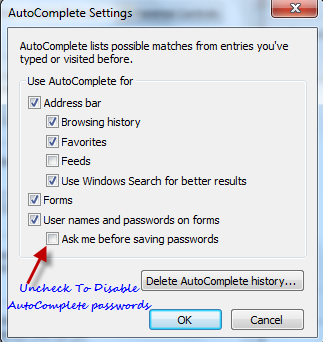
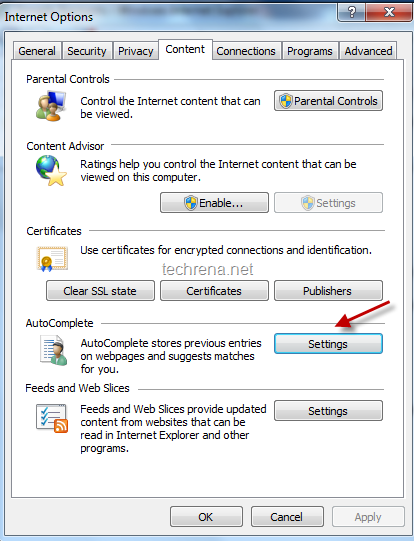
1. Go to Tools > Internet Options, switch to “Content” tab. Click on “Settings” under “AutoComplete” section.

ie content settings

2. Uncheck the “Ask me before saving passwords” option in the AutoComplete settings window.

AutoComplete settings

3. Click OK and close the settings window.

From now on, your Internet Explorer will not offer you the AutoComplete passwords dialogue. To re-enable this feature at any later time, just check the same option in the third step.

[How To] Hide The Windows 7 System Tray Icons

Windows 7 logo

Notification area or system tray icons in Windows 7 has been enhanced when compared to the earlier Windows versions like Windows XP. However, for some reasons if you want to disable the notification area and save some space (?) on your taskbar, here is what you need to do:

Registry hack:

Follow the registry path given below: (Registry code for hiding tray icons )

registry key notepad screenshot

HKEY_CURRENT_USER\>>Software\>>Microsoft\>>Windows\>>CurrentVersion\>>Policies\>>Explorer  and set  “NoTrayItemsDisplay” DWORD value to 1.

NoTrayItemsDisplay in windows 7

Third-Party Software:

If it’s looks complicated for you, just try this small app Hide SysTray to hide the notification area automatically.

Hide Systray

If you run the app, you can disable your notifications area like this:

notification area disabled

Note: You need to have .NET Framework version installed on your computer to run this application else you’ll end up with the following error.

Hide systray .net error

Run Multiple Versions of Firefox On Your PC

firefox logo

How I can run two (or multiple) versions of Firefox on my computer?”

This is the common questions asked by many of the Firefox, especially web developers who need to test their applications in various versions of Firefox.

It also might be a case that you liked an earlier version of Firefox and just want to run it as the secondary version (it’s always recommended to run the latest updated version to avoid any security risks).

While this question has no absolute solution, I’m posting a tip that at least gives us a chance to run two different versions of Firefox (but still won’t serve the purpose fully).

Update: Read How To Run Two Different Versions Of Firefox On The Same Computer, the updated version

One way we can two different versions of Firefox is to install and use a Portable Edition of the Firefox. Just install the version of the Firefox that you want to use on portable device, install it on your USB flash drive. Plug it in and start using the portable version. However you please note that you cannot run these two versions simultaneously. Supposing that you have installed a new Firefox v3.6 on your PC and a portable version 2.0.0.20 on your USB disk, if you are running Firefox v 2.0.0.20 from your USB and you click on the Firefox icon shortcut to open a new window, you will be surprised to see that it’s the v2.0.0.20 that runs and not v3.6 and vice-versa.

Download Firefox Portable Edition

Tip: Always Run A Program As An Administrator By Default

Windows 7 as a security measure doesn’t allow you run any program as an administrator by default. But sometimes you might need to run a program a program far too many times that requires elevated privileges, and it’s really annoying if to see that you are being asked to run it as an administrator each and every time you run it. However, there is a way to run the program as an administrator by default in Windows 7 (and Vista) that many of us aren’t aware of. Here is how you can do it :

Steps:

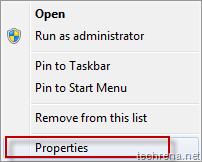
1. If you wish the program to run as an administrator by using the shortcuts of a program, you need to right-click on the shortcut, select “Properties”,

Windows 7 right click context menu on shortcut

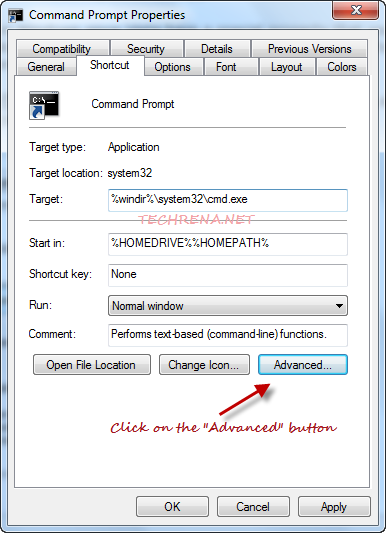
2. Now click on the “Advanced..” button under the “Shortcut” tab of the properties window.

Windows_7_advanced_properties_shortcut

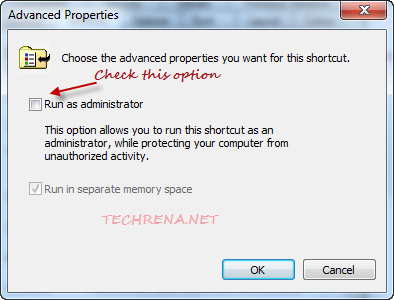
3. Select “Run as administrator” option under “Advanced Properties” window and click OK. Apply the settings and close all the properties window.

advanced_properties_exe

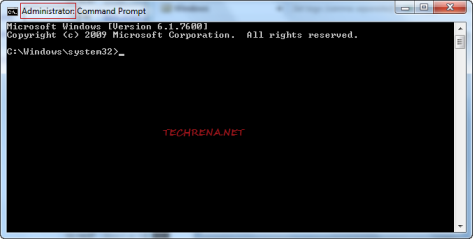
4. Now run the program again and you will see that it’s running as administrator (See the screenshot of the Windows Command Prompt, and observe the string “Administrator” in the title of the program)
CMD as administrator in Windows 7

For more tips and tutorials on Windows 7, you can subscribe to our RSS feed via Email.

Change Drive Letters In Windows 7

Change drive letter post image

Windows automatically assigns letters to drives by default. Most users are happy with the letters that Windows chooses and they don’t complain about it. But for some reasons, if you didn’t like a letter assigned by Windows to one your new drives, you might want to step-in and select your desired letter for that drive instead of the one chosen by Windows 7. Here is a tutorial on how you can accomplish it.

Please note that you must be logged on as an administrator to perform the steps mentioned below.

Steps:

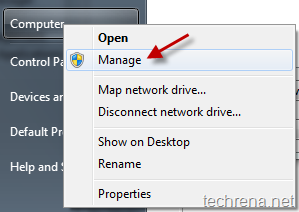
1. Right-click on “Computer” and click on “Manage” to open “Computer Management”.

Windows 7 Computer management shortcut

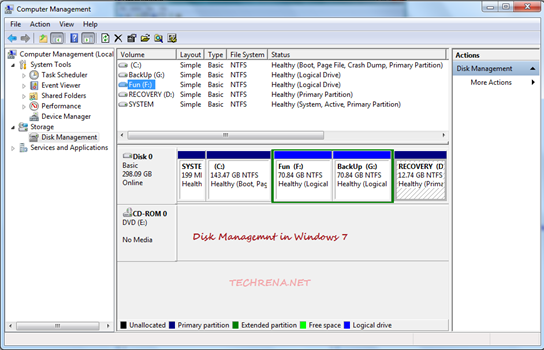
2. In the Disk Management windows, click “Disk Management” under the section “Storage”.

Windows 7 Computer management

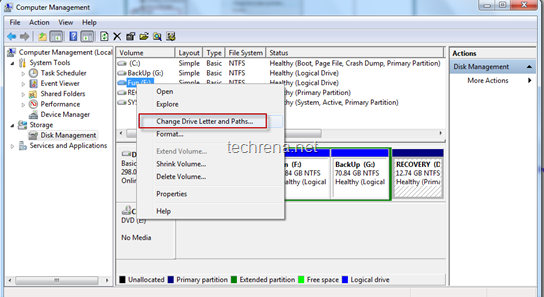
3. Right-click on the drive or partition that you want to change, and then select “Change Drive Letter and Paths”.

Windows 7 Disk management

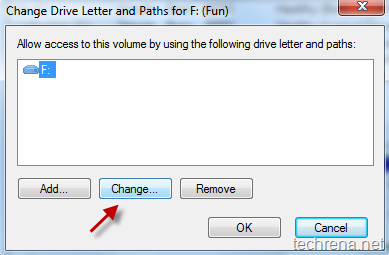
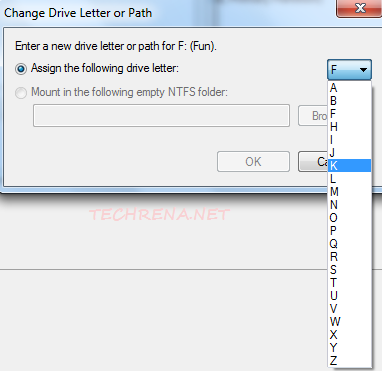
4. Click on Change and then click “Assign the following drive letter” and select the drive letter that you want.

Change Drive letter and paths

Change Drive letter and paths selection

Similarly if you want to remove a drive letter, click “Remove” in the previous step and click Yes to confirm.

Close the Computer Management window and checkout the changes that you have made.

Change Address Bar Search Provider In Firefox

Firefox logo

Address bar search is the feature that allows you to search for a keyword entered in the address bar (location bar) without entering the search engine homepage. Firefox by default will look for the keyword entered in the address bar in Google search as it is usually set as the default search engine to manage address bar keywords.

However, you might want to change it to suit your personal interest. It may sometimes can also be a case of hijacking: You install some programs that they change your search bar address bar search provider without asking for your permission (ex: so many toolbars like Alexa, Yahoo etc.). For some reasons, if you want to change the Firefox address bar search provider, you can do it by following the steps below:

1. Type about:config in the Firefox address bar. You will be presented with a warning, if you are using Firefox 3.5 + version, just click “I’ll be careful, I promise”!” to continue to the about:config page.

Firefox_about_config_warning

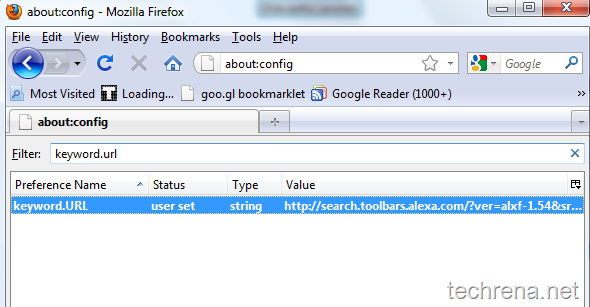
2. In the Filter search box, type “keyword.url” and the result returns only one result as shown in the screenshot below.
keyword.url_firefox

And as you can see here, the address bar search engine provider in my case has been changed to Alexa, when I installed it’s toolbar sometime back. Now I want to change it to a different provider, back to Google may be, or Bing? Well I can even test how it works with Twitter search.

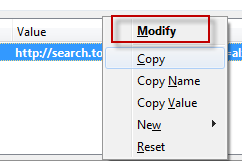
3. Right-Click on the field value and click “Modify”.
change_firefox_keyword.url_string_1

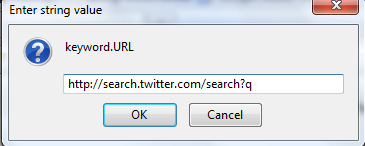
You will now be asked to enter a string value for the keyword.URL, choose the values according to the provider, as listed in the table below.
change_firefox_keyword.url_string

List of  string values of various search engines:

Google http://www.google.com/search?ie=UTF-8&oe=UTF-8&sourceid=navclient&gfns=1&q=
Yahoo http://search.yahoo.com/search?p=
Bing http://www.bing.com/search?q=
Ask http://www.ask.com/web?q=

Click OK to save the settings and checkout the result yourself with typing a keyword in the address bar of the Firefox.
Add A Background Image To Google Homepage

Google new official logo

Google has recently announced a new feature that lets you choose your own background images for the Google homepage similar to the Bing.

This feature is initially available to US version of Google, Google.com. This feature will be rolled out to the users outside US very soon. However no will stop you to visit Google.com/ncr and access this feature. Here’s how we can add the background image for Google homepage.

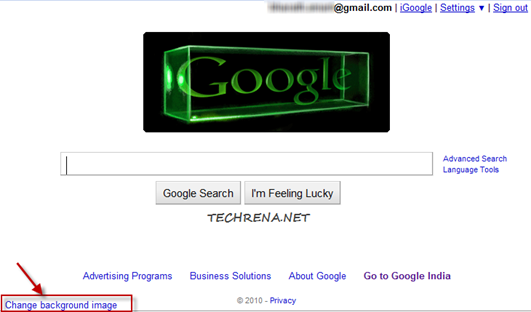
1. Visit Google.com/ncr and click on the “Change background image” link on the bottom left of the page.

Google homepage

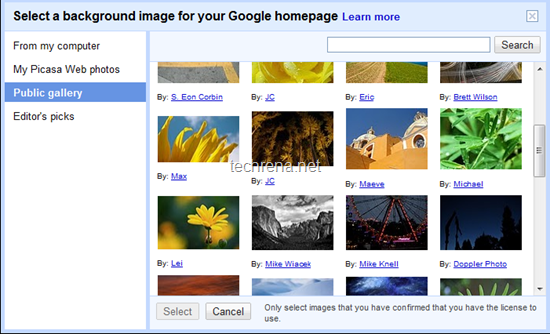
2. Now you can choose the background picture from your computer, your Picasa Web photos, Google public gallery or from editor’s picks.

Google background image selection

3. Click Select to apply the background image and you are done, and the Google homepage will now look like this one in the below screenshot.

Google homepage with background image

Note:

  1. When you upload a image from your computer, it will be saved as a photo in a new unlisted album in your Picasa Web Albums.
  2. Image Requirements: Landscape, Min. resolution: 800 x 600 pixels
  3. Image formats: .jpeg, .tif, .tiff, .bmp, .gif, .psd, .png, .tga

How To Fix “The Requested Operation Requires Elevation” Error

Windows 7 logo

While executing some commands in Windows 7 (or Windows Vista) command prompt, you may see some error message like

The requested operation requires elevation

This may also appear sometimes when you are installing some older applications in your Windows 7.

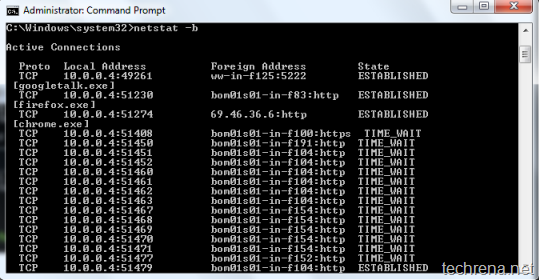
In my case the above error popped in while I was trying to run a “netstat –b” command from the Windows 7 command prompt. You may also end with the same error if you try to other commands like “ipconfig /flush” or “ipconfig /release” etc.

requested operation requires elevation error

This error arises so because, some programs like this need to be run with elevated privileges even though you did turn off UAC (User Account Control). However, there is a simple solution available for this, all you need to do is that run the command prompt with administrative (elevated) privileges.

Solution:

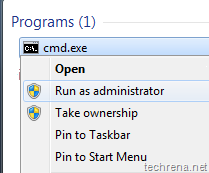
To solve this error, go to Start > Type cmd in the search box, you will the result cmd.exe under programs. Right-click on it and select Run as administrator.

run_cmd_administrator_1

Now run the same command and you will no longer get any error messages and the command gets executed in the right manner.

Command prompt with elevated administrator rights

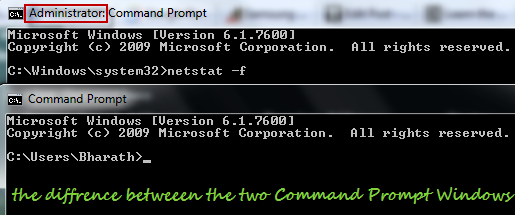
If you are wondering so as to how to find whether you are running the command prompt with Administrator privileges or not, use the following hint:

If you are running command prompt as an admin, you will see the word “Administrator” in the CMD window title. Checkout the following screenshot, which depicts the difference between the two CMD windows.

Difference between the command prompt windows

How To Download Google Chrome Standalone Offline Installer

Google Chrome Offline Installer

Google Chrome, the lightweight browser from Google has become very good alternative for browsers like Internet Explorer and Mozilla Firefox and its market share is continuously increasing booting other less popular browsers.

The problem that many users raise against Google Chrome is regarding the installation of the browser. When you want to download Google Chrome, all that Google gives you is a small file called “Google Chrome Installer” which then connects to internet and downloads the installer package online and automatically installs the stable version of the Google Chrome on your computer.

Google_Chrome_Installer

But do you guys know that Google offers a standalone offline installer which you can download and install on any computer that has no internet connection ?

Tip #1 :

If you want to download the standalone installer for the official Google Chrome stable version,

Download Google Chrome Standalone Offline Installer

Tip #2:

If you want the standalone offline installer for the latest Dev version of Google Chrome, follow these steps:

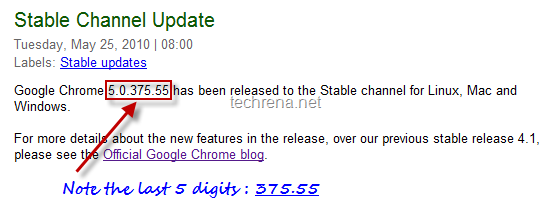
1. Find the latest dev version of the latest release from official Google Chrome Releases blog, find the latest version number mentioned there (in the screenshot, it is 5.0.375.55).

Note down the last 5 digits of the version number (xxx.xx format). In this case, it is 375.55

Chrome latest dev stable release version
2. Paste the above 5 digit number that you copied in the above step in place of “xxx.xx” in the following link:

http://dl.google.com/chrome/install/xxx.xx/chrome_installer.exe

[ In the above case, the link will be http://dl.google.com/chrome/install/375.55/chrome_installer.exe ]

3. Type the link in the address bar and press enter. You can now download the standalone offline installer of the latest Dev channel release version of Google Chrome.

Open Command Prompt From Any Folder In Windows 7

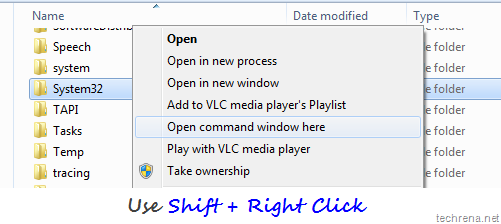
Open command window here option in Windows 7 using shift plus right-click

Last month we have written about how to copy the path of a file or folder to clipboard in Windows 7. And now, here is another handy tip for Windows 7 users to open command prompt in any folder. This requires no extra software to be installed. It’s actually s built-in feature that many of us don’t really know.

Use Shift + Right-Click on any folder and you will find an option “Open command window here”.

Click on the option to open command prompt window in that particular folder

Command prompt opened in folder

This is an especially useful time saver when you use command prompt a lot to execute commands or for performing some tweaks in Windows.This trick also works in Windows Vista.

If you know more tips like this, you can let us know through your comments.