[Tip] Get Rid Of The Ask Toolbar

Ask toolbar

Ask.com, the popular search engine distributes a browser toolbar to make it easier for users to access features of the search engine by integrating it to the browser. But the Ask toolbar is often criticized as it bundles with many freeware and gets installed in your system without you even having a clue about when it got into your computer. It is often bundled with freeware that we install daily and the toolbar setup would normally appear during the installation phase when most of the users don’t pay much attention as they just want to get done with the installation of the software.
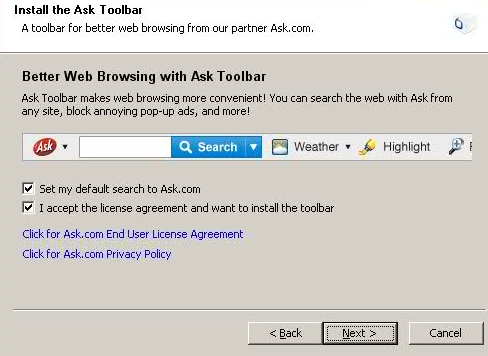
Ask toolbar install

And that is it, the toolbar comes and sits on the top of your browser (mostly in the Internet Explorer). It could even get worse because of the fact that Ask toolbar once installed, it also changes the homepage and default search engine( of course, to Ask.com and Ask search respectively).

This could be very annoying to many users who don’t use the Ask search engine as they are now forced to use the Ask as their default search engine for everything you search on the browser and not just that, the presence of the Ask toolbar can make your browser (Internet Explorer, Firefox or any other browser) much slower. If you are deliberate to get rid of the infamous Ask toolbar, follow the steps mentioned in this tutorial.

You can remove the Ask toolbar in many possible ways.

#1 Uninstalling Right From The Browser:

This is the simples of all the available options to remove the toolbar. Just click on the “Options” dropdown button menu in the Internet Explorer and you will see an option to uninstall it as shown:
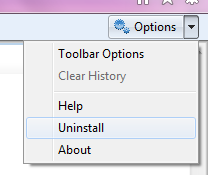
Ask toolbar uninstall option

#2 Uninstalling From The Control Panel:
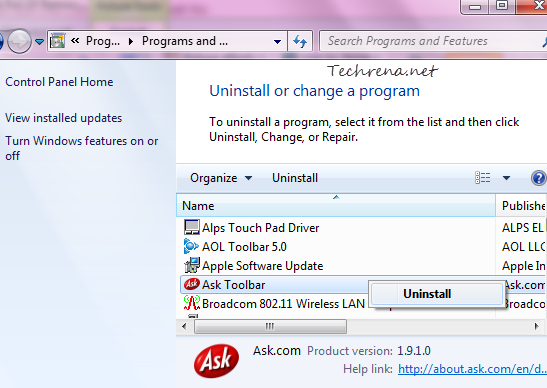
Ask toolbar control panel uninstall

You can also uninstall the Ask toolbar in the more traditional way like you do in the case of most other software. Go to Control Panel > Programs > Programs and Features, locate the Ask toolbar in the list and double-click on it to uninstall the toolbar.

#3 Using Ask Toolbar Remover

While the above two methods can do the trick for you without needing to install any other program, you may also install small third-party software called “Ask Toolbar Remover” to achieve the desired result. Just download the program from the link added below and click “Execute Removal” and it will do the work for you.
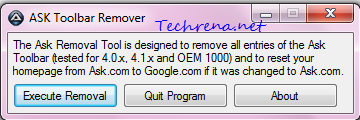
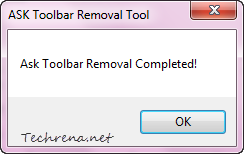
Ask Toolbar Remover

Ask Toolbar removal tool operation

Download Ask Toolbar Remover
Using Google Recipe Search Feature

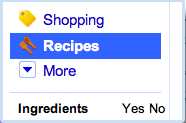
Google search recipes left-hand panel

Are you having hard time trying to figure out the best recipe that could be cooked with the available items in your kitchen and within limited amount of time to serve your guests who came for a visit to your home? Wish you had a magic wand in your hands? Well, here is it! May not be a wand but just the right tool which could help you in preparing your recipes, the tool is ‘Google Recipe View’, a new search feature currently available for the users in the United States and Japan. Google’s Recipe view is a new search filter that has been added to the existing filters on the left-hand panel.

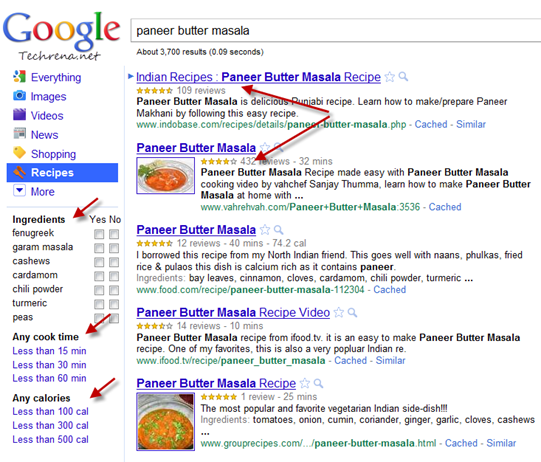
To use this feature, go to Google.com, (Google.com/ncr for users located outside the US and Japan) and type a recipe for which you want to get the information hit the search button and then click on the “Recipes” link in the left-hand panel. You will immediately get the results for the concerned recipe along with ratings so that you make you decide on which one to go for.

Google recipe search results

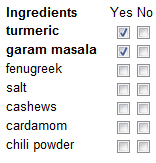
Closely look at the options in the left-hand panel in the results. You can narrow down the recipe search results by choosing the ingredients that you want to include or exclude:

Google Recipe search ingredients

And if you are in rush for time, you can also get the recipe results that help you to cook the recipe in quick time:

Cook time filter in Google recipe search

You might also keep an eye on the amount of the calories that your recipe would serve to your guests. Fortunately there are filters available to narrow down your recipe search results based on the calorie count as well :

Calories filter google recipe search results

Give it a try, I’m sure you will find this pretty useful. Non-US and Non-Japan users can also get try the direct Google Recipe View landing page.

[via] Official Google blog

[Tip] Turn Off The Clicking Navigation Sound In Internet Explorer

IE9 logo

If you use Internet Explorer frequently, you might be aware of the annoying click sound that the browser generates whenever you click a link in the webpage, use back or forward buttons or when you type a URL and press enter. If you observer closely, this is the same sound that comes when you are browsing the Windows explorer windows as well. This happens so because whenever you click something in Internet Explorer or Windows explorer, it will trigger the “System Navigation” event of the system sounds. As always, you can completely disable this sound both for Windows explorer and Internet Explorer. But let’s confine ourselves to the Internet Explorer for now, in the wake of the latest IE9 release. Follow the steps briefed below to disable the clicking navigation sound in the Internet Explorer 9.

Steps:

1. Click on the settings icon IE9 settings iconfound on the top right corner of the Internet Explorer. Choose “Internet options” from the menu.

IE9 settings menu

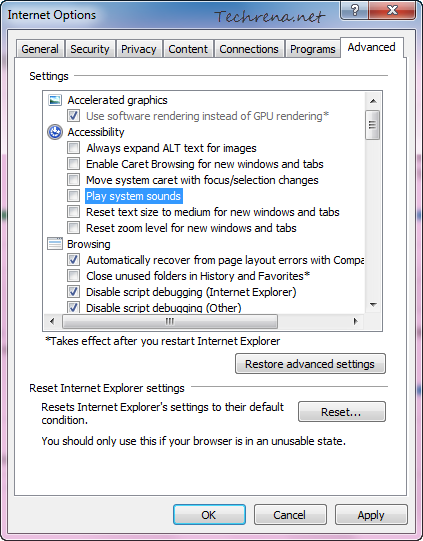
2. A new “Internet Options” window opens up. Go to the “Advanced” tab in the window. Uncheck against “Play system sounds” under the settings for “Accessibility”.

System sounds from internet options in IE9

Click “Ok” to apply the changes and close the window. Now the click navigation sound in the Internet Explorer gets disabled (If you to enable it back, just choose the option shown in the above screenshot and save the settings). However, the clicking navigation sound in the Windows explorer will still continue to exist. We’ll see how to completely turn off or mute these navigation sounds for Windows explorer completely in the upcoming posts.

Covert Word Documents To PDF Using Google Docs

These days, most of the users including organizations prefer to save or export their office documents created using various Office suites like Microsoft Office or OpenOffice etc. as PDF (Portable Document Format) files. This is because when you save it in other typical document formats, some of the elements in the document may not render properly when you open it with Office suit other than the one using which it is made, so it may not look the same on all the computers running on different platforms or using different types of office suits. There are plenty of tools available both online and offline to export the documents into PDF format. In fact, we had earlier written about how to covert Word and Excel documents into PDF using Microsoft Office 2010.

Now let’s me introduce you a not-so-known feature in Google Docs that lets you save any document as PDF.

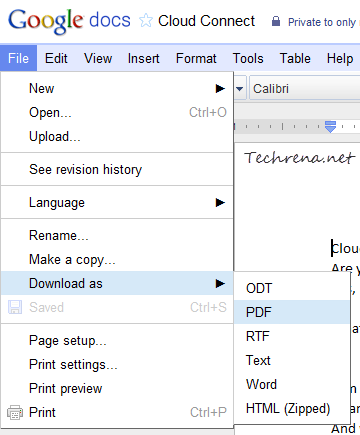
1. Upload your Word document to Google Docs.

2. Open the document and you click on the “File” in the menu bar.

3. Under File > Download as ; choose PDF to save the document as PDF and download to your computer.

Google docs download as PDF option

[Tip] Disable Delete Confirmation Dialog Box In Windows 7

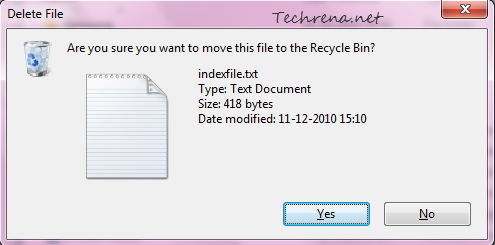
Windows alerts users in the form of various prompts including various confirmation dialogs. These are actually pretty much handy in making sure that you are performing the action that you are actually intended to do. Delete confirmation dialog box is one such prompt, asking you to confirm that you really want to delete that particular file.

Delete file confirmation in Windows 7

Though highly useful, sometimes when you are deleting a large set of files, these dialogs could annoy you and you might want to disable them till you complete the task. Here’s what you need to do to disable the delete confirmation dialogs on your Windows 7 or Windows Vista based PC.

Steps:

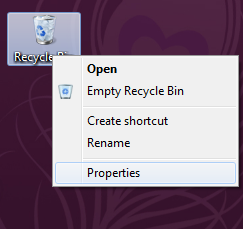
1. Right-click on the “Recycle Bin” icon on your desktop and choose “Properties”.

Recycle bin properties link

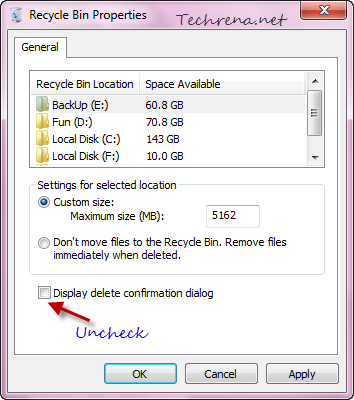
2. In the Recycle Bin Properties window, you will see this option: “Display delete confirmation dialog”.

Display delete confirmation dialog

Just uncheck this option and click OK to apply the settings.

Recycle bin properties delete confirmation

That is all you need to do. You will not be shown the delete confirmation dialogs anymore. But I strongly advise you to change this settings only if you are desperate to get rid of these prompts for a while.

Enable Reading Levels In Google Search

Google reading level is a feature that lets you adjust the reading level in Google search results so that you get the most appropriate results based on your reading level so that you get webpages that you can read and understand easily. To get a better understanding, consider the scenario which Google mentioned in the help article (linked at the bottom of the post) about the reading level: A student or second-language learner might need a webpages more of basic reading levels when compared to a research scholar who might want to webpages of advanced reading levels. If you think, reading level matters for you, here’s how you can change

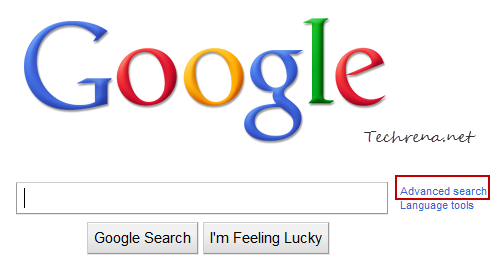
Go to Google homepage and click on the “Advanced Search” link found next to the search bar.

Advanced search link in Google

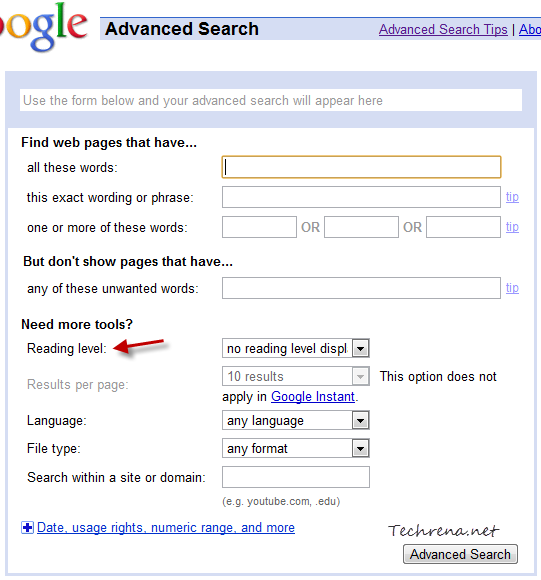
Locate the “Reading level” settings in the advanced search page:

Advanced search options in Google

Basically there are three reading levels to choose from: Basic, Intermediate and Advanced.

reading level options

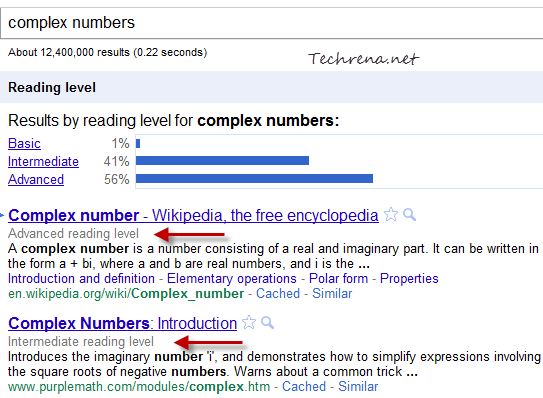
You can either choose one of the three levels or you can also choose “annotate results with reading levels” and the reading level of the webpages will be displayed in the search results as shown:

reading levels in Google search

You can then choose to read the webpages that are at your desired reading level.

These reading levels have been compiled by based on data provided by number of teachers hired by Google for the same purpose.

Source: Google Help article

[Tip] Change Internet Explorer 9 Search Provider

IE9 logo

If you have already downloaded and installed the Internet Explorer 9 (IE9) on your computer, you might well be aware that there’s no search sidebar in IE9. IE9 lets you search directly from the address bar so much so in the similar way Google Chrome does. You can also see the suggestions as you type (along with suggestions) in the address bar. But the problem here is by Bing set as the default search engine by default and most of the beginners will have tough time in figuring out how to change this default search engine to their liking, say Google. Here is a small tutorial explaining you the exact procedure to follow to change the default search engine in the Internet Explorer.

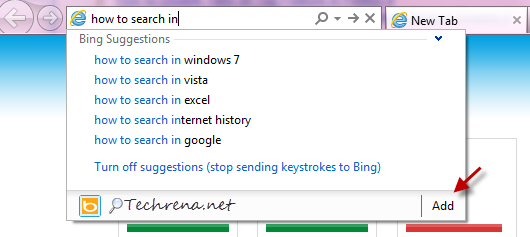
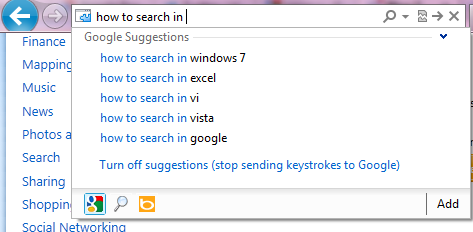
1. Type your search query in the IE9 address bar and click on “Add” button that you can see under the search suggestions (from Bing by default).

Bing search suggestions in IE9

Icon of your current search engine is shown at the extreme left below the suggestions. As you can see from the above screenshot, it is Bing in my case and it should be in most of the cases as well.

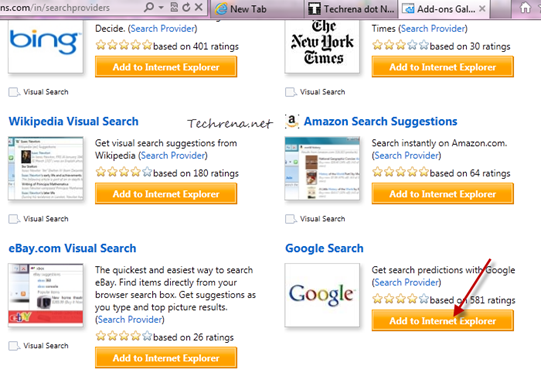
2. You will now be taken to IE add-ons gallery page where you will find a whole lot of available search providers.

Search providers IE add-ons gallery

Locate your favorite and click on the “Add to Internet Explorer” link present next to it. All of the search providers listed there offer search suggestion as well.

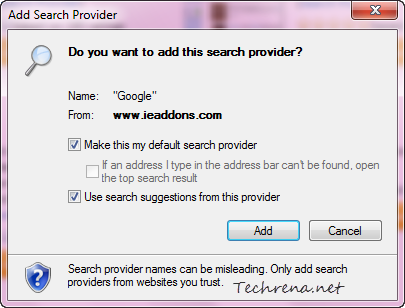
3. In the new window that pops up, choose both the options (“Make this my default search provider” and “Use search suggestions from this provider”) and click the “Add” button.

Add search provider IE

That is it. We have successfully change the search provider in the Internet Explorer 9. And as you can see Google is my default search engine now!

Google search in IE9 address bar

Related: Download Internet Explorer 9 RC

[Tip] Disable Built-In PDF Viewer In Google Chrome

google chrome logo

Google has started shipping the Google Chrome browser with a built-in PDF viewer since the release of Chrome 8. Even when you install native PDF readers like Adobe Reader of any other applications to view the PDF files on your system, Google Chrome will automatically disable the browser PDF plugins and enable the built-in PDF viewer. But the built-in PDF viewer in Chrome has got some limitations compared to a standalone PDF viewer. If you want to disable the built-in PDF viewer in Chrome, follow these steps:

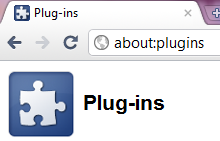
1. Type about:plugins in the Google Chrome address bar and hit Enter.

about:plugins in Chrome

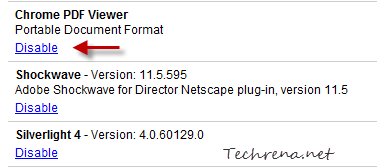
2. All the plugins installed in the Google Chrome will now be shows in the window. Scroll down the list until you locate “Chrome PDF Viewer”.

Chrome PDF Viewer plugin settings

3. Click on the “Disable” link under the “Chrome PDF Viewer”.

Google Chrome’s built-in PDF Viewer will now be disabled and all the PDF files from now on, will be opened using the external PDF reader plugin that you have installed. In case you want to activate the built-n PDF Viewer in future, just follow the step-1 and click the “Enable” link under “Chrome PDF Viewer”.

[Tip] Disable The New Photo Viewer In Facebook

Facebook logo

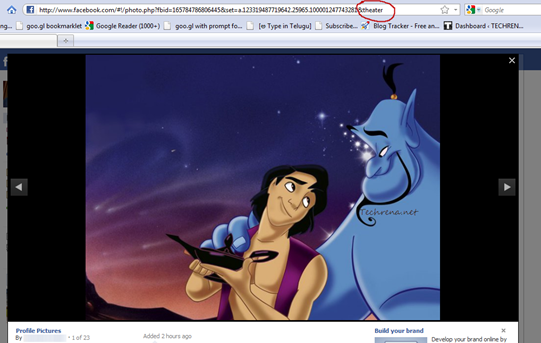
Facebook has recently introduced a new Photo Viewer (called ‘Photo Theater’) last week. It has become a topic of debate among the Facebook users since then with most of them not supporting the initiative from Facebook to introduce the new theater version of the Photo Viewer. The new Photo Viewer is all about popup slideshow covering up almost the entire Facebook page in black background. If you are one of those that doesn’t like this annoying Photo Viewer, you might want to disable it and revert back to the good old Facebook Photo Viewer. These are the set of workarounds to get rid of the new Facebook Photo Viewer.

Facebook new photo viewer

Using F5:

Facebook appends the URL of a photo in Facebook with this “&theater” parameter to the URL to trigger the new Photo Viewer instead of the old one (You can manually delete the “&theater” tag from the URL and hit enter to load the photo in the old viewer). But it is found that refreshing the page loads the same photo in the old Photo Viewer. So all you have to do is to press F5 button and the photo should load again in the old Photo Viewer instead of the new one and you will see the rest of the photos in the album in the old Photo Viewer. However, this is not a permanent solution, and you might want to automate the things for you, and this is why you should scroll down to the next workaround.

Facebook old photo viewer

Using Browser Extensions:

If you are using Firefox, you should first install the Greasemonkey add-on and then use the following Facebook Photo Theater Killer script. This script works in Google Chrome too. Alternatively, if you are on Google Chrome, you can install Revert Facebook Photo Viewer extension for this purpose.

Activate 2-Step Verification Process For Your Google Account To Make It More Secure

Google 2-step verification

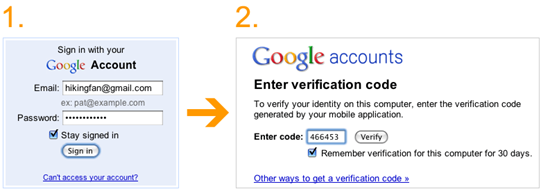
Google had previously announced the new 2-step verification for Google apps users. The same is now being rolled out to all the Google account users. The 2-step verification would make your Google account more secure by verifying you are the real owner of the account that you are trying to access. You can verify your authentication by using a smartphone, or via a SMS text code that you receive similar to how you do it while making online banking transactions or even you could use a landline to verify your identity through a voice call in case you don’t have a mobile phone with you.

How To Enable 2-Step Verification In My Account?

To set up the 2-step verification, login to your Google account and navigate to the Manage Account page, and if the feature has been enabled for you, you should see a “Using 2-step verification” link under Security column in your Personal Settings.

Google account personal settings

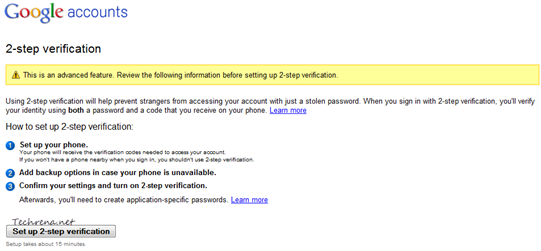
And the whole setup should take about 15 minutes. You will see this page on the next screen:

google 2-step verification setup

Click on the “Set up 2-step verification” to continue and complete the setup process. It involves 3 steps: 1. Setting up your phone 2. Adding backup option when your phone is unavailable 3. Confirm your settings

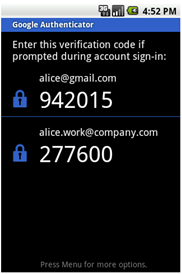
If you have a smartphone, you can install Google Authenticator application from (available for Android, iPhone and BlackBerry devices).

Google authenticator screenshot

The application generates a verification code that is required in the second step during the sign in. You can also check the “Remember verification for this computer for 3 days” option and you don’t need to re-enter the code again for the next 30 days. In case you don’t have a smartphone, you can receive the verification code through a text message or through a voice call as well. You can also generate application specific passwords to sign in to non-browser based applications that use Google account like mobile Gmail, Picasa or AdWords Editor. But all these are advanced options and might confuse you. For now you have completed the 2-step verification process and you have added more security for your Google account and lets not bother too much about the advanced settings.

[via] Official Google blog