Google Buzz Desktop Apps

We have been constantly writing about Google Buzz ever since it was announced last week.

We had mentioned how to test it before starting to use it in Gmail, we had written about the Google Chrome extension for Buzz that displays your buzz notifications without needing to open Gmail in new browser windows or tab.

And most recently we have come up with the tip to How to Completely disable Google Buzz from Gmail,

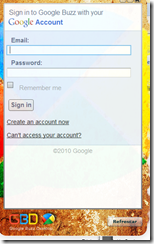
Tip #1.And today we are covering one more tip about Google Buzz, not actually a tip but we are talking about a desktop application for Google Buzz called “Google Buzz Desktop” (GBD).

GBD is based on Adobe AIR platform, installs and works smoothly.

Buzz Desktop Application Adobe airFeatures:

* Updates every 2 minutes
* Emulates iPhone version of Buzz on desktop (Like mentioned here)
* Works on any platform/browser.

DOWNLOAD

Tip #2 You can also create your own desktop application as a Site-Specific Browser (SSB) app for Google Buzz.There’s a guide at mashable (using Prism) on how to do it.But actually it’ creates SSB web app for Gmail not Buzz alone.This tutorial isn’t just for Buzz alone, you can create SSB apps for any website that uses cookies for login info and you want to simultaneously use multiple accounts at the same time.

google-buzz-fluid

Google Responds Again Over Google Buzz Privacy Concerns

Google Buzz official Logo

Well, Google has responded for the second time in the week of the launch of Buzz over the continuous increase in concerns regarding the privacy of the users using Google Buzz .

Google has taken some steps to address these main concerns (if not all), over the Buzz, adding some settings to it.

It’s very rare that see hear the word “sorry” from Google, like this one:

We quickly realized that we didn’t get everything quite right. We’re very sorry for the concern we’ve caused and have been working hard ever since to improve things based on your feedback.

There have been mainly 3 updates in Google Buzz settings from Google based on the user feedback.

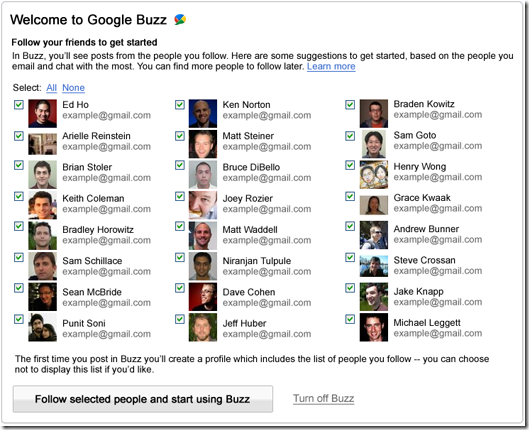
#1 No auto-following only auto-suggesting: Google has disabled auto-following in Buzz, you will see auto-suggestions suggesting people to follow instead.

Google Buzz follow suggestions techrena.net

#2 Buzz will not connect your public Picasa Web Albums and Google reader shared items automatically.

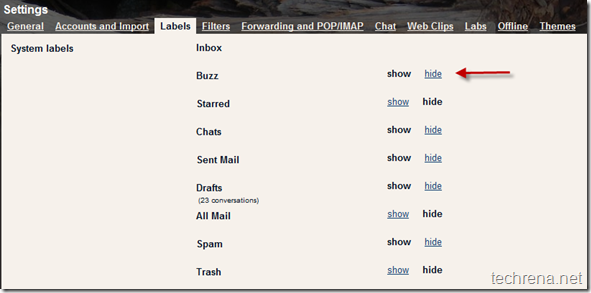
#3 Disable Buzz completely:  Google has added a link under settings in Gmail tthat allows you to hide, or completely disable Buzz from Gmail

Hide Or Completely Disable Google Buzz In Your Gmail

Well, it seems Google is hearing all those privacy concerns raised all over the web by the users that made Google to respond quickly and yesterday they have updated Google Buzz with an option to completely  disable or turnoff it from your Gmail account.

Just follow these steps to know how to do this:

  1. Go to the bottom of your Gmail page, i.e navigate to the region that is located below your email messages appears.
  2. You’ll find options like “Last account activity”, “Gmail view” etc.
  3. Under “Gmail view”, locate “turn off buzz” link and clicking on that one will relaod your Gmail but without Buzz

Turnoff Google Buzz

There’s another way you can do it (I doubt that this setting is not available to all users right now)

  • Go to seetings

Gmail settings link

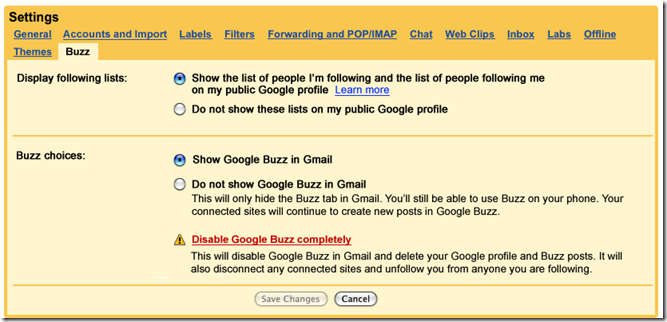
  • Locate “Buzz” tab under settings, under this tab you will find an option “Disable Google Buzz Completely” also you have option to “Hide Google Buzz in Gmail”

Disable Google Buzz Or in some accounts, this show/hide option may be located here:

Hide Google Buzz

New Comodo Dragon Internet Browser Based On Chromium

Comodo Dragon Internet Browser: One More Chromium Browser

comodo browser logo

Comodo Dragon is a Chromium technology based free browser set to offer fast and safer browsing experience to the internet users.

Comodo Dragon, of course has similarity with Google Chrome as it’s also based on Chromium technology.But it doesn’t support Chore extensions, make a note of it.

Features:

  • Improved Privacy over Chromium
  • Easy SSL Certificate Identification
  • Fast Website Access
  • Greater Stability and Less Memory Bloat
  • Incognito Mode Stops Cookies, Improves Privacy
  • Very easy to switch from your Browser to the Dragon
  • Has privacy enhancements that surpass those in Chromium’s technology
  • Has Domain Validation technology that identifies and segregates superior SSL certificates from inferior ones
  • Stops cookies and other Web spies
  • Prevents all Browser download tracking to ensure your privacy

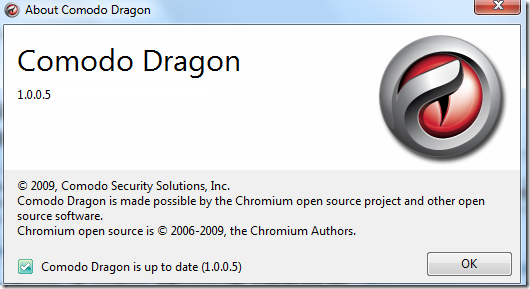
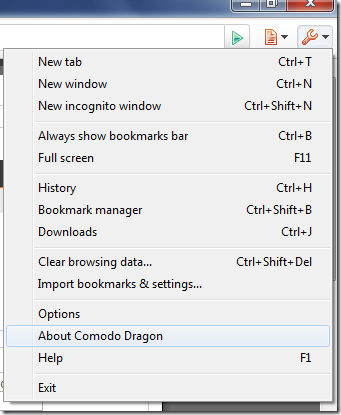
We have downloaded and checked the latest version 1.0.0.5.Here are the screen shots of the browser:

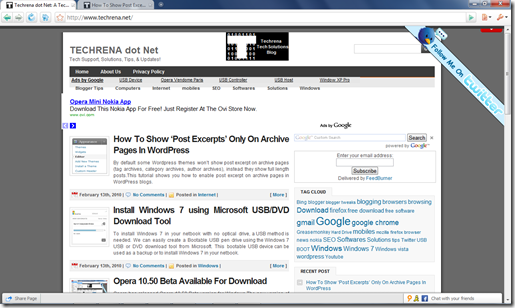
Comodo dragon browser screenshot

About Comodo Dragon comodo dragon settings techrena.net

The installation file size (DragonSetup.exe) is larger than most  of the browsers (Opera – 9.5 MB, Firefox – 8 MB, Chrome- 12 MB) except Safari (28.3 MB).

If you are fine with Chrome, it’s ok.But if you want to have one just another browser like Google Chrome, just grab the Comodo browser from the below link.

DOWNLOAD:

Comodo Dragon Internet Browser(version 1.0.0.5)

How To Show ‘Post Excerpts’ Only On Archive Pages In WordPress

If you use a WordPress you would better know that managing archives is very essential in terms of SEO prospective.

It’s a SEO rule that if you don’t use ‘nofollow’ for archive pages, you should use ‘excerpts’ only in your theme archives rather than showing full posts, as it creates the problem of duplicate content for the search engines.

Even though many WordPress themes in recent are coming with just excerpt only pages for archives by default, there are still come classic themes like (WordPress Classic theme for instance) that will show full posts under archive pages.In this post I’ll cover how to disable full posts for archive pages.

[Fortunately for showing excerpts on homepage, we have Homepage Excerpts plugin, but for archive pages, we need to follow the below procedure]

Steps:

This method is very simple and involves a very minor code editing.

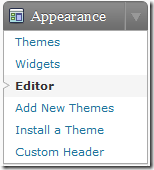
1.First, go to your “Theme editor” page from your WordPress Dashboard.

Theme editor under WordPress dashboard

2.Under the theme files, find and open a template file called archives.php (in some themes, you need to look for tag.php and category.php template files included separately for each type of archives)

In the template file look for something similar to the following line

<?php the_content

Archives php file the_content

3.Replace the above line with, the following line:

<?php the_excerpt(); ?>

After editing:

archives php the excerpt5

Now open your archive pages (tag/category), and you will only see the post excerpts instead of full posts.

Now your archive pages will show first 55 words of the blog post as excerpt.But you can still personalize it.Either you can use ‘Post Excerpt’ field under your WordPress WYSIWYG editor or you use “more” tag present under “HTML” mode in your post editor.

More Tag:

Using ‘more’ tag splits your post into parts, and adds ‘Read More” link

More tag in WordPress Post editorOr use ‘Excerpt’ field under the post editor in WordPress

Excerpt field in WordPress Post editor

Note: If you are using some professional theme, you may not find archives.php or other files in your theme template files.

Install Windows 7 using Microsoft USB/DVD Download Tool

We have already discussed the Installation of Windows 7 from a USB Device without using any external software. The technique we used was easy, but now a days people want automation. Just install a program, let the program handle everything. No headache, no worries. As this is the current trend, we are sharing this fully automated method of making a bootable USB device for installing Windows 7 using the Microsoft Windows 7 USB/DVD Download tool.

But we need to download a software from Microsoft store for this method. In case, if you don’t want to download any software, you can use this technique:

Install Windows 7 or Vista Using Bootable USB Disk Drive

Now to start, check the requirements and then follow the steps below.

Requirements:

1. A USB Drive of minimum 4GB space

2. Windows 7 installation ISO file

Step 1: Download Windows 7 USB/DVD Download tool from the Microsoft store

Link: Click here to download Windows 7 USB/DVD Download Tool

Password: techrena.net

Size: 2.6 MB

Step 2: Install the tool in your computer.

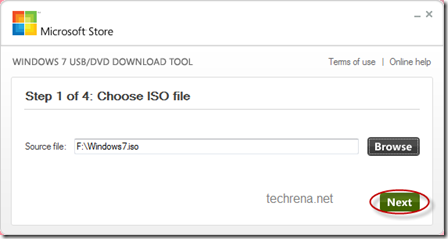
Step 3: Connect your USB Flash Drive or Pendrive. Open the program. Click on Browse to select the ISO file.
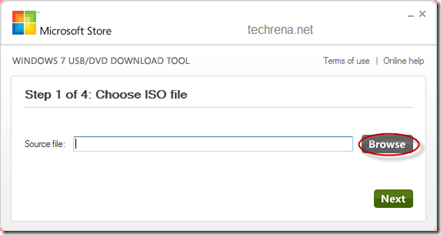
Microsoft Windows 7 USB/DVD Download tool

Step 4: Select the proper Windows 7 ISO file and click Open. Then Click Next.

Microsoft Windows 7 USB/DVD Download tool

Microsoft Windows 7 USB/DVD Download tool

Step 5: Now Click On USB device. If you want to burn the ISO to a DVD, you can select the DVD mode.
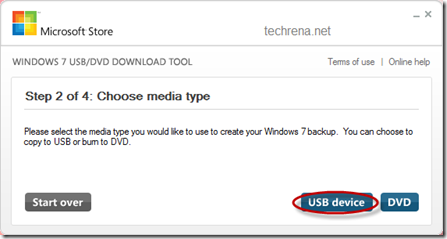
Microsoft Windows 7 USB/DVD Download tool

Step 6: Select the correct USB device from the drop down menu. If your Device is not seen in the menu, connect it properly and then press the refresh button which is present right next to the menu. After selection, Click on Begin copying. Note that, this will process format your USB Device. All unsaved data will be lost.
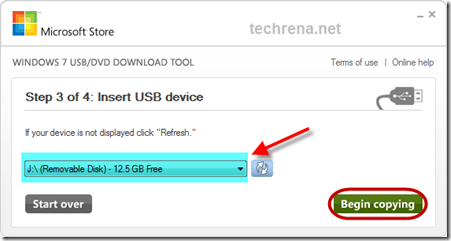
Microsoft Windows 7 USB/DVD Download tool

Step 7: Now the tool will make your USB disk drive Bootable and then copy the files to it. After completion of the process, you can use the USB device for installing Windows 7.
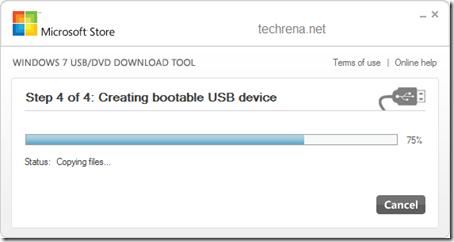
Microsoft Windows 7 USB/DVD Download tool

Note:

1. To start the installation you need to boot from your USB device. In order to boot from your flash drive, you have to change the boot menu. Many computers have DELETE, F10, F2, F12, ESC keys as Boot menu key (the boot menu key information is usually displayed during Start Up). In the boot menu Select USB Diskette on Key and boot it from the USB.
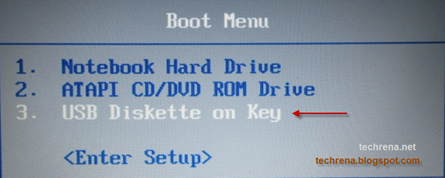
Windows 7 install from usb

Now the Windows 7 installation will boot,  follow the instructions to install.

2. If you do not have the ISO file or if you have only the DVD or the installation files in your hard drive, then you cannot use this tool, you need to follow the technique given here: Install Windows 7 or Vista Using Bootable USB Disk Drive

3. Windows 7 USB/DVD Download tool is a property of Microsoft. It is intended to be used according to the terms and conditions provided by Microsoft Corporation. Techrena is not responsible for any kind of misuse of this product.
Opera 10.50 Beta Available For Download

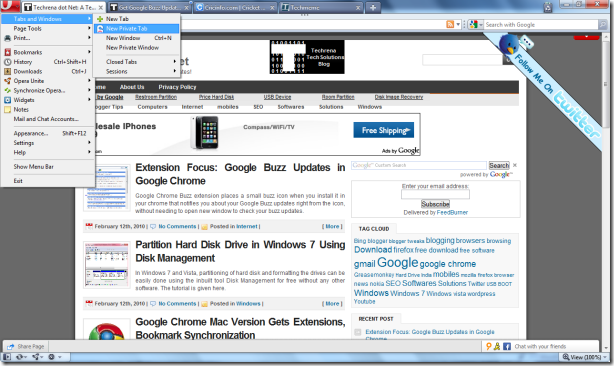
Opera has released the beta version of their browser Opera 10.50 which Opera claims as the fastest browser on Earth.The new JavaScript engine that they have included in Opera 10.50 beta release makes it faster than the current version of Google Chrome, according to Opera press release.[Scroll down to the page for download link]

List of new features at a glance:

  • # New clean look
  • # Private browsing
  • # Search right from the address bar
  • # Windows 7 & Vista integration (Windows taskbar Aero support)
  • # New menu bar

Opera 10.50 screen shot

Windows 7 integration [Tabs preview Just like in Internet Explorer 8]:

Opera 10.50 tabbed windows on the dock

Opera fastest browser claim

Download link: Download Opera 10.50 Beta for Windows

Verdict: Although Opera 10.50 may not look like ‘the faster browser on earth’ that Opera is claiming, it has really improved in performance, speed, design and lot of other things.Good work, team Opera !!

Extension Focus: Google Buzz Updates in Google Chrome

Google Buzz was launched a couple of days ago, and many Gmail users all over the world are still in the process of exploring the various features of it.

And the app developers are busy developing Buzz-based applications just like we are flooded with lots of Twitter apps ever since its launch.

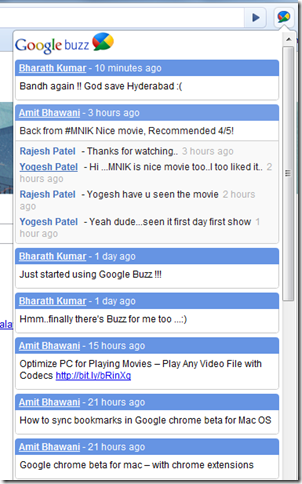
If you have become a fan of Google Buzz and want to have easy access to it, well here’s some good news for you.If you are using Google Chrome, you can make use of the extension called “Chrome Buzz” from the Google chrome extension gallery.

When you install this, you can see all your buzz notifications right from an icon that’ll be placed next to the address bar in Google Chrome.Well, you can just read the buzz updates, but there’s no way you can comment on the updates, make a note.

Google buzz updates in chrome

Partition Hard Disk Drive in Windows 7 Using Disk Management

Creating and partitioning Hard Disk Drives have become very easy in Windows 7 and Vista with its inbuilt Disk Management. We do not need any third party software to create and format Disks in Windows 7. Previously we used to rely on software like Partition Magic etc. but now it has become very easy.

For those who are completely new to partitioning Disk drives, before starting the steps understand the following example:

If you have a drive, say C drive of 200GB and you want to partition it into two more drives, then you need to shrink C drive first. Suppose you have shrunk it to 100GB, then you will have 100GB of unallocated space. Now you can create new drives from the unallocated space, say first one for 60GB drive, and then you can create the second drive for 40GB. Totally you will have three drives now of 100, 60 and 40 GB respectively, after completing the process.

Follow the steps below to shrinking existing drives and creating new partitions in Windows 7.

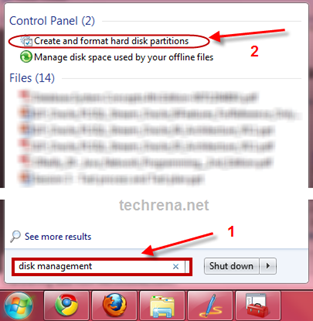
Step 1: Click Start and type DISK MANAGEMENT in the search box. Click “Create and format hard disk partitions” from the search results.

Hard Disk partition in Windows 7

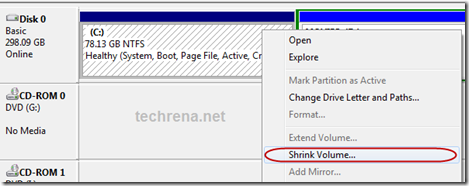
Step 2: After opening Disk Management successfully, you can see the existing drives in your system. Right click on the drive you want to shrink. Click on Shrink Volume. It may take few seconds to configure the available shrinkable volume.

Hard Disk partition in Windows 7

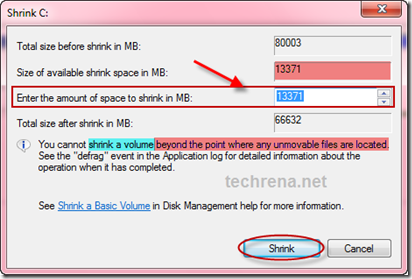
Step 3: Now type in the amount of space(in MB) you want to shrink. It should be less than or equal to the available shrink space. Then click Shrink.

Hard Disk partition in Windows 7

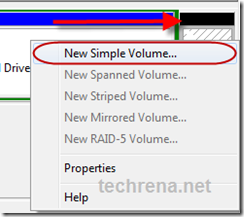
Step 4: After shrinking the volume, you will find a new volume in the right side labelled as Unallocated Space(the one with BLACK colored label). Right click on it, and select New Simple Volume.

Hard Disk partition in Windows 7

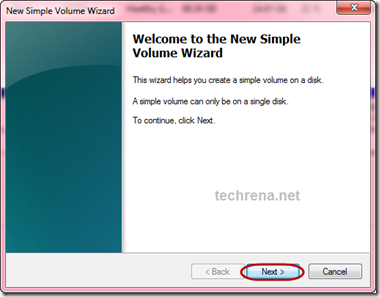
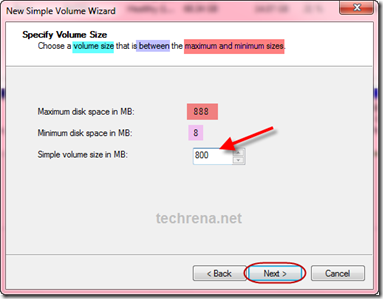
Step 5: Click next in the New Simple Volume Wizard. Then enter the size of the new partition you want to create. It should not exceed the maximum sizes.

Partition Disk Windows 7 e Hard Disk partition in Windows 7

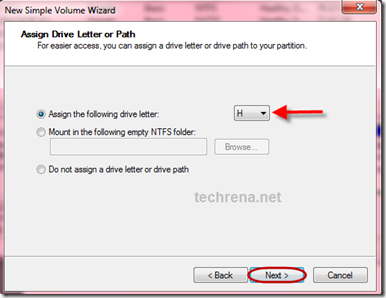
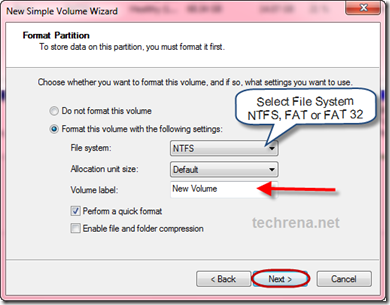
Step 6: Select the Drive letter you want to assign, then click next. Now, select the file system. Usually, we use NTFS(more common) or FAT32.  Type in the Volume label, then click next to format the partition.

Hard Disk partition in Windows 7

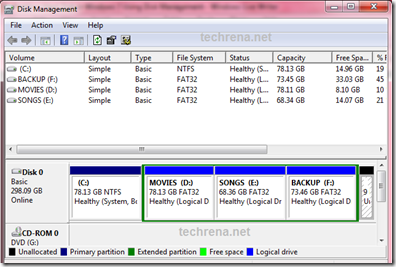
Hard Disk partition in Windows 7 After the formatting is done a new disk drive can be seen. That’s it you have successfully partitioned your hard disk drive. I have created four drives for my computer which is shown below:

Disk Management

Note: This steps will also work in Windows Vista but not in Windows XP.

Google Chrome Mac Version Gets Extensions, Bookmark Synchronization

Hello there, Mac OS folks, there’s a good news for you.Google Chrome has just released it’s beta version for Mac OS with the support for Chrome extensions, Bookmarks sync between computers and lots more other features.

Chrome has just announced the release of Google Chrome beta for Mac.

Google Chrome Techrena

With this new version, you’ll be able to install any of over 2,200 extensions currently available in Chrome’s extensions gallery.You can manage your extensions by clicking on the Window menu and choosing "Extensions."

Download Google Chrome Mac Beta [version 5.0.307]

More tips:You can learn how to use Greasemonkey in Chrome, How to download YouTube videos from Chrome, How to remove most visited sites from Google Chrome.