[Tip] Disable Threaded View In Gmail

Gmail logo

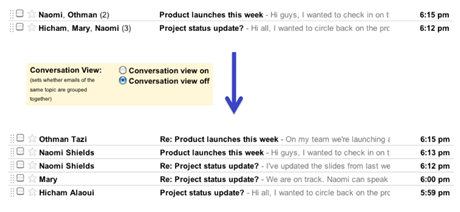
Gmail’s conversation view is without any doubt, one of the key factors that has helped Gmail emerge as the most used web based email program on the internet. While the normal users like us enjoy related email messages being grouped into threaded conversation messages thus making your inbox not to be cluttered with mails, but there have always been some people who don’t like this feature, as they like the traditional or classic way of email, the one with unthreaded messages. For those minority uses, who still want to see their mails in the traditional format, without the threaded conversation view, Google has just added the feature that lets you enable or disable this feature for their accounts.

threaded and non-threaded in gmail

Follow the steps to disable the conversation view in your Gmail:

1. Log into your Gmail account.

2. Click on the “Settings” link on the top right corner. Alternatively, you can click on this link once you are logged in, this will directly take you to the Gmail settings page.

Settings link in Gmail

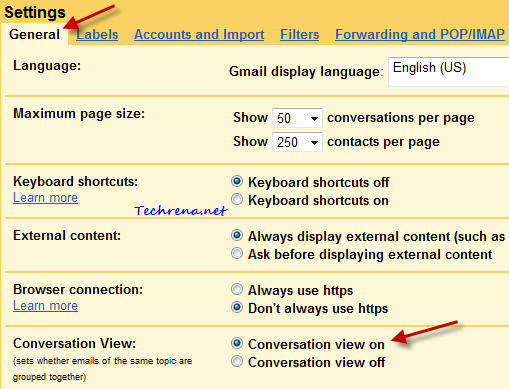
3. Under the “General” tab, find

Gmail settings for conversation view

4. By default, the conversation will be set on. To disable the threaded conversation, select “Conversation view off” button and click “Save changes” button.

Conversation view off

From now on, you won’t see the email messages being threaded to form conversation view. So any reply or related message that you get to a particular mail will be shown with the corresponding symbols as the case with any other classic email clients (for instance you will get RE:.. for any reply you get to the mail that has been sent by you).

[How To] Disable Session Restore In Firefox

firefox logo

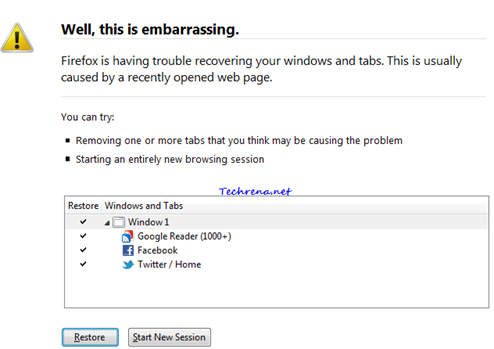
Firefox has a pretty useful “Session Restore” feature that lets you recover the opened sites when the browser crashes all of a sudden. In the latest version (Firefox 3.5+), Firefox has even allowed the users to restore only a certain number of tabs that were open just before the Firefox had crashed.

Session restore prompt in firefox

Even though highly useful and recommended, you might want to disable this feature for your very own reasons. With a little bit of effort, session restore can be disabled altogether from Firefox.

In this tutorial, let us see how to disable the session restore feature in Firefox via Firefox configuration settings page.

Steps:

1. Launch Firefox.

2. Type about:config in the address bar and press enter.

3. Accept the warning (This might void your warranty..) and proceed to the next page (click I’ll be careful, I promise!)..

This might void your warranty

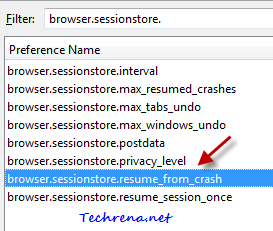
4. Type “browser.sessionstore” in the Filter and look for the entry “browser.sessionstore.resume_from_crash”.

session restore firefox settings

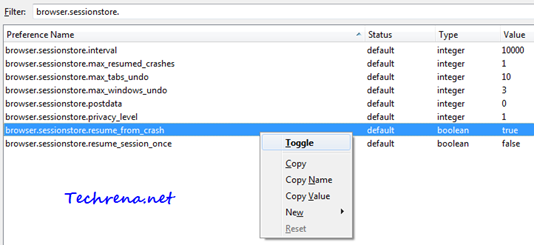
5. By default, the boolean value will be “true”. Right-click on the entry and choose “Toggle” to set the value to “false”. Close and restart the Firefox.

Browser session restore settings in firefox

Now you have disabled the Session Restore feature in Firefox. You will not be asked to restore the last opened tabs after the browser crash, instead the homepage will be opened.

[Tip] Clear Cookies And Cache For A Particular Domain In IE9

Internet Explorer 9

Microsoft’s latest innovation Internet Explorer 9 is slowly turning out to be the best ever browser that the Redmond based software giant has ever produced. With all the positive reviews creeping in from most of the users and experts, IE9 can now be viewed as the browser that will dominate the internet in the upcoming years. If you haven’t explored IE9 fully, yet there’s absolutely no reason why you should start doing it right away now.

There’s one useful feature in IE9 that most of us might not be aware of. Until now to delete cookies in the browser, we needed to delete the entire browser cache, in the same way, to delete cookies, we had to delete all the stored cookies. It’s not the same anymore with IE9. Thanks to IE9 developer tools, you can now clear cookies or clear cache for a particular single domain in Internet Explorer 9. It can be done if you follow the steps briefed below:

1. Open the Internet Explorer 9.

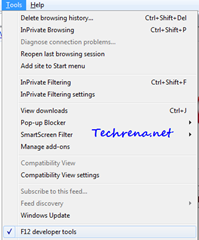
2. Press F12 to open the Developer tools. You may also access this via Tools (by pressing ALT) > F12 developer tools menu item.

Developer tools menu item

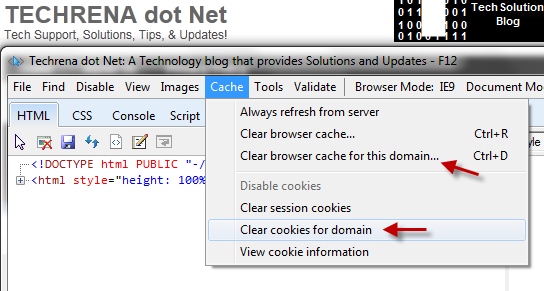
3. In the developer tools, you will see two options:

i) Clear cache for this domain

ii) Clear cookies for domain

Clear cookies and cache for this domain in IE9

These two options are very much handy especially if you are a developer.

[Download] KB2300535 Windows 7 Update

Along with KB979538, Microsoft has also released KB2300535 for Windows 7 based systems. KB2300535 addresses the issues with Windows Ribbon in certain applications running on 64-bit systems or 32-bit systems with the /3GB switch enabled.

Windows Update

When you run a certain application that uses the /largeaddressaware option (Windows Live Movie Maker for instance), on Windows 7 or Windows Server 2008 R2 systems, Windows Ribbon sometimes may not be displayed correctly and then the whole application doesn’t work on the expected lines. Microsoft released the supported Hotfix for this issue as well. Until now, users needed to download this Hotfix from Microsoft website to address this issue.

The update KB2300535 is available as Windows6.1-KB2300535-x86.msu and Windows6.1-KB2300535-x64.msu (file size: 1.8 MB for 32-bit systems and 2.9 MB for 64-bit systems). Download the file (strictly for Windows 7 systems) from the link given below. You need to restart your computer after installing this update.

Download KB2300535 [x86 link] [x64 link]

[Download] Windows 7 Update KB979538

Microsoft has just released a new update KB979538 to address issues with Windows 7 while using a USB video device. The issue may include unexpected shutdowns or bluescreens while using the USB video device.

KB979538

The issues with USB video devices arise because of a race condition in the USB Video driver when the device is unloaded. If you didn’t know, Microsoft had already released a Hotfix to solve the issue for those Windows 7 machines that were severely affected by the issue. But now Microsoft has decided to release a software update that can be applied to all the Windows 7 machines irrespective of the issue with the USB Video device being small or severe.

Find the download link below to download the Windows update file called “Windows6.1-KB979538-x86.msu”, 336 KB in size. Restart the computer after installing this update.

Download KB979538

Disable Internet Explorer First Run Welcome Screen Pop Up

When you install Internet Explorer 8 or IE9 and launch it for the first time (or even when you reset the settings), you might have noticed the Set Up Windows Internet Explorer 8 (applies to Internet Explorer 9 as well) screen (Tour and RunOnce) appears asking you to go through a few steps to change the configuration of the search and accelerator settings.
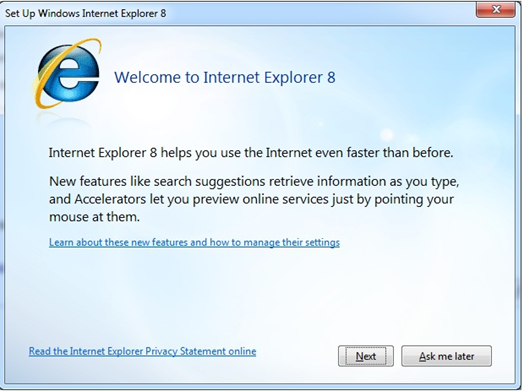
IE8 Set Up Welcome Screen

You might not want to see this popup every time you install IE (IE8 or IE9) or reset settings in IE. Unfortunately Microsoft hasn’t made it easier to disable this initial set up. However there are workarounds to achieve the same.

In this post, I’ll discuss about different methods to disable this initial set up popup:

Method-1: Using Group Policy Editor:

If you are using Professional, Ultimate or Enterprise versions of Windows 7 or Vista, you can tweak Group Policy Editor (gpedit) to disable the initial set up for Internet Explorer 8/9.

1. Press Start button + R and type “gpedit.msc” in the text field and press Enter to launch the Group Policy Editor.

2. In the left pane, expand User Configuration, then find and expand Administrative Templates, next find Windows Components under it and expand it. Then finally find “Internet Explorer”, click on it.

So the path would be: User Configuration> Administrative Templates> Windows Components> Internet Explorer

4. On the right pane, find “Prevent performance of First Run Customize settings” and double click on it. A new settings window will open up.
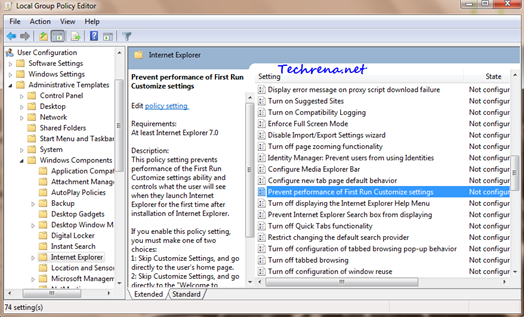
IE settings in GPEDIT

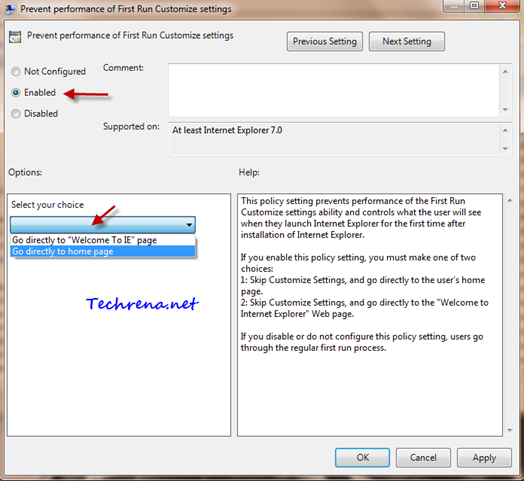
Prevent Performance of First Run Customize settings

5. Set the value to “Enabled” and then go for the options section. You will have two options from the dropdown menu:

i. Go directly to “Welcome To IE” page

ii. Go directly to home page

Select the first option (i) to skip the IE first run Customize Settings and go directly to your home page.

Select the second option (ii) to skip the IE first run Customize Settings and and go to the “Welcome to Internet Explorer” page directly.

6. Click Apply to save the settings then click OK and close the Group Policy Editor window.

Method-2: Using Registry Editor:

Warning: Using Registry Editor to modify Registry settings without much knowledge is deemed dangerous as it may cause some serious problems. Proceed to the Registry Editor at your own risk.

1. Press Start button + R to open run command dialog box. Type “regedit” and press OK to open the Registry Editor.

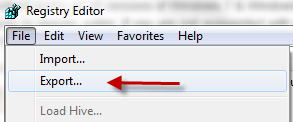
2. Before we work further, save a backup of the Registry Editor. Go to File > Export and save the .reg somewhere on your Hard disk or USB disk drive.

3. Navigate to the following path carefully in the Registry Editor:

HKEY_LOCAL_MACHINE\>Software\>Policies\>Microsoft\>Internet Explorer\>Main

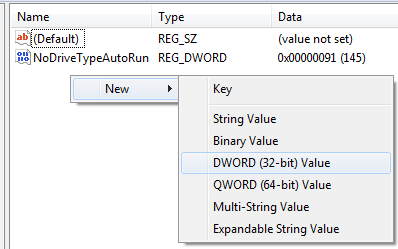
4. Right click on the right pane and select New > DWORD (32-bit) Value.
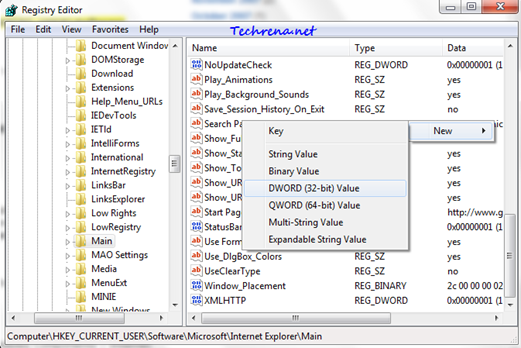
IE8 regedit

5. Give it a value DisableFirstRunCustomize as shown:

DisableFirstRunCustomize

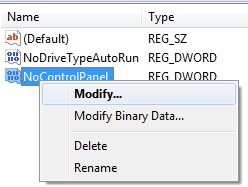
6. Now right-click on it and choose “Modify”.

DisableFirstRunCustomize modify

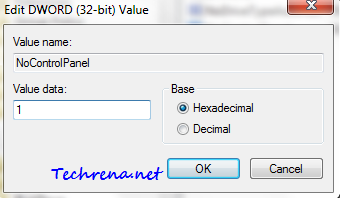
7. Modify its DWORD (32-bit) Value to “1” from “0” and click OK.
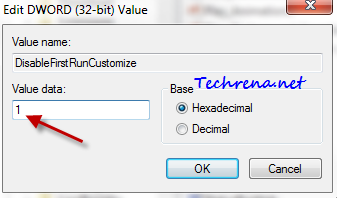
DisableFirstRunCustomize edit DWORD

8.Exit the Registry Editor.

Note: If you follow the Group Policy Editor method, the settings will be applied to all the users accounts, where as if you follow the Registry Editor method, the settings will effect only the currently logged in user account.

WordPress.com To Be The New Blogging Platform For Windows Live Users

Windows_Live_WordPress

So here is some big news, Windows Live Spaces is dead ! All the Windows Live Spaces users (bloggers) will now be shifted to the WordPress.com, which is going to be the default blogging platform for all Windows Live users.
This was announced by Dharmesh Mehta, Director of the Windows Live Product Management at the TechCrunch Disrupt.

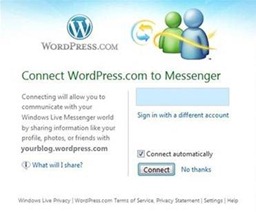
All the existing users need to upgrade their current Windows Live Spaces blogs (there are 30 million of them !) to WordPress.com. This collaboration means that you can use Messenger Connect, to share your blog content with friends over Windows Messenger, each new post will be sent via notification to your friends in Windows Messenger.

WordPress and Windows Live Messenger

The migration may be a bit tricky as it changes your current URL and redirects it to the new WordPress.com URL (there won’t be significant traffic loss though). You can start the migrating process right now at the moment by visiting your Live Space blog. For more information about, read the official post from Windows Live Blog.

[Tip] Change The Default Menu Bar Position In Internet Explorer

Internet explorer logo

If you are using Internet Explorer 7, 8 or even the latest IE9 beta, you might have noticed the change in position of the menu bar from IE or even from other browsers like Firefox, which shows the menu bar above the address bar. Of course, even though there’s no harm when the menu bar is at the top or beneath the address bar, but given the fact that you might have been accustomed to using it at the top. Here we have come up with a small tweak involving registry editor, which can change the position of menu bar in the Internet Explorer.

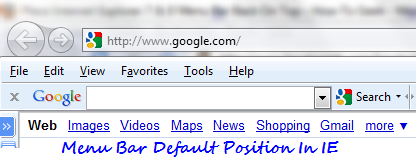
Default menu bar position in IE:

menu bar position in IE

As you can see the menu bar is located beneath the address bar (location bar) in the Internet Explorer. Follow the steps mentioned below to change its position:

Steps:

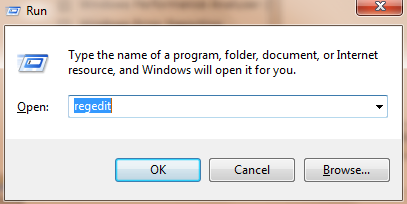
1. Press Start button + R to open the run command bar. Type “regedit” and press enter.

regedit run command

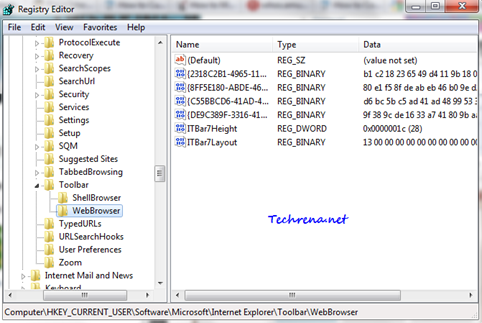
2. In the registry editor, navigate to the following path:

HKEY_CURRENT_USER> Software> Microsoft> Internet Explorer> Toolbar> WebBrowser

Registry Editor webbrowser

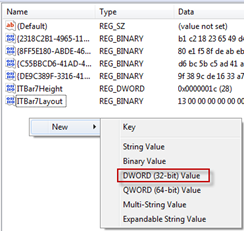
3. Right-click on the right hand side pane and select “New > DWORD (32-bit) Value“.

New DWORD

4. Give the DWORD value ITBar7Position:

ITBar7Position

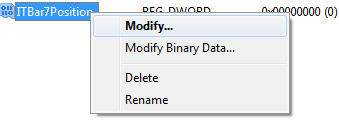
5. Right click on ITBar7Position and choose “Modify”.

Modify DWORD ITBar7Position

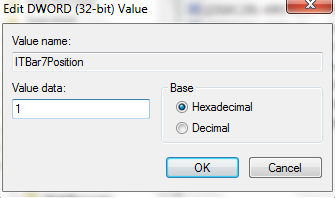
6. Enter “1” under the value date filed instead of “0” and click OK. Close the Registry Editor.

Editing DWORD Value Data

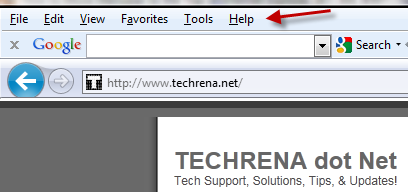
You are done with the tweaking. Open Internet Explorer now and you should see the IE menu bar being moved to top like this one:

Menu bar at top in IE

Warning: If you are a novice user of Windows and doesn’t know much about Registry Editor, stay away from this tweak. A wrong edit at the wrong place in Registry Editor can make your Windows corrupt. Always take a backup of the registry editor before working with it (use File > Export > save location).

[How To] Disable Access To Control Panel In Windows 7

control panel restriction

If your computer is used by many of your friends or family members etc., you might want to restrict access to Control Panel of your Windows 7 (or Windows Vista) so that they won’t mess up with it. Disabling access to control panel means that they won’t be able to modify the default settings of the programs installed and other settings as well.

Here is the step-by-step by guide to disable Control Panel from your Windows 7. It not only disables access to the Control Panel, it’ll also remove shortcuts present for Control Panel in places like Start Menu etc. I’m going to discuss two ways in which you can do it. While the first method only works for Professional, Enterprise or Ultimate editions of Windows 7 or Windows Vista.

Method-I: Using Group Policy Editor

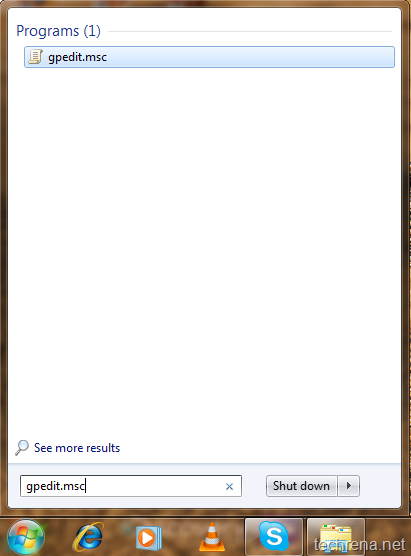
1. Open start menu and type “gpedit.msc” in the search box and open the Group Policy Editor from the results:

Gpedit start menu

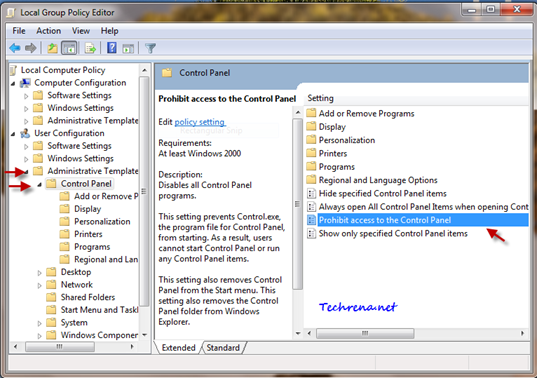
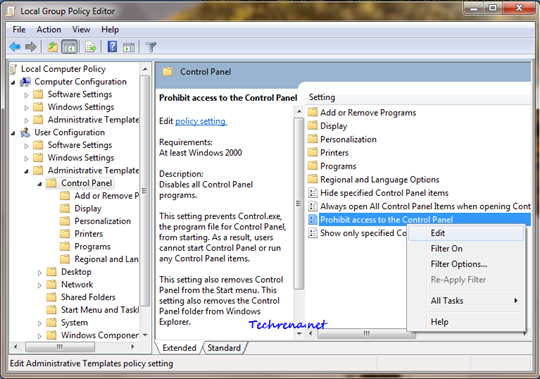
2. In the Group policy editor, expand “User Configuration” and find “Control Panel” under “Administrative Templates” as shown in the screenshot below:

Local Group Policy Editor

3. Find the “Prohibit access to the Control Panel” entry in the right hand side of the window. Either double click on it or right-click and choose “Edit”.

Control panel in Gpedit

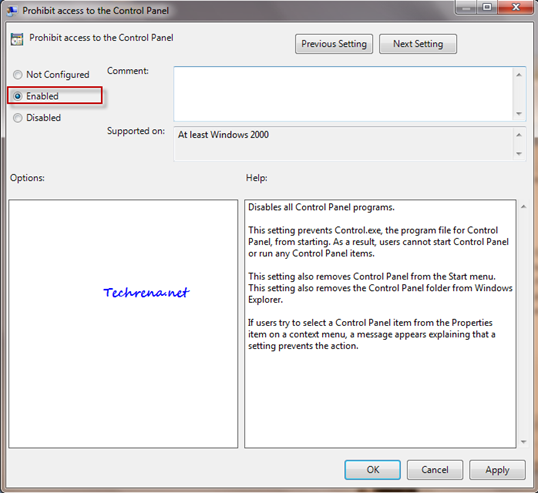
4. Choose the option “Enabled” under “Prohibit access to Control Panel” as shown here.

prohibit access to control panel

Click “Apply” and then choose “OK” to close the window.

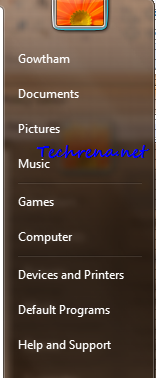
5. Now your Control Panel will get disabled and you can’t even find the link for the same in the Start Menu. Check it yourself:

control panel missing from the start menu

When you try to open it by searching it in start menu, you will get an error:

This operation has been cancelled due to restrictions in effect on this computer. Please contact your system administrator.

Control panel start menu

control panel restriction error

Method- II: Using Registry Editor:

This method works on all versions of Windows 7 & Windows Vista. But this involves a bit of editing the values in registry editor. If you are not acquainted with the Registry Editor much, we strongly advise not to implement this.

1. Press Start + R to open the run command. Type “regedit” and click OK.

regedit run command

2. First take a backup of the registry editor just to be on the safe side. Go to File > Export and save a backup on your computer.

Regedit export backup

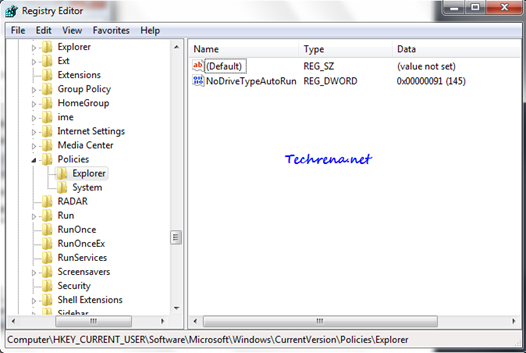
3. Now navigate to the following path in the registry editor:

HKEY_CURRENT_USER > Software > Microsoft > Windows> Current Version> Policies> Explorer

Regedit explorer

4. Right click on the right hand pane and select “New > DWORD (32-bit) Value

Regedit_explorer_new_key

Give it a value “NoControlPanel”.

NoControlPanel

Right-click on the new value NoControlPanel and choose “Modify”.

NoControlPanel modify value

Change the Value Data filed value to “1” from “0” and click OK.

Edit dword value

Close the registry editor and restart your computer and check back. When you check back after rebooting your PC, you will find that the Control Panel is disabled and also is not listed in the Start Menu as shown in the first method.

If you want to enable the Control Panel again, just choose ‘Disabled" (third option) in the step 4 of the first step. In case of the second method, just delete the "NoControlPanel" DWORD Value and the Control would be back once your reboot your system.

Disabling Control Panel is just not enough to restrict users using your PC, If you want to setup advanced controls on your computer, read how to setup parental controls in Windows 7 .

[Alert] Orkut Affected By ‘Bom Sabado’ Worm, Stay Away For Now

orkut logo

If you are an avid Orkut user, you might be aware of this new worm which has just been discovered. This XSS (cross-site scripting) attack was allegedly initiated in Brazil, where the social networking site has the most of users than any other country in the world.

The worm hijacks the user account and sends spam scraps to all those in the user’s friend list. The scraps just contain the words “Bom Sabado” with some links attacked to it, clicking on which the receiver’s profile will also get hacked. The worm adds some unrelated communities to the infected accounts and currently thousands of such attacks have been reported.

Bom Sabado virusBom Sabado worm communities

The word “Bom Sabado” stands for “Good Saturday” in Portuguese, the official language of Brazil.

Tip: If you notice that your account has been affected by this worm/virus, logout from your account, clear your browser cache and cookies and then sign back in, then change your password and secret question for the Orkut/Google account. If you account stands good and no traces of hijacking are found, just stay away from Orkut until the engineers fix the issue.