Activate 2-Step Verification Process For Your Google Account To Make It More Secure

Google 2-step verification

Google had previously announced the new 2-step verification for Google apps users. The same is now being rolled out to all the Google account users. The 2-step verification would make your Google account more secure by verifying you are the real owner of the account that you are trying to access. You can verify your authentication by using a smartphone, or via a SMS text code that you receive similar to how you do it while making online banking transactions or even you could use a landline to verify your identity through a voice call in case you don’t have a mobile phone with you.

How To Enable 2-Step Verification In My Account?

To set up the 2-step verification, login to your Google account and navigate to the Manage Account page, and if the feature has been enabled for you, you should see a “Using 2-step verification” link under Security column in your Personal Settings.

Google account personal settings

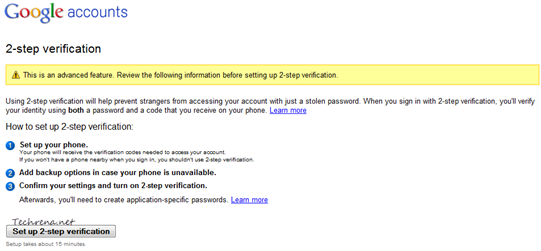
And the whole setup should take about 15 minutes. You will see this page on the next screen:

google 2-step verification setup

Click on the “Set up 2-step verification” to continue and complete the setup process. It involves 3 steps: 1. Setting up your phone 2. Adding backup option when your phone is unavailable 3. Confirm your settings

If you have a smartphone, you can install Google Authenticator application from (available for Android, iPhone and BlackBerry devices).
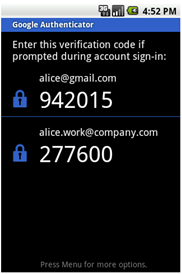
Google authenticator screenshot

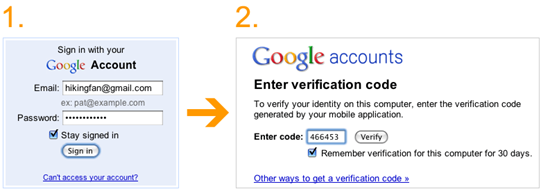
The application generates a verification code that is required in the second step during the sign in. You can also check the “Remember verification for this computer for 3 days” option and you don’t need to re-enter the code again for the next 30 days. In case you don’t have a smartphone, you can receive the verification code through a text message or through a voice call as well. You can also generate application specific passwords to sign in to non-browser based applications that use Google account like mobile Gmail, Picasa or AdWords Editor. But all these are advanced options and might confuse you. For now you have completed the 2-step verification process and you have added more security for your Google account and lets not bother too much about the advanced settings.

[via] Official Google blog

Why Do Adobe Reader Need So Many Updates? – An Open Question To Adobe

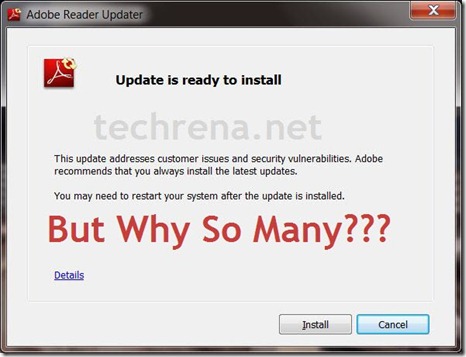
Adobe-Reader-Updater

I am writing this post as an open question to Adobe. Well my questions is “Why do Adobe Reader need so many updates?”.

Today morning, I was in a hurry to book an online ticket. So, I just started my computer in a hurry. Well I expected it to start quickly, but the first Window I saw is what the image above. I thought of canceling  the update and click cancel. But by mistake, I clicked Install and there it goes. After the updation process, it restarted my PC. Quite a frustration for me in such a hurry.

I would not have freaked out so much if it was once a lifetime update but it is not. If I remember correctly, I had updated my Adobe Reader few weeks back.

I can understand why something like adobe flash player might need a few updates, but what I cannot understand is why would a PDF file reader need so many? Do the way of reading simple PDF files gets changed so many times? And why would a PDF reader update need a system restart? Well if my OS is updating then it is quite normal, but a restart for my reader update?

Well I am not the only one asking this question, I am sure that most of the users feel the same and I myself have seen such questions in many computer forums.

adobe-logo

I think we need some kind of real good explanation from Adobe regarding the frequent updates. They should be reminded that there are other good PDF readers around for free.

This is just a plain simple question from an end user of Adobe Reader, unaware of the internal functionality of the product. Hope Adobe can keep up to bring light to us.

[Tip] How To Delete Explorer File Search History In Windows 7

Windows 7 has enhanced search feature that enables users to search for files and folders present in the computer efficiently. The search is faster, more accurate and fetches the results in seconds. Windows Explorer saves and remembers these search terms along with locations of the files and visitors for future use.

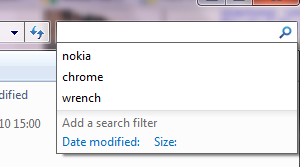
Windows 7 search history

These items will be shown when you start typing the part of the search term of location of a file or folder.While this is pretty useful you might also want to have a choice to delete them when you don’t want them to show up in the Windows Explorer location bar on in the search bar.

The Easy Way:

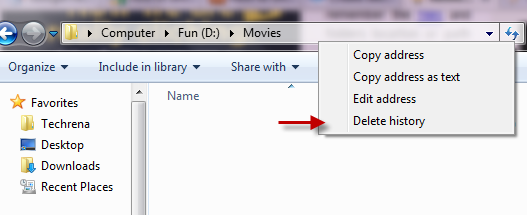
In the Windows Explorer window, right-click on the location bar or address bar when it is out of focus and choose “Delete history” from the context menu. This will delete all the files and folders search terms history that were typed in the location bar and search bar. This should delete the file history in your Windows 7.

Delete file folders history in Windows 7

Alternate Method:

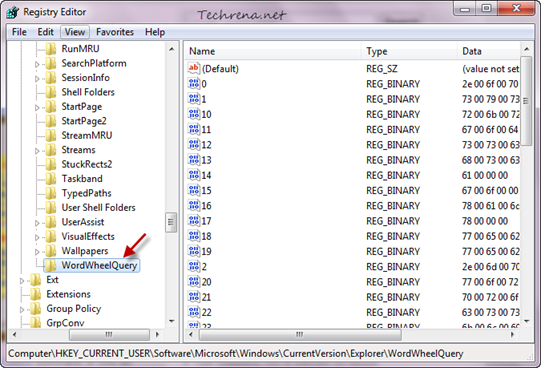
The same can be achieved using Registry Editor as well. Type regedit in the Start Menu search and open the Registry Editor from the results or press Windows button + R to open the Run command and type “regedit” and hit OK to open the Registry Editor.

In the Registry Editor, navigate to the following path:

HKEY_CURRENT_USER\Software\Microsoft\Windows\CurrentVersion\Explorer\WordWheelQuery

Files and folders histoy registry editor Windows 7

and delete all the entries (each one corresponds to a search term) present inside this sub key. That is it. Now all your history related to files and folders would be deleted.

[Tip] Hide Your Facebook Updates From Specific People

Facebook logo

Facebook can be a place for lot of fun.  It has some annoyances too. It all depends on how you use it. Have you ever wondered whether you can post a private post or status update on your post that appears only to certain people and is hidden from other friends? Advanced users of Facebook might very well be aware of how to do this. But if you are relatively new user or never had a clue that such a feature existed in Facebook that allows to set a private post or status update on your wall, read the following guide to quickly learn how to do this:

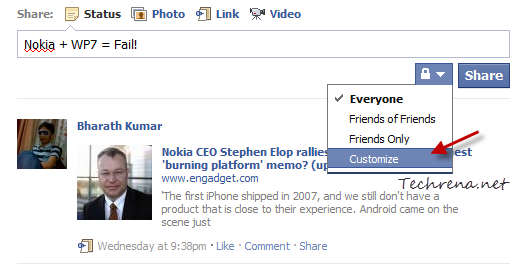
1. Login to your Facebook account, and start post your status update. Click on the small “Padlock” button that is placed just before the “Share” button.

Facebook private status update

Click on the “Customize” button that appears in the dropdown menu list.

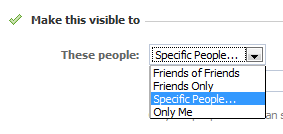
2. In the next window, you will be presented with privacy options for your current status update. As you want only specific people to see your status update, choose “Specific People” from the list under “Make this visible to”.

Facebook status update to specific people

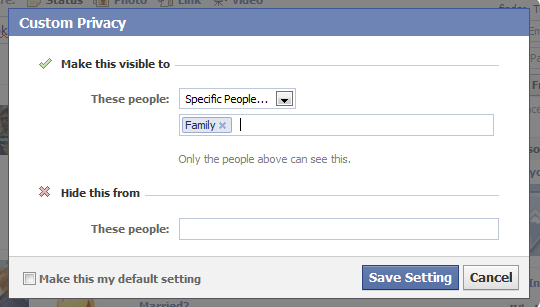
3. You can either choose your friends from Facebook manually or you can create custom friends lists to choose from. To create a friend list quickly, go to your Facebook friends edit page and create a list with your specific friends. If you had already done that, you must now be able to choose a list by typing in the name of the list.

Facebook post visibility

4. Now your status update will only be visible to the people from your chosen list. Or if you want status update to be hidden from few selected friends of yours, you need to enter the names of those friends or friend list under “Hide this from” as in the previous case.

Facebook status update privacy

Click the “Save Setting” button once you are done. Your status update will now be visible to specific people or friends and will be hidden from other friends. You may also check the “Make this my default setting” option to set it as your default setting for other future updates.

[Download] Internet Explorer 9 Release Candidate

Internet Explorer 9

Microsoft has just released the release candidate version of the Internet Explorer 9 for Windows 7 and Windows Vista operating systems. The first public beta of Internet Explorer 9 was released in September 2010. So that was like nearly five months ago. Microsoft has stated that there were more than 2,000 changes incorporated since the release of IE9 beta. Here are the few new feature improvements in the Internet Explorer 9 release candidate.

>> Improved JavaScript Engine (Chakra) Performance

>> Dynamic GPU Usage

>> Lesser Power Consumption Levels

>> ‘Do Not Track’ feature

Other minor improvements include the increase of temporary internet files size from 50 MB to 250 MB.

Download IE9 RC:

Download the Internet Explorer 9 RC (Build 9.00.8080.16413) online setup (from the below links) which needs an active internet connection to download and install the browser on your Windows.

Windows 7 32-bit

Windows 7 64-bit

Windows Vista 32-bit

Windows Vista 64-bit

For more information on IE9 RC release, read this blog post on official IE9 blog.
[Download] Adobe Flash Player 10.2 With Hardware Acceleration

Adobe Flash Logo

Adobe has released the final version of Adobe Flash Player 10.2, which has been in beta since December last year. Adobe Flash Player 10.2 for Windows, Mac, and Linux has some new cool features and many feature enhancements. The new release is 34 times more efficient than its predecessor.

New features in Flash Player 10.2 include:

  • Stage Video hardware acceleration
  • IE 9 hardware accelerated rendering support
  • Native custom mouse cursors
  • Support for full screen mode with multiple monitors
  • Sub-pixel text rendering

The ones that standout among the rest are the “Stage Video” hardware acceleration and the support for full screen mode while using multiple monitors. The Stage Video hardware acceleration speeds up the video delivery process while watching videos on webpages. According to Adobe, Stage Video hardware acceleration can play most online HD videos with just 1-15% of CPU usage on a MAC or Windows PC. Adobe has also recommended users to watch a suggested 1080p HD video to experience the new video performance enhancements after installing the new 10.2 version of Flash. Flash Player 10.2 allows you to work on your primary computer while watching content in full-screen mode in the secondary monitor.

Download Adobe Flash Player 10.2:

Download the Adobe Flash Player 10.2 from the below direct download links for your MAC, Windows or Linux computer. It’s highly recommended that you uninstall the previous version of the Adobe Flash Player before going ahead with installing 10.2.

Windows (2.7 MB – Windows 7 / Vista / XP / 2008 / 2003)

Mac (5.5 MB – Mac OS X 10.4 – 10.6) Update: Link expired

Linux (4.74 MB )

If you are on Google Chrome, read our guide on how to force Chrome to use Flash Player 10.2 (based on 10.2 beta version, but still works!)

[How To] Schedule Emails in Gmail with Boomerang

I would say Google’s Gmail is the best email service. We do not need any introduction to Gmail here.

Well, if you use Gmail this is going to be an interesting post. Here, I am going to write how to schedule your emails. Means you can send or receive your mails at a particular time set by you in prior. Let me explain how it is going to be useful. Say one of your good friend’s birthday is coming and you do not want to miss wishing him. So how do you make it 100% sure that you wish him at midnight? Just write a beautiful email and schedule it to the time you want it to send using Boomerang for Gmail.

Boomerang-for-gmail

Boomerang is an add-on for Firefox and Chrome which lets you to schedule the emails in Gmail.  Follow the following steps to install it and schedule the mails.

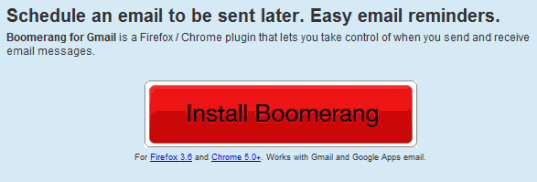
Step 1: Download Boomerang. Click the Install Boomerang button below.

download-boomerang

Step 2: Click on Allow Button to install the Add-on. If you are installing on Chrome, Click the Continue button in the left lower corner of the window. (Click to enlarge the image below).

Install-boomerang

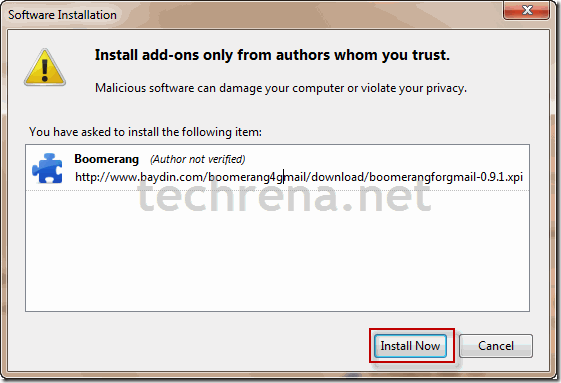
Step 3: Click on the Install Now button to install the add-on.

install-now-plugin

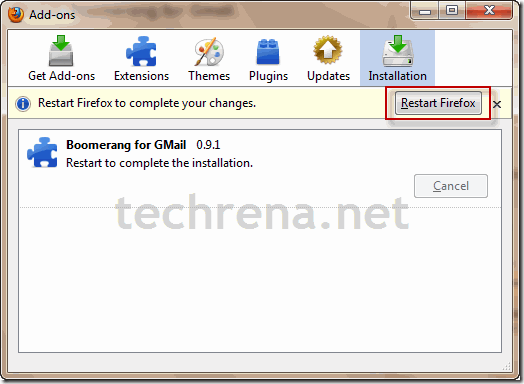
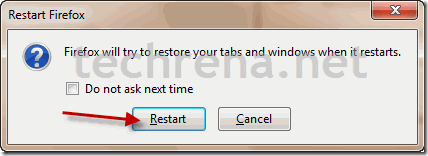
Step 4: After installation, it will ask you to restart the Browser. Restart the Browser to use the add-on.

restart-firefoxrestart-firefox-window

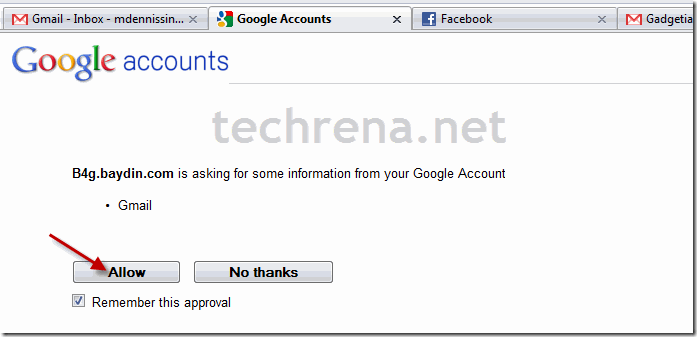
Step 5: Now after restarting the browser Google will ask you if you want to share information to  Boomerang. Click on allow.

allow-information

Step 6: Now you should be able to see Boomerang on the top right corner.

boomerang-installed

As Boomerang is finally installed you can schedule your emails. As follows:

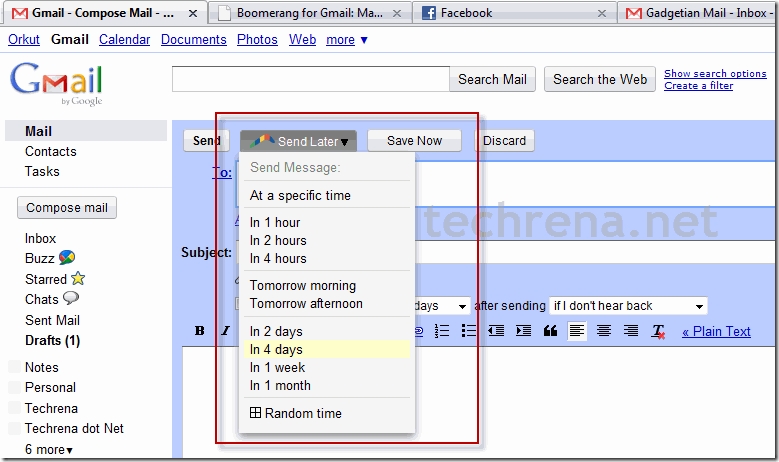
To send a mail at a scheduled time, click on Send Later Button and select any time.

send-email-later

If you select At a specific time, you can enter the exact time and date.

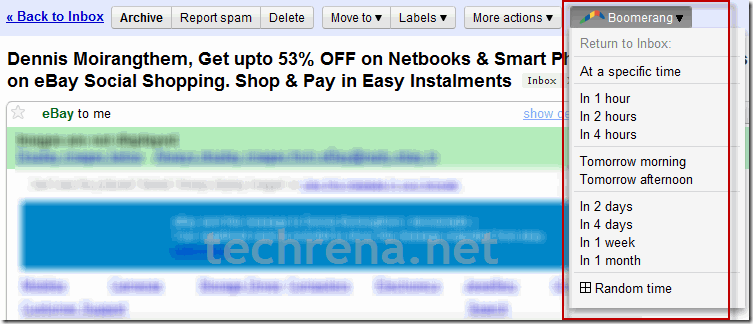
To re-receive an already received mail, click on Boomerang after opening the main and select the time you want it to return to your inbox.

return-to-inbox

I hope that this add-on will be really helpful for all of us.

[Download] Google Chrome 9 Stable Offline Installer

Google chrome 9

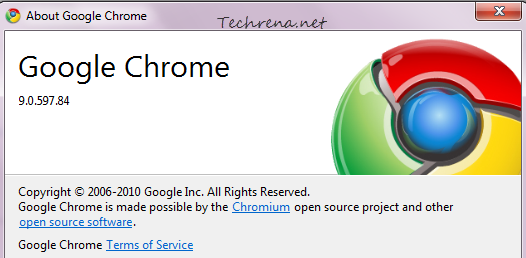
Google Chrome 9 stable version has been released and is coming just after two months of the release of the Google Chrome 8 stable version. Hitting the landmark of version 9.0 (current version 9.0.597.84) is quite a good achievement for the two and half year-old browser from the search engine giant.

The new version includes few enhancements like:

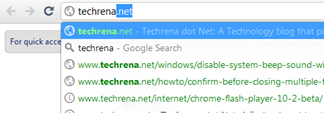
  • Chrome Instant: Courtesy of Google Instant, this new feature in Chrome auto-completes the URL bar with the pages that you visit frequently as soon as you start typing it in the address bar.

Chrome instant demo

  • WebGL: Bings Hardware-accelerated 3D graphics to the Chrome and enables you to experience a rich 3D experiences without needing to install any plugins. Visit the Google’s demo page to test the WebGL capabilities of Chrome browser.
  • Chrome Webstore: The Chrome Webstore (integrated into Google Chrome) has been made available to the users in the United States. Users can quickly access the Chrome Web Store on the New Tab page. (Try Tweetdeck app)
  • About:conflicts: New about:conflicts lets you quickly check for any possible conflicts with third-party software that conflicts with Chrome (Windows only).

Besides these new features, Google Chrome 9.0.597.0 is coming with five important security fixes and Adobe Flash 10.2.

Download Google Chrome 9.0 :

As usual, unless the Google Chrome’s “Auto update silent mode” is disabled, you should automatically get updated to this version if you were using an older one. You can also quickly check for update by going to Wrench > About Google Chrome.

>> Online Installer:

Google Chrome 9 Stable:

Windows (Windows 7, Windows Vista and Windows XP)

Mac

Linux

>> Offline Installer (Full Setup):

Windows (23.96 MB)

Mac (32.35 MB)

Tip: Learn how to make Google Chrome to use Flash Player 10.2

[Tip] Change Wireless Networks Priority In Windows 7

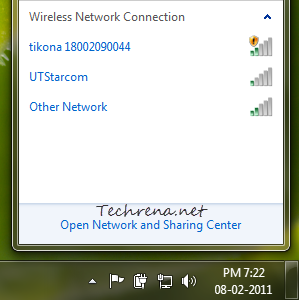
Wireless networks in Windows 7 taskbar

Connecting to a wireless network in Windows 7 is pretty much simple and straightforward compared to the days of Windows XP and earlier operating systems. However if you have more than one wireless network available at your home or workplace, you might want to assign priority to these networks to tell your windows to which it should try to connect first. Al though you can choose to a wireless networks from all of the available wireless networks that appear under the network icon in the taskbar, it would be better if your computer connects to your favored networks automatically. This tutorial explains how you can change the priority or order of wireless networks in Windows 7.

Steps:

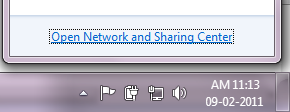
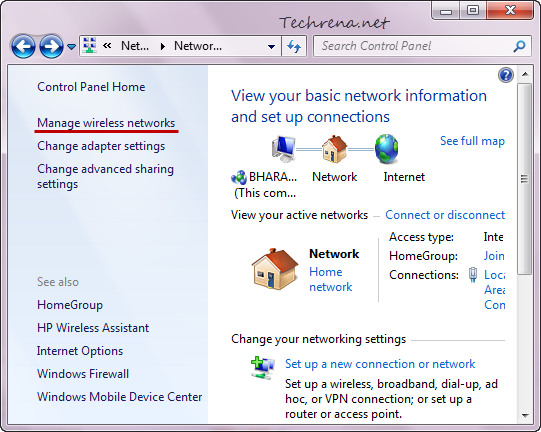
1. Open the Network and Sharing Center either from link in the network icon in the taskbar or from Control Panel > Network and Internet > Network and Sharing Center

Network and Sharing center link at the taskbar

Click on the “Manage wireless networks” link found on the left-hand side pane.

Manage wirelss networks link in the network and sharing center

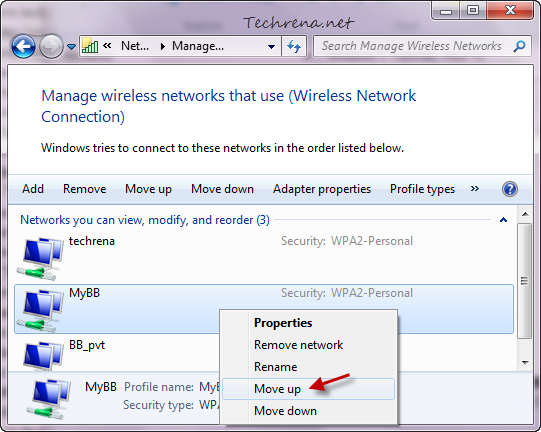
2. In the Manage wireless networks window, right-click on the wireless network for which you want to change priority and you can either move it up (giving more priority) or move it down (lesser priority) depending on your usage.

Move wireless network up in Windows 7

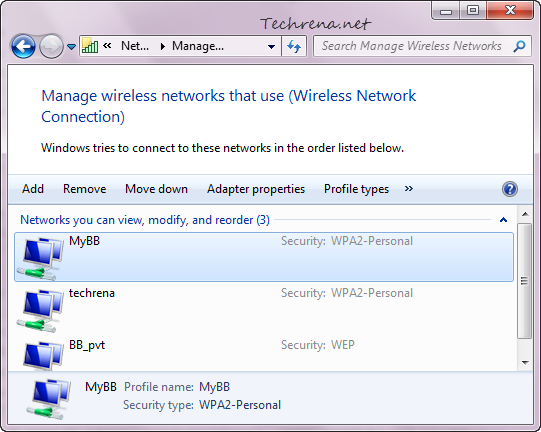
3. Now the order of preference of the wireless networks used by your Windows will be changed.

Wireless-networks-windows-7-priority-changed

You are now done with setting up the priority order for your wireless networks. So from now on, Windows will try to connect to the first one wireless network in the priority list. If it isn’t available, then it will try the next connection and so on. You can also change the settings to not connect to a particular wireless connection automatically.

If you are looking to change the order of priority among the various wired and wireless network cards on your computer, read our popular post on changing the network cards priority order in Windows.

[How To] Delete Cookies In Google Chrome

google chrome logo

This simple step-by-step guide is to teach how to delete individual browser cookies in the Google Chrome browser. Follow the steps carefully to clear or remove individual or all cookies in Chrome.

Steps:

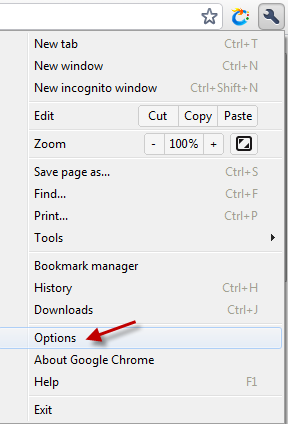
1. Click on the wrench icon Chrome wrench icon tools menu towards the left-hand side of the Chrome window and click “Options” from the list.

Chrome options in the Menu

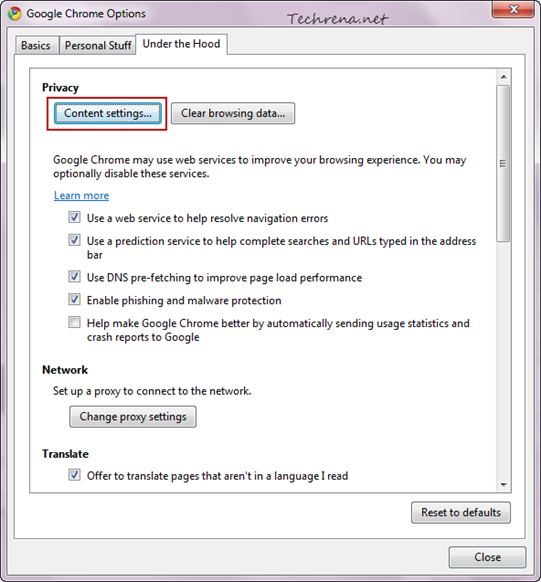
2. And in the “Under the Hood’” tab, click on the “Content settings..” button.

content-settings-chrome-options

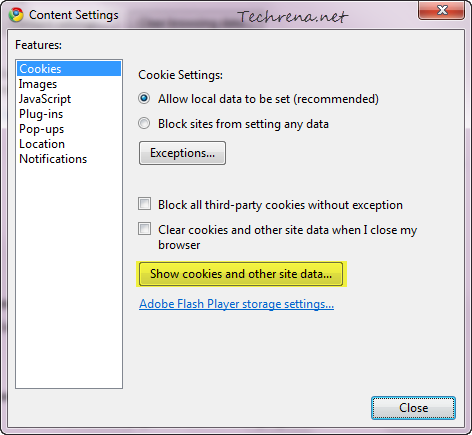
3. Click on the “Show cookies and other site data..” button.

Cookies settings in Chrome content settings

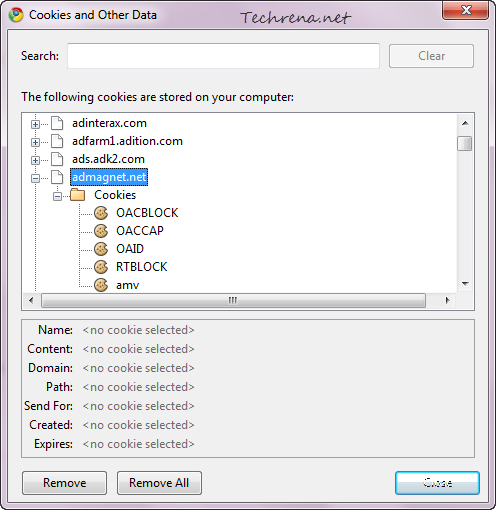
4. Now you will see all the cookies stored for different websites in Chrome

cookies-google-chrome

Select the cookies that you want to delete and click the Remove button delete that particular cookie. To delete all the cookies stored in your browser, click the “Remove All” button. The settings are almost similar on Chrome installed on other operating systems like Mac OS X, Linux etc.