[How To] Create And Enable Mobile Version Of A Blogger Blog

blogger logo

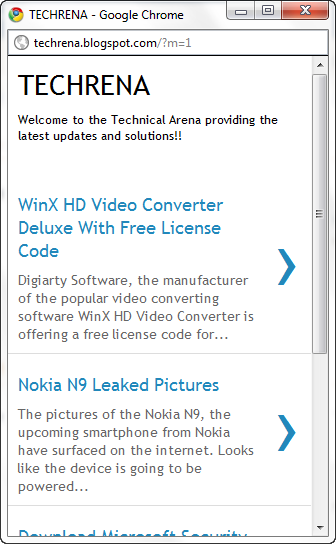
With the growing usage of iPhones, Android devices and other smartphone devices around the world, the number of people who access the internet from their mobile devices. Considering this, it is now very essential that you create a mobile version of your website or blog just to make sure that it fits perfectly on the screens of such devices. If you are a blogger and using WordPress, it’s pretty much easy to setup a mobile version of your blog with plenty of plugins serving the purpose. But what about Blogger? If you still don’t know, the answer is Yes! now you can. Blogger has recently announced the mobile templates for Blogger. But this now is available as an opt-in functionality on Blogger in Draft.

Here’s how you setup and active a mobile version for your blogspot blog without using any hacks:

1. Log in to Blogger in Draft.

Blogger in draft

2. Click on the “Settings” link for you blog

Blog settings link on Blogger dashboard

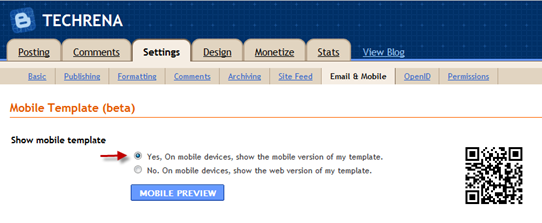
3. Go to the “Email & Mobile” tab under “Settings”.

Email & Mobile tab under blogger blog settings

4. Under the Mobile Template, choose the first option (Yes, On mobile devices, show the mobile version of my template).

Mobile Template in Blogger

5. You can click on the “Mobile Preview” button to see a preview of how your blog will look on a mobile device

Blogger mobile preview

6. Click the “Save Settings” button at the bottom once you are done.

save settings button in blogger

You have successfully enabled the mobile template for your blog now. Test it by visiting your blogspot blog from a mobile phone or use the QR code found in the mobile template settings to directly go your site on your mobile device.

techrena QR code

[How To] Change The Favicon In Blogger

Change default favicon in Blogger

If you have landed here while searching for changing the favicon in blogger, this itself is a indication that you know something about the favicons. Even though I assume that you know a bit about favicons, let me quickly introduce the concept of “favicon” :

Favicon (pronounced fav-eye-con) is the short name for “favorites icon” and is otherwise called as a shortcut icon. It is a 16×16 (most common) or 32×32 pixel square icon that is shown next to the URL of any webpage in a browser that supports tabs like Firefox, Google Chrome, Opera or Internet Explorer 7/8 etc. It is also shown in bookmarks or favorites, when you bookmark (in Firefox, Chrome or Opera) or when you add a site to favorites (in Internet Explorer). Many websites use well designed favicons as branding for their site and it also enables their site to be distinguished from other sites easily.

Wikipedia Favicon

If you are using Blogger blog, you might have already noticed that Blogger shows default favicon Blogger faviconnext to the URL of your blog as shown here:

blogger favicon example

Usually if you want to change the favicon of a website, you need to upload the new favicon file to the root folder of the website and the new favicon appears in your website immediately. But it’s not the same case with Blogger. As the user doesn’t have control over the files hosted on Blogger, the only way you can change the favicon in a Blogger blog is to upload that favicon to a free image host that supports uploading of .ico formats and then tell the Blogger to use this favicon instead , by specifying it in a short code inside the HTML source code of your blog template. Let’s look into the step-by-step guide on how to get this done.

Steps:

1. Design an attractive favicon for your site using many online favicon generators online. I’m quoting a few such tools here:

favicon.cc

favicon.co.uk

antifavicon.com

iconj.com

2. Once you have designed and downloaded the favicon on to your desktop, you need to upload it to a host site where you have access to upload the favicon file and retrieve it later. I suggest you try some image hosting sites that allow the uploading of .ico files. Iconj.com mentioned in the above list supports uploading and hosting your .ico files as well.

3. Now note down the URL of the file located on the image host.

4. Login to blogger.com and go to your dashboard. Click on the “Design” tab under your dashboard.

design link in blogger dashboard

5. Now click on “Edit HTML” tab found under the “Design” tab.

Edit Html under design in blogger

6. Find the <head> and </head> lines in the HTML code.

7. Copy the following code:

 <link href='http://www.your-icon-url' rel='shortcut icon' /> 
 <link href='http://www.your-icon-url' rel='icon' />

Replace “www.your-icon-url” in the above code with the actual URL pointing to the new favicon file of your site. Example:

<link href='http://www.techrena.net/favicon.ico’ rel='shortcut icon'/>
<link href='http://www.techrena.net/favicon.ico’rel='icon'/>

8. Paste the modified code anywhere in the HTML code, but it should be placed after the <head> and before </head> section [Tip: Use Ctrl + F to find these lines] in the HTML code. Click “Save Template” to save the changes to the code.

favicon code in blogger html design

9. The new favicon may take some time to appear in your browser. You may not see it until your browser clears its local cache. To see the new favicon instantly, try Ctrl + F5. If it doesn’t show up, try opening your blog in another browser and you will see the change

New favicon

If you liked this post, you might also want to read our earlier exclusive posts about Blogger : How to verify Blogger blog in Webmaster tools, Blogger title tweaks for SEO and swapping Blogger blog title and post title.

[How To] Set up Custom Domain Name For Your Blogger Blog

Blogger logo

This for those who has a Blogger (..blogspot.com) blog and want to upgrade it to use your own custom domain like www.example.com instead of your current example.blogspot.com. First up, you should know why should you migrate your blog to a custom domain. The advantages with using a custom domain instead of a Blog*Spot (..blogspot.com) subdomain are:

Your blog URL becomes reasonably short and you can choose a catchy domain name that will make your regular blog readers to remember the blog URL easily.

You can have a blog at the domain root folder (like example.com) and this has clear advantages in terms of SEO and PageRank aspects. For instance Alexa sometimes may not rank blogs that are located on subdomains like blogspot.com, it only works well with the sites that are hosted on the root folders.

Fortunately, Blogger supports publishing on a custom domain and offers free unlimited hosting and bandwidth for all of your content associated with your blog. So you don’t need to look for a hosting service and pay it for hosting. Let’s see how a naive Blogger user can start using a custom domain name for his/her Blog*Spot blog.

The Actual Process

>> To start with, login to blogger.com with your Google account and go to your Blogger dashboard.  Click on “Settings” link under your Blog entry in the dashboard.

>> Find “Publishing” tab under the Settings and click on it. You will see the following:

Publishing on blogspot.com settings

>> Click on “Custom Domain” link to get started with the custom domain.

buy domain through blogger

Now you have two options. You can either buy a domain name for your blog from Google (Blogger) itself (charges $10 per year via Google Checkout) or you can buy through some dedicated domain name/hosting registrars, for instance Yahoo Small Business.

>> If you choose to buy the domain from Google, it’s very straightforward and you need not worry about other settings like DNS settings plus you will also get Google Apps for your domain.

However, if you have bought the domain from external domain name registrar, first you need to configure DNS (Domain Name Server) settings for your domain.You must have an option to change your CNAME and A NAME records for your domain, if you find difficulty in changing these records, contact your domain name registrar.

1. Creating CNAME record:

Create a CNAME record for your blog with the following CNAME:

ghs.google.com.
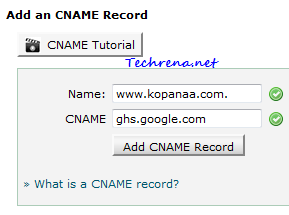
Adding CNAME record

2. Creating an ‘A’ NAME record: ‘A’ NAME records are helpful in redirecting non-WWW URL (naked URL) of your domain (your-blog.com) to a WWW version of your domain (www.your-blog.com).

Create a three ‘A’ NAME records with the name of your domain without the ‘www’ as shown here:

Add the following four such records pointing your naked domain (ex:your-blog.com) to the IP addresses listed below:

216.239.32.21

216.239.34.21

216.239.36.21

216.239.38.21
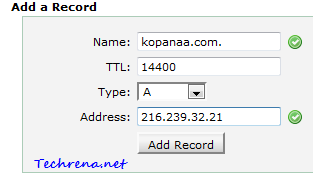
add A NAME record

>> Now, click on the “Switch to advanced settings” at the top corner on your right hand side.

switch advanced settings in Blogger custom domain

>> Enter your domain name (with www) in the “Your Domain” filed. And also select “Redirect your-blog.com to www.your-blog.com” option. You may keep the default options “No” for “Use a missing file host? ” filed.
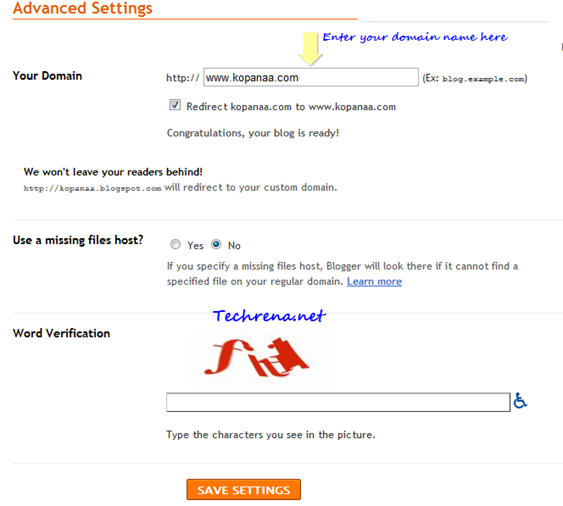
Advanced settings for custom domain in Blogger

>> Enter the word verification and click “Save Settings” to finish the process and save your settings. Now you are done with setting up for your custom domain for your Blog*Spot blog. Now Blogger will redirect all Blog*Spot subdomain visitors to your own custom domain.
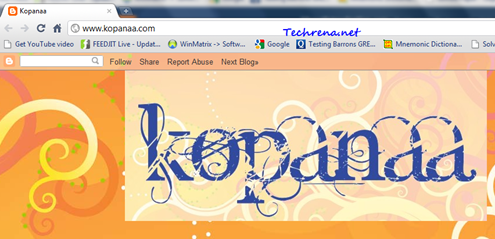
Blogger custom domain output

Initially your new domain won’t redirect itself to your blog as it takes nearly 24 hours for DNS records to be updated. Tip: Use DNS Propagation checker to check how your DNS information has been propagated around the globe in the internet.

Please note that you can only use this feature on domains or subdomains (like your-blog.com or diary.your-blog.com etc.) but not on subdirectories (your-blog.com/diary). All your existing content including images will continue to work as they used to be.

Let’s know if you find any problem while following this tutorial.

New Feature: Blogger Stats Comes To Blogger In Draft

Blogger stats

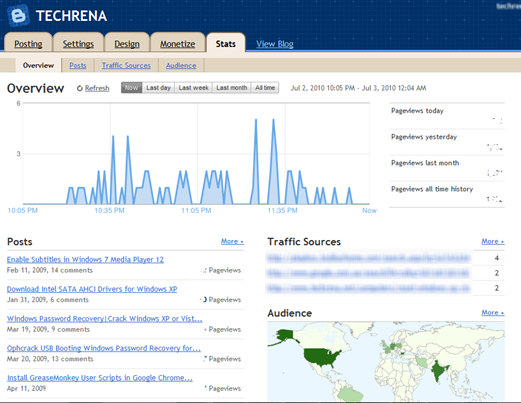
Blogger has just launched a new almost real-time like visits tracking to blogger.com blogs via

Blogger in Draft (which means that it is still in testing phase).

Though we have tools like Google Analytics, people still want to see their visits in real-time. But if you think that you are just a beginner with Blogger and not completely comfortable with all those advanced features in Analytics, then this is probably the one that you just needed.

Blogger Stats offers all basic information about your site visits in a far better easier way. You can see visitors details during intervals of one hour/day/week/month like which posts are getting most visits, the referring pointing to your blog, the geographic location of your visitors etc. [Checkout “Overview”, “Posts”, “Traffic Sources” & “Audience” tabs].

Just login to draft.blogger.com, and checkout the “stats” tab on your blog dashboard to get started.

Blogger stats tab

Create A Facebook Page For Your Website [How To]

facebook_logo

Facebook is undoubtedly the no.1 social networking site in the world.According to Alexa data, it’s next only to Google.It is very much true that majority of the traffic to the most of websites on the internet comes through Google mainly.Similar it is always essential for the website owners to look at sites like Facebook also as traffic sources for their blogs, provided they offer pretty good lovable content that the users on the Facebook like to read.Facebook has made it easier for all the webmasters to integrate Facebook into their sites easier courtesy the Facebook “Like”.

If you are a webmaster the you may be want to know how to create a Facebook page for your website or blog.So we are coming up with thus tutorial that will guide you to create a page for your site in Facebook in 10 simple steps.

Steps:

#1. Go to Facebook.com and login with your ID.If you don’t have an account yet, you must be living in another world, just come back to our world and signup for Facebook now.

#2. Go to Facebook create new page link.

#3. You will now find 3 options:

  • Local business
  • Brand, product, or organization
  • Artist, band, or public figure

Choose the 2nd option, and select “Website” from the drop-down menu.

#4. Give your page a name and click “Create Official Page”.

#5. Now you have created a simple page which is just having name nothing else.So we need to start editing the info about your website.

#6. Add a picture to your website page and edit other information as well from the Info tab.

Change facebook page picture
edit facebook page

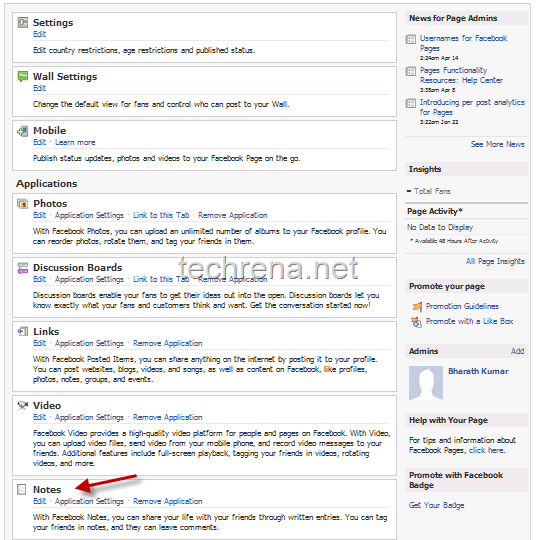
#7. Go to page settings> find a section Notes under Applications.Click on Notes to open and edit notes.

Notes in Facebook page settings

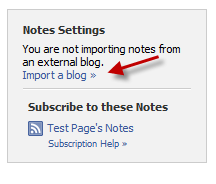
#8. Under the Notes settings, click on Import a blog.
Notes settings in facebook page

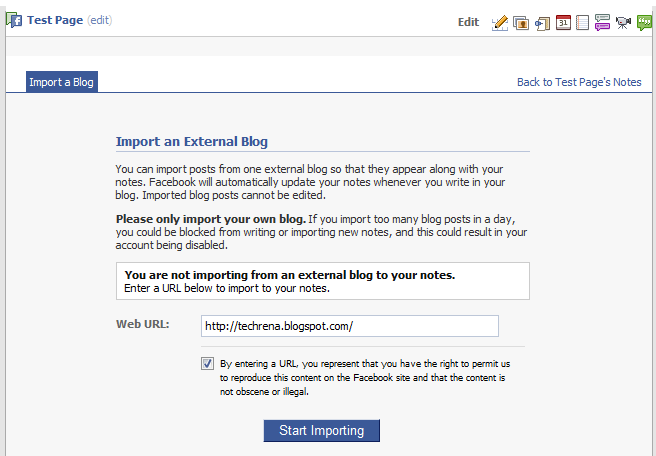
Enter your blog URL in the Web URL field (you can even enter your blog’s RSS feed address) and click Start Importing.

Import a blog in Notes settings in Facebook page

#9. Now you will be shown the preview of the imported blog.Click Confirm Import to finish this step.

Facebook page blog import preview

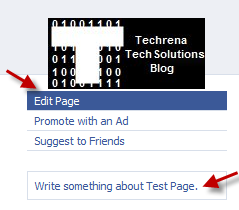
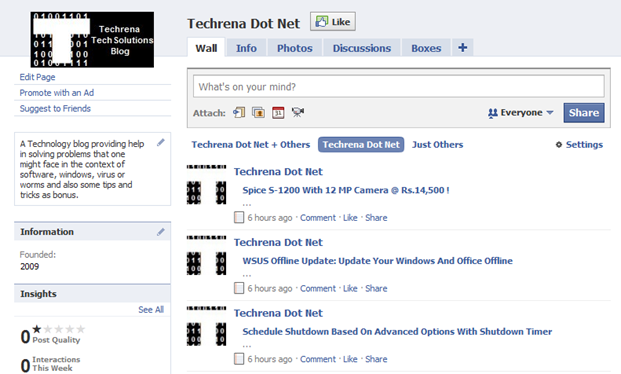
#10. Now you are done with creating a page for your blog.You can also click on “Write Something about your page” link as shown in step #6 to write a brief introduction to your site page.Now your page looks like this, add yourself to the Facebook page by clicking the Like button.

techrena.net facebook page

May be you should also start following our blog in Facebook by clicking the Like button or by visiting Techrena Dot Net Facebook page.

UniverCell Hyderabad IndiBlogger Meet 2010 – A Beautiful Experience

IndiBlogger

I was very much excited for this event as this was my first bloggers meet. The event was interesting in every part of it and didn’t even find a single boring moment (Which usually happens in most of the meets). It was very well organized and beautifully executed. We wholeheartedly thank the IndiBlogger team for organizing such an exciting event and we also thank UniverCell for sponsoring it.

I am putting forward my experience in the whole event below.

Hyderabad IndiBlogger Meet 2010

Image Source: Aditya

Arrival and Startup

I reached the venue at 1:50 PM, which was quite early and I was one of the first bloggers to arrive. The conference hall was almost empty. The IndiBlogger team showed a warm hospitality.

By 2:30 PM the Hall was almost full. But as we were expecting more attendees, the meet started around at 2:40 PM. The IndiBlogger team was introduced to us. We got to know the whole team and got the idea whom to catch if our blog is rejected from IndiBlogger. One of the team member even rode a bike from Mumbai to Hyderabad to attend the meet. The introductory video featuring Adolf Hitler showing his desire for attending the meet to fulfill his hunger for Hyderabadi Dum Biryani was completely superb and hilarious.

30 Seconds of Fame (The Most Exciting one)

We had to introduce ourselves in 30 seconds. I got to know a lot on new people. The blogosphere in Hyderabad included from Movie Directors, Government employees, IT professionals to Mothers, Pensioners, etc. Most of the blogs were about their personal experience, life, social problems. Some were about poetries, songs and others were about jokes, sensible bakwas, humours, nothing, everything and so on.


Some people were nervous about the introduction. And i don’t know why many people compared the intro part with a matrimonial event? It was an exciting one, grey haired people searching for other grey haired ones, jobless people searching for helpers job providers, etc.

Live & let comment

This was another fun part. Mingling with each other, getting to know new people and writing about the person whom you hardly know. Enjoyed every part of it.

My Comment chart was almost filled. So one commenter wrote:

follow@anicode: “This guy is getting a lot of comments. So I am gonna spam!”

My friend Supraja wrote: “Craziest person ever seen”. I didn’t understand why she had to express that I am crazy on the comment chart? Guess she got the guts as it was the IndiBlogger’s meet!

The UniverCell Blogger Quiz by Riyaz Usman

The quiz was an interesting and a well researched one. Many topics and discussions were covered from Wikipedia, facebook, to Tharoor’s Tweet. This part was engaging.

Mingling session / High Tea

We had a good time talking to new bloggers over a cup of coffee. Just felt that we Bloggers had constructed our own identity. As a blogger I felt really happy to see other bloggers around me.

IndiBlogger Forum: Open discussion

In this session we decided an open discussion forum for the Hyderabad Bloggers as hyderabadbloggers.in. Hope we got to meet each other in the forum soon.

At last there was a group photo session. It was fun. Everyone wanted another photo because of the reasons like I didn’t smile!

Confession and A Sincere Apology

I am really sorry that I forgot to return the sketch pen which I got for commenting. Sorry!

Jokes apart, I sincerely thank IndiBlogger and UniverCell for making this event happen. I thank you for the Hospitality and also the T-Shirt. We are looking forward for similar events in future. Our confidence and morale as a blogger has been greatly enhanced after this meet.

Thank You!

Blogger ‘Blog Pages’ Allows You To Create Pages In Blogger

Blogger has just rolled out another feature which has been available in blogger in Draft till now.

This one of the most requested features in Blogger.Now you can publish static information on stand-alone pages like you can create “About Us” or “Contact Us” or “Privacy Policy” pages on blogger (like you do in WordPress) easily.

You can have at most 10 pages in your Blogger blog.Writing these pages is very similar to the way you normally do in the case of posts.

This tutorial guides you to create a simple static page in you Blogger.com blog.

STEPS TO FOLLOW:

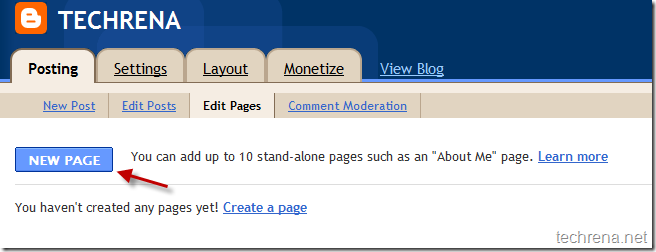
Step 1: Visit Dashboard of your blog in blogger.com and go to the “Posting” tab, under which you find “Edit Pages’ tab

new page link in dashboard

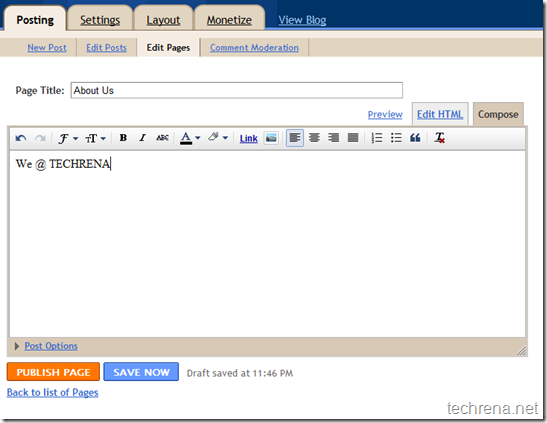
Step 2:Click on “New Page’ to start composing a new page like “About Us” for instance.Similar to writing a new post.Hit the “Publish Page” button once you are done with writing.

Composing new page in Blogger dashboard

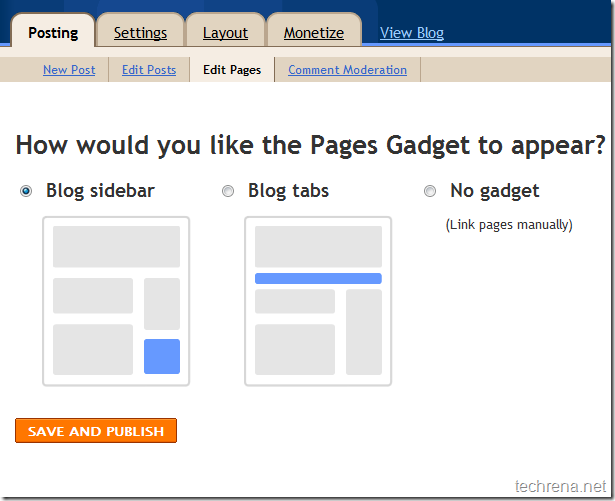
Step 3: Now choose the position where you want the Pages Gadget to appear.You can either chose it to appear along the blog sidebar or on the blog tabs.

Blogger Page Gadget

Pages Gadget in Blogger

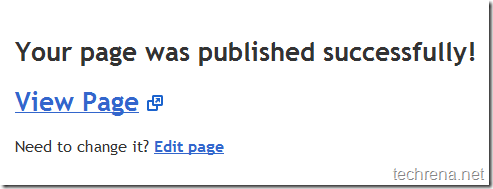
Step 4: Now you can see the page you have composed in browser.

Blogger page published

published page in Blogger test in browser

If you have liked this, why not take time to read about our guides on Optimizing Blogger blogs for better SEO.

Swapping Blogger blog title and post title -Blogger SEO tweak

How To Verify Blogger blog in Webmaster Tools

Blogger Update: New and Improved ‘Next Blog’ Link

From next week onwards, Blogger users will find that clicking on the “Next Blog” link at the top right corner of the NavBar will take them to a blog relating to similar topic.For example if you have a blog written about your favourite electronic gadgets in French, it’s most likely that the click on the Next Blog will take you to a blog written in French about gadgets.

Until now, Next Blog link used to open up a random blog written by a random user in any language.This new feature, according to the blog post in Blogger Buzz, will be rolled out from next week.

blogger navbar next blog link

According to them, using this “You might discover a cool blogger who has hobbies similar to yours, has similar taste in electronic gadgets, likes sports that you’re into, or has similar curiosities and interests.”

Hmm, let’s see to what extent it works.

Blogger Service Interruptions Update on Blogger Status Blog

Blogger team today has posted a blog post saying that the the Blogger users, from now on will be communicated for the likes of interruptions like for instance that occurred on last Saturday on Blogger Status.If somehow even if the Blogger Status blog doesn’t work for you, check Blogger Twitter update on Blogger’s twitter account

Blogger team also clarifies that in case of any significant service interruptions, they plan to publish a post mortem on the Blogger status blog within 3 business days to provide details about the cause for the interruptions and what they are doing to sort it out and to avoid similar problems in future.

Excerpt from the Blog post:

“We don’t like it when our users experience problems like what we saw on Saturday, but we hope the combination of transparency around these issues and our commitment to learn from our mistakes will help assure you that we’re doing everything we can to keep Blogger a robust and reliable service for you.”

Blogger Buzz

BTW, Check out the first “Postmortem on recent issues affecting users in Europe” published on Blogger Status blog.

How To Verify Blogger blog in Webmaster Tools

There has been some changes of late, to the verification process in Google Webmaster Tools for Blogger.com hosted blogs. The “Webmaster Tools” auto-verification link from the Blogger dashboard has been removed leaving Blogger blog users to have no other choice but to opt for verification through adding a HTML meta tag.

GWT plus Blogger logo

Webmaster Tools has outlined this process in simple steps.

Steps:

Sign in to Webmaster Tools

1)Click the “Add a site” button on the homepage of Webmaster Tools

add a site in webmaster tools

2) Just enter you blog’s URL (like techrena.blogspot.com for instance) and click “Continue” button.

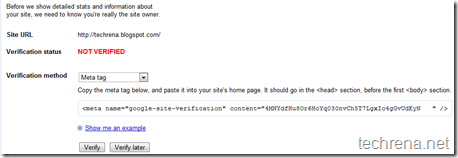
3)Select the “Meta tag” verification method from the drop-down list

get verification meta tag

Copy the meta tag code that has been generated.It should be something of the form <meta name=”google-site-verification” content=”X…….X” />

Now open Blogger.com in a new tab or window and don’t close this Webmaster Tools page.

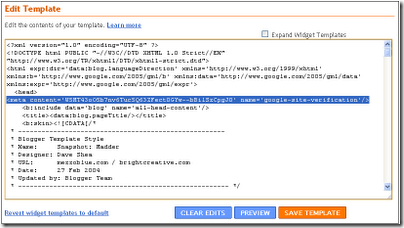
4) Now Sign into blogger.com and go to Dashboard and go to Layout section of your blog, under the Layout, select  “Edit HTML”

5) Paste the meta tag verification code it into the <head> section, before the first <body> section

edit template html and paste meta tag verification code

[Image : Google Webmaster Central blog]

6) Click “Save Template “

7) Go back to Webmaster Tools page which you have kept open and click on the “Verify “ button.

You are done and your blog has now been verified in Google Webmaster Tools.