[How-To] Exporting Your RSS Reader[Google Reader & Other] Feed Subscriptions As OPML File

OPML logo

This isn’t our conventional ‘How-To’ article, but still some readers who are just beginners of RSS feed readers/ aggregators may want to know these little things about importing/ exporting feeds in OPML format.

OPML stands for Outline Processor Markup Language.This is now being used for exchanging list of web feeds between various web feed aggregators.In this small tutorial, we are going to explain how exactly this importing and exporting via OPML is done.

Importing / exporting feeds in Google Reader:

Login to your Google reader account.Click on “Reader settings” on the top right corner of your window.

reader settings

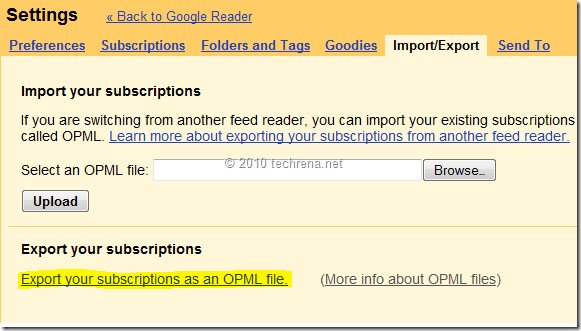
Navigate to “Import/Export” tab under settings

export reader subscriptions OPML file

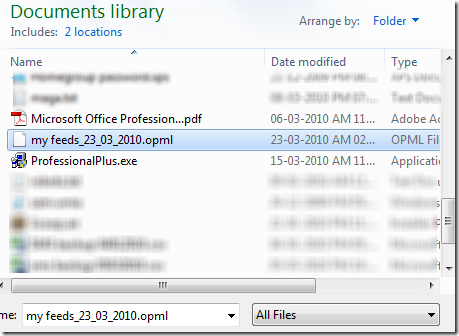
save_as_opml_file

Now here you can find options to export your subscriptions as an OPML file or import your existing subscriptions OPML file.Isn’t it simple ??

FeedDemon & RSS Bandit :

FeedDemon is the popular RSS feed aggregator for desktops which supports synchronization with Google Reader.

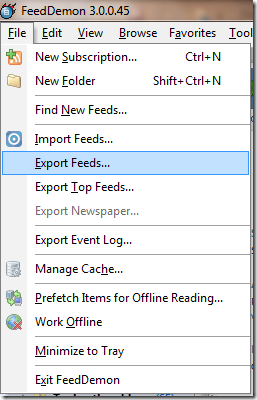
Importing and exporting feed subscriptions as OPML files is a lot easier in these readers.You can directly access “Import Feeds/ Export Feeds” options under “File” menu.

feeddemon feed import export OPML file

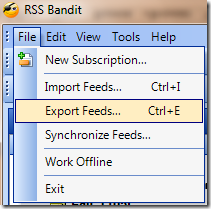
Similarly in Rss Bandit, you can Import Feed or Export feeds from the “File” menu,or suing shortcuts Ctrl + I or Ctrl + E.
Rss Bandit feeds import export

Is your operating system is Windows 7/Windows Vista? If so, you can use “Feed Headlines” gadget show feeds from your feed subscriptions.Stay tuned to this blog to know how to do it.

How To Disable Recent Items in Windows 7 Start Menu

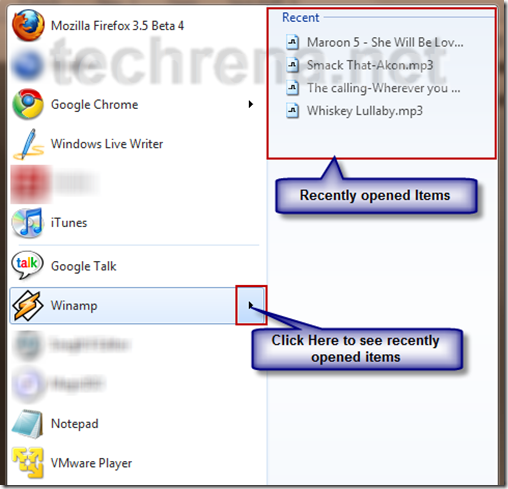
In windows 7, we can see recent items which you have opened using a specific program. This property in Windows 7 is a very good one. We can find our favorite files to be opened using a program in the start menu itself.

But, for some people it can be a trouble to their privacy. When we share a Windows 7 computer, others can easily see what files or even the programs which were opened recently by the previous user. In this case some of us may want to stop this feature from saving the recently open items or programs.

For example, I have opened some MP3 files using the Winamp player. So, if other people see then, they will come to know that these songs are some of my favorites . If I want to hide this then I need to disable this Recent items feature. This is just an example, it is more serious in case if you are handling sensitive data.

recent items start menu

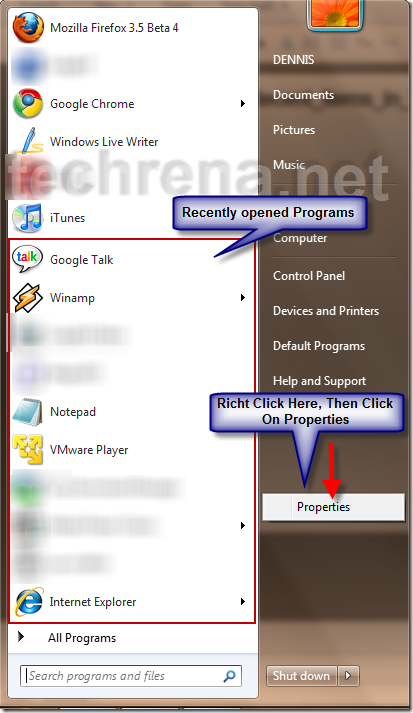
You can see the recently opened programs also. You can even hide the recently open programs if you want.

Just follow the two steps below.

Step 1: Open Start Menu. On the right pane of the menu, Right Click. Click on Properties. See the Screen Shot Below.

recent programs start menu

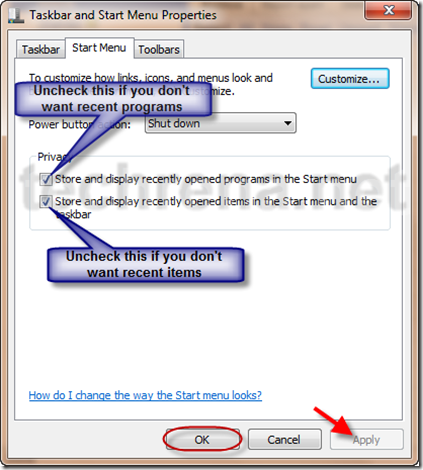
Step 2: In the Taskbar and Start menu Properties, Uncheck the features you want to disable. If you don’t want to show recently open items then Uncheck it and Click on Apply then OK.

start menu properties

Note that you may not want to disable recent programs feature as it is very useful.

So you can customize your settings according to your needs and privacy. If you need any help in any of such Windows 7 features, just leave your query in the comment.

Complete Tutorial: How To Disable Windows Error Reporting In Windows 7 ?

Microsoft Windows 7 Official Logo

Windows Error Reporting (WER), a technology (previously known as Dr. Watson),developed by Microsoft lets you report post-error debug information to the developer of the particular application that has just crashed or stopped responding.Windows Error Reporting has been introduced as a Windows service from Windows XP and is being continued in the later versions Windows Vista and Windows 7.By default, this Error Reporting service will be started automatically.

However for some reasons like you may get annoyed by frequent error reporting alerts or for privacy concerns etc., you may want to disable or stop Error Reporting in your Windows operating system (here it is Windows 7).If you are not sure how to stop Error Reporting in Windows 7, please do follow the steps outlined below:

Method-1: Using Action Center

1.Type “wer” in the Start menu search bar.Check the results obtained for this search in control panel (refer to the screen shots).

type wer in start menu

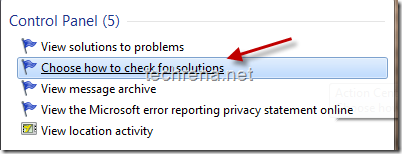
start menu search choose how to check solutions

2.Click on the “Choose how to check for solutions” item in the search results.It will open up the “Problem Reporting Settings” under Windows Action Center.

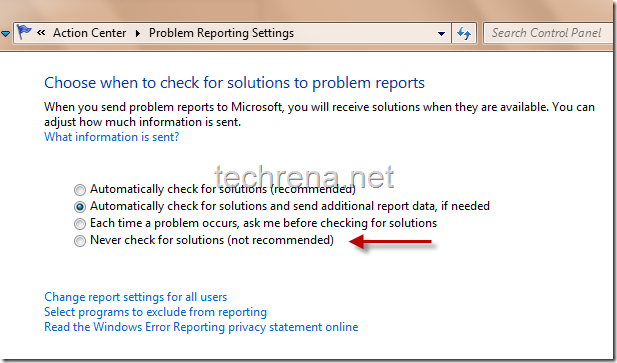
problem reporting settings action center windows7

3. By default the first or second option (“Automatically check for solutions”) will be selected by your Windows.If you want Error reporting to be disabled, select the last option “Never check for solutions” for completely disabling it or select the third option “Each time a problem occurs, ask me before checking for solutions” for moderating the error reporting alerts.Click “Ok” button down the window once you have selected your option.

Method-2: Disabling WER service

Windows Error Reporting Service function:

“Allows errors to be reported when programs stop working or responding and allows existing solutions to be delivered. Also allows logs to be generated for diagnostic and repair services. If this service is stopped, error reporting might not work correctly and results of diagnostic services and repairs might not be displayed.”

We’ll try to achieve the same previous settings result but this time via disabling the Windows Error Reporting(WER) service.To do this, follow..

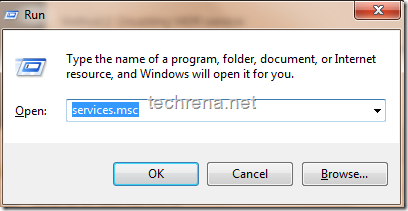
1. Press Windows button + R to open the Windows Run command.Type “services.msc” in the run command bar and hit ‘OK’.

windows run command services.msc

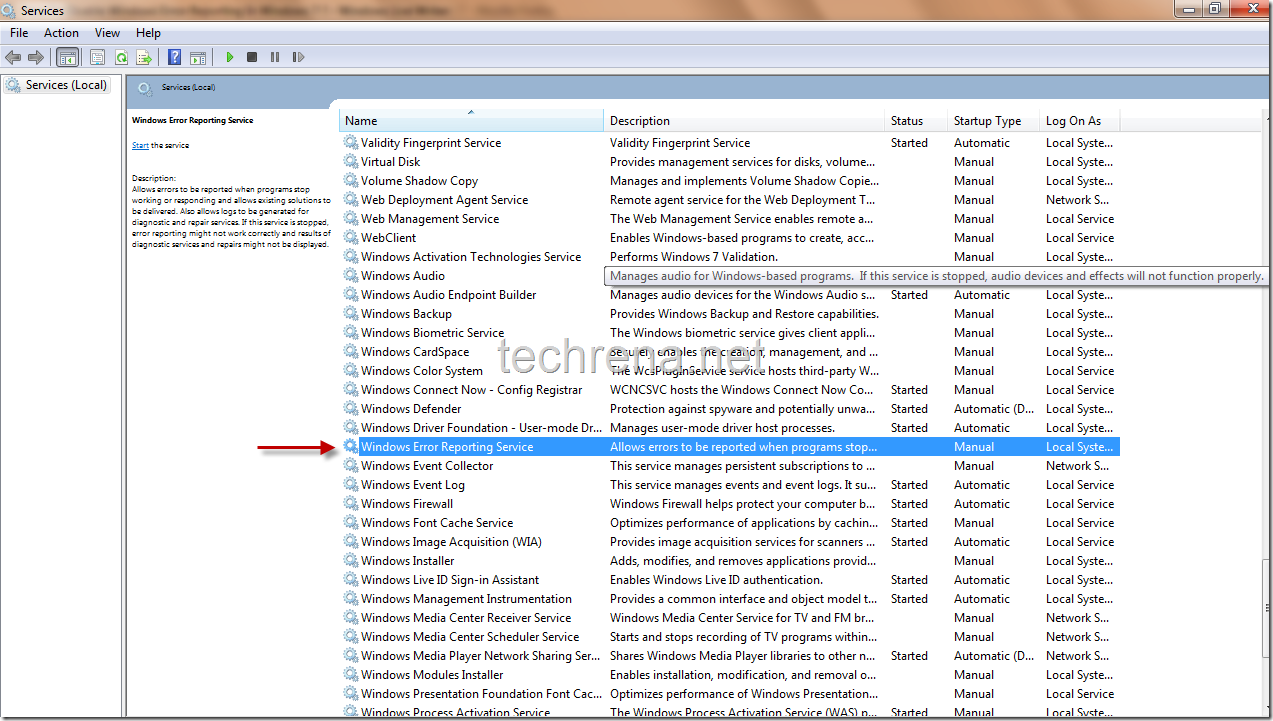
2. It will open up Services window, where you can see list of all the services that are currently available on your Windows.Find “Windows Error Reporting Service” in this list.

Windows Error Reporting Service

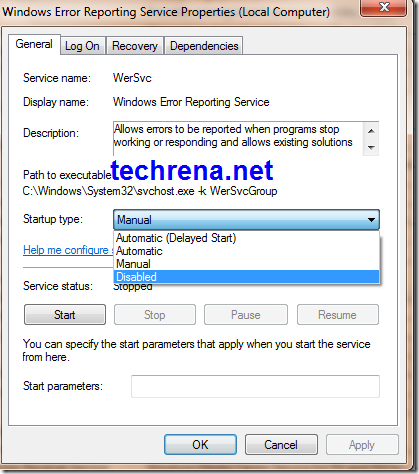
3. Right click on the Windows Error Reporting Service and choose “Properties’ that should open a new properties window.The startup type will be either in “Automatic” or “Manual” by default.To completely disable the service choose “Disabled” and press ok.

Windows Error Reporting Service Properties

That’s it, now you have disabled the Windows Error Reporting Service successfully.

Method–3: Using Registry Editor

Warning: Changing registry values without much knowledge will dump your entire Windows Operating system.Change them at YOUR OWN RISK.

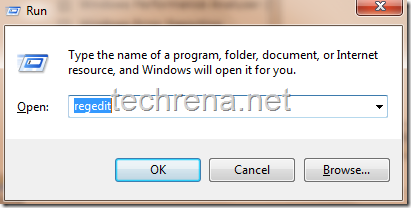
1. Type Windows + R as in the previous case to open Windows run command.Type “regedit” in the command bar.

regedit run command

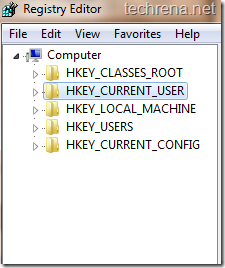
2.It will open up the Registry Editor window which will look like this.It contains three folders like navigable sub keys:

HKEY_CLASSES_ROOT ,

HKEY_CURRENT_USER,

HKEY_LOCAL_MACHINE,

HKEY_USERS,

HKEY_CURRENT_CONFIG.

Registry editor windows 7

HKEY_CURRENT_USER is the one we want.Click on it to expand the sub registry key.

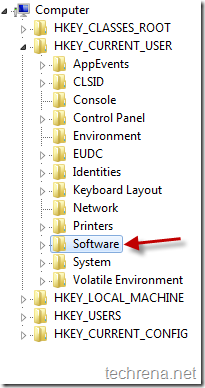
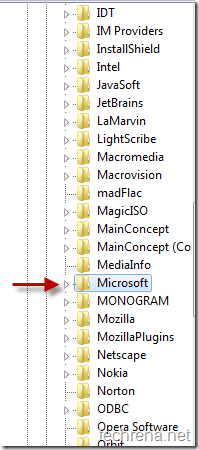
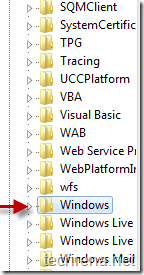
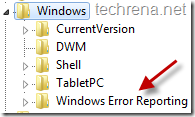
3. Navigate to HKEY_CURRENT_USER\Software\Microsoft\Windows\Windows Error Reporting sub key using the following screen shots carefully.

regedit HKCU navigation

regedit HKCU navigation 2 regedit HKCU navigation_3

regedit_HKCU_Windows_Windows_Error_Reporting_key

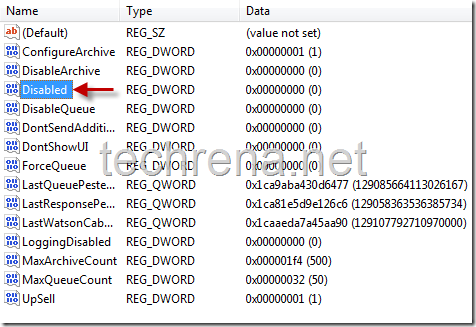
4. In the Dword list, find the registry entry by name “Disabled” (highlighted in the screen shot).By default the Date value of this dword will be “0” meaning that it is enabled.

Disabled dword in WER subkey

Right click on the “Disabled” DWORD and choose “Modify”.In the value data filed, change its value to “1” instead of “0”.Click on to reflect the changes.

Now you have successfully disabled WER.


You may also want to read our previous guides on A-Z of Installing Windows 7, Installing Windows 7 on USB stick, Activating Windows 7, Resetting Windows 7 password (when you forget it and unable to retrieve it), Creating desktop shutdown shortcut in Windows 7,Enabling GOD mode in Windows 7, Partitioning hard disk in Windows 7 , Restoring previous versions of files in Windows 7, Install and Run Windows XP in Windows 7 Using VMware Player and much more..

Feel free to leave a comment here if you find problem somewhere in following these methods.

Complete Tutorial: How To Install Windows 7

Installing an Operating System (OS) is not a very easy thing. Why? Because an OS deals directly with your computer hardware which is completely useless without a working OS. Another thing is OS installation needs to deal with your existing data in your hard drive. You need to format a drive partition for new OS installation, which is critical because your sensitive data may be lots in the process.

So in order to help you, you can just make yourself familiar with the whole installation process before actually starting the real installation. The process explained here is applicable to all the editions of Windows 7 for example, Windows 7 Ultimate, Home, Professional etc.

Before beginning the installation process decide in which partition you want to install the OS. Please back up all the critical data from the drive in which you want to install Windows 7. This tutorial is made for a fresh Windows 7 installation.

System Requirements:

1 gigahertz (GHz) or faster 32-bit (x86) or 64-bit (x64) processor
1 gigabyte (GB) RAM (32-bit) or 2 GB RAM (64-bit)
16 GB available hard disk space (32-bit) or 20 GB (64-bit)
DirectX 9 graphics device with WDDM 1.0 or higher driver

Note: We have tried installing Windows 7 in a 32-bit computer with just 512 MB RAM and it worked.

Carefully follow the step by step guide below. Click on the Screen shots to enlarge it.

Step 1: Insert to source of the Windows 7 installation to your computer(Powered Off). The source may be the Windows 7 installation DVD or a USB flash drive. If you want to install Windows 7 in a netbook then you need a flash drive.

If you need a Flash drive installation of windows 7 Click here

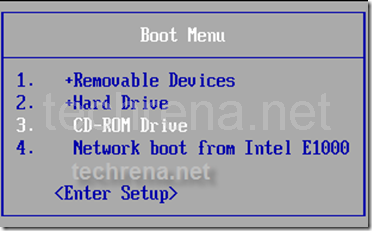
Step 2: Turn on your computer. Press the Boot menu key. (Usually Boot Menu key is the Esc Key). Select your source. If DVD then select CD-DVD Drive, flash drive then Select USB Removable Drive.

boot_menu

If it will shows Press any key to Boot, then press any key on your keyboard.

Press_any_key

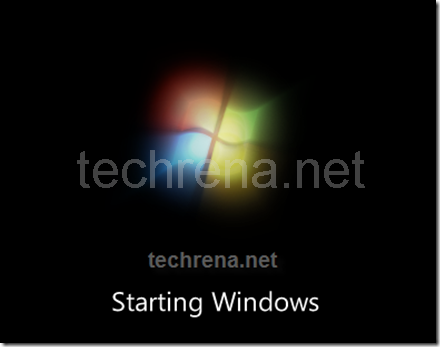
Now it will load the files and Windows will start.

loading_files

Starting Windowssetup_is_starting

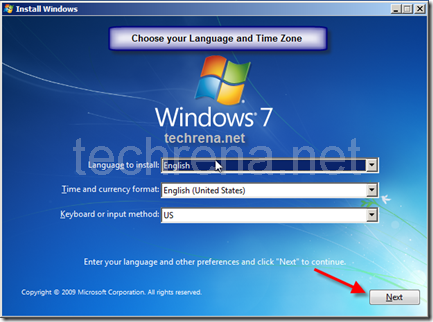
Step 3: Now select the language, time and Keyboard format. Click Next.

Install_windows_7

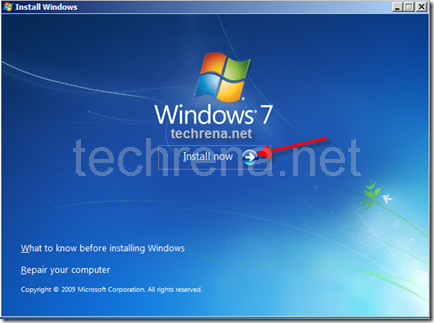
Click on Install Now.

Install_now_windows_7

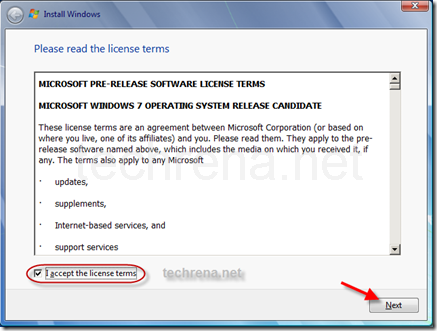
Step 4: Accept the license agreement and Click on Next.

Install_windows_7_license

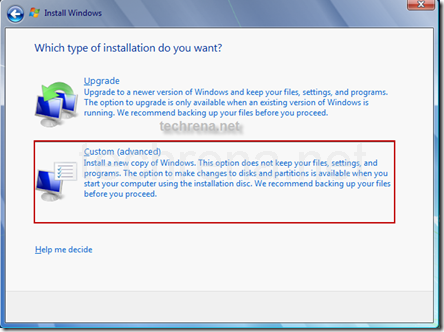
Step 5: This is a critical step. Upgrade needs to be selected if you want to keep your programs and files and upgrade to Windows 7. In a fresh installation you have to select Custom (advanced).

Install_windows_7_type

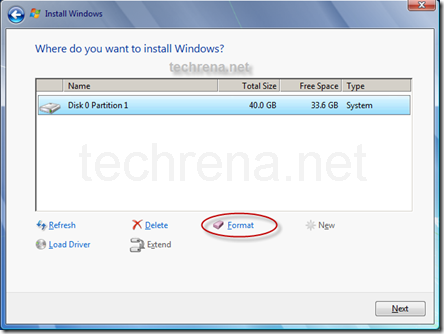
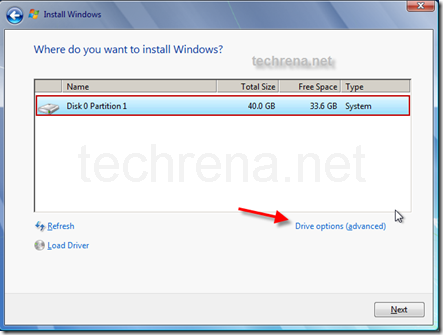
Step 6: Formatting a Hard drive partition to install Windows 7. You need to select and format the partition. You may have mare than one partition but select the one in which you want to install Windows 7. Click on Drive options to format.

Install_Select_drive_windows_7

Select the Partition you want to format and Click on Format.

Install_windows_7_format_drive

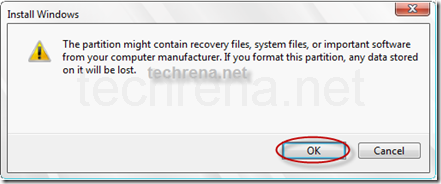
It will ask for a confirmation. Click OK to confirm format. Once format is done, Click Next.

Install_windows_7_format_drive_ok

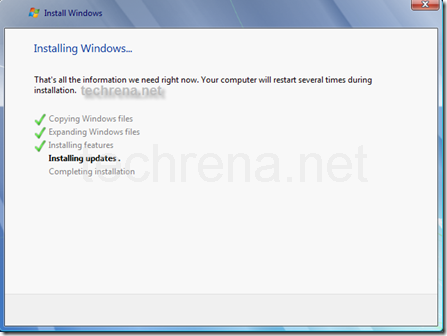
Now the Installation process starts. It may take a few minutes. The time taken varies according to your CPU and the source you are installing from(either USB or DVD). USB drive is faster.

Intallation_process_windows_7

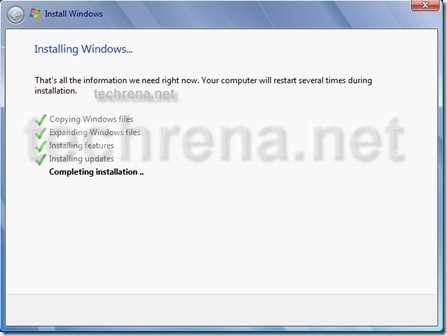
After Installing Updates the computer will restart.

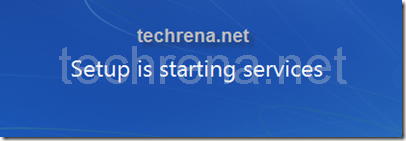
Important Note: Please make sure that from this time onwards it boots from your Hard Drive.

Completing_installation

install_windows_7_starting_services

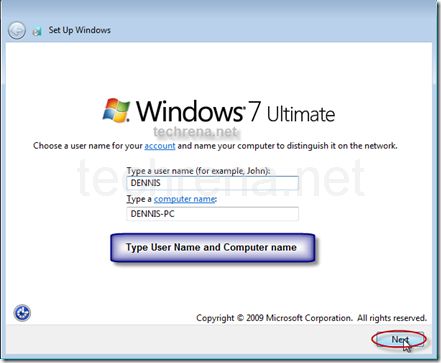
Step 7: Type the user name and Computer Name. Click Next.

enter_name_windows_7

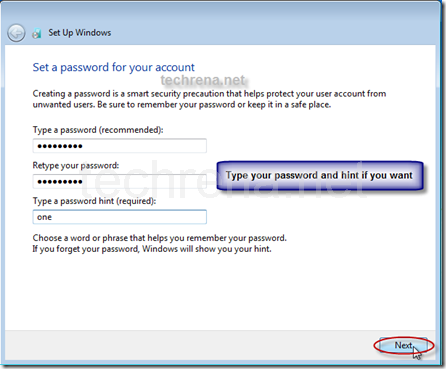
If you want you can set the password for the username. Make sure that you remember the password.

enter_password_windows_7

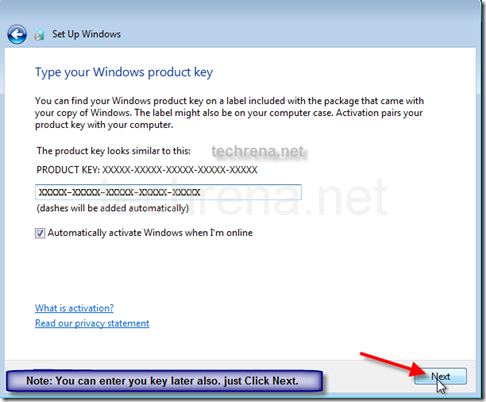
Step 8: Type your Windows 7 Product Key. This is an optional step. You can enter the key later also. If you want to do it later just leave the field blank and Click Next.

Note: Check Automatically activate Windows when I’m online if you want to activate the Windows by itself. If you want to do it manually, then uncheck it. Activation of Windows online is mandatory for Windows 7.

enter_product_key_windows_7

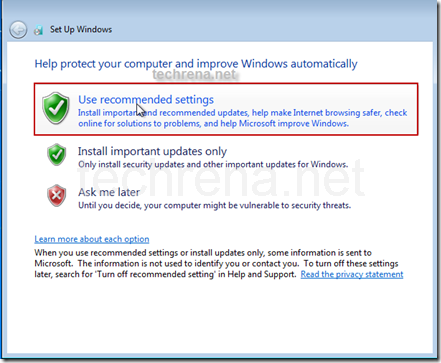
Step 9: You can select Use recommended settings. If you have a WLAN adapter, then it will ask you to select you network. Select one if you have a network.

Install_now_windows_7_settings

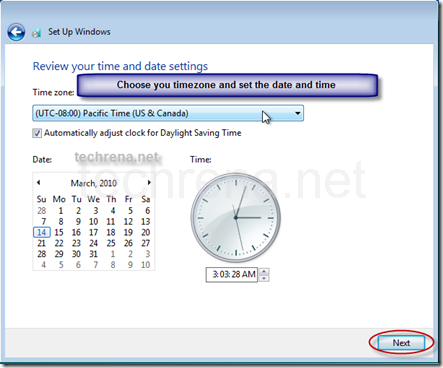
Step 10: Set the time and date. Click Next.

Install_windows_7_set_time_date

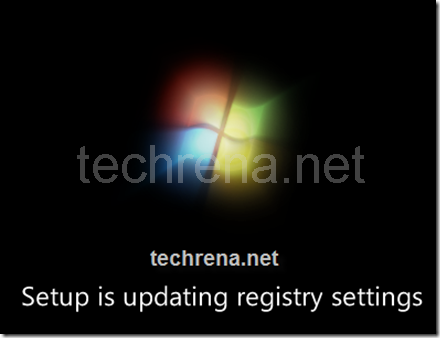
Now Windows will restart the computer, update your settings and prepare for the first use.

updating_registry

setting_up_for _first_start

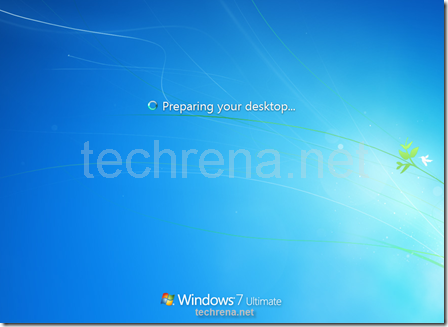
Install_windows_7_prepare_desktop

Now you have successfully installed Windows 7. If you have any doubt please leave a comment. We will reply to you shortly.

You may fine the below posts interesting:

Boot And Install Windows 7 from USB Flash Drive (Pen Drive)

Install Windows XP Virtual PC in Windows 7 Using VMware Player

Windows 7 Activation Online

How to Activate Windows 7 Online

The new Windows 7 has an enhanced security feature. The Product Key which you enter while installing is not enough to activate Windows 7. You need to activate the key you have entered online within 30 days of the installation otherwise it will stop working.

So if you have installed Windows 7, then you need to activate Windows 7 online. This is applicable to all the editions of Windows 7 namely Starter, Home, Professional, Ultimate edition respectively.

Actually this activation process is done automatically whenever you are online. But if you had selected not to do so during installation you need to do it manually. You need not worry if you have a valid key. Just follow the simple steps below.

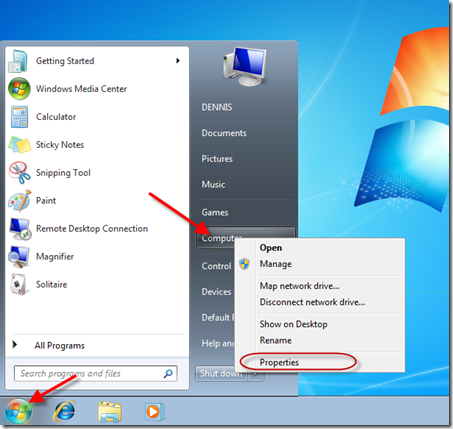
Step 1: Click on Start. In the Start Menu Right Click on Computer. Select Properties.

windows_7_computer_properties

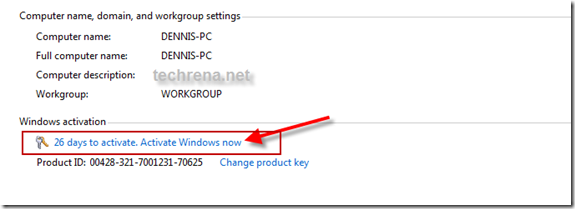
Step 2: In the System Properties Window, Click on Activate Windows now.

Activate_windows_7

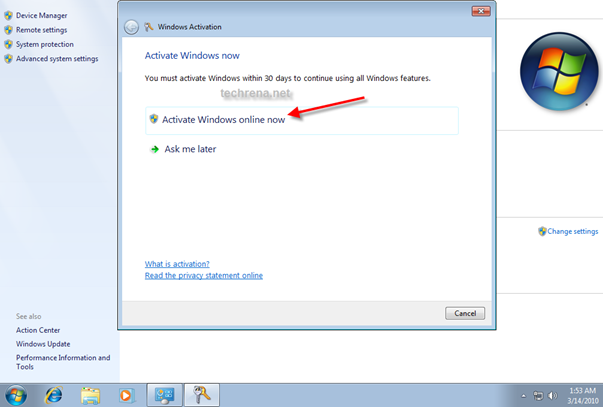
Step 3: In the Windows Activation window, Click on Activate Windows online now.

Activate_windows_7_online

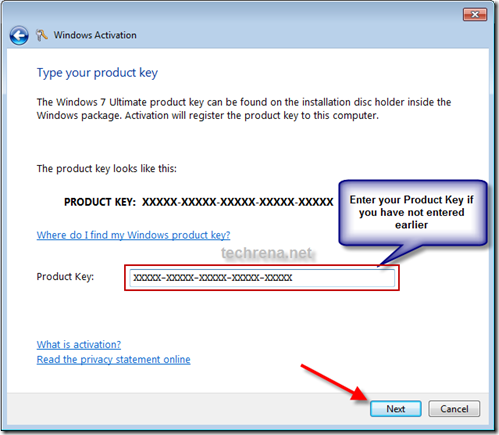
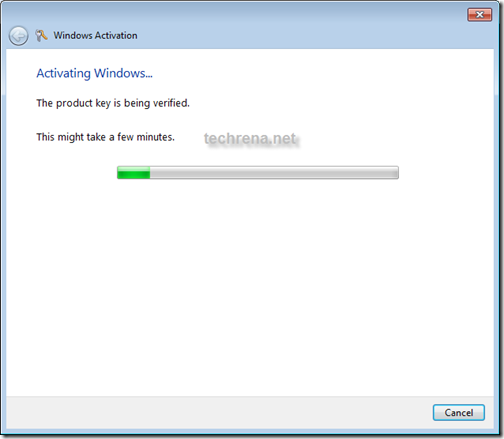
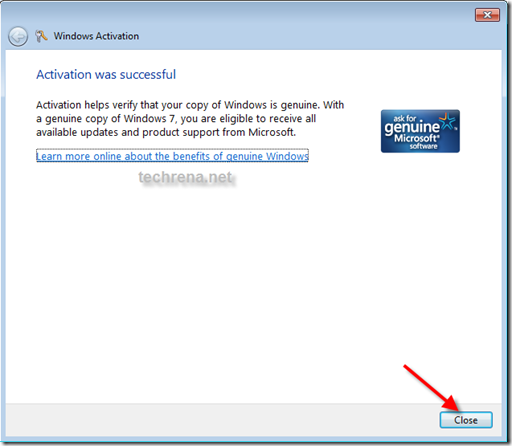
Step 4: If you had not entered the Product Key during Installation, it will ask for your key. Enter the key. Check if its correct. Now it will verify your key online and if your Product Key is valid it will show the success window.

Activate_windows_7_enter_key

Activate_windows_7_verify_product_key

windows_7_activation_successful

Now you can see the Windows Genuine Logo in you System Properties window.

Activated_windows_7

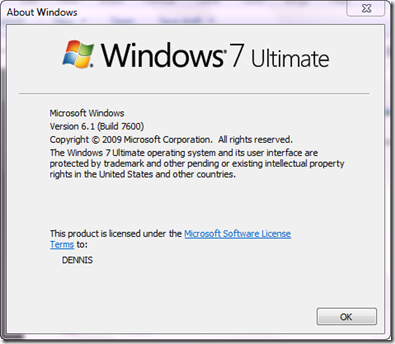
If you want to see the date of expiry of your Windows 7 then Press Start + R and type winver and press Enter. You can see the Version, Build and the Expiry Information. If your Windows is a full version then no expiry date will be present.

Windows_Version

You may find the below posts interesting:

Install Windows 7 from a Bootable USB drive or flash drive

Install and Run Windows XP in Windows 7 Using VMware Player

Windows Activation Technologies Update To Detect Pirated Copies Of Windows 7

Install and Run Windows XP in Windows 7 Using VMware Player

Windows XP has been the most famous and most useful operating system to its users till date. Well even if we are have to migrate to Windows 7, we will never forget the ability of Windows XP. There are a lot of programs which were supported by Windows XP but not in the later versions like Windows Vista and Windows 7. Now when we migrate to Windows 7, we will not be able to run such programs.

In order to solve the problem of incompatibility of software and drivers in Windows 7, we have been given the option of installing Virtual Windows XP using Microsoft Virtual PC. But the lone problem in this option is that the processor should support Virtual Machine.

Windowx XP and Windows 7

Here we have given a technique with which you will be able to run Windows XP in Windows 7 without any Virtual XP software or Virtualization Supporting Processor. Moreover you can use your own CD or ISO backup of Windows XP to create the Virtual Machine and no need of downloading the XP Virtual PC from Microsoft.

Requirements:

Windows 7 installed Machine

Minimum 1 GB RAM.

Minimum 4 GB Free Hard Disk Space

Windows XP backup either CD or ISO file

OR

If you have downloaded Microsoft Virtual XP Mode, then refer the instruction at Step 6.

Step 1: Download and Install VMware Player 3.0.1. The download Links are given below.

Size: 90.0 MB

Download VMware Player 3.0.1 from VMware

or

Download VMware Player 3.0.1 from FileHippo.com

Follow the normal instructions and install. Restart your computer after installation.

Step 2: Now we have to create a new Virtual Machine. Open VMware and click Create a New Virtual Machine as shown below.
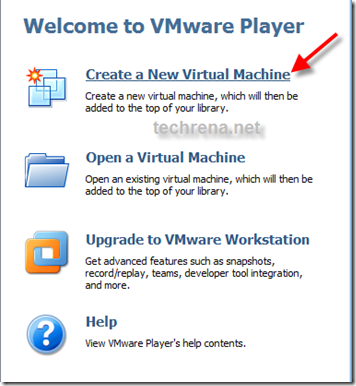
VMware-New-virtual-XP-Machine

Step 3: Select the location from which you are going to create the new Virtual Machine. If you have a CD then select the drive. If you have a back up file in an iso, then you can select the file.
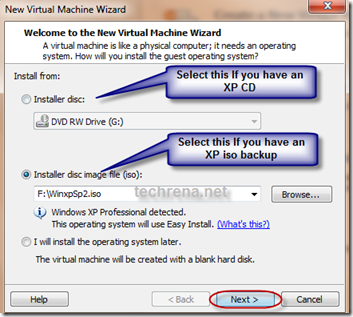
Select-disc-iso-XP-Machine

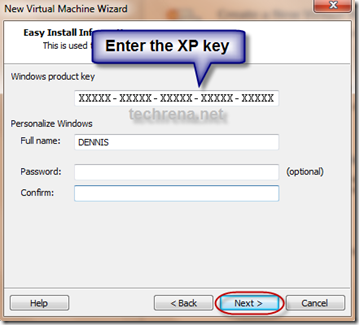
Step 4: Enter the Windows XP key and the user name and password.
Enter-key-XP-Machine

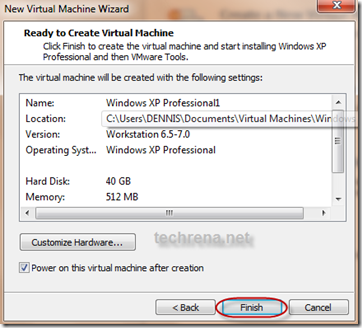
Step 5: Then you can set the location to be installed, maximum Disk space size and the RAM size. Follow the instructions normally. Finish the setup. It will continue to install Windows XP in your Virtual Machine.
3-6-2010 12-35-50 PM

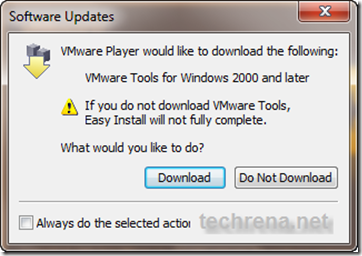
Optional Note: While installing the Virtual Machine it may ask you to download VMware Tools for Windows 200 or later. It is recommended that you download it or you can download it later also.
download-vmware-tools-for-Windows

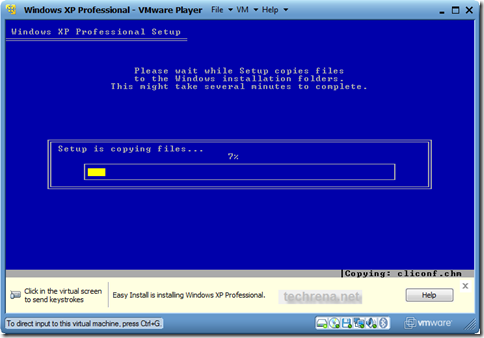
After that, the installation process will continue by itself and Windows XP will start.
Windows Xp installation

Windows Xp installation process

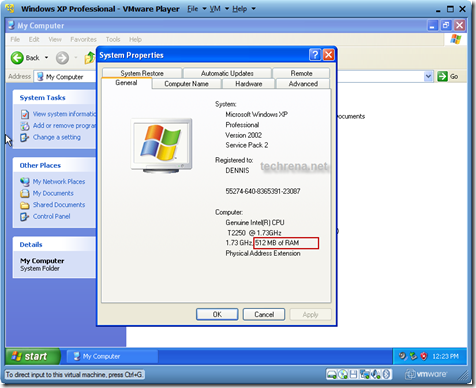
After successful installation Windows XP will start and you can see the System properties as shown below. 512 MB of RAM is set when installation(you can change the size in VM settings).
Virtual-xp-properties

Now, you have successfully installed Windows XP virtual PC using VMware player. In order to quit Windows XP you can simply shutdown and quit VMware player.

To start the Windows again in virtual mode, open VMware Player and Select Windows XP in the left pane and Click Play virtual machine.

VMware

Let us discuss some of the issues which should be known by the users.

How to Transfer Data to and from Windows XP virtual Mode?

As you are running two different machines drag and drop will not work if you have not installed VMware tools. Even if you can copy directly, it takes more time. You can either use a flash drive or Disc drive to transfer data between Windows 7 and XP virtual mode. But this is not the optimal way. You need to map network drive in Windows 7 which has been shared from Virtual XP.

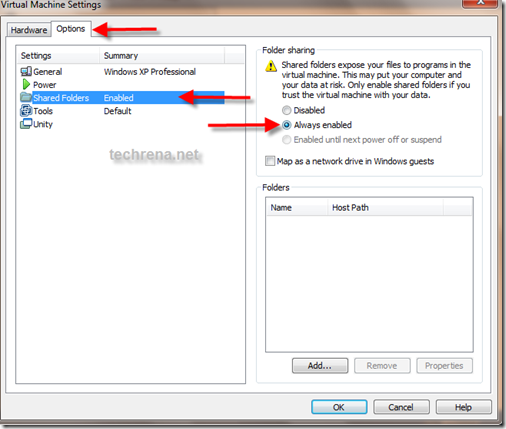
To enable file and folder sharing in Windows XP virtual Mode, you need to edit the settings. Click on Virtual Machine Settings as shown above to edit the settings.

Select Options and select Shared Folders. Set Always enabled and click OK.
VMware-settings-folder

Now you need to share a folder with write permission as shown:

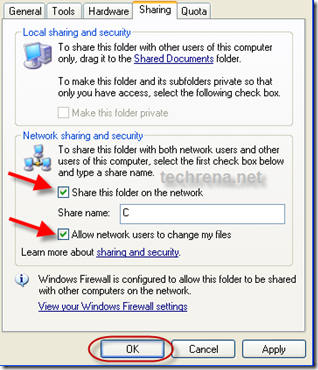
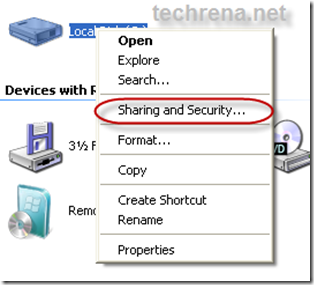
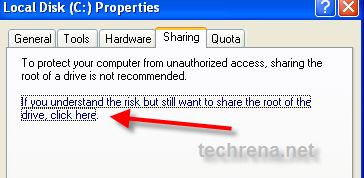
In Windows XP, right click on the folder or drive you want to share and select Share and Security. Do not forget to check Allow network users to change my files.
Share a folder in XP

share-folder-in-virtual-xp

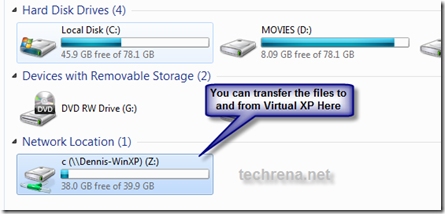
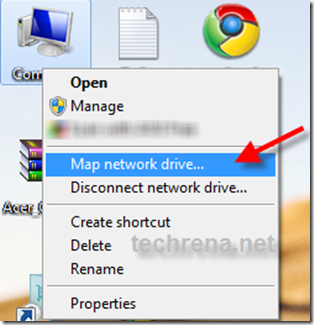
Now after sharing the folder in Virtual XP, you need to map the folder in Windows 7 as shown below:

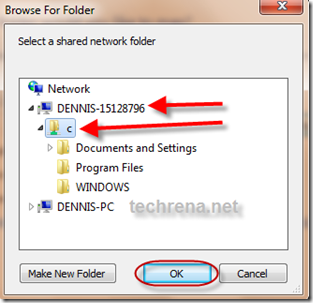
Right Click on My Computer and Select Map network drive. Under Network search for the folder you have shared in Virtual XP Machine and click OK.
set-virtual-drive-windowsset-virtual-drive-windows-7

virtual-drive-windows-7

You can copy or paste anything from or to the network location drive in Windows 7. This is how you can transfer files between Windows 7 and Windows XP virtual mode.

Removable Devices:

Now if you want to use a removable device like a flash drive, you can connect the device using the following setting:

VMware-set-devices

You need to disconnect the device from the host in order to connect to the Virtual machine.

Step 6. Running Microsoft’s Windows XP Virtual PC:

All the above installation is not done using the Microsoft’s Virtual  Windows XP PC. Above we used normal Windows XP installation CD. If you have downloaded Virtual XP PC from Download Windows XP Mode then,  install it on your PC and then you can open the Virtual Machine from the VMware Player as follows.
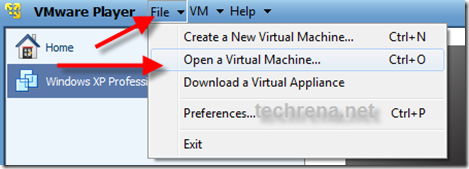
VMware-open-virtual-PC

Browse for the .vmx file in the folder you have installed the Virtual XP PC and  Click Open. You can run it.

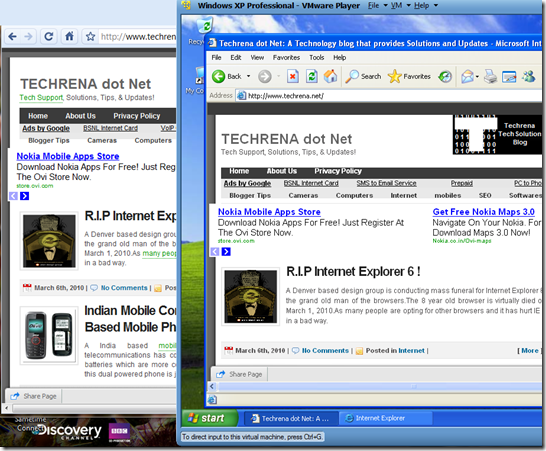
Finally, as you have successfully installed Windows XP Virtual PC in Windows 7 using VMware Player 3.0.1 you can enjoy the unbeatable features of Windows XP in Windows 7 also.
windows7-and-virtual-windows-xp

Note: No new Partition is created in your hard disk for the Virtual PC. Just a virtual disk file is created in your drive which will increase in size according to what you copy and install in your Virtual PC. The maximum size of this file is the size you have set as maximum disk size.

PS: If any problem occurs or if you are not able to follow the steps and instructions, please leave a comment below.

How to Find Your Location In Windows 7 Using Geosense

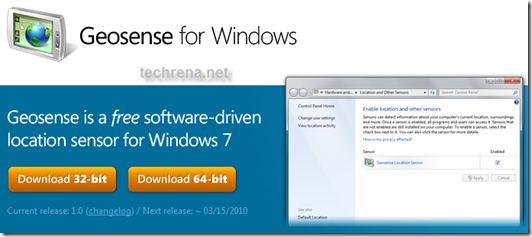
Geosense is a Windows Sensor that uses the Location and Sensors platform in Windows 7 accurately using IP lookup, WiFi and Cell tower triangulation positioning without the assistance of GPS hardware, enabling more practical location-based applications and scenarios on Windows 7.

Today most of the laptops are not equipped with GPS, so  the Windows 7’s new Sensors and Location platform is practically not much useful to the users. But with the help of Geosense, we can use this location sensor platform.

Geosense if free to download and it is available for  both 32 and 64 bit editions of Windows 7. Please note that Geosense will work only with Windows 7 editions having Location and Sensor platform. For example this functionality is not available for Windows 7 starter. All other higher editions have this feature.

Follow the instructions below to install and use Geosense For Windows.

Step 1: Download Geosense For Windows from the link below. Select your compatible edition while download.
Click Here to Download Geosense for Windows

Download Geosense  for windows

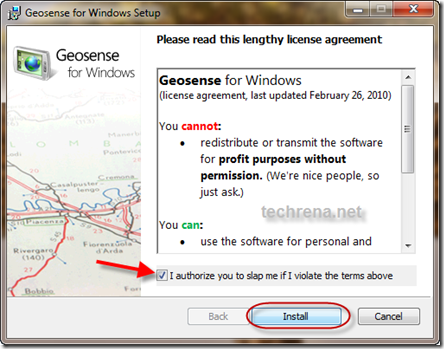
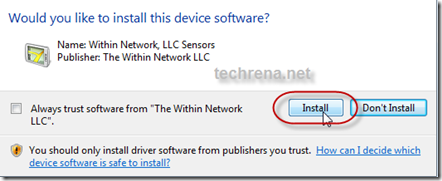
Step 2: Install Geosense for Windows. Accept the agreement, and accept to install the device.

install Geosense for windows

Allow install Geosense for windows

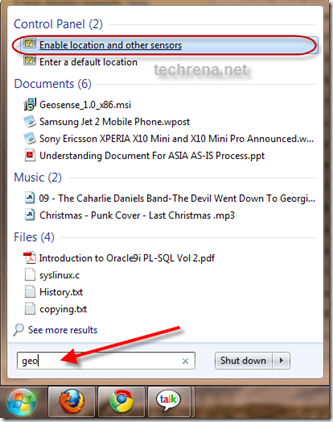
Step 3: After successfully installing the sensor, Click on Start button and type geo in the search box. Click on Enable Location and other sensors.

Open  Geosense for windows

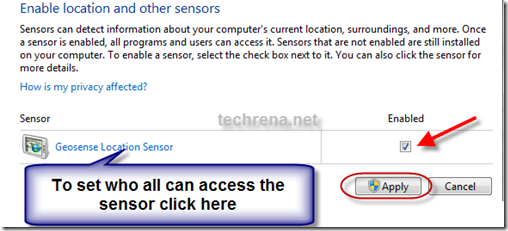
Step 4: Select the enabled Check Box and Apply.

enable Geosense for windows

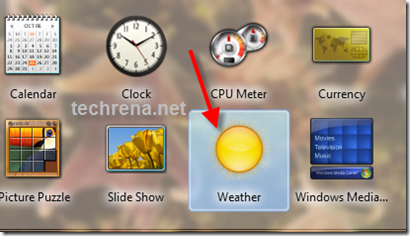
Step 5: Now on the desktop right click, and open Gadgets. Double click on Weather. You can see your location in the Weather gadget as shown.

Weather Gadget for windows 7

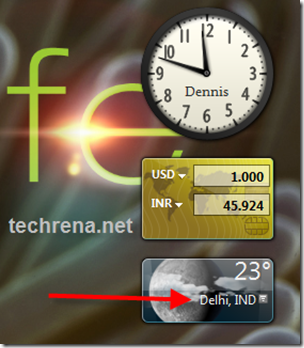
Once you have added the gadget, you can see the Location in the desktop Weather gadget as shown below. My location shown here in Delhi, India.
See location using Geosense for windows

But the location sensor displaying only the location in the gadget is not quite impressing. As there in not much of Location aware Windows 7 applications, Geosense has made a Google Maps Client Demo to make use of the sensor in a proper way. Hope that in near future we will be able to use this Windows 7 Location sensing feature in a proper way.

SearchWiki Goes, Stars Debut In Google Personalized Search

Google Kills SearchWiki, Adds Stars For Customized Search:

Google has rolled out new “Starred results” in Google search results, killing its previous “SearchWiki”.

This feature will be available to all the users in the coming few days, according to a blog post on Official Google blog.

Google has been offering personalized search via SearchWiki, which the search engine giant thought should be replaced by much simpler “Starring the results”

How This Works?

Google Bookmarks actually allow you to bookmark the sites right from the search results.Just go to search for anything you want in Google,

Find the small white star logo on the extreme right after the every search result listing, click on any result that you liked or what to bookmark to save it.

adding star bookmark in Google results

Now that you have saved the result page in your Google bookmarks using star, next time when you search for the same query, you would see the results like this:

Google starred results overview

How To Create Profiles in Mozilla Firefox For Customized Browsing

In Mozilla Firefox we can create and use more than one profile.This is also another useful feature Firefox. Here we will see how to create new user profiles and use it to browse more efficiently pertaining to each user.

This feature will enable Firefox as an Operating software for the web where each user profile can be thought as a different user in the computer.

Firefox Logo

Benefit of Profiling in Firefox:

Each user can develop his/her own profile according to their preference and desire. But there is another concept of profiling. A single user can maintain different profiles for different purposes. For example, for using the browser for Social Networking, the profile setting can be made a bit relaxed and all the scripts allowed to run. If you are using the browser for secure internet banking, then you can create a new profile with strict settings like disallowing scripts and cookies.

Enabling User Profiling in Firefox is very Easy. Just follow the steps below:

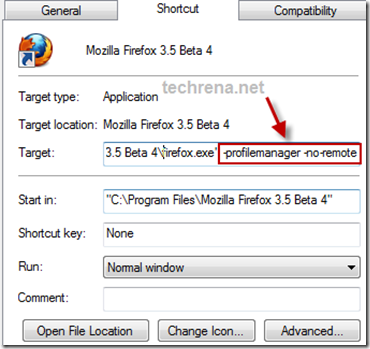
Step 1: Enable User Profiles in Mozilla Firefox Startup. To do this Just Create a different shortcut for Firefox and Right click on it. Select Properties and add the following in he Target.

-profilemanager -no-remote

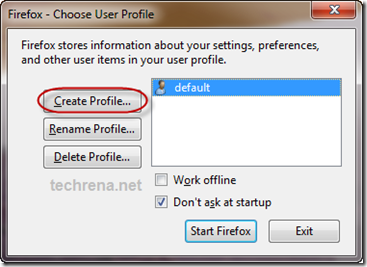
Firefox profile manager

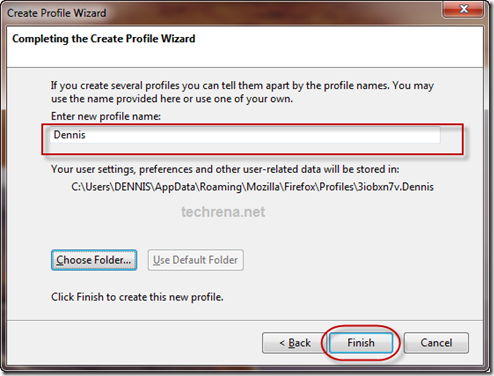
Step 2:  Create a user Profile: In order to create a user profile, open Firefox using the shortcut. Click on create profile button. Enter your profile name. Click on Finish.

Firefox profile create

Firefox profile naming

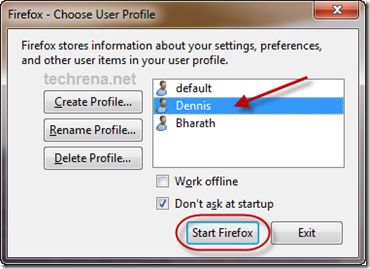
Step 3: Now open Mozilla Fire fox using the Created profile.

Firefox profiling

Now you can use your profile and customize the settings and preferences in the way you want your Firefox should behave.

Create Shutdown Shortcut for Windows XP, Vista, Windows 7 on Desktop

Learn How to add/create a desktop Shortcut to Shutdown / Turn off your Windows computer.

Shortcuts are meant for making life easier. We all know how to add shortcuts to our favorite programs on desktop.Now let’s see how to add a desktop shortcut for “Shutdown”,  which when double clicked will shutdown your system.

Important: For those who are using Windows 7 please refer the NOTE given below (Please Scroll Down)

Steps:

1.Right Click on your desktop select New>>Short cut

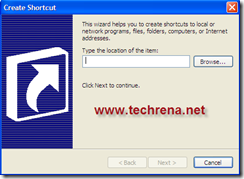
2.Now a “Create Shortcut” window pops out which will ask you to type the location of the item (in our case it is “shutdown.exe”).

create shortcut for shutdown -www.techrena.net

3.Type the following code :%windir%\System32\shutdown.exe –s in the textbox.

[As you can see we are trying to locate an .exe file called shutdown.exe which when executed will shutdown the computer].

After entering the above code, click Next

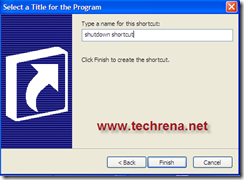
4.Now the window will ask you to select a title for the program give it a name whatever you like “Shutdown Shortcut” and click on the Finish button

give shutdown shortcut a name

5.The new shortcut will appear on your desktop.

shutdown shortcut without icon

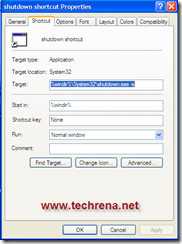
You may change the icon of the shortcut so that it’s easier for you to identify the shortcut.[In the image, I’ve used a “Power Off” icon for the same ]

shutdown shortcut properties changin icon of the shutdown shortcut

You are done  now. You may also go for advanced options like adding –f or –t after –s in the textbox area.
If you use –f it’ll immedialtely closes all running applications and shutdown without any warning

if you use –t you can specify the time after which you want your system to be Turned off.

for example you may give like %windir%\System32\shutdown.exe -s -t 100 which will trun off your system after 100 seconds.[a message will appear as shown].

Note:You may also use command prompt to shutdown your system.The same code as in the above can be typed as shutdown.exe -s -t 100 and you’ll still get the same turning off message.Once it has started the only way to stop it is using the command prompt again.Use shutdown.exe –a to stop your scheduled turn off.

The above process has been posted with the Windows XP as the base OS,  the same process can also be applied to Windows Vista based systems.

NOTE: For those who are using Windows 7 download the zip file below which contains the shortcut to Shutdown. Extract the file and place the shortcut where ever you want.

Download: Windows 7 Shutdown Shortcut.zip

Size: 850 Bytes

Contains 1 file: Shut Down Windows.lnk