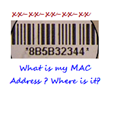
[How To] Find The MAC Address Of Your Computer

what is my mac address

Media Access Control address (wiki: MAC address), also known as physical address or hardware address is a unique identification number assigned to each of your local network adapters or network interface cards like Ethernet card, Wireless LAN card, Bluetooth device etc.

As said earlier, MAC address is unique for each of the network adapters and will not match MAC address of any other device in the world. MAC address will generally be in the form “xx-xx-xx-xx-xx-xx” (12-digit alphanumerical). The address will tell many things about the network adapter card installed in your PC. The first six digits of the MAC address belong to the manufacturer of that adapter card. Of late, MAC address are sometimes used to register your computer to your ISP.

An example for such MAC address may be of the following three forms:

0C:60:76:42:0A:3B” or “0C-60-76-42-0A-3B” or “0c6076420a3b

Here the first six digits “OC6076” denote that it is being manufactured by the vendor, a Taiwan based Hon Hai Precision Ind. limited.

[Tip: Use online MAC Address Decoder to find details about your network card after find out the MAC address following this tutorial.]

Now get into the details of how to find the MAC address for network adapters in your computer. Before proceeding, you should know that the MAC address can only be traced if that network adapter is being enabled and connected to a network.

Finding MAC Address in Windows [Windows 7 or Vista]:

You find physical address of your computer’s network adapter in the following methods:

Method ONE:

  • Open the  “Network and Sharing Center” from the Control Panel
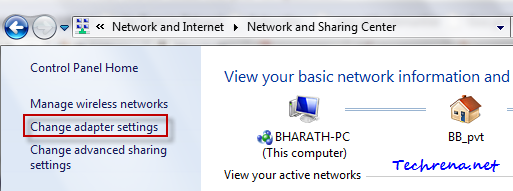
  • Click on “Change adapter settings

network sharing change adapter settings link

  • Now all your Network connections will be shown in the window. Those that are in grey denote that that particular network connection is currently disabled. The adapters which are currently enabled will be shown in blue. The network adapter or connection which is enabled but not connected to any network right now will be shown with a “X” mark below it.
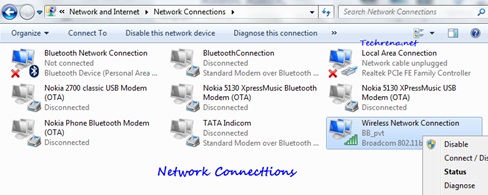
network connections list

  • Right-click on the Network connection for which you want to find out the MAC or physical address. Select Statusoption from the popup. The network connection status window will open up. Click on the “Details” tab in the status window.
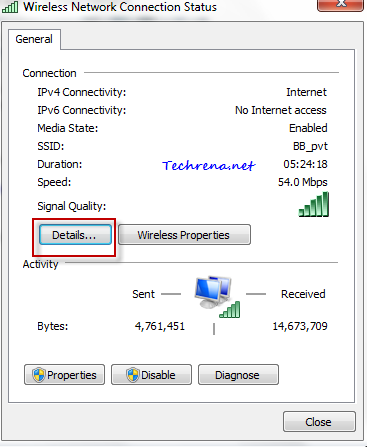
Wireless network connection status

  • In the “Network Details” window, you will see the physical address as marked in the screenshot.
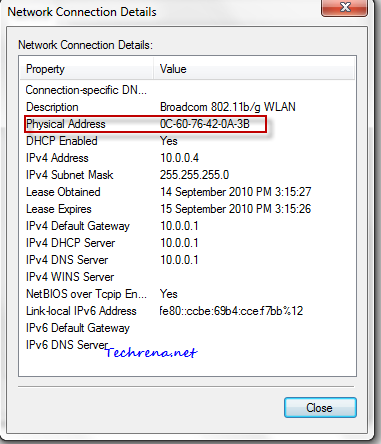
Physical address Network connection details

Method TWO:

Using the “ipconfig” command:

Go to Start menu(press windows start button) and type “cmd” in the search box and open cmd.exe from the results.

Cmd in start menu search

cmd.exe from start menu in programs

Type “ipconfig/all” (without quotes) and press enter.

ipconfig command

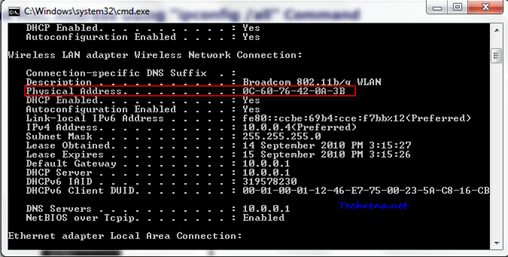
Physical address using ipconfig command

The command prompt window will show you the full list of your network adapters and their properties. Adapters that are disabled will be shown as “Media disconnected” against them. Carefully scroll the window to find the network connection for which you want to trace the physical (MAC) address (that is enabled and connected). While scrolling the window ignore all the network connections that are shown as “Media disconnected”. In my case I want to find the MAC address for my wireless network connection which is currently enabled is connected to a network. So I have scrolled the window until I could find the properties for Wireless LAN adapter and figured out the Physical address. Note down the MAC address value listed against the Physical Address (Right-click on the window, choose Mark select the physical address value and press “Enter” to copy the value to the clipboard) it as highlighted in the above screenshot.

Method THREE:

Using the getmac command:

Open the command prompt window as shown in the previous method and type “getmac” (without quotes) and press enter. Notice the MAC address of the device listed under “Physical Address” for the adapter that has not been marked as “Media disconnected” under “Transport Name”.

getmac command

You will find the mac address of the devices that are connected as well as disconnected.

Finding The Physical Address on a Mac OS X:

1. Click on the Apple Menu > Select System Preferences.

2. Select Network tab under the Internet & Network.

3. If you are connected to a wireless network, select “AirPort” from the drop down next to “Show” tab. The AirPort ID shown there is your physical address for that wireless adapter.
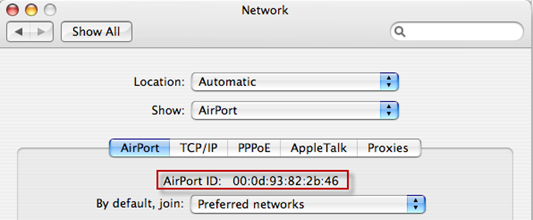
AirPort id in mac

4. If you are connected via a wired connection, select “Built-in-Ethernet” from the drop down under “Show” tab. The Ethernet ID shown there is the MAC address of your Ethernet card.
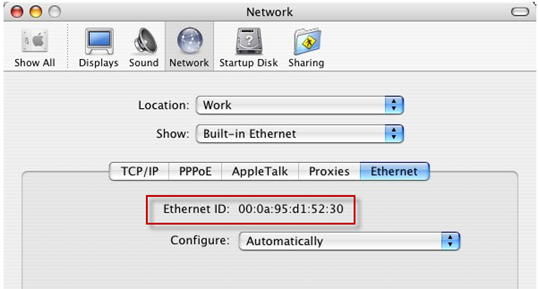
Ethernet id in mac osx

Finding MAC Address in Linux or in any UNIX based systems:

1. Launch the Terminal and type ifconfig and press enter.
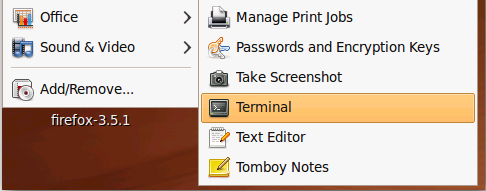
Terminal in linux

2. Now you will be shown the MAC address next to HWaddr (shortcut for Hardware address) as shown:
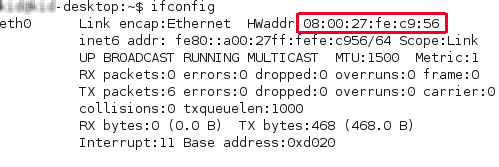
ipconfig command in linux

Alternatively, you may also type “/sbin/ifconfigsbin/ifconfig in linuxin the console and press Enter. You may need to provide credentials if you get “permission denied” error, by using su –c “/sbin/ifconfig” ifconfig in linuxin the console.

These are the ways you can find the MAC address without using any external software. However, there are many third party programs available to do the same, you may also use them to find our MAC address.

BTW, do you know that you can actually change the MAC address (read spoofing MAC post) to show a dummy number instead of the actual value? If you liked this post, do take time to read our earlier tutorials.

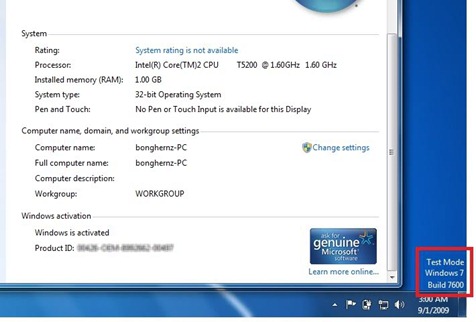
[How To] Remove The “Test Mode” Watermark From Windows 7

Test Mode Windows 7 Watermark

Legitimate Windows 7 users who are using the original and activated copies of Windows 7 versions are lately getting kind of weird “Test Mode Windows 7 Build 7600” watermark/message on the bottom right corner of their desktop just above the time zone area in the taskbar. This is really annoying as it appears suddenly anytime, users hardly knowing anything about the reason why it’s being showed up.

This message may appear when you follow one of the methods to disable driver signature checking in Windows 7. While implementing the method you may accidentally use the following commands

bcdedit.exe -set loadoptions DDISABLE_INTEGRITY_CHECKS

bcdedit.exe -set TESTSIGNING ON

and these commands are found to cause this problem. Having known the cause of the problem, we just need to do the reverse (enable “Integrity_checks” and set “Testsigning” off). Let’s see the full solution to disable this message on your Windows.

Solution:

1. You need to first run the command prompt as an administrator before you could proceed to the next steps. Refer to this old post at Techrena to know how you can run the command prompt program as an administrator.

2. In the command prompt window type the following command

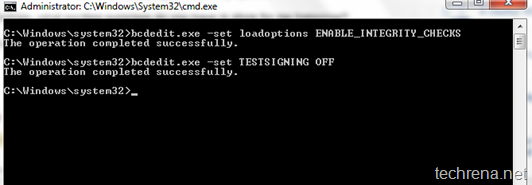
bcdedit.exe -set loadoptions ENABLE_INTEGRITY_CHECKS

and press enter and you must see “the operation completed successfully” message

now enter the following command and hit Enter again

bcdedit.exe -set TESTSIGNING OFF

and again you should get the same above success message. Refer to the screenshots posted below:

removing test mode cmd

3. Reboot your Windows and see the changes, the “Test Mode Windows 7 Build 7600” watermark disappears. That’s all.

[How To] Save Office 2010 Document As A PDF File

Microsoft Office 2010

It’s quite common nowadays that we convert any document into a PDF file , as PDF files are really portable and can be opened on any computer running on any OS with light weight and free software (like Foxit reader for instance). PDF is also the standard file format that is mostly being used for e-books, other official release and taking printout of the documents as the elements inside the PDF file can’t be edited and will uphold their properties unlike other documents which can be easily edited or sometimes even render in a different way in different computers.

After assessing the quick popularity that the PDF file format is getting among the users, Microsoft was supposed to include a direct “Save as PDF/XPS” option in Microsoft 2007 itself, but Microsoft was apparently chose not to do so because of threat of lawsuit from Adobe. However, they were offering such feature in Office 2007 via “Save to PDF” & “Save to XPS” add-in.

Now I guess many of the users like me has already started using Microsoft Office 2010. The good news is that you no longer need to install any add-on for your Office 2010 as, Microsoft has officially included an option to save any document as an PDF / XPS file.

There are two ways in which you can save a file in Microsoft Office Word 2010 into an PDF or XPS file.

Option 1: Just open the file that you want to save it as PDF and click Save (or Save As) button.

Save_file_office_2010

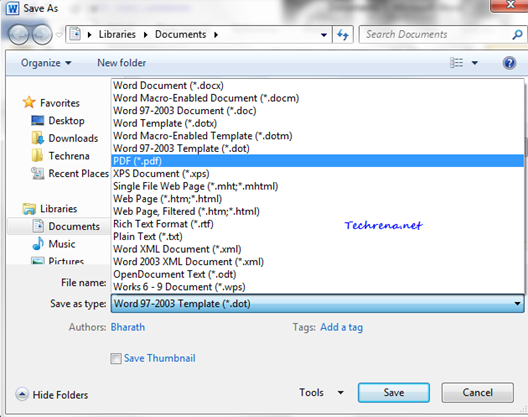
Once you click on Save button, you will be asked to choose the location where you want to save it and the type of file you want it to be. Choose the PDF (*.pdf) from the drop down and click Save.Save file as PDF in Word 2010

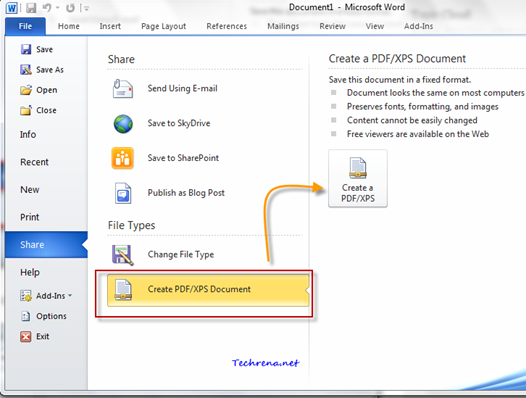
Option 2: Open the file that you want to convert, click on the “File” icon and click on the “Share” button in the menu. Now click on “Create PDF/XPS document “ and click on “Create a PDF/XPS” button on the right hand side.

Share as PDF or XPS document in office 2010

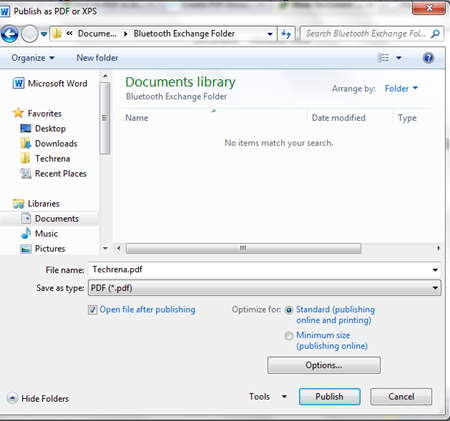
In the next step, choose the location where you want it to be saved.

Save as PDF in Word 2010

PDF saved with office 2010

Bonus Tip:

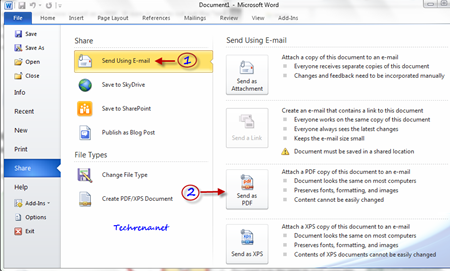
To convert the document into PDF and send it as an email attachment in MS Office 2010 (via Outlook 2010), just click File > Share > Send Using Email and then select Send as PDF option.

Send Email as PDF in office 2010

In this way you can convert any document to PDF file using in MS Office 2010 (Word 2010 and Excel 2010 have this Save As PDF option built-in).

[Tip] Create A Lock Down Computer Shortcut

Lockdown my PC

We have previously covered how to create desktop shortcuts for shutdown and hibernation here at Techrena. Many readers of our site found them to be useful. We thought like when we could have shortcuts for shutting down and hibernation, why can’t we have shortcut for locking the computer user ? To begin with, if you don’t know yet, there is a much simpler Win + L (press Start key while holding “L” button your keyboard) shortcut already available to do the same and is easier as well.

We are just writing this tip to let you know that you can create shortcut for locking down your computer as well. It’s up to you to use this or the most preferred Win + L short key. Follow the steps below to add the shortcut to your desktop.

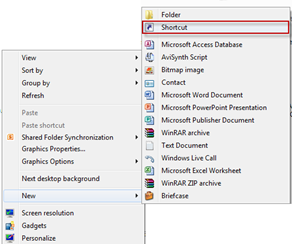
1. Right-click on your desktop (on any blank area) and select New > Shortcut.

create new shortcut

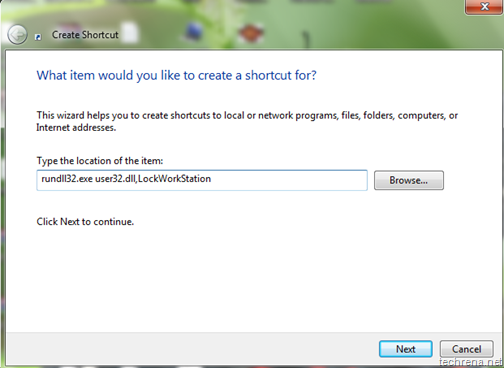
2. Type rundll32.exe user32.dll,LockWorkStation in the “Type the location of the item” filed in the window and click next.

Type shortcut location

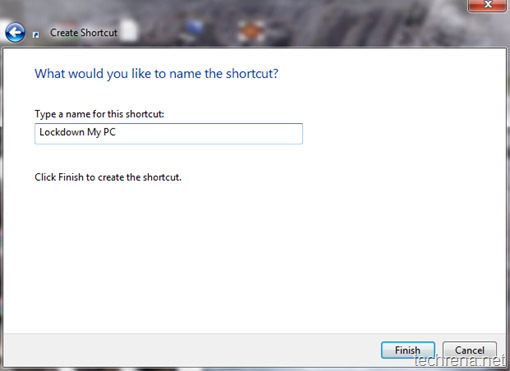
3. Give a name to the shortcut (something like Lockdown My PC) and click “Finish” to complete the setup.

Lockdown shortcut name

4. Now the shortcut for locking down your computer appears on desktop. You can even customize it by adding some colourful icon to it.

Lockdown shortcut on desktop

Clicking on it will lockdown the computer. This works well on Windows XP, Windows Vista and even on Windows 7. You need to login back to your computer by providing your credentials if you need to unlock it again. Of course I still prefer to use Win + L shortcut (to which I got used much to) than this, anyway it’s always good to explore and find new things, even if they had alternatives Smile.

[How To] Use Google Multiple Sign-In Feature

Google Mutiple sing-in

If you use Google products a lot and that too with different logins (may be one for personal use and other for business purpose etc.), you would be knowing there’s absolutely no way to use both accounts on the same browser. Until recently you need to go through some workarounds or use another browser and keep switching between the two windows often. Times have changed, Google has listened to users like you and enabled this glorious multiple sign-in feature for selected Google products.

You wouldn’t even be knowing that such a feature exists until you open your Google account settings page. This tutorial explains you how to enable and use Google multiple sign-in feature for your account.

To begin with, visit Google account settings page,

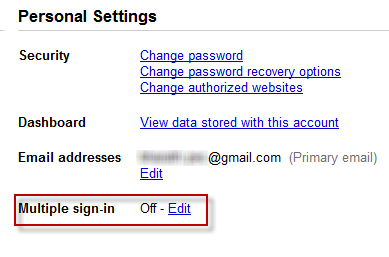
Google account personal settings

Find a “Multiple Sign-in” tab under your personal settings, by default this feature would be set to “Off”, click on the “Edit” link to change the multiple sign-in settings.

You will be taken to multiple sessions page,

multiple google accounts enable

You need to read and understand the four aspects listed there (as shown in the screenshot) before adding a “check” to each one after which you can enable the Google multiple accounts feature. After you checked the each option, the “save’ option would be enabled. Click on it to save the settings and enable the multiple sign-in feature.

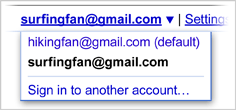
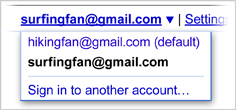
Now the Google multi-login feature gets enabled for you. Open any multiple sign-in supported Google product page(ex: Gmail) and you can figure out a drop down menu next to your Google account username. Click on it to see “Sign in to another account” link and click on it.
multilogin menu sample

You can sign in up to two additional accounts (so in essence, you can simultaneously access up to three Google accounts, while the first being your default account) and you can also open the same product in multiple tabs with different tabs.

Please note that the multiple sign-in option is currently available to only few products listed below and also it is not fully supported for use with Offline Gmail and calendar , for the same reason you wouldn’t want it to enable yet if you use offline Gmail.

Multiple-sign in feature supported Google products:

  • Code
  • Calender
  • Gmail
  • Reader
  • Sites
  • Voice
  • Docs

If you want to use multiple sing in with other products, you still need to either use tricks like using private browsing mode in supported browsers or use another browser as you have been doing all through.

[How To] Using Windows 7 Credential Manager

Windows 7 logo

Credential Manager is a Single Sign-On (SSO) solution that Microsoft has been offering since Windows Server 2003. It was there in Windows XP, Vista and now in Windows 7 too, this with some more extended features.

Credential Manager allows a Windows user to store sensitive credentials like log on information (ex: user IDs and passwords) required for the websites you visit or for connecting with the other computers on a network. These credentials are stored in special folder called vaults. With this stored information, Windows 7 can automatically log on securely to the websites and the computers on your network automatically without requiring you to remember the credentials all the time. Credential Manager is based on a secure client-side credential-caching mechanism. Now let’s see how we can use Credential Manager in Windows 7:

You can open Windows Credential manager via Start > Control Panel > Credential Manager or alternatively go to start and type “cred” (or even “credential manager” ) and open Credential Manager from the results.

Credential manager search

Credential Manager search results

Credential Manager:

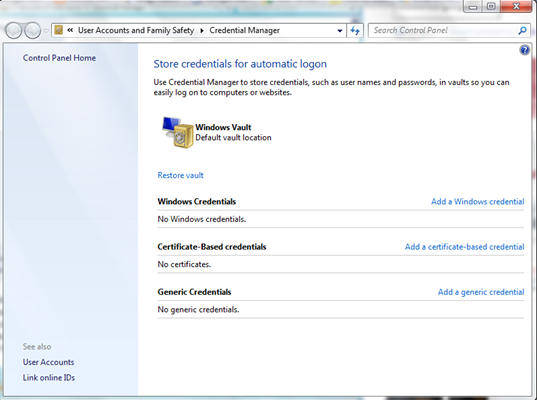
Windows Credential Manager
As you can see in the above screenshot, there are basically three types of credentials you store using Credential Manager:

1. Windows Credentials: Lets you store the network addresses, user IDs and passwords that are required while accessing intranet and SharePoint sites.

For example you can add a credentials required to connect to one of a computer in the network or you can even store the password needed to access you printer, storing upon which Windows can automatically log on to it while accessing the printer.

2. Certificate-Based Credentials: Lets you store digitally signed public key certificates like Smart Card Logon certificate or Smart Card user certificate if you are using a certificate that is used with the smart card.

3. Generic Credentials: Lets you store the URLs and the usernames and passwords associated with them.

Adding Credentials To Windows Vault:

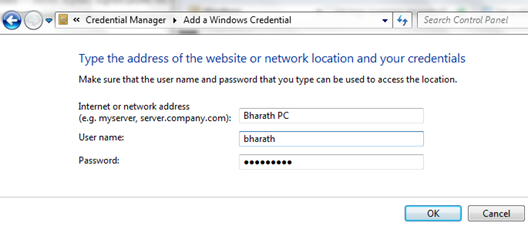
If you want to add a new credential, just  select the type of the credential that you want to add and then click “Add a credential” link and enter the details that are needed like username, password and network address etc.

Add new Windows Credential Manager

Backing Up Windows Vault:

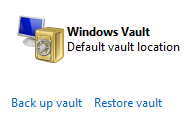
If you stored some credentials in your Windows vault using Windows Credential Manager, you can safely backup the Windows Vault to other places (preferably on removable media) so that you can access them even in case of any Hard disk failure.

Windows vault backup

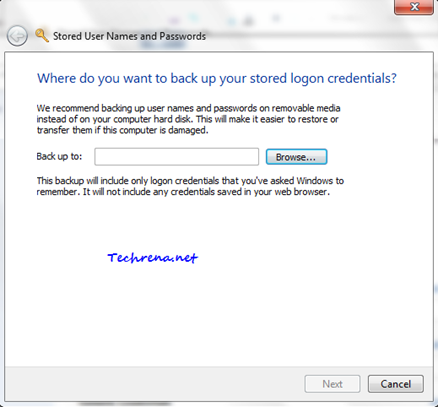
Click on the “Back up vault” link under the Windows Credential Manager. Select the location where you want to save the back up file (stored as “Credential Backup Files” with .crd extension)

Stored user names and passwords
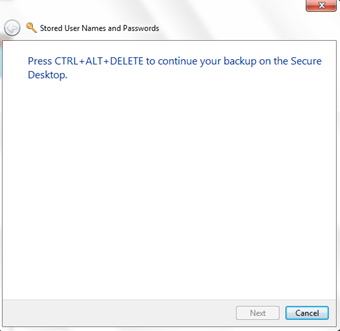
Press Ctrl + Alt + Delete to continue the backup process on the Secure Desktop. Finish the step and your vault backup would be ready on your computer.

Stored user names and passwords in vault

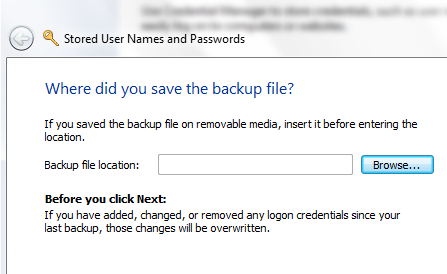
Then you again restore your Windows vault backup using the “Restore vault’ link below the Windows Vault.

Restore vault

Note:

1. You can not store credentials of websites that you browse through browser for instance Gmail credentials, Twitter credentials or Facebook credentials etc. These credentials can only be accessed by certain Windows applications which need to go through authentication with the resource (or server). Some of the Windows applications that make use of the Windows Credential Manager in Windows 7 include Windows Live Messenger, Microsoft Word, Outlook and Windows Explorer.

2. Please note some of the above features may not work in some editions especially if you are using Windows 7 RTM (Release To Manufacturing) builds.

[New] Drag And Drop Attachments From Gmail To Your Desktop

gmail drag attachment

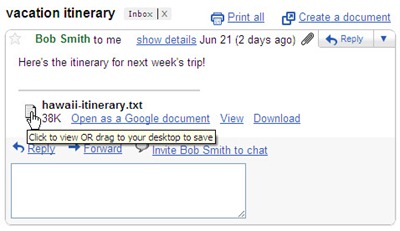
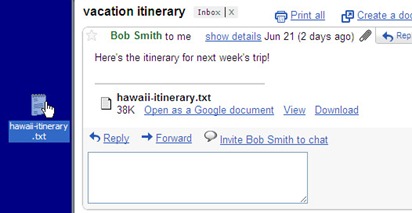
Gmail has just announced a support to drag and down the attachments from mail to your desktop. Until now we could only drag and drop attachments from the desktop to the mail while composing but the reverse was not possible. Now Gmail blog has officially announced the launch of this new feature (in Google Chrome) along with a couple of screenshots on how to do it. I have included the screenshots in this post so that you can get a brief idea about how to use this feature. When you hover the mouse over the attachment, you can see a message “Click to view OR drag to your desktop to save”. It’s pretty much straight forward, just click and hold, drag and drop the attachments from your mail to any folder on your computer. Release the mouse button once you have taken the cursor to your desired folder.

gmail_drag_attachment_2

Gmail had earlier enabled another feature that lets you drag and drop images on to your email messages while composing a mail.

Note: This works only with Google Chrome as of now

Via Gmail Blog

[How To] Type The Rupee Symbol Using Your Keyboard

Indian_Rupee_symbol

With the release of the Rupee symbol (`), everyone in India is excited and curious of how to use this new symbol. Well, here we are suggesting a unique way of how to type this new symbol using your keyboard.

With the release of the Rupee font by Foradian Technologies, it is easily possible to type the new symbol in your computer.

Follow the simple steps below:

Step 1: Download the Rupee font from the link below:

Download: Rupee Font Version 2

Size: 60KB

Step 2: Copy the Rupee_Foradian.ttf file from the location you have saved.

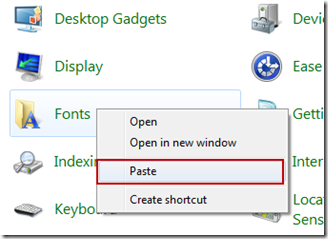
Step 3: Go to Control Panel with non category view. Find Fonts, right click and paste. The font gets installed automatically.

install_font

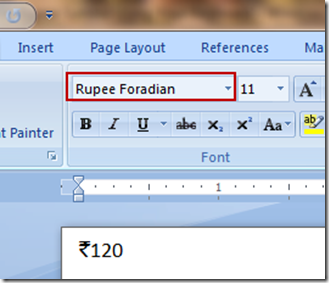
Step 4: Now you can use the ‘~’ key which is in the left of ‘1’ key to type the font. First, whenever you want to type the Rupee symbol, change the font to Rupee Foradian and press the ‘~’ key without shift.

type_rupee_symbol

After typing the symbol, you can change the font to the normal one. We are hoping that this symbol is included in the keyboard soon. Hope you have got to know how to type it now at least for the time being.

[Tip] Get Free Gmail Email Alerts Via SMS

Gmail via SMS logo

If you want to get all your new Gmail messages to your mobile phone via SMS text messages, there are already enough no of services and tools have been developed to serve the purpose for which you need to share your Gmail password. Even though most of these services are genuine, still you might not always want to share your Gmail personal credentials with those services for security concerns. Here I’m coming up with an alternative where you need not give access to your personal Gmail to any unreliable third-party service. All you need is an Gmail account and a Windows Live Mail (Hotmail account). If you still haven’t got an account at Live Hotmail, get a new account here. Now follow the steps mentioned below:

Steps:

1. Connect a mobile device to your Hotmail account and set up Hotmail Email SMS alerts.

2. Login to your Gmail account, go to settings page.

3. Go to Forwarding and POP/IMAP tab, find the “Forwarding” tab.

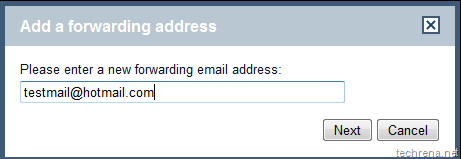
4.  Add a new email address to your forwarding list by selecting “Add new email address..” option for the drop down box. Enter the new forwarding email address. It should be something like username@hotmail.com

Add new email address Gmail forwarding

forwarding_address_gmail

5. Click Next and complete the verification process. Enter the verification code that you receive via SMS.

Verfiy forwarding mail in Gmail

6. Now that you have successfully verified your new forwarding hotmail address, you will now receive each and every mail from your Gmail inbox to the new forwarding hotmail address (we selected “keep Gmail’s copy in the inbox” option). As you had also setup your Hotmail Email alerts to be sent to your mobile via SMS, in effect you get all your new mails in your Gmail inbox directly to your mobile.

7. But some operators in India like Airtel have a limit on the number of free text messages that you can receive through Hotmail (The current limit for Airtel is 300 !). So you might want to filter out some unimportant mails to wasting these free messages count. Luckily we have “filters” in Gmail that makes this task easier for us.

8. First of all disable the forwarding under your Gmail’s “Forwarding and POP/IMAP” settings.

disable forwarding in gmail

Now go to Filter tab and create a new filter:

Filters tab in Gmail

9. Under the filter settings filter out Emails based on senders or words or based on subjects of the mail that you receive. I have chosen not to receive alerts for mails from Facebook alerts, Twitter alerts etc. You can setup your own criteria for filtering the mail.

Creating Filter in Gmail

Click on “Next Step” once you are done.

10. Now select the fifth option i.e “Forward it to:….@hotmail.com”. And click “Create Filter”.

forwarding using Gmail filter

That is it. You are done with configuring your Gmail inbox to receive SMS alerts for important mails in your Gmail.

Note:

Windows Hotmail Email SMS alerts is currently available only in few countries. This tutorial is based on the such service offered in India,and thus this trick may not work for you if you are located in a country where Hotmail SMS service is currently not available.

[How To] Configure Windows 7 Action Centre Warning Messages

Windows 7 Action Center messages

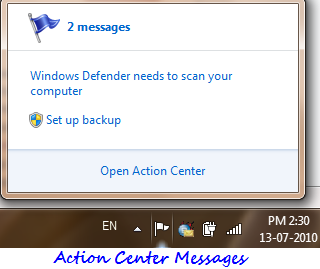
Action Center in Windows 7 offers warning messages relating to your computer. You can find these messages in your notification area in the form of a flag. They include important security messages, virus protection alerts, Windows Update, Internet security settings, Spyware and related protection, User account control, troubleshooting, windows backup etc.

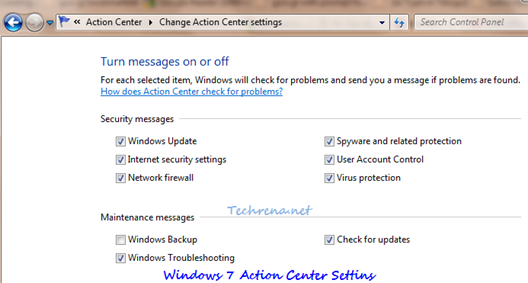
It is highly recommended that you keep these messages enabled as they include some important security issues as well. However you might not want to see Windows Backup warning messages when you are using an external third-party backup software. And you do check for updates according to your convenience. In such cases you might not want to get annoyed by warning messages about these simple things. This tutorial explains how you can configure the settings for these messages or even to completely turn off (not recommended) these action center messages in Windows 7.

Steps:

1. Click on the flag icon in your notification area or type “action center” in the start menu search box and open the Action center.

Action Center Windows 7 home

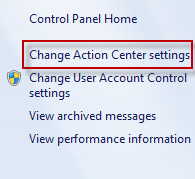
2. Under the “Action Center Settings”, you can choose for which categories Windows Action center needs to check for problems. Uncheck all to completely turn off the entire Action Center alerts which is obviously not recommended.

Windows 7 action center settings

Click OK and close the window. You will no longer receive warning messages from the categories you have unchecked in the previous step. The white flag icon however stays there without any warning messages.