[How To] Block A Website Using Content Advisor In Internet Explorer

site blocked

Blocking certain websites that may not suit the audience mainly in the case of children or workers has always been one such compulsory feature. In case you haven’t spotted yet, there’s one such option in Internet Explorer too. Here are the steps to block any website in Internet Explorer using IE’s content advisor.

Steps:

1. Go to Tools > Internet Options in the Internet Explorer.

2. Go to “Content” tab under the Internet Options. Find “Content Advisor” under this tab. By default it would be set default. Click “Enable” option opposite to it.
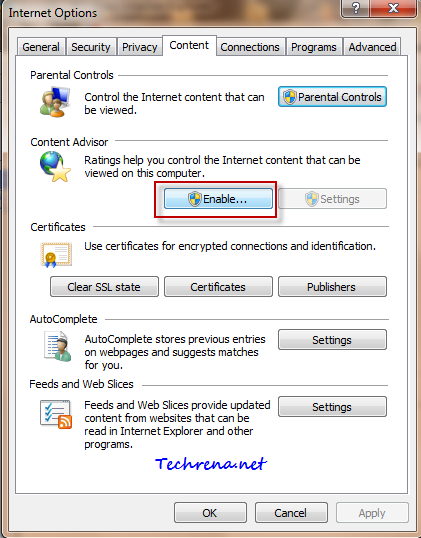
Content advisor in Internet Options

3. Go to “Approved sites” tab in the Content Advisor window. Type the URL of the website that you want to block in the text box and clock “Never” button. See the screenshot below:
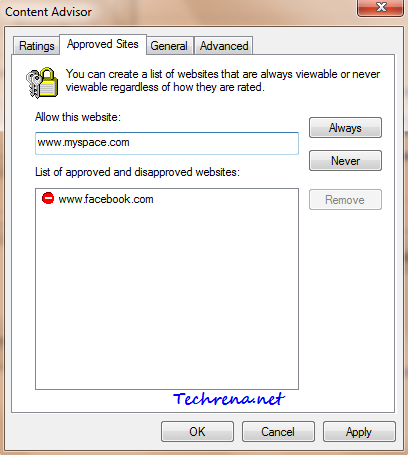
Approved sites in Content advisor

4. Click “Apply” once you are done and then go to “General” tab. Here you can choose whether to password protect the blocked sites that you added. Once configured, click “OK’ to close the window.
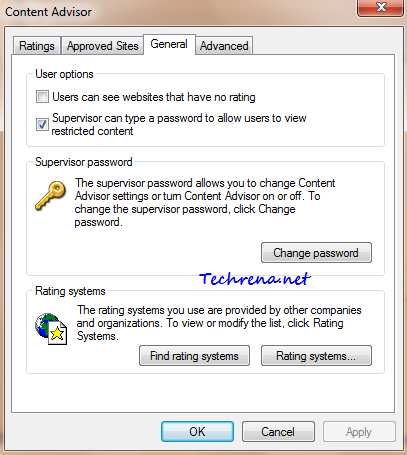
Content advisor General options

You will now be asked to enter the supervisor password for the content advisor settings.

5. Create a supervisor password and add a hint (recommended) which is helpful in case you forget the password in future. Close the window once you have done that.
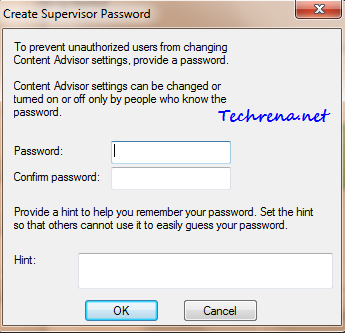
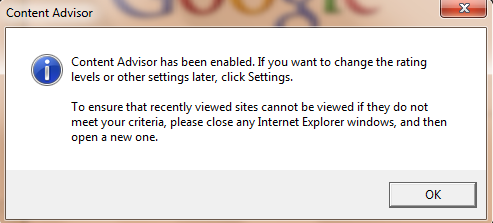
Supervisor password for content advisor

Content Advisor settings done

6. Now try to open any website that you have added in the block list. You will see the following prompt window, asking for you to enter the supervisor. User can view the website only if he knows the supervisor password.
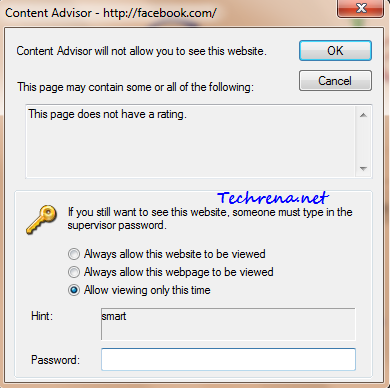
Content advisor prompt window

7. You can disable the content advisor any time by clicking the “Disable” button under the “Content Advisor”. You will however need to authorized to do that by validating through the supervisor password.

For more tips on software, subscribe to Techrena’s RSS feeds via email.

[Tip] Show Additional Windows Clocks

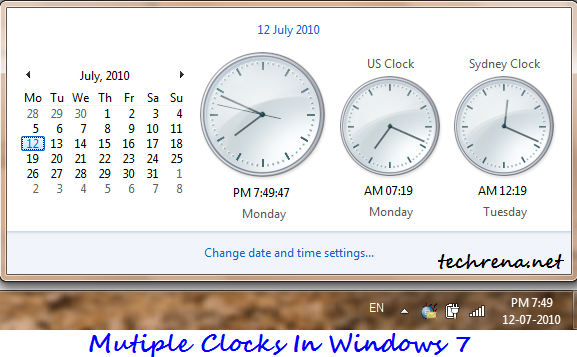
Mutiple clocks in windows 7

Windows by default shows one clock next to the calendar, based on your location in the world. Sometime you might want to see the what’s the time in your best pal’s place located somewhere in other part of the globe. This tutorial explains how you can show multiple or additional taskbar Windows clocks.

Steps:

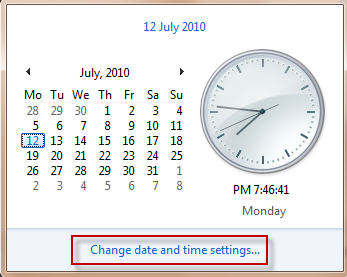
1. Open the Windows calendar by, click on “Change date and time settings..”.

Windows 7 clock

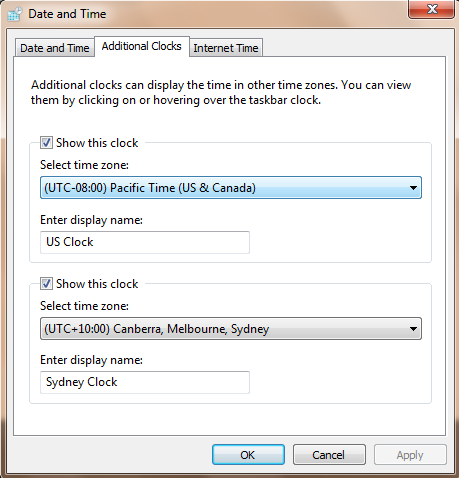
2. Under date and time settings, click on “Additional Clocks” tab. Here you can select one or more additional clocks from different cities across the world. You can also name the clocks as you would want them to be.

Additional clocks in date and time settings

3. Click OK and close the window. Now you can see the additional clocks popping up when you click on the date and time area in your Windows taskbar.

That’s it. Please note that this tutorial also applies to Windows Vista.Find out for more how-to tutorials from us on Windows 7, or subscribe to our RSS feeds via email.

[How To] Disable Firefox Taskbar Tab Previews

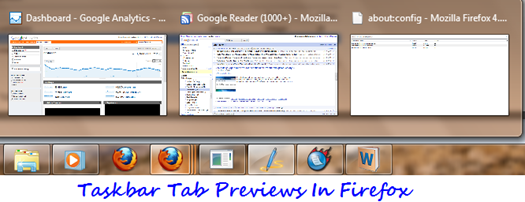
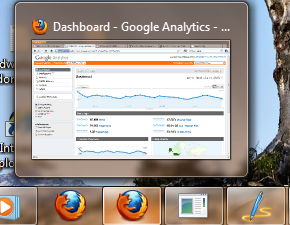
Multiple tasbar tab previews

Taskbar tab previews is a great feature introduced in Windows 7, with the help of which you can access any opened tab right from your taskbar without opening the browser. This feature was first meant for Internet Explorer only, but later it was adopted by almost all the browsers.

Even though this is a great feature, however it may sometimes annoy you particularly when you open a lot too may tabs in the browser. That’s why we posted a tutorial on how to disable the multiple taskbar tab previews in IE, Firefox and Google Chrome. Now that Firefox 4 is coming with this taskbar tab previews feature enabled, we thought we’d revisit and bring to your attention if you are looking for a way to get this feature disabled in your Firefox. Follow the steps carefully:

Steps:

1. Type about:config in the Firefox address bar.

2. Accept the warning message and proceed (Click “I’ll be careful, I promise) to the configuration page.

Firefox about:config warning

3. Type

browser.taskbar.previews.enable

in the filter and look for the entry with the same name as shown in the following screenshot.

Firefox 4 taskbar previews config
4. Change the value to “false” by double-clicking. That’s it. You will only see a preview of the one (active) tab preview instead of the multiple taskbar tab previews.

Firefox taskbar tab previews disabled

You might also want to read our tutorial on how to enable All Tabs Preview in Firefox.

Add Images To Your Gmail Signatures

Gmail has recently launched a new feature that lets you add rich HTML signatures right inside your Gmail without needing to any hacks. Until now Gmail didn’t have a built-in support for rich text HTML signatures, if you had to add a signature, it used to look like something as shown below;

gmail_old_signature

Now that Gmail has official support for rich text HTML signatures, you can create a more customised signatures like the one shown below:

Gmail html signature

To start using this feature in Gmail, follow the steps:

1. Login to your Gmail and go to settings page.

2. Find the signature section under settings

3. You can see a much familiar rich text editor that you would normally see while composing a mail using Gmail.

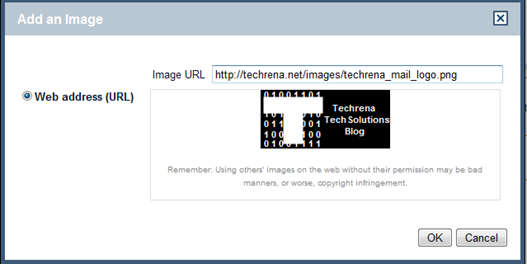
4. You can even add images and link them to your profiles on various social networking sites.Click on the “image” icon to start uploading a image.

add images in Gmail signatures

The only issue here is that you can only upload images that are already present on the web, however you can’t upload images directly from your computer. That being said, one need not bother much about it because images can be easily uploaded to Flickr or Picasa for permanent storage and faster access. You can also resize the image to three different sizes (small, medium or large).

5. You can even change your font size, style, color etc. using the rich text editor. Click on the “save changes” to save your signature.

[How To] Enable All Tabs Preview In Firefox 4

firefox logo

As Mozilla has made Firefox 4 Beta to be available publicly. My Firefox lovers have already downloaded it and managed to get a first look of what’s in store for the upcoming Firefox 4. Whie we still learn about all the major and minor features introduced in Firefox 4, we thought we would share this minor and handy feature that may interest you. This feature is called “All tabs preview”. It is similar to taskbar-tabs preview, but built right into the Firefox without needing to install additional add ons. By default this is not active in Firefox 4.0, but you can always activate it by following the steps briefed below:

All_tabs_preview_firefox_4

Steps:

1. Type “about:config” in your Firefox address bar and press enter.

2. Accept the warning that you get under “This might void your warranty”. Click on “I’ll be careful, I promise”.

this might void your warranty firefox

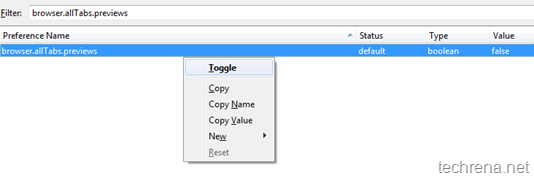
3. Now type “browser.allTabs.previews” and look for a entry with the same name (Preference Name).

All_tabs_preview_firefox4
By default, this has been set to “false” which disables the All Tabs Preview feature in your Firefox 4. To enable this, double click on it or right-click and choose “Toggle”, change the value to “True”. Close the about:config window.

4. You can now spot a new “List All Tabs” icon at the top right hand side, just below the close icon of your window. click on the icon to see the preview of all the opened tabs of your Firefox.

All tabs preview firefox 4 icon

To disable this feature, go back to the third step and change the value of browser.allTabs.previews back to “false”.

Tip: Learn how you can run two different builds of Firefox on the same computer.

Firefox 4.0 Beta 1 & Beta 2 Builds Available For Download

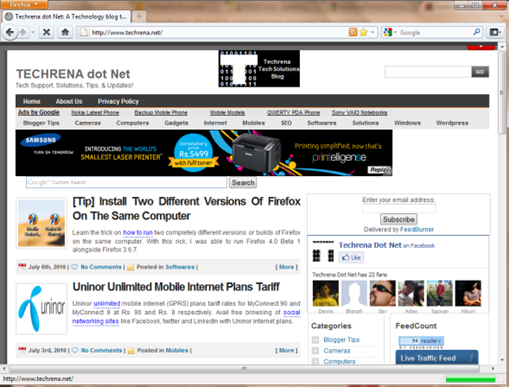
Firefox 4.0 Beta 1 Screenshot:

Firefox 4 beta 1 screenshot

Mozilla has recently unveiled a new Beta version (yeah, it’s still buggy and under testing) of  upcoming Firefox version, Firefox 4. Users can get a rough idea about how the upcoming Firefox 4x versions would be by installing this beta version of Firefox. You can download Firefox 4.0 Beta 1 and Firefox 4.0 Beta 2 Pre Build from the Mozilla’s directory of nightly builds links for which are posted at the bottom of this post.

Changes in Firefox 4.0 Beta :

1. New User Interface simple in line with Windows Aero in Windows 7 and Windows Vista also supports the new Glass translucency effect. This version  supports multiple tab previews much like in Internet Explorer 8.

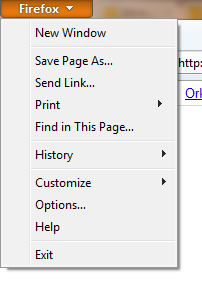
2. The menu bar has been repositioned at the top most left of the windows, which you might have seen in the latest Opera browser too.

Firefox 4 menu

3. Another change includes the change in the position of the tabs. Until Firefox 3.6, the tabs are used to be placed below the address bar, which is not the case in this new version. Tabs are neatly placed above the address bar like Google Chrome.

Firefox_4_address_bar

Download Firefox 4.0 Beta:

Update:Download from Firefox Beta page (available for public download)

[Tip] Install Two Different Versions Of Firefox On The Same Computer

firefox logo

Today I wanted to install and test the latest Firefox 4.0 Beta 1 version on my laptop where I had already installed Firefox 3.6. I didn’t want to loose all my customised addons and other preferences that I have been using in Firefox 3.6, at the same time I should also test the latest Firefox 4 beta version. The option to use portable version of Firefox, is obsolete here. So in short, my PC should have both the Firefox builds installed and should be able to run both independently. I looked for a possible solution, and I think I was successful in  accomplishing the task, hence I’m sharing it here:

Steps:

1. First download and install the new Firefox version (Firefox 4.0 Beta 1 in this case). Don’t worry Firefox will keep your old installation as such and will install Firefox 4.0 Beta 1 in a separate folder.

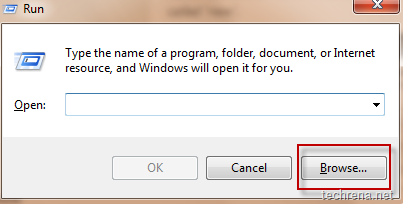
2.  Now go to run (by pressing Windows button + R) command, and click “Browse”.

run windows browse

3. Locate the “firefox.exe” from the program files and click “Open”. It will show

"C:\Program Files\Mozilla Firefox\firefox.exe" [If you are not able to see backslashes “\”, see the image below:

Firefox.exe shortcut path

in the run command filed.

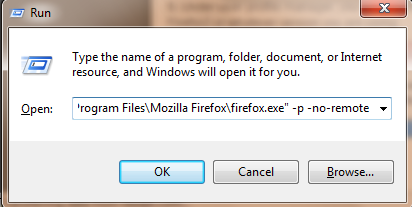
4. Just append “-p -no-remote” to it and click OK.

run program path

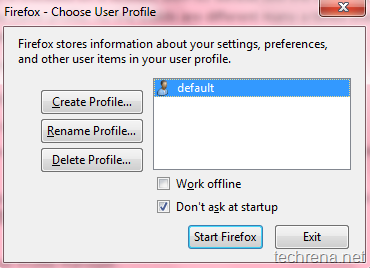
It will open Profile Manager.

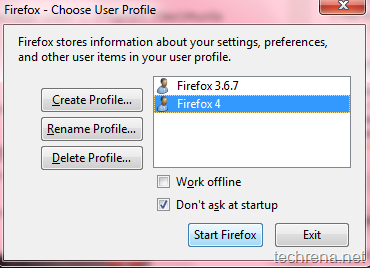
5. Under user profile manager, you will just find an entry called “default”. Rename it to something like Firefox3 or whatever version you are using.

Firefox User Profile Manager

6. Now create a new profile (something like “Firefox4”) through the “Create Profile" Wizard”.

7. So by now you will have two user profiles for Firefox.

choose user profile

8. Now create two separate shortcuts for both the versions on your desktop.

Firefox desktop shortcuts two different builds

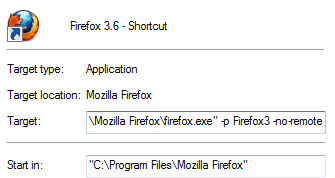
Right-click on the shortcut for the older version and under shortcut target append the following line:

-p Firefox3 -no-remote

[ replace “Firefox3” with whatever your profile name that you had given].

So the shortcut will look like this after editing:

Firefox 3.6 shortcut profile name

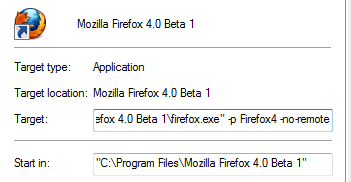
Add the following line to the shortcut for the new version (Firefox 4.0 Beat 1 here):

-p Firefox4 -no-remote

[Replace “Firefox4” with whatever profile name that you have chosen]

The shortcut now appears as shown:

Firefox 4 Beta shortcut with profile name

Save the shortcuts and give them appropriate names so that you can distinguish them.

Now you can use these shortcuts to open either of the Firefox versions at ease. However, please be noted that you cannot run the two different versions/builds at the same time.

The trick involved here is all about using Firefox user profiles.Without using profiles, if you try to open the Firefox 3.6 version with Firefox 4.0 beta 1 also installed, then it’ll only going to launch Firefox 4 instead of the other.

Turn Off Your Laptop LCD Monitor Screen Manually With A Single Click

Laptop LCD screen

As all of us are quite familiar with desktop computers, where we can turn-off the monitor just by pressing a button. But when it comes to a laptop, we know that you can always close the lid to turn off the LCD screen automatically. But wouldn’t life be simpler if we had a button to turn off the LCD screen of the laptop ?

Here is a simple program that can be used on windows based systems (including Windows 7 and Windows Vista) to manually turn off your laptop’s LCD screen.

This is pretty much useful when you want to just listen to the music on your laptop keeping its lid open. This also saves some energy, knowing which some manufactures do offer this kind of option on the laptop while most of the others don’t. (Sadly, my HP Pavilion notebook also lacks this feature).

A million thanks to Taimur Asad of Redmond Pie, who has developed this simple program called “Turn Off LCD” based on his experience with HP DV2799 Special Edition notebook that he owns. He wrote this application in C# with Microsoft Visual Basic 2008. It makes use of a DLL (User32.dll) file from Windows using System.Runtime.InteropServices namespace which then calls the required function.[ More tech info at Redmond Pie post]

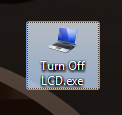
Turn Off LCD shortcut

Just download the zip file from the following link and run the Turn Off LCD.exe (85 KB in size). That’s all you need to do, you can now observe your laptop’s LCD screen being turned off. Just hover the mouse or press any key to turn on the LCD screen again. If you have liked this, then you might want to add similar shutdown shortcut to your notebook also.

Download Turn Off LCD (v1.01, 68.5 KB)

Photo credit

[Tip] Top 4 Ways To Schedule Your Facebook Status Updates And Twitter Tweets

With the evolution of social media, so many new features are being added to the social networking sites so often to keep up with the ever increasing demand from the users to stay connected with their pals in the sites like Facebook and Twitter in a number of different ways. But we still feel that they are lacking some features. One such feature I think of is the ability to schedule the updates in the networking sites so as to respond faster to future events like birthdays, parties etc.

We understand how handy it could be if we are able to schedule Facebook status updates and the Tweets in twitter. Here are the list of such services (most of them are free) offering this feature.

1. Sendible

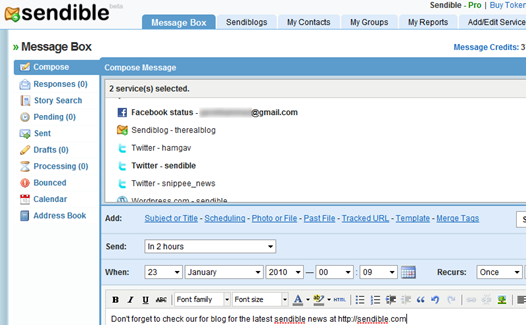
Sendible schedule

Sendible is the popular tool for scheduling emails, sms and updates for social networking sites like Facebook, Twitter, MySpace etc. If you signup as a free user, you can send up to 100 updates per month using Sendible. You can also send messages to more than one site at the same time using Sendible.

2. LaterBro

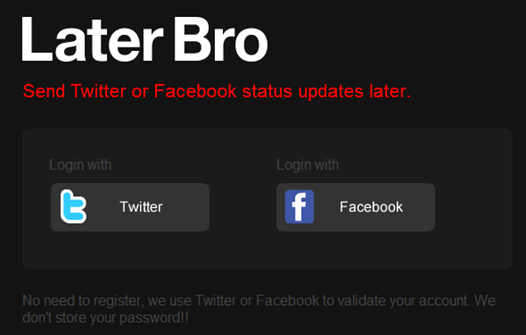
LaterBro twitter facebook updaes

LaterBro (funny name, isn’t it?) doesn’t require you to create an account at their site. You just need to login to the site using either your Twitter account or with your Facebook account. You can then schedule Facebook updates or tweets from multiple accounts.

3. Social Tomorrow

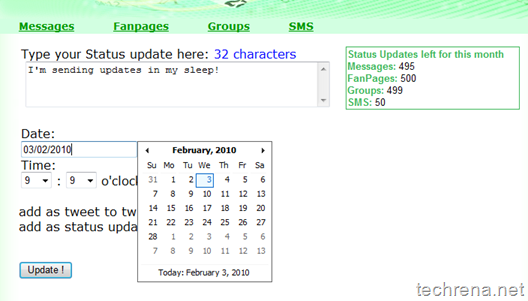
Social tomorrow facebook

With Social Tomorrow, you can schedule Facebook status updates, fan page wallposts, twitter tweets and sms text messages. Note that there is a limit of 500 messages per month.

4. Hootsuite

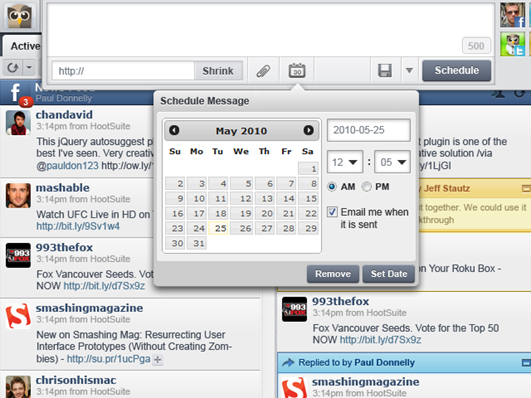
Popular web based twitter client Hootsuite also offers scheduling Facebook and twitter updates. You can see all your scheduled messages under one column. It is an easy to use and already established service, strongly recommended.

HootSuite_schedule

Enable/Disable Auto Fill Or Auto Complete In Firefox

AutoFill Firefox

Firefox by default is coming up with AutoFill or Auto Complete feature in location bar (address bar), but for some reasons if you see it disabled in your Firefox, you can enable it in the following steps:

1. Type about:config in the address bar.

about: config firefox

2. Just accept the “This might void your identity” warning to proceed to the about:config settings page

3. Under the Preference Name, filter the entries by typing “Autofill” in the filter bar.

Autofill in browser urlbar

4. Change the value field to “false” to enable the Auto Complete feature in the browser URL bar.

Just set the value back to “false” to disable the auto-fill feature in the location bar.