Tip: Make Taskbar Previews Load Faster In Windows 7

Windows logo

Taskbar thumbnail previews take a bit of time to appear when you hover your mouse cursor over any taskbar icon in Windows 7.This delay if set by default to 400 ms by the OS.However, if you want to change the delay time so that the taskbar thumbnail previews load faster, here’s the tutorial that you need to follow.

1. Go to Start Menu, right-click on Computer and select Properties
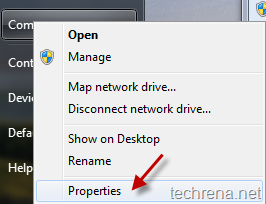
my computer properties in windows 7

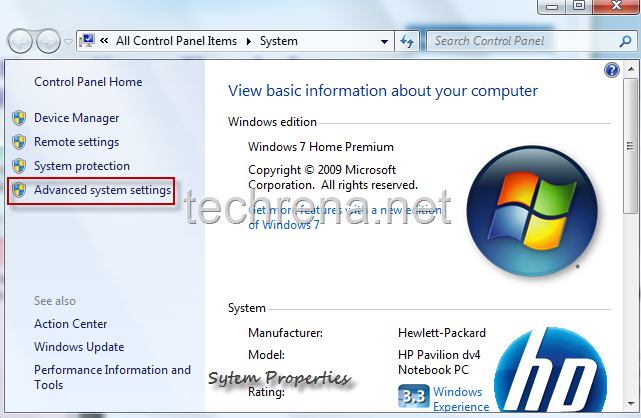
This will open the System Properties window, click on Advanced system settings.Alternatively you can use Windows + Pause/Break shortcut key to open the same.

System_properties_windows7

2. Now under the System Properties, go to Advanced tab and click Settings under Performance.
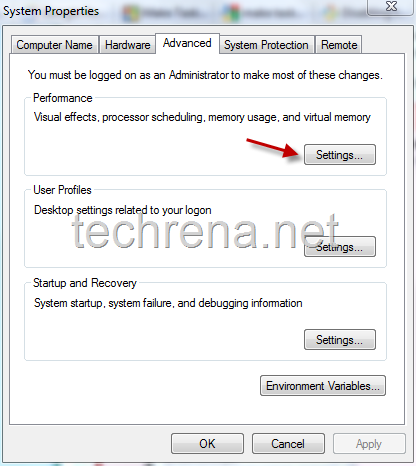
Advanced Settings in System Properties

3. This will open up Performance Options windows, now there, uncheck “Animations in the taskbar and Start Menu”.
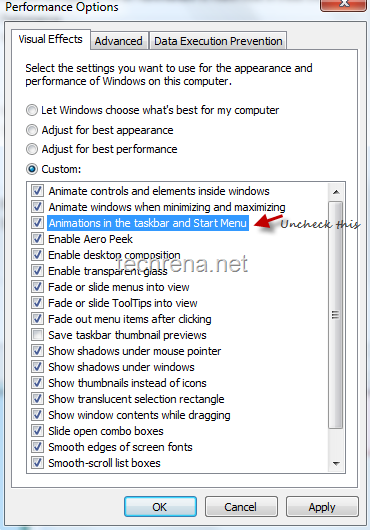
Performance Options under Visual Effects in Windows7

This option should be deselected since, you may not see much  difference after trying out this tutorial if you keep this option checked.

4. Now go to registry editor by typing regedit in the run command (shortcut: Windows + R).Navigate to

HKEY_CURRENT_USER > Control Panel > Mouse

Find the entry “MouseHoverTime” under it.
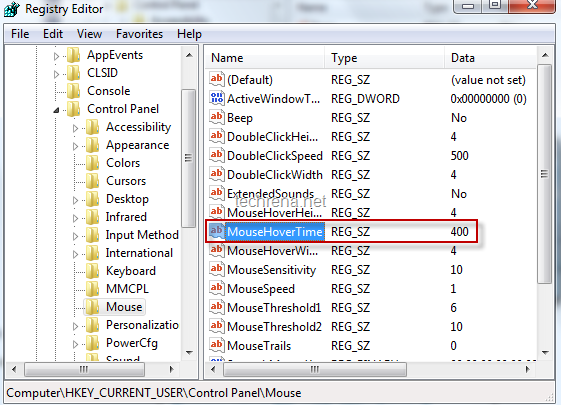
Mouse Hover Time in Regedit
5.You will find a default value of 400 against it in the Data filed.Change this value to something like 100 or even less that that.
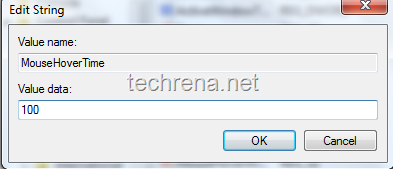
Edit MouseHoverTime string value

That’s it, now you have decreased the Mouse hover time which in turn will make the taskbar thumbnail previews to appear more faster.

You can subscribe to our RSS feed via email for more tutorials under Windows 7.

Create A Facebook Page For Your Website [How To]

facebook_logo

Facebook is undoubtedly the no.1 social networking site in the world.According to Alexa data, it’s next only to Google.It is very much true that majority of the traffic to the most of websites on the internet comes through Google mainly.Similar it is always essential for the website owners to look at sites like Facebook also as traffic sources for their blogs, provided they offer pretty good lovable content that the users on the Facebook like to read.Facebook has made it easier for all the webmasters to integrate Facebook into their sites easier courtesy the Facebook “Like”.

If you are a webmaster the you may be want to know how to create a Facebook page for your website or blog.So we are coming up with thus tutorial that will guide you to create a page for your site in Facebook in 10 simple steps.

Steps:

#1. Go to Facebook.com and login with your ID.If you don’t have an account yet, you must be living in another world, just come back to our world and signup for Facebook now.

#2. Go to Facebook create new page link.

#3. You will now find 3 options:

  • Local business
  • Brand, product, or organization
  • Artist, band, or public figure

Choose the 2nd option, and select “Website” from the drop-down menu.

#4. Give your page a name and click “Create Official Page”.

#5. Now you have created a simple page which is just having name nothing else.So we need to start editing the info about your website.

#6. Add a picture to your website page and edit other information as well from the Info tab.

Change facebook page picture
edit facebook page

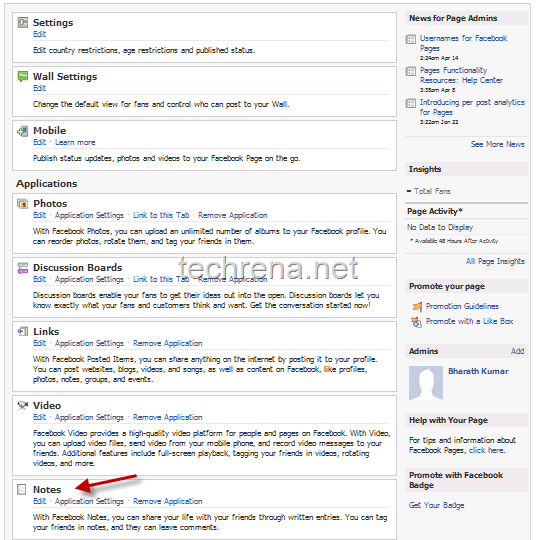
#7. Go to page settings> find a section Notes under Applications.Click on Notes to open and edit notes.

Notes in Facebook page settings

#8. Under the Notes settings, click on Import a blog.
Notes settings in facebook page

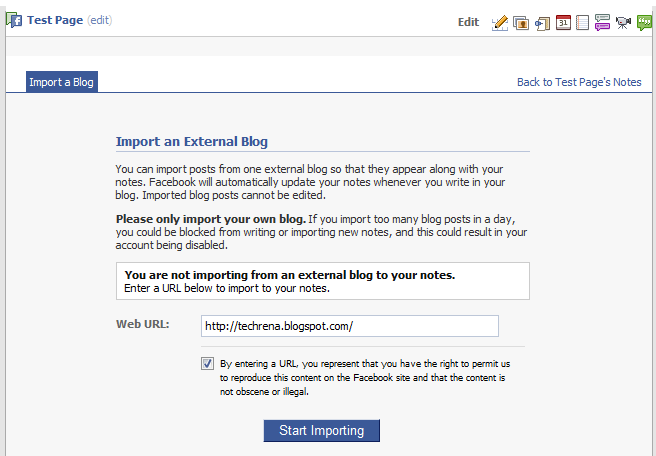
Enter your blog URL in the Web URL field (you can even enter your blog’s RSS feed address) and click Start Importing.

Import a blog in Notes settings in Facebook page

#9. Now you will be shown the preview of the imported blog.Click Confirm Import to finish this step.

Facebook page blog import preview

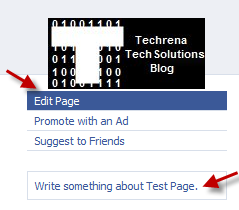
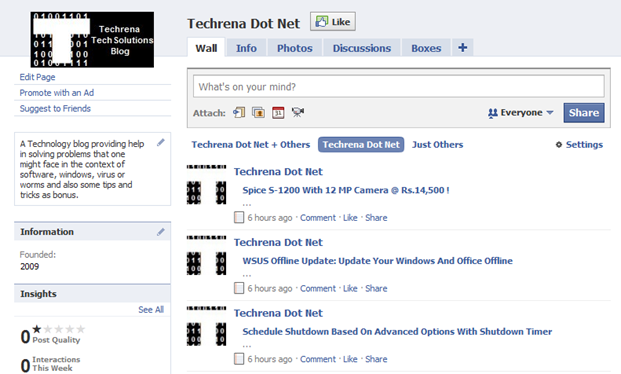
#10. Now you are done with creating a page for your blog.You can also click on “Write Something about your page” link as shown in step #6 to write a brief introduction to your site page.Now your page looks like this, add yourself to the Facebook page by clicking the Like button.

techrena.net facebook page

May be you should also start following our blog in Facebook by clicking the Like button or by visiting Techrena Dot Net Facebook page.

Turn Off New Geolocation Feature In Google Chrome

google chrome logo

The latest beta (developer) version of Chrome, Google Chrome 5.0.375.23 Beta (Official Build 45690) is coming with a inbuilt geolocation feature that lets any website know the location of your computer once you allows access to track your physical location.(See the screenshot below).

Geolocation in Chrome
Well, this may be useful in many ways for websites that offer services based on your location, like Google Maps for instance.This feature gets activated when you click the small little circle at the upper left corner of your browser in Maps.

However if you are worried about your privacy, you shouldn’t allow access at the first place.If you have allowed access initially and later want to rollback and deny access to Google maps to track your location, you should follow the following steps:

Turning Off Geolocation In Google Chrome:

1. Click on the wrench chrome tools menuand click Options.

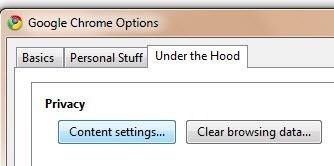
2. Go to Under the Hood tab

3. Under Privacy, click Content settings

Chrome options under the hood

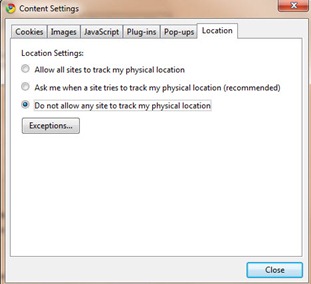
4. Go to Location tab in the Content Settings

5. Choose “Do not allow any site to track my physical location”.

Chrome Content Settings

6. Close the settings windows.

That is it, Chrome won’t track your location to websites from now on, hope this small tutorial has helped you.For more tutorials and updates from us, you can subscribe to Techrena RSS feeds via email.

Schedule Shutdown Based On Advanced Options With Shutdown Timer

Shutdown Timer For Windows:

Many a times, you may need to keep your computer on, until it completes its task like downloading a movie or ripping an entire DVD for instance, these tasks take a considerable amount of time (and considerable amount of CPU usage in some cases), so much so that you just can’t wait until the task gets completed.This where Shutdown scheduler programs will help you.

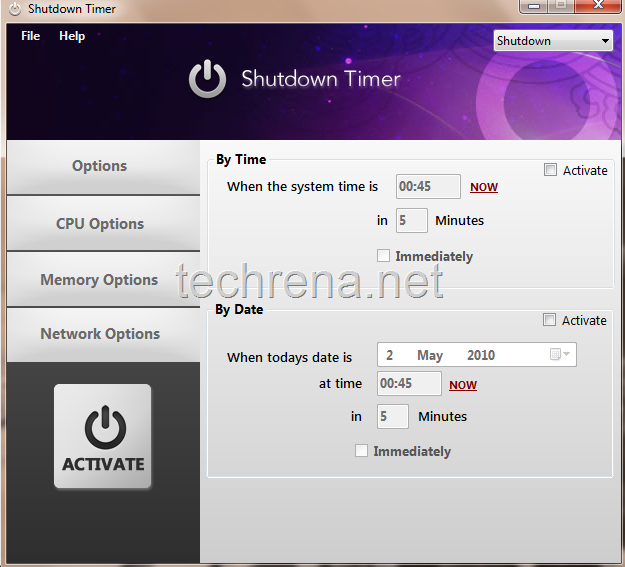
Even though there are quite a number of shutdown scheduler programs available on the internet for download, the one which I’m talking about is more than just a scheduler.Shutdown Timer, as the name speaks out, is basically a shutdown scheduler for windows.

Shutdown_timer_by_time

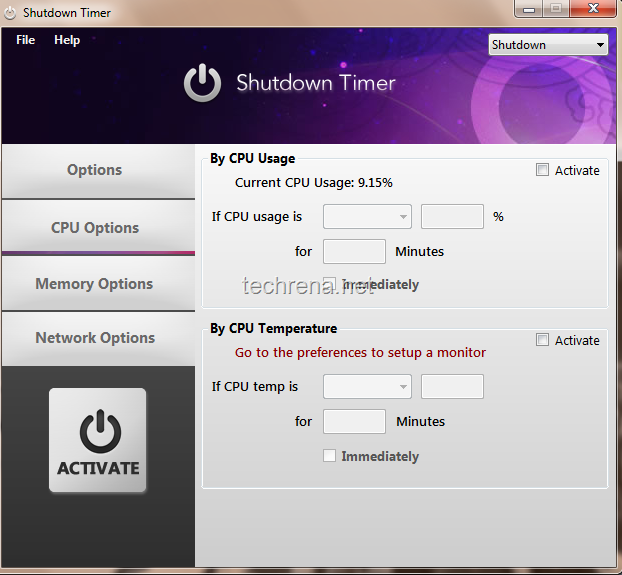
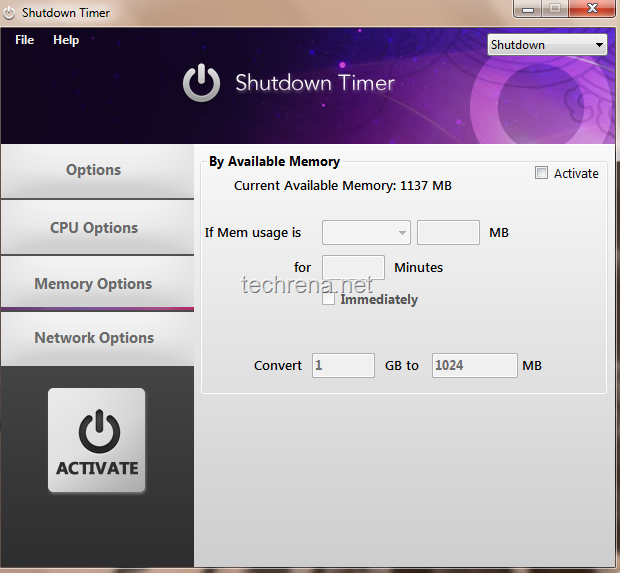
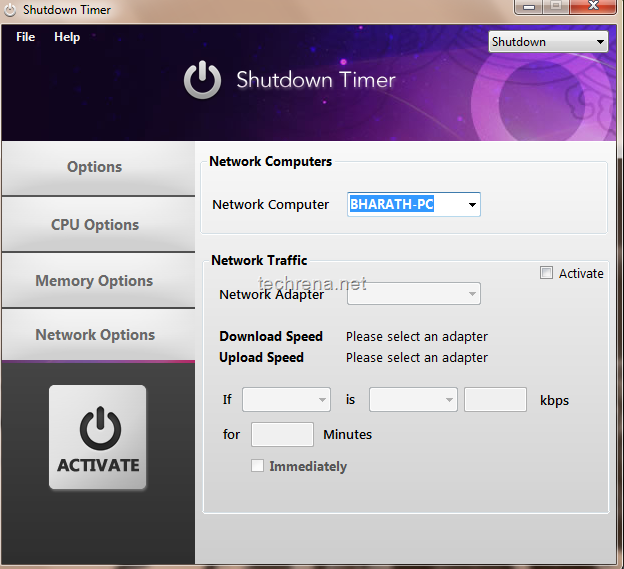
But unlike other schedulers which will only offer you to schedule your shutdown to a predefined time, Shutdown timer offers to schedule your computer’s shutdown based on a wide variety of scenarios.Bundled with a neat and clean UI, Shutdown timer allows you scheduler your computer’s shutdown based CPU memory usage limit or CPU temperature threshold or on network traffic basis besides scheduling your shutdown on a pre-defined date and time.The program continuously monitors your CPU usage and once it reaches the thresholds defined (temperature or memory usage), it will trigger the shutdown event.Scroll down to the bottom for the download links.

Shutdown timer by CPU usage and temperature

Shutdown timer by memory

Shutdown timer by network traffic

Download Links:

Shutdown Timer (Windows 32-bit)

Shutdown timer (Windows 64-bit)

Related: Read how to create desktop shutdown shortcut

Password Protect A RAR File Using WinRAR

Winrar logo

WinRAR is my favorite archiving software till date.It’s so simple and easy to use.That’s why almost all PC users will have installed this by default as their archiving program.But how many of you are aware that you can actually password protect any RAR file using WinRAR ? If you don’t know how to do ut, follow these steps:

Steps:

1. Right click on the file for which you wan to archive with a password.

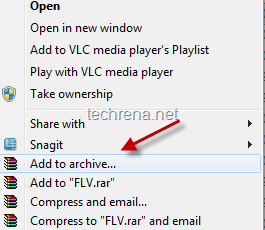
2. Select “Add to Archive”

add_to_archive_winrar

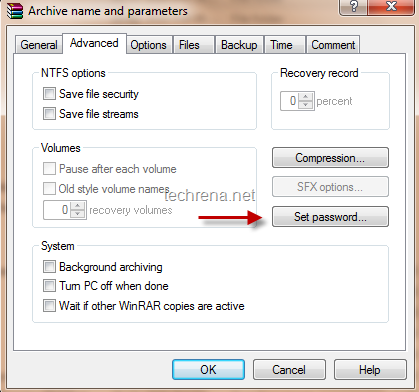
3. In the Archive name and parameters window, go to Advanced tab, click “Set Password”

Archive name and parameters password

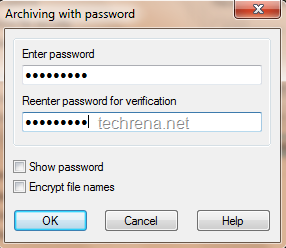
4. Choose the password for the archive and click OK.

setting archive password in Winrar

You can select “Encrypt file names” option if you want to encrypt the files names also, if this is selected, users will not be able to even see the contents of the archive file.

[How To] Save And Manage Google Chrome Sessions

google chrome logo

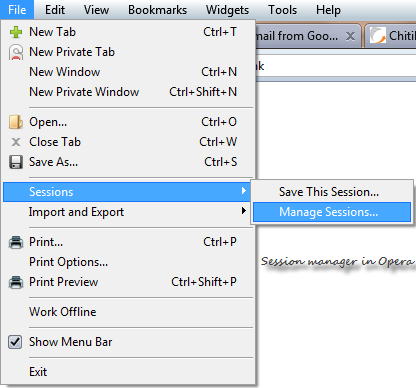
Almost all the browsers off late are coming up with an option to save and manage the browsing sessions.What it means is that you can save the entire session for later reading when you are in a hurry.For instance in Opera, you’ll find this option under File> Sessions>

session manager in opera

But where is such option in Google Chrome?

Ans: It isn’t there at least as of now.This is one of the most requested feature in Google Chrome.I wish the developers considers this in their future releases.

Tip #1: Even though, Google Chrome hasn’t got a default Sessions manager, it does however offer to save your currently opened tabs.For this, go to Wrench > Options > Basic tab> On Start up

Select “Reopen the pages that were open last”

This will save the current session and opens it up as it was when you last closed your Chrome.

Tip #2: There are some good extensions available, through which you can manage your sessions in Google Chrome.One such extension is Session Buddy.

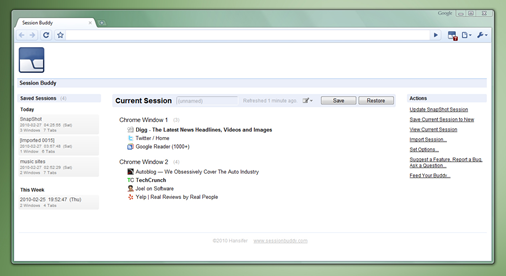
With Session Buddy, you can view all of your tabs in each window of a current or saved session.

Session buddy

The extension also makes it possible to access saved crash recovery sessions automatically after a Chrome or OS crash.

You can also edit each saved session by deleting individual tabs or windows.

Entire session can be exported into a text or CSV format file.

Install Session Buddy

More Google Chrome resources:

Hide Most Visited Sites from New Tab in Google Chrome in Easy Steps

Enable GreaseMonkey User Scripts in Google Chrome

How to Download Video From YouTube in Google Chrome

Reopen or Recover Recently Closed Tabs in Google Chrome

[How To] Configure AutoPlay In Windows 7

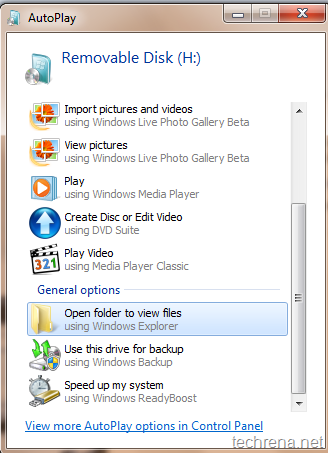
AutoPlay in Windows 7

We are here with yet another tutorial.In this tutorial, I’m going to discuss about how to disable AutoPlay in Windows 7 and Windows Vista.[AutoPlay for CDs/DVDs and AutoRun for USB flash drives or for any removable flash drives.]

AutoPlay (and AutoRun) is disabled by default in Windows 7 and Vista.That’s why Windows gives you an option to choose the possible actions that you  can take without directly playing the DVD in media player.Start reading the following tutorial to learn how to enable or disable AutoPlay .

Tutorial: How to enable/ disable AutoPlay

Covers: Windows 7/ Vista

User level: Intermediate

Complexity: Easy

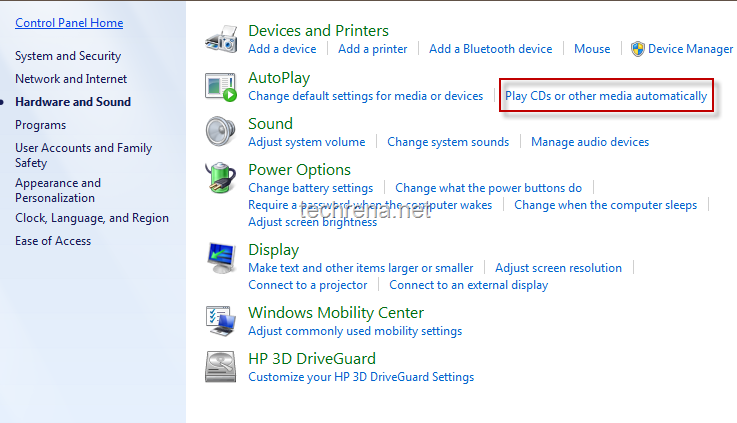
1. Go to Control Panel, and choose “Hardware and Sound” options.

Under AutoPlay, click  Play CDs or other media automatically.

Autoplay in Hardware and Sound

2. Now AutoPlay options window will open.Under uncheck under “Choose what happens when you insert each type of media or device” to completely disable AutoPlay globally for all types of devices.

choose_autoplay_options

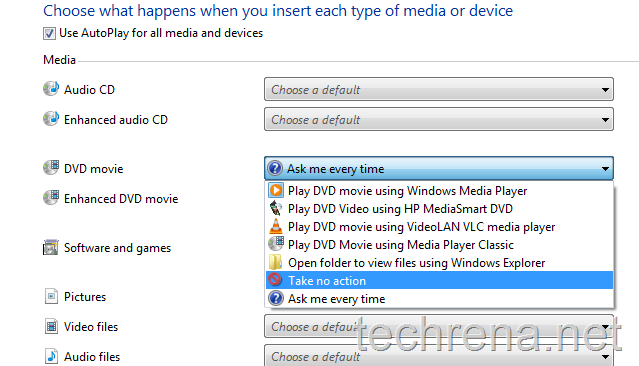
3. If you want to disable AutoPlay for particular devices like  DVD movie instance, select the “Take no action” under the DVD Movie options.

disable_autoplay_for_single_type

Likewise you can also configure auto play for USB devices and other plug and play devices.

Using Group Policy Editor [For Business/ Ultimate Editions] :

This methods works only for Business and Ultimate versions of Windows 7 and Windows Vista.

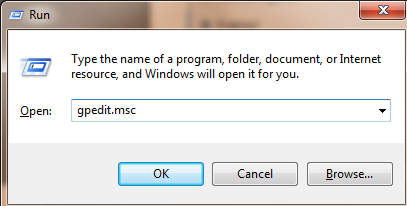
Go to run command by pressing Start button + R.Type gpedit.msc in the text field and click OK.

gpedit run command

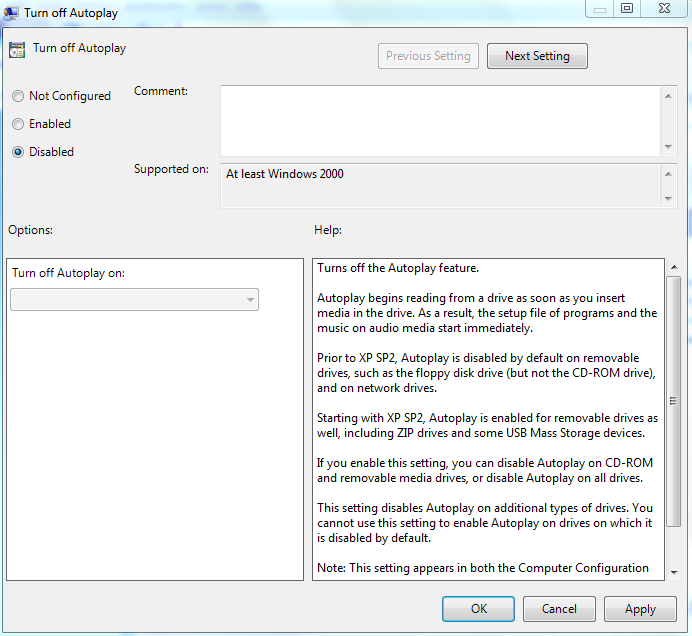
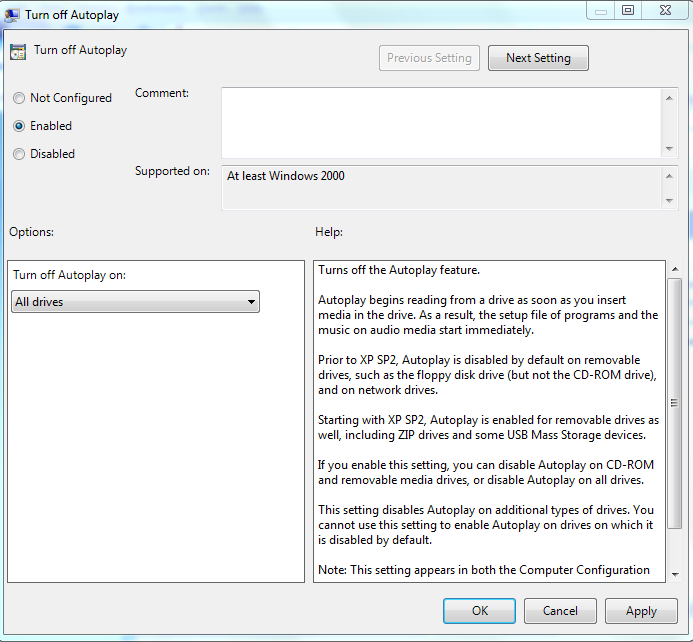
From the Group Policy Editor window, navigate to Computer Configuration\ Administrative Templates\ Windows Components\ Autoplay Policies\ Turn off Autoplay, you will see the “Turn off Autoplay” window as in the screenshot.

To enable the AutoPlay, just change the value of “Turn off Autoplay” to Disabled.

autoplay gpedit enable settings

If you want to completely disable the AutoPlay for all types of devices for default, change select the value Enabled under Turn off Autoplay.

disable autoplay gpedit settings

[How To] Enable Automatic Updates In Windows 7

Windows logo

This is a small tutorial dealing on how to enable or disable automatic updates in Windows 7 or Windows Vista.This is basically intended for beginners who have just installed Windows 7 or Windows Vista in their systems and looking for assistance.

User level: Beginner

Complexity Level: Easy

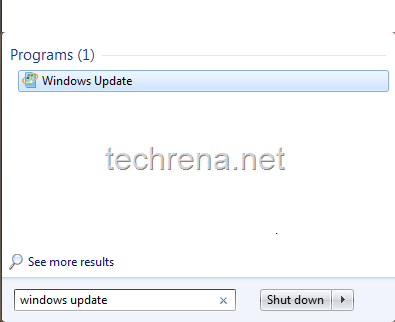
1. Go to Start menu and type windows update in the search box.Click the Windows Update program in the search result.

windows update start menu search

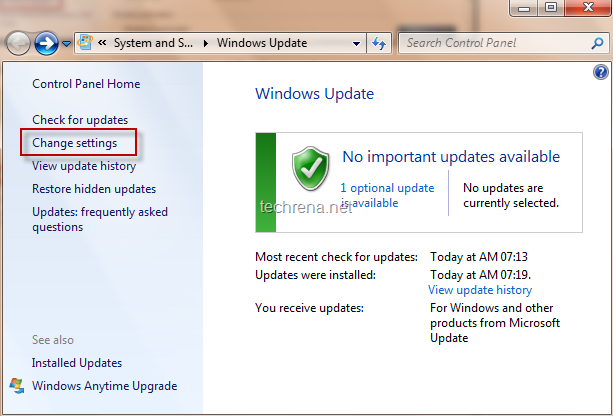
2. Now the Windows Update window will be opened.On the left pane, find “Change Settings” and click on it to open the Windows Update Settings page.

windows update page

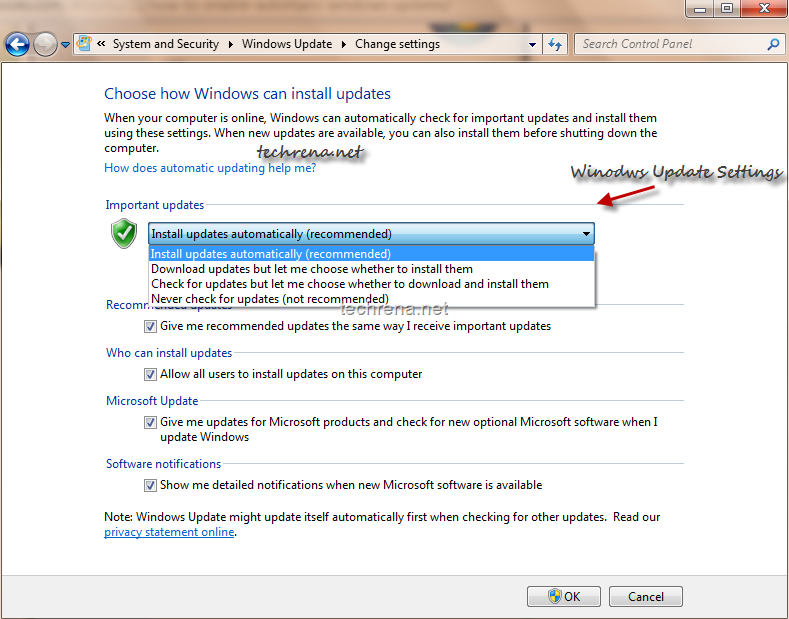
3. In the Windows Update Settings window, as you can see there are basically 4 options to choose from.

  • #1 Install updates automatically (recommended)
  • #2 Download updates but let me choose whether to install them
  • #3 Check for updates but let me choose whether to download and install them
  • #4 Never check for updates (not recommended)

change windows update settings

It is always recommended that you choose the option #1 “Install updates automatically” to install updates that address various vulnerabilities and keep your Windows up-to-date.

Option #2 is also OK, given that it makes your Windows to download the updates automatically as and when they are available but will install them without your permission.

Options #3 and #4  are recommended only if you are using an interconnection with limited data usage (like  using mobile phone to connect to internet).If these options are chosen, your Windows will not automatically download or install the updates.

Find The Last ShutDown Time Of Any Windows PC

At times may be you allow somebody, take for instance your kid to use your computer but strictly warned him or her to shut it down by midnight.But you don’t really know till what time they had used your PC as you can’t figure it out easily by just looking at your desktop Smile.

Luckily you need not worry much, if your system runs Windows.If you want to know how to do that in your PC, follow the steps briefed below:

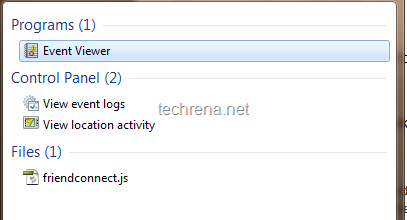
1. Open Event Viewer in your computer:

Windows 7 ot Vists users: Go to start menu and type “Event Viewer” in the search box and open the Event Viewer.

Windows XP users: Go to run command from Start> Run or by pressing Windows+R and type eventvwr.msc in the field and hit enter.

event viewer from start menu

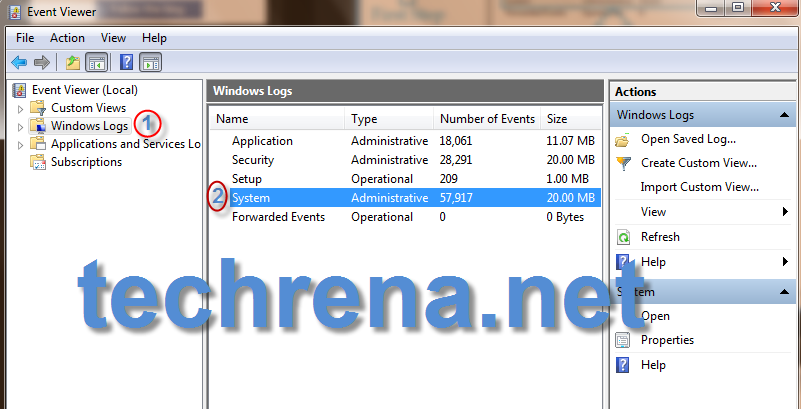
2. In the Event Viewer, On the left side pane click on “Windows Logs” and in the right pane, click on the item “System”  [See the screenshot below].

Windows Logs in Event Viewer Windows 7

3. Now on the right pane, you will find all the system logs information basically divided into 3 tabs: Information,

Date and Time,

Source,

Event ID

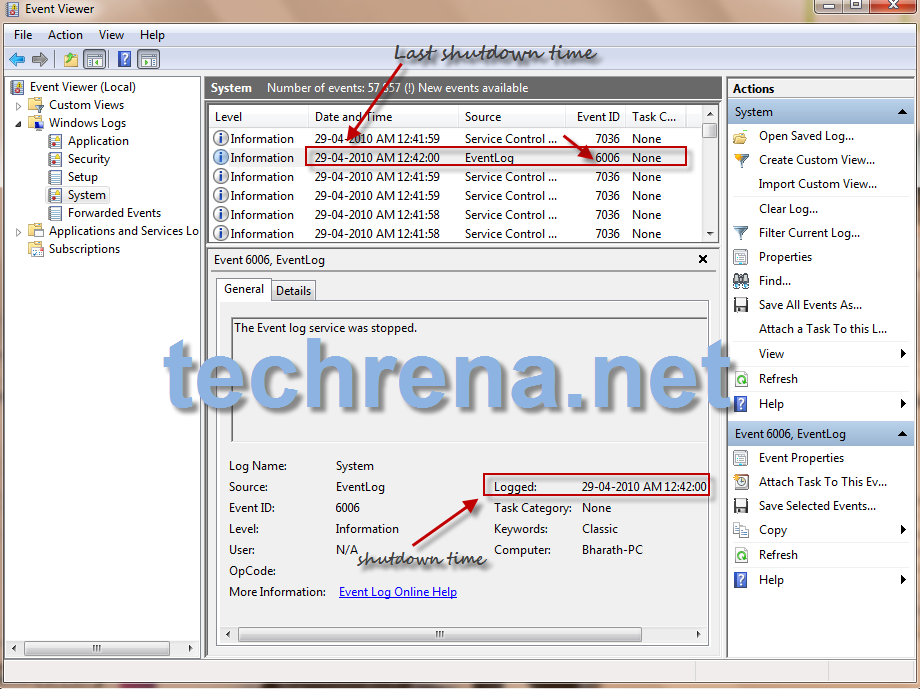
Find the column corresponding to the Event ID 6006, the date and time displayed in this column is when your computer was last shuttedDown.

last shutdown time in event viewer

In the above screenshot, the time shown is 29-04-2010 12:42:00 AM, so this is the last shutdown time of the PC used here.

[How to] Pin or Unpin The Contents Of a Folder in Windows 7 Taskbar

Have you ever thought of adding a shortcut of your favorite folder in the taskbar. Well you can do it in Windows 7. Here we will show how to pin a folder in the Windows 7 taskbar.
Any folder can be pinned to the task bar as a New Toolbar in the Task bar of Windows 7 with a small or large icon and with or without text of the folder name.

Point to be noted:

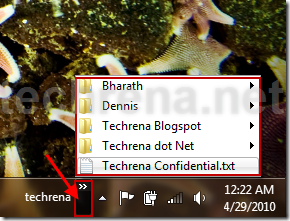
When we pin a folder, we can see only the only the contents of the folder in the task bar. It is like the folder is already opened and displayed in the taskbar. So it is not that the folder’s shortcut is pinned to the task bar, but its just that the shortcut of the contents of the folder is created in the taskbar.

Now just follow the simple steps below to pin the contents of a folder to the task bar.

Pin a folder to the taskbar.

Add a new toolbar in the task bar:

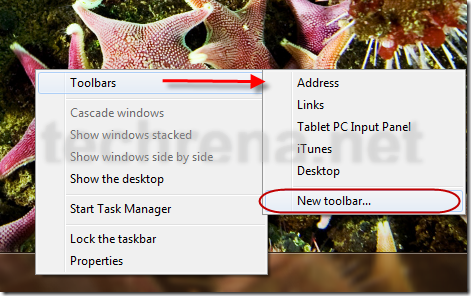
Right Click on the taskbar, go to Toolbars and select New toolbar.

Add_new_toolbar_taskbar

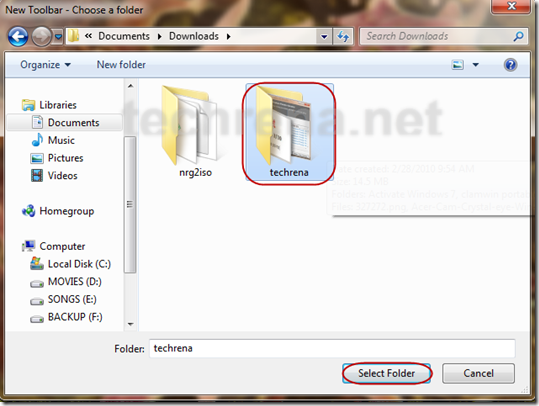
It will ask to select the folder. Select the parent folder which you want to add so that the contents of the folder is shown in the taskbar.

select_toolbar_folder

Now you can see the folder name in the taskbar with its content.

taskbar_toolbar_opened

Unlock the Taskbar to modify the positions and settings if its locked

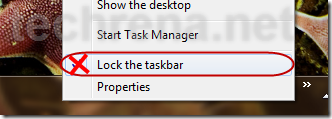
Right Click on the taskbar and select lock taskbar to uncheck it.

unlock_taskbar

Changing the settings of the toolbar:

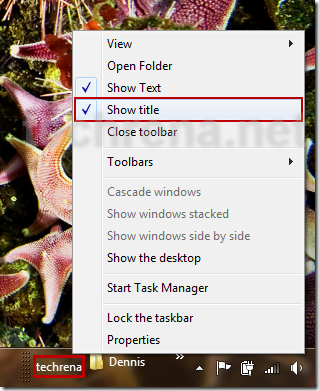
If you don’t want to name of the folder to be displayed but only the contents, then right click on the folder name in the taskbar and uncheck Show Title.

Show_Title

If you want to move the toolbar to the left side, yo have to drag the divider to extreme left to the Start menu.

Drag_divider_to_leftToolbao_divider

If you want to move it back, drag it back to right.

Now, if you want to show bigger icons of the content in the toolbar, Right click on the toolbar, go to view and select Large Icons.

View_large_icons

Now after doing all the changes you can lock the taskbar again if you wan to.

Unpin the folder from taskbar:

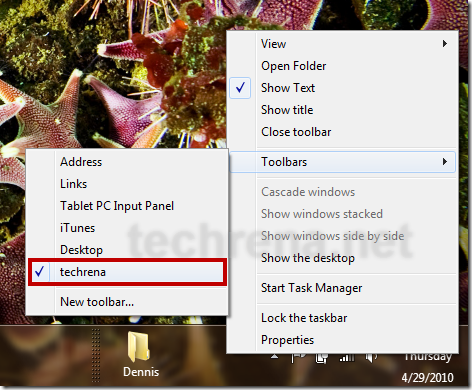
Now to unpin the folder, right click on the taskbar and go to Toolbars and unselect the folder name. You can also right click on the toolbar and select close Toolbar.

close_toolbar

Now you have successfully learnt how to pin and unpin a folder to the taskbar in Windows 7.