[How To] Change IP Address of Your Network Adapters in Windows 7

Windows 7 logo

Changing the IP(Internet Protocol) address of your computer is a basic thing we do at times. Well the IP address we see in our local computer network adapters are mostly for a local networking purpose. There is always a global Internet IP provided by our Internet Service Providers(ISP).

But why do we need to change the IP address? It may be required when you want a local connection be done with no DHCP(Dynamic Host Configuration Protocol) servers. It is because of the DHCP servers are present in most of our systems, we need not provide an IP for every connection, the DHCP host takes cares of the IP allocation. But when you are in your own custom network without a DHCP host, we definitely require to set the IPs of our own to fit in the network.

Here I am going to demonstrate changing an IP address of a local network adapter. This can be used to change the IP Address of any adapter like Wireless LAN, Local Area Connection, Bluetooth Adapters or even virtual Network Adapters.

Step 1:

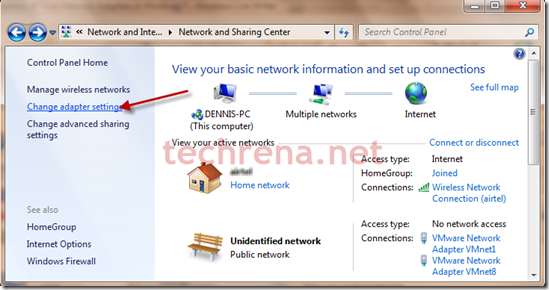
Go to the following location: Control Panel—>Network and Internet—>Network and Sharing Center

Click on Change adapter settings in the top left corner.

network-and-sharing-center

Step 2:

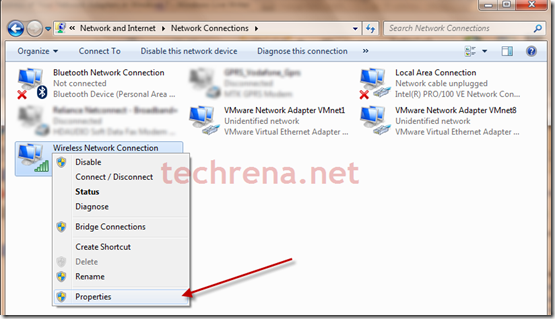
In the next window, you can see all your adapters. Right click on the adapter you want to change the IP, say Wireless Network Connection. Click on Properties.

adapter settings

Step 3:

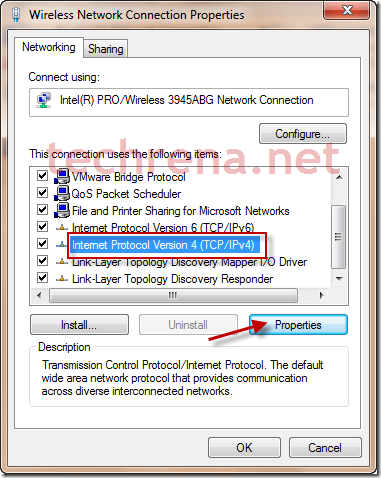
In the properties window, select Internet Protocol Version 4(TCP/IPv4) and click on properties.

network adapter properties

Step 4:

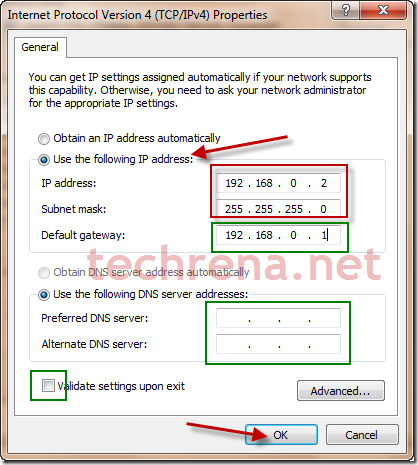
Now Select Use the following IP address. Type the IP address details you need. and Click OK.

TCP IP v4 properties

Your IP address has been successfully changed.

Notes:

1. Default gateway is required when you have to connect to the internet using a router or another computer.

2. DNS servers may be required in case of a direct connection to the internet through you adapter.

3. Validate settings upon exit can also be used to validate the IP if you want.

Given below is some of the IP address formats that we use. You can always use a private network format for your personal use.
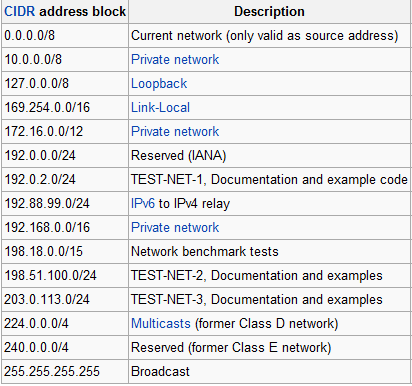
ipv4 address format

IP formats source: Wikipedia

Important Note: Once you set your IP address manually, the DHCP host will not allocate the IP address for your network adapter. Make sure you set it to Obtain an IP address automatically in Step 4 in order to use DHCP host addresses.

[Tip] Disable Built-In PDF Viewer In Google Chrome

google chrome logo

Google has started shipping the Google Chrome browser with a built-in PDF viewer since the release of Chrome 8. Even when you install native PDF readers like Adobe Reader of any other applications to view the PDF files on your system, Google Chrome will automatically disable the browser PDF plugins and enable the built-in PDF viewer. But the built-in PDF viewer in Chrome has got some limitations compared to a standalone PDF viewer. If you want to disable the built-in PDF viewer in Chrome, follow these steps:

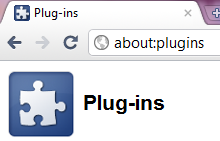
1. Type about:plugins in the Google Chrome address bar and hit Enter.

about:plugins in Chrome

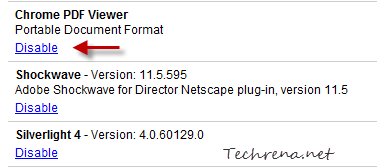
2. All the plugins installed in the Google Chrome will now be shows in the window. Scroll down the list until you locate “Chrome PDF Viewer”.

Chrome PDF Viewer plugin settings

3. Click on the “Disable” link under the “Chrome PDF Viewer”.

Google Chrome’s built-in PDF Viewer will now be disabled and all the PDF files from now on, will be opened using the external PDF reader plugin that you have installed. In case you want to activate the built-n PDF Viewer in future, just follow the step-1 and click the “Enable” link under “Chrome PDF Viewer”.

[Tip] Disable The New Photo Viewer In Facebook

Facebook logo

Facebook has recently introduced a new Photo Viewer (called ‘Photo Theater’) last week. It has become a topic of debate among the Facebook users since then with most of them not supporting the initiative from Facebook to introduce the new theater version of the Photo Viewer. The new Photo Viewer is all about popup slideshow covering up almost the entire Facebook page in black background. If you are one of those that doesn’t like this annoying Photo Viewer, you might want to disable it and revert back to the good old Facebook Photo Viewer. These are the set of workarounds to get rid of the new Facebook Photo Viewer.

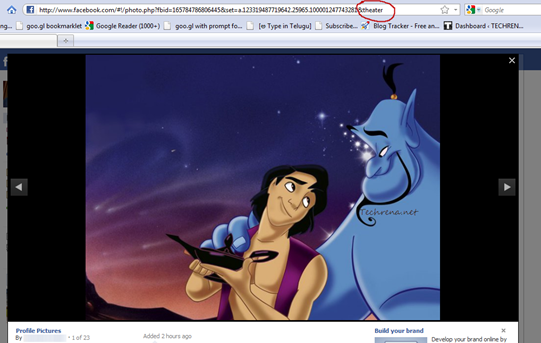
Facebook new photo viewer

Using F5:

Facebook appends the URL of a photo in Facebook with this “&theater” parameter to the URL to trigger the new Photo Viewer instead of the old one (You can manually delete the “&theater” tag from the URL and hit enter to load the photo in the old viewer). But it is found that refreshing the page loads the same photo in the old Photo Viewer. So all you have to do is to press F5 button and the photo should load again in the old Photo Viewer instead of the new one and you will see the rest of the photos in the album in the old Photo Viewer. However, this is not a permanent solution, and you might want to automate the things for you, and this is why you should scroll down to the next workaround.

Facebook old photo viewer

Using Browser Extensions:

If you are using Firefox, you should first install the Greasemonkey add-on and then use the following Facebook Photo Theater Killer script. This script works in Google Chrome too. Alternatively, if you are on Google Chrome, you can install Revert Facebook Photo Viewer extension for this purpose.

[Tip] How To Delete Explorer File Search History In Windows 7

Windows 7 has enhanced search feature that enables users to search for files and folders present in the computer efficiently. The search is faster, more accurate and fetches the results in seconds. Windows Explorer saves and remembers these search terms along with locations of the files and visitors for future use.

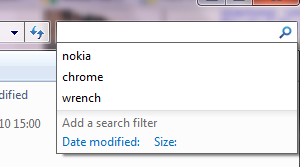
Windows 7 search history

These items will be shown when you start typing the part of the search term of location of a file or folder.While this is pretty useful you might also want to have a choice to delete them when you don’t want them to show up in the Windows Explorer location bar on in the search bar.

The Easy Way:

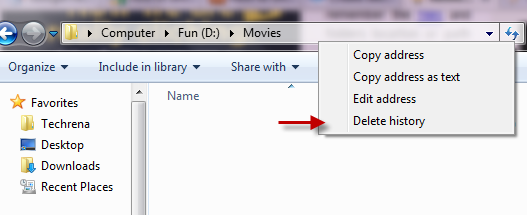
In the Windows Explorer window, right-click on the location bar or address bar when it is out of focus and choose “Delete history” from the context menu. This will delete all the files and folders search terms history that were typed in the location bar and search bar. This should delete the file history in your Windows 7.

Delete file folders history in Windows 7

Alternate Method:

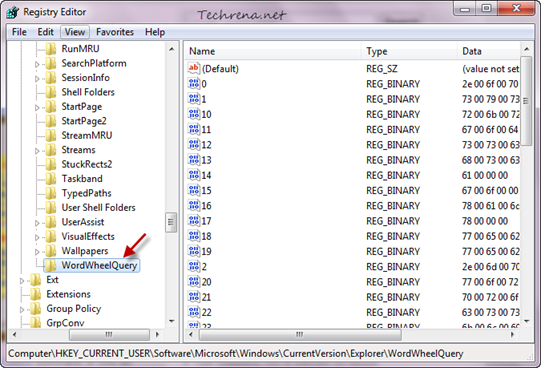
The same can be achieved using Registry Editor as well. Type regedit in the Start Menu search and open the Registry Editor from the results or press Windows button + R to open the Run command and type “regedit” and hit OK to open the Registry Editor.

In the Registry Editor, navigate to the following path:

HKEY_CURRENT_USER\Software\Microsoft\Windows\CurrentVersion\Explorer\WordWheelQuery

Files and folders histoy registry editor Windows 7

and delete all the entries (each one corresponds to a search term) present inside this sub key. That is it. Now all your history related to files and folders would be deleted.

[Tip] Hide Your Facebook Updates From Specific People

Facebook logo

Facebook can be a place for lot of fun.  It has some annoyances too. It all depends on how you use it. Have you ever wondered whether you can post a private post or status update on your post that appears only to certain people and is hidden from other friends? Advanced users of Facebook might very well be aware of how to do this. But if you are relatively new user or never had a clue that such a feature existed in Facebook that allows to set a private post or status update on your wall, read the following guide to quickly learn how to do this:

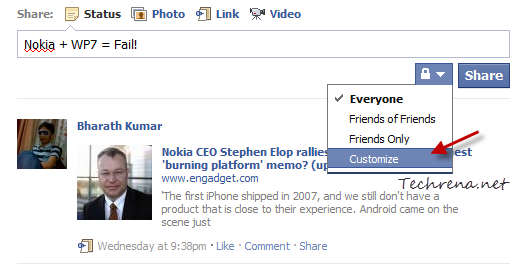
1. Login to your Facebook account, and start post your status update. Click on the small “Padlock” button that is placed just before the “Share” button.

Facebook private status update

Click on the “Customize” button that appears in the dropdown menu list.

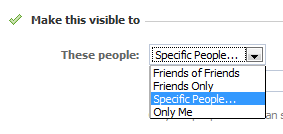
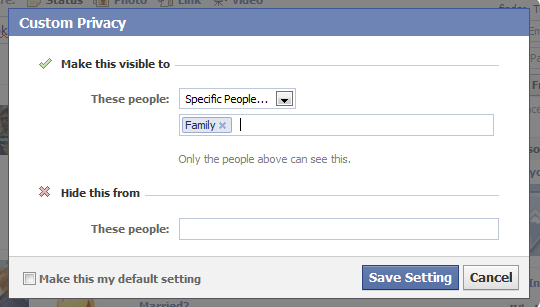
2. In the next window, you will be presented with privacy options for your current status update. As you want only specific people to see your status update, choose “Specific People” from the list under “Make this visible to”.

Facebook status update to specific people

3. You can either choose your friends from Facebook manually or you can create custom friends lists to choose from. To create a friend list quickly, go to your Facebook friends edit page and create a list with your specific friends. If you had already done that, you must now be able to choose a list by typing in the name of the list.

Facebook post visibility

4. Now your status update will only be visible to the people from your chosen list. Or if you want status update to be hidden from few selected friends of yours, you need to enter the names of those friends or friend list under “Hide this from” as in the previous case.

Facebook status update privacy

Click the “Save Setting” button once you are done. Your status update will now be visible to specific people or friends and will be hidden from other friends. You may also check the “Make this my default setting” option to set it as your default setting for other future updates.
[How To] Schedule Emails in Gmail with Boomerang

I would say Google’s Gmail is the best email service. We do not need any introduction to Gmail here.

Well, if you use Gmail this is going to be an interesting post. Here, I am going to write how to schedule your emails. Means you can send or receive your mails at a particular time set by you in prior. Let me explain how it is going to be useful. Say one of your good friend’s birthday is coming and you do not want to miss wishing him. So how do you make it 100% sure that you wish him at midnight? Just write a beautiful email and schedule it to the time you want it to send using Boomerang for Gmail.
Boomerang-for-gmail

Boomerang is an add-on for Firefox and Chrome which lets you to schedule the emails in Gmail.  Follow the following steps to install it and schedule the mails.

Step 1: Download Boomerang. Click the Install Boomerang button below.

download-boomerang

Step 2: Click on Allow Button to install the Add-on. If you are installing on Chrome, Click the Continue button in the left lower corner of the window. (Click to enlarge the image below).

Install-boomerang

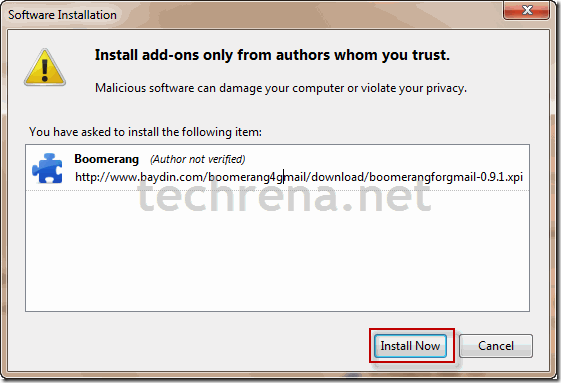
Step 3: Click on the Install Now button to install the add-on.

install-now-plugin

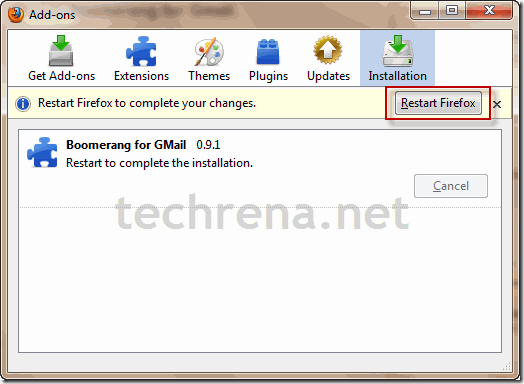
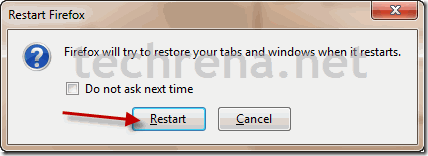
Step 4: After installation, it will ask you to restart the Browser. Restart the Browser to use the add-on.

restart-firefoxrestart-firefox-window

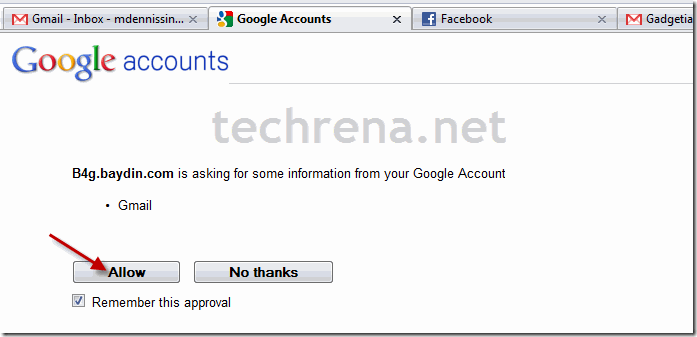
Step 5: Now after restarting the browser Google will ask you if you want to share information to  Boomerang. Click on allow.

allow-information

Step 6: Now you should be able to see Boomerang on the top right corner.

boomerang-installed

As Boomerang is finally installed you can schedule your emails. As follows:

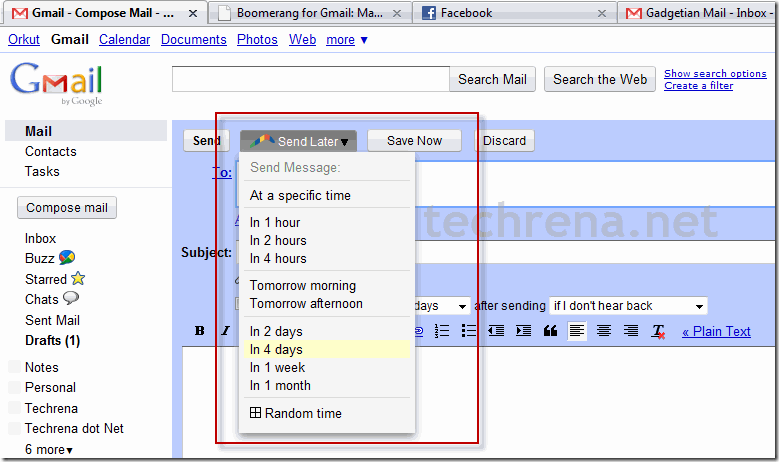
To send a mail at a scheduled time, click on Send Later Button and select any time.

send-email-later

If you select At a specific time, you can enter the exact time and date.

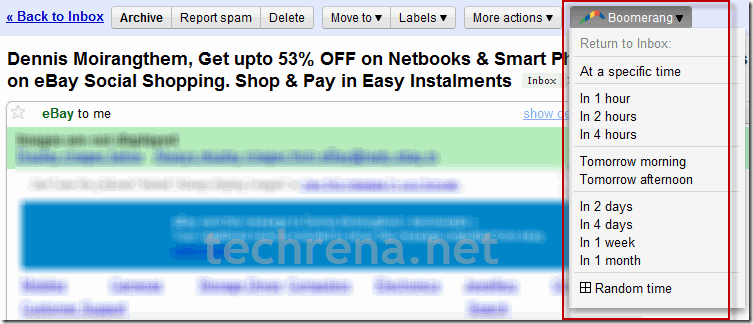
To re-receive an already received mail, click on Boomerang after opening the main and select the time you want it to return to your inbox.

return-to-inbox

I hope that this add-on will be really helpful for all of us.

[Tip] Change Wireless Networks Priority In Windows 7

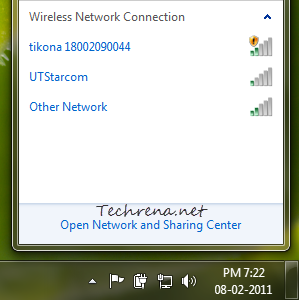
Wireless networks in Windows 7 taskbar

Connecting to a wireless network in Windows 7 is pretty much simple and straightforward compared to the days of Windows XP and earlier operating systems. However if you have more than one wireless network available at your home or workplace, you might want to assign priority to these networks to tell your windows to which it should try to connect first. Al though you can choose to a wireless networks from all of the available wireless networks that appear under the network icon in the taskbar, it would be better if your computer connects to your favored networks automatically. This tutorial explains how you can change the priority or order of wireless networks in Windows 7.

Steps:

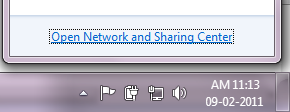
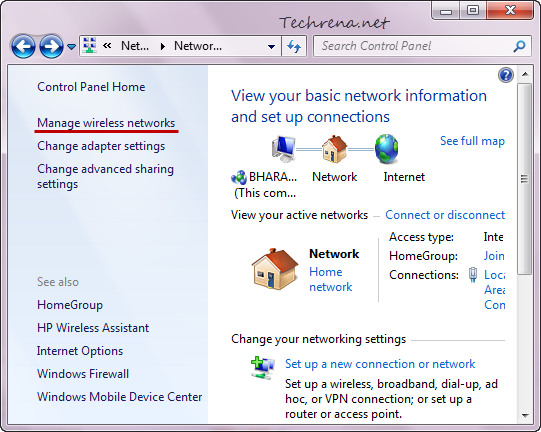
1. Open the Network and Sharing Center either from link in the network icon in the taskbar or from Control Panel > Network and Internet > Network and Sharing Center

Network and Sharing center link at the taskbar

Click on the “Manage wireless networks” link found on the left-hand side pane.

Manage wirelss networks link in the network and sharing center

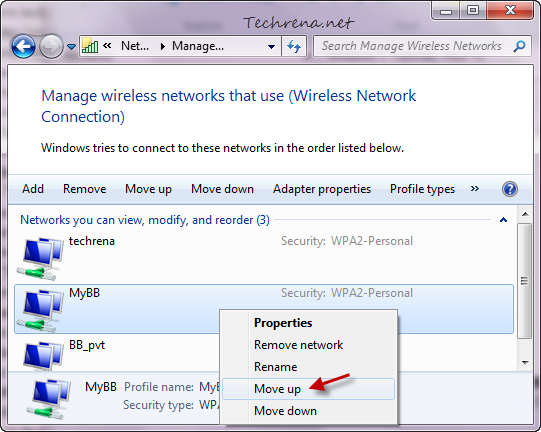
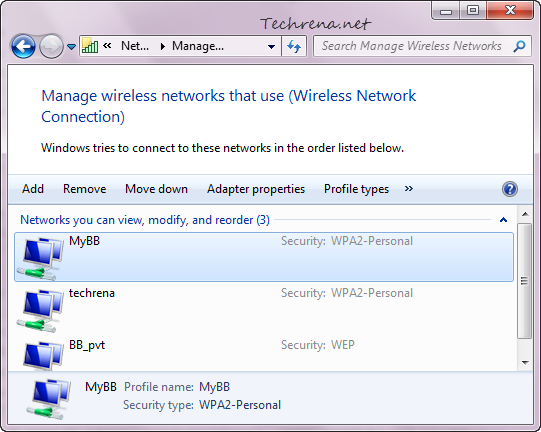
2. In the Manage wireless networks window, right-click on the wireless network for which you want to change priority and you can either move it up (giving more priority) or move it down (lesser priority) depending on your usage.

Move wireless network up in Windows 7

3. Now the order of preference of the wireless networks used by your Windows will be changed.

Wireless-networks-windows-7-priority-changed

You are now done with setting up the priority order for your wireless networks. So from now on, Windows will try to connect to the first one wireless network in the priority list. If it isn’t available, then it will try the next connection and so on. You can also change the settings to not connect to a particular wireless connection automatically.

If you are looking to change the order of priority among the various wired and wireless network cards on your computer, read our popular post on changing the network cards priority order in Windows.

[How To] Delete Cookies In Google Chrome

google chrome logo

This simple step-by-step guide is to teach how to delete individual browser cookies in the Google Chrome browser. Follow the steps carefully to clear or remove individual or all cookies in Chrome.

Steps:

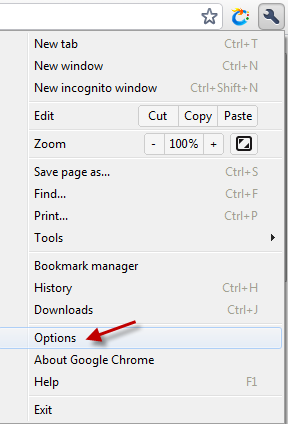
1. Click on the wrench icon Chrome wrench icon tools menu towards the left-hand side of the Chrome window and click “Options” from the list.

Chrome options in the Menu

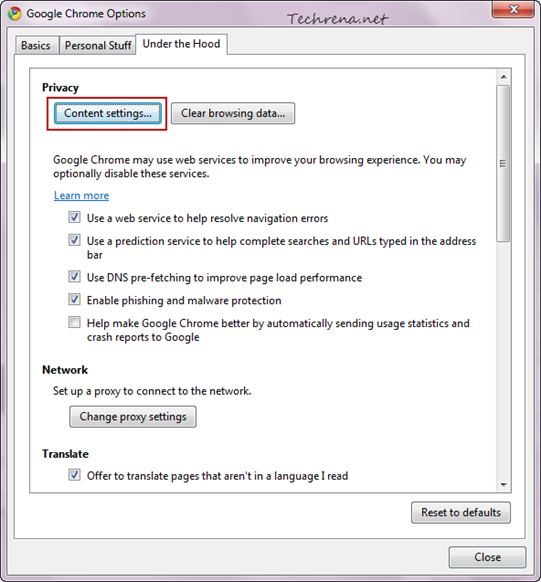
2. And in the “Under the Hood’” tab, click on the “Content settings..” button.

content-settings-chrome-options

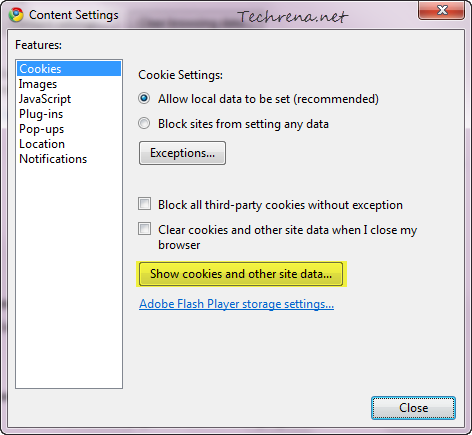
3. Click on the “Show cookies and other site data..” button.

Cookies settings in Chrome content settings

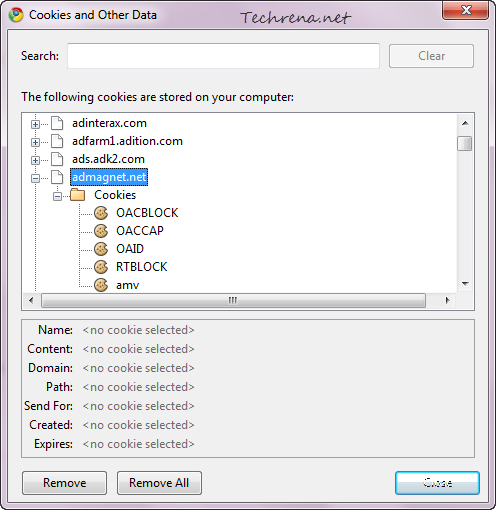
4. Now you will see all the cookies stored for different websites in Chrome

cookies-google-chrome

Select the cookies that you want to delete and click the Remove button delete that particular cookie. To delete all the cookies stored in your browser, click the “Remove All” button. The settings are almost similar on Chrome installed on other operating systems like Mac OS X, Linux etc.

Search The Internet Right From The Windows 7 Start Menu

start menu internet search

Searching the internet is fun and it would more fun if it could be made easily accessible. We all by default use browsers to search (through the address bar, search box or using the search engine website) the internet. But the modern gadgets like Android phones, tablets and others are coming up with more quicker ways to search right from their home screens. In fact, you will find a Google search box on the homepage of most Android devices. Wouldn’t it be good if we have such quick access to any search engine like Google from our desktop? Of course we have few third party applications like Google Desktop to serve the purpose. If you are on Windows 7, you don’t even need any special software to achieve this. Windows 7’s Start Menu has integrated the web search feature right in it. Let’s see in detail, how to enable and search the internet directly from the Start Menu in Windows 7.

>> Method –1: Using The Registry Editor

This method works on all the different editions of Windows 7 as we make use of the Registry Editor that’s key ingredient of all the different editions of Windows 7.

1. Type “regedit” in the Start Menu and open the regedit.exe from the results under the “Programs” section.

2. Navigate to the following path in the registry editor:

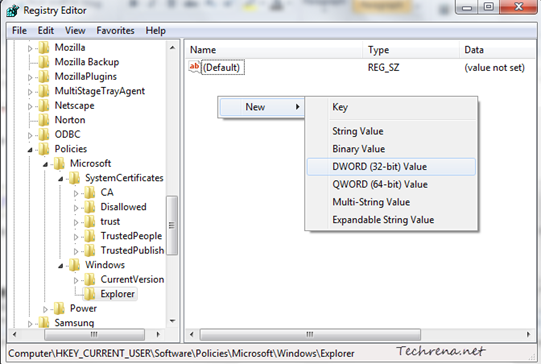
HKEY_CURRENT_USER\Software\Policies\Microsoft\Windows\Explorer

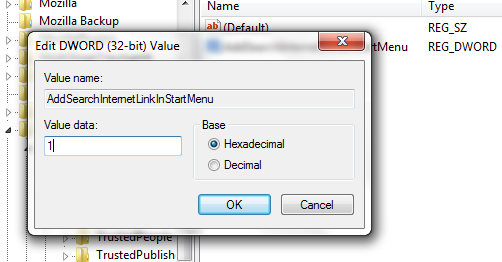
3. Right-click on the right-hand side pane and choose New > DWORD (32-bit) value and name it as “AddSearchInternetLinkInStartMenu”.

registry editor internet search from start menu key

Adding search internet link in the Start Menu

4. Now double-click on the DWORD and edit the “Value data” filed to “1” and click OK.

Adding search internet link in the Start Menu key value

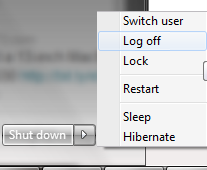
Now either log off from your user account and long back in or just restart the “explorer.exe” process from the Task Manager.

Log off link in the Start Menu

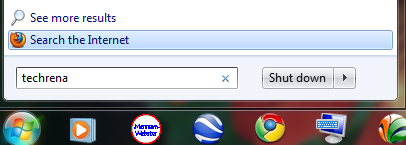
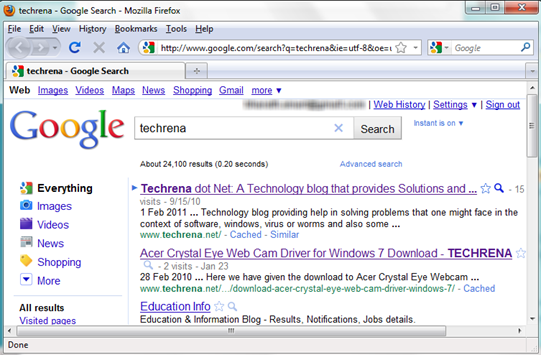
You can now search for anything in the Start Menu and you will see the “Search the Internet” option below the “See more results” link. Clicking on it would open your default browser (Firefox in my case) and search the web using your default address bar search engine for your browser (Google in my case).

Google search from start menu in Windows-7

To rollback or undo this change, just change the Value data back to “0” or completely delete the DWORD in the step 4.

>> Method- II : Using The Local Group Policy Editor

Local Group Policy Editor (GPEdit, as it is also known as) is not available in the Hone editions of Windows 7. So if you have Windows 7 Professional, Enterprise or Ultimate editions, you can go ahead with this tweak.

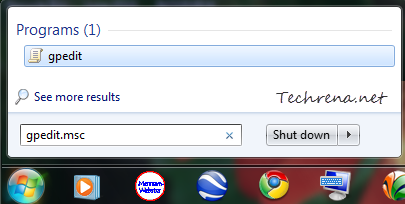
1. Type “gpedit” in the Start Menu search and open the “gpedit” from the results under the ‘Programs’ section.

gpedit from start menu search

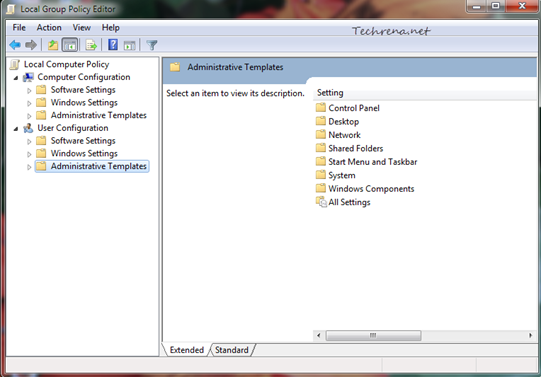
2. Local Group Policy Editor window will open up.

GPEdit overview

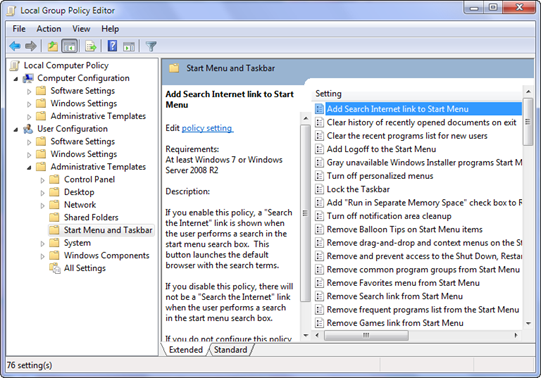
Scroll down to “User Configuration > Administrative Templates > Start Menu and Taskbar” and find “Add Search Internet link to Start Menu” entry in the list.

Search Internet Link to start menu in GPEDIT

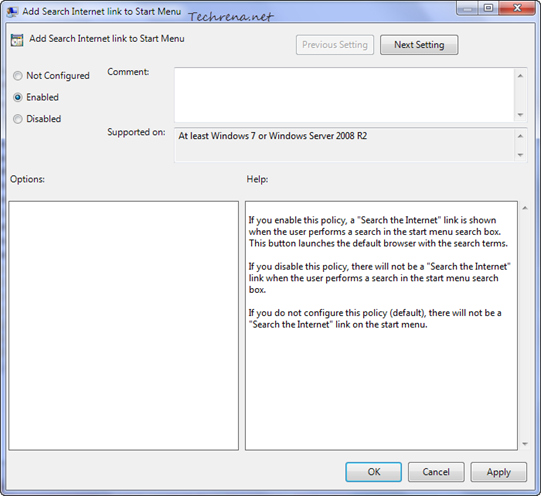
3. Double-click on it to change the settings. Change the value to “Enabled” and click “OK” button at the bottom to save the settings and close the window.

Search Internet link to Start Menu settings

That’s it. As said in the earlier method, either log off and log back into your Windows user account or restart the explorer.exe process from the Task Manager to effect the change. Now you will find a link in the Start Menu itself to search the internet for your keyword/query as shown in the screenshot.

Solve YouTube Rebuffer Problem When You Switch To Full Screen Mode

YouTube video resolutions

YouTube lovers on slower internet connection are very much disappointed by a recently changed settings that went into live in the video sharing site. The new settings (known as Auto HD) force the video to re-buffer from the beginning when you switch to full screen mode when watching a video. Just imagine a situation where you load a full video in normal mode in 360 pixels resolution. Now you wanted to watch it in full screen, the video switches from 360p to 480p automatically and starts buffering from the starting point again! Very annoying, isn’t it? Not so much when you are on a high speed internet connection, but if you are on a slow connection, you have every reason to feel so. Though YouTube doesn’t really offer any fix for this, we have few tricks which can solve this issue for you.

Method-1: Changing Settings In Your YouTube Account

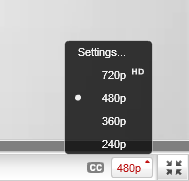
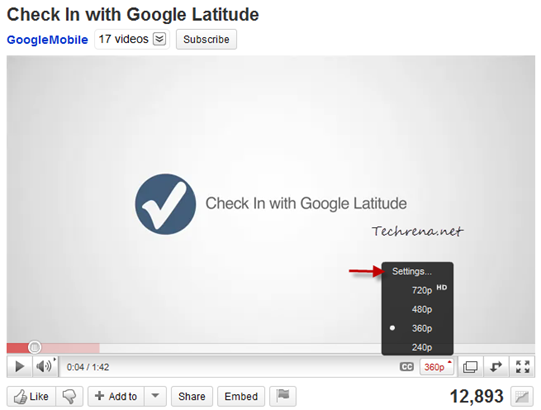
Click on the “Settings..” link found atop when you click on the video resolution (240p, 360p etc.) button.

YouTube video resolution settings

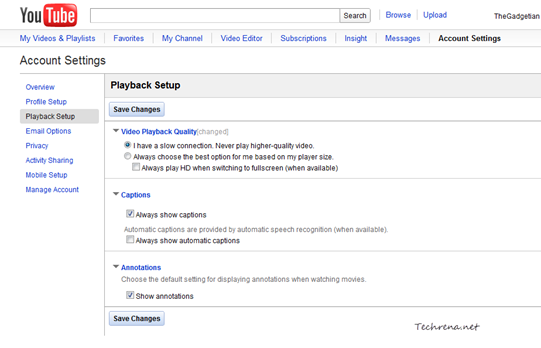
If you are already having an YouTube account, sign in to the account and go to your YouTube account settings page, where you’ll find settings for “Video Playback Quality”. Choose the first option “I have a slow connection. Never play higher-quality video.” and click the “Save Changes” button at the bottom of the page.

YouTube video playback quality settings in account

Now, videos will never get into the higher resolution mode when you switch to the full screen mode. On the downside, this method only works when you play the videos while you are logged into your YouTube account.

Method-2: Using GreaseMonkey Script

Install GreaseMonkey add-on for Firefox and restart your browser. If you are on Google Chrome you need not install any extension.

Install this GreaseMonkey script (YouTube Auto Buffer & Auto HD & Remove Ads) in your Firefox or Chrome browsers and it will take care of the rest. Now test the script by playing and switching any YouTube video into full screen. The problem should have been fixed now!