[How To] Download Windows 8 Pro 32/64-bit from Microsoft with Upgrade Key

The new shiny Windows 8 featuring Tiles and all is here. Windows 8 was officially launched last week on October 26 along with Microsoft’s Surface Tablet which runs Windows RT. Windows 8 seems to be getting good reviews from users except from few. Well many of us are still thinking whether to upgrade or not.

For all those who are not aware of the Windows Upgrade program, Microsoft is offering you a Windows 8 Pro (32/64-bit) for only $39.99 (USD). This offer is valid for many countries. The criteria is you should be running Windows XP, Vista, or Windows 7. Additionally if you bought a Windows 7 PC after June 2, 2012 you can get it for $14.99.
Windows 8 Logo

Well for those who are aware and have already purchased Windows 8 key(s), you might have already downloaded it or you might be still waiting to download. We just wanted to inform everyone through this post that you need not worry about the download. You can do it whenever you are free or if you are in a limited internet plan, you can do it during your next billing cycle.

Requirements to Download Windows 8 Pro Legit from Microsoft:

# Operating System: Windows XP, Vista, or 7
# Of course an internet connection and
# Your Windows 8 Pro Upgrade Key you purchased earlier

Step 1: Download Windows8-Setup.exe from here. it is 5.2MB in size.

Step 2: Decide which Windows Pro version you want – either 32-bit or 64-bit. Well do note that you can install 64-bit only if your processor supports it. you can check if your CPU supports 64-bit OS here.

Step 3: Run the “Windows8-Setup.exe” you have downloaded  from a PC which has a 32-bit Windows if you want to download Windows 8 Pro 32-bit. Similarly run from a 64-bit PC if you want 64-bit version.
Size Details:
# 32-Bit Windows 8 Pro: 2.01GB
# 62-Bit Windows 8 Pro: 2.63GB

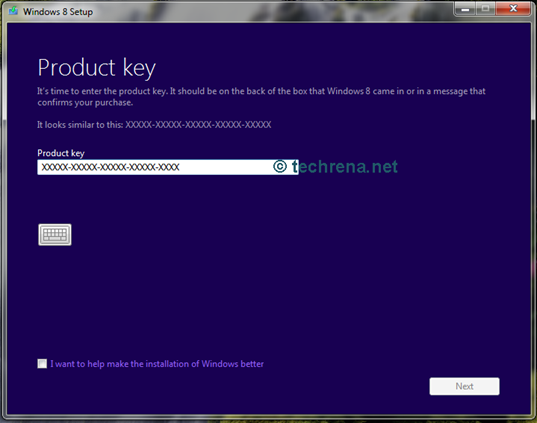
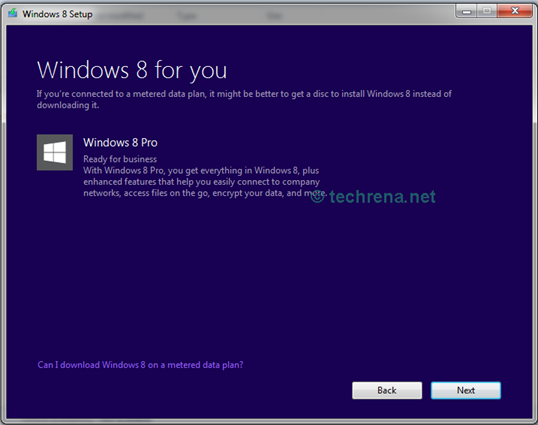
Step 4: When the Setup program starts, it will ask for your Windows 8 Pro key. Just enter your keys and viola, your download will commence.

windows 8 download

windows 8 download2

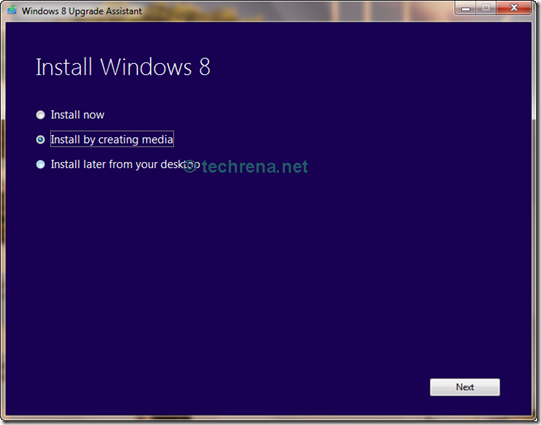
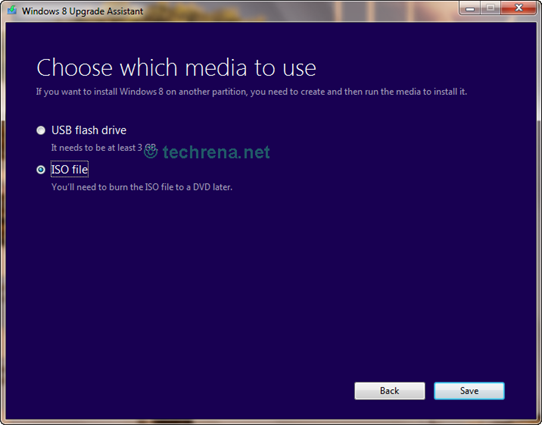
Step 5: After the download is completed, before installing the upgrade, we suggest you to create an iso or a USB drive backup for future setups. You can exit the setup program after that. Don’t loose the backup!

Windows 8 Pro Install

Step 6. While closing the setup program, it automatically creates a desktop icon(if it doesn’t you can re-start the program and it will start where you left off). So if you want to install Windows 8 as an upgrade to your existing OS, you can proceed to ‘Install’. But if you want a clean install, make use of the iso or USB drive backup. I personally recommend clean install over any upgrade install. Its up to you.

Windows 8 Pro Install by media

Important Notes:
# The back up you created to a USB drive or a DVD after download is similar to a retail version, meaning it is not linked to any key. You can use it for installing to any compatible system with any other legit key.
# The same product key can be used for downloading ether 32/64-bit Windows 8 i.e. the key is common for both versions.
# The Upgrade program will ask for your choice if you want to keep files, apps, or none. This choice is irrelevant if you are going for a clean install using a media device (USB/DVD)
# The language will depend on your location. You can install your preferred languages after installing windows 8.

If you have any questions or updates please leave a comment.

[Tip] Remove System Volume Information Folders

System Volume Information: Is it really a virus?

Myth: System Volume Information is a virus and it suddenly appears in your Windows XP computer and it doesn’t let you open its contents. It may have virus or suspicious files within it.

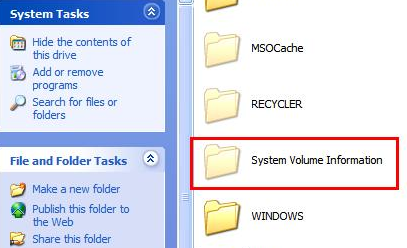
System Volume Information in Windows XP

Fact: System Volume Information (and even “Recycler”) folder is a standard Windows folder. System Volume Information folder stores the restore points data and the Recycler folder belongs to the Recycle bin. So first up, you don’t need to delete them and treat them as virus. These files do exist in later versions of Windows too. Here’s the proof: (Windows 7 screenshot)

System value information folder in Windows 7

These are system folders and are hidden by default. They will show up once you change the settings under “Folder Options’ to show the hidden system files and folders.

Thankfully Windows (Vista, Windows 7) doesn’t give you access to this folder so that averts any probable mess up if at all you access them and change the files inside it. Having said that , a virus can work around this and gain access to this folder to corrupt the restore points and create some .exe files inside it.

So to remove (actually to hide) the folder, just change the settings back in the folder options to not to show hidden system files and folders. However if you still insist on removing the System Volume Information completely (highly not recommended), here’s what you have to do:

Windows XP:

1. Right-click on My Computer and select Properties.

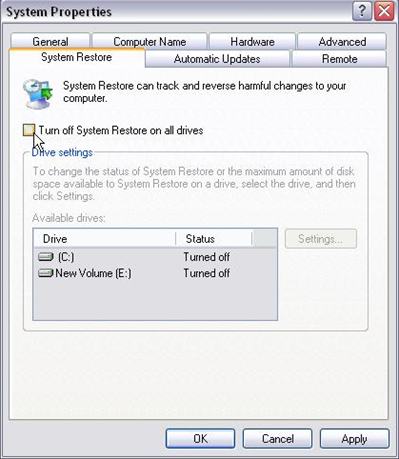
2. Click on the System Restore tab.

3. Click the Turn off System Restore on all drives check box and click OK.

Turn off System Restore

Windows 7 & Vista:

Read the How to disable System Restore in Windows 7 post written here at Techrena.

[Tip] Create A Lock Down Computer Shortcut

Lockdown my PC

We have previously covered how to create desktop shortcuts for shutdown and hibernation here at Techrena. Many readers of our site found them to be useful. We thought like when we could have shortcuts for shutting down and hibernation, why can’t we have shortcut for locking the computer user ? To begin with, if you don’t know yet, there is a much simpler Win + L (press Start key while holding “L” button your keyboard) shortcut already available to do the same and is easier as well.

We are just writing this tip to let you know that you can create shortcut for locking down your computer as well. It’s up to you to use this or the most preferred Win + L short key. Follow the steps below to add the shortcut to your desktop.

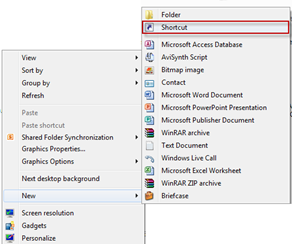
1. Right-click on your desktop (on any blank area) and select New > Shortcut.

create new shortcut

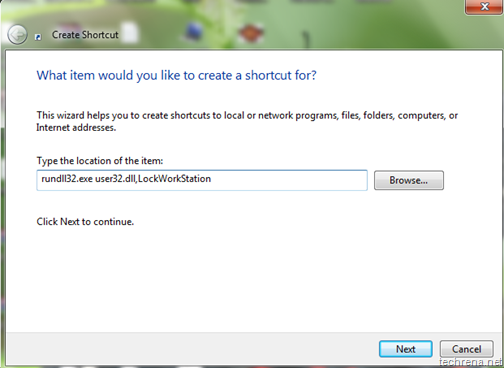
2. Type rundll32.exe user32.dll,LockWorkStation in the “Type the location of the item” filed in the window and click next.

Type shortcut location

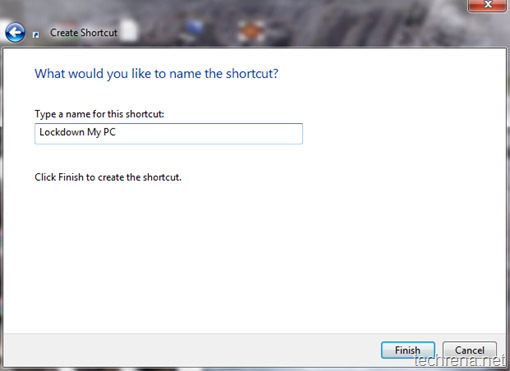
3. Give a name to the shortcut (something like Lockdown My PC) and click “Finish” to complete the setup.

Lockdown shortcut name

4. Now the shortcut for locking down your computer appears on desktop. You can even customize it by adding some colourful icon to it.

Lockdown shortcut on desktop

Clicking on it will lockdown the computer. This works well on Windows XP, Windows Vista and even on Windows 7. You need to login back to your computer by providing your credentials if you need to unlock it again. Of course I still prefer to use Win + L shortcut (to which I got used much to) than this, anyway it’s always good to explore and find new things, even if they had alternatives Smile.

[How To] Windows Virtual Memory Configuration

Did you notice an alert anytime saying ”Virtual Memory Low” while running a huge application or a game?  Well all what you need about Windows Virtual Memory and its configuration is explained in detailed here.

First question in your mind will be:

What is Windows Virtual Memory?

Physical memory or you know it as RAM is the vital component of your Windows machine. But Windows is not designed to run on RAM chips alone, no matter how much physical memory you have. In addition to using physical RAM to store programs and data, Windows creates a hidden file on your primary hard disk and uses that file to manage pages of data pulled from scattered sections of the hard disk and used in physical memory when necessary. The page file acts as an extension of main memory which is known as virtual memory.

What is the default Size and File location of Virtual Memory?

Windows creates the page file in the root folder on the same drive that holds the Windows system files. The size of the page file is determined by the amount of RAM in your system. By default, the minimum size on a 32-bit (x86) system is 1.5 times the amount of physical RAM if physical RAM is less than 1 GB, and equal to the amount of physical RAM plus 300 MB if 1 GB or more is installed. The default maximum size is three times the amount of RAM, regardless of how much physical RAM is installed.

Configure Windows Virtual Memory Size and Page file Location

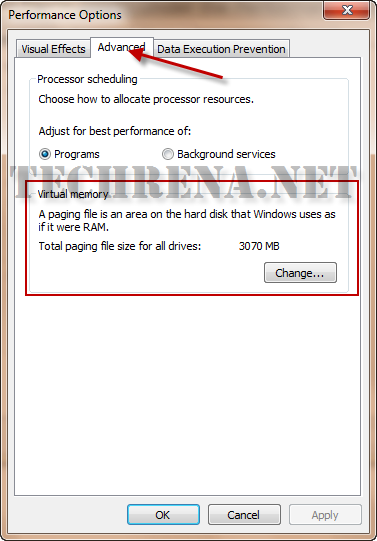
Press Start + R and type systempropertiesadvanced and press Enter. Under the Performance heading, click Settings. In the Performance Window, go to the Advanced tab. Here you will find Virtual Memory Change Option.

change virtual memory

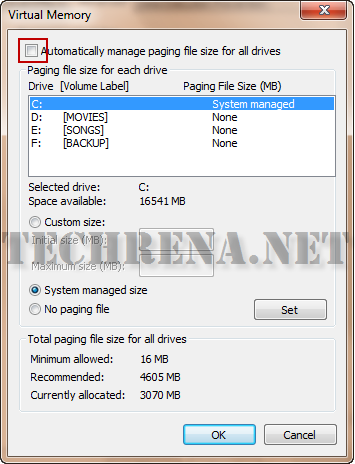
If you click on change, you can find the configuration window where you can change how the virtual memory is managed. Uncheck Automatic manage paging file size to change the virtual memory size.

virtual memory change window

You can have the following options in this window:

  • You can move the page file to a different volume if you have more than one.
  • If you have more than one volume, you can establish more than one page file.
  • For any page file, you can choose between System Managed Size and Custom Size.
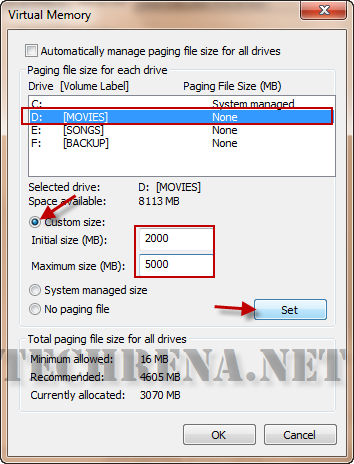
  • If you choose Custom Size, you can specify an initial size and a maximum size.
  • You can remove a paging file from a volume by selecting the volume and choosing No Paging File. (You can even get rid of all paging files this way, although doing so is not recommended, even on systems with a lot of RAM.)

An example configuration is given below:

virtual memory custom management

Should you enlarge your page file(Virtual Memory)?

Most users won’t need to do this. But sometimes you might get a pop up warning telling “Low Virtual Memory”. This happens when you have huge applications and less RAM size. If this is the case you might consider increasing the maximum size of your page file.

How To Stop Internet Explorer To Stop Asking You To Remember Passwords ?

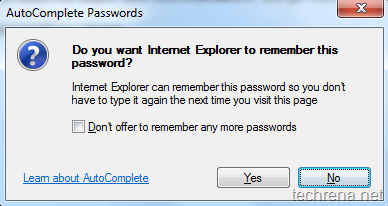
AutoComplete passwords

Microsoft Internet Explorer has a default “AutoComplete Passwords” feature that lets you save passwords for different login pages while browsing the internet. But if you are using a shared public computer with many users working on it, you might want to disable this feature for privacy concerns. Follow the steps below to make Internet Explorer stop asking for you to remember passwords.

Steps:

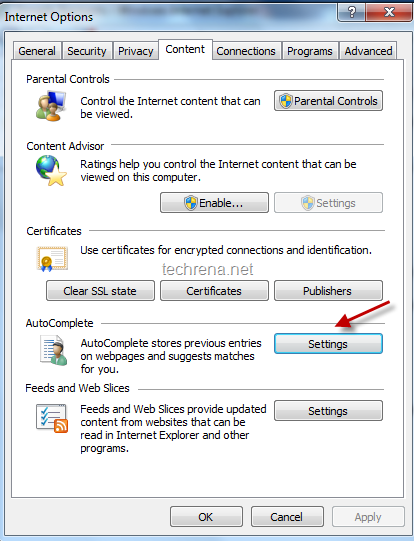
1. Go to Tools > Internet Options, switch to “Content” tab. Click on “Settings” under “AutoComplete” section.

ie content settings

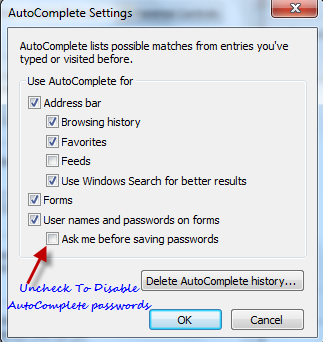
2. Uncheck the “Ask me before saving passwords” option in the AutoComplete settings window.

AutoComplete settings

3. Click OK and close the settings window.

From now on, your Internet Explorer will not offer you the AutoComplete passwords dialogue. To re-enable this feature at any later time, just check the same option in the third step.

Microsoft Security Bulletin MS10-032 (KB979559)

MS10-032 bulletin

Microsoft Security Bulletin MS10-032, one of the 10 security bulletins released by Microsoft as part of the routine monthly security update for June 2010 addresses vulnerabilities in Windows Kernel-Mode drivers.

Security bulletin MS10-032 include important Windows security update KB979559, which resolves two publicly disclosed vulnerabilities and one privately reported vulnerability  in the Windows kernel-mode drivers. These vulnerabilities could allow elevation of privilege, if a user just views content that is rendered in a specially crafted TrueType font.

Windows users who have not enabled automatic updates must download and installed this KB979559 update immediately.

KB979559 Direct Download Links:

Download the update package for various Windows systems from the following direct links.

Windows 7 x64 -1.6 MB x86 (32-bit) – 1.2 MB
Windows Vista x64 – 1.5 MB x86 (32-bit) – 1.2 MB
Windows XP x64 – 4.1 MB x86 (32-bit) – 1.4 MB

How To Open IE In Private Browsing Mode By Default

Internet explorer logo

In Private Browsing Mode IE

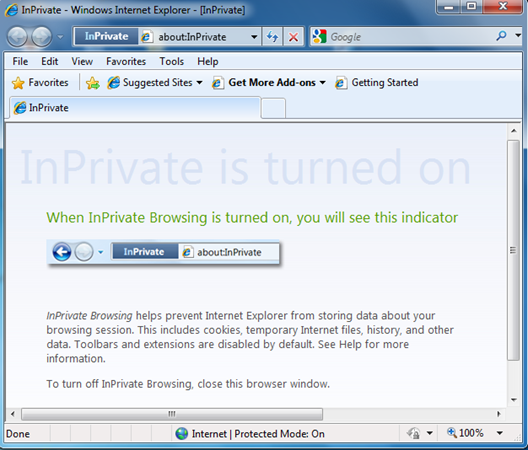
Private browsing mode” is idle for those who don’t want other users on the same computer to see sites that he had visited and other information. In private browsing mode, the browser will not store your browsing details in cookies or in browsing history.

But for some reasons this private browsing mode is hidden in the browser windows and is not that easy to access (even though you can use a keyboard shortcut to open it, I’d still want a better way) this mode. Even if we create a desktop shortcut for Internet Explorer, it’ll only create a shortcut for normal browsing mode, not the private mode. But here’s a tutorial for you which explains you how to add a private browsing mode desktop shortcut.

1. Create a desktop shortcut as you would do normally.

IE private mode shortcut

[I just renamed the shortcut to “Internet Explorer Private Mode” to reflect its purpose]

2. Right-click on the shortcut now and you will be under “Shortcut” tab by default. You can find a field “Target” under the Shortcut tab.

3. Append the following string to the target location present in the filed:

-private

Now the string will look like:

IE private mode shortcut

"C:\Program Files\Internet Explorer\iexplore.exe" -private

4. Click OK to save the settings.

You can now use this shortcut to start Internet Explorer in “Private Browsing Mode” by default.

Windows 7:

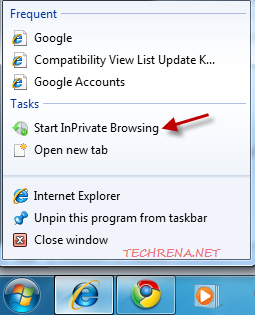
If you are using Windows 7, you need not worry about going through all the above listed steps to create a shortcut as Windows 7 by default will have a shortcut to start InPrivate Browsing. Just right-click on the IE shortcut present in the taskbar and choose “Start In Private Browsing option” from the list.

Windows 7 IE start inPrivate Browsing

[How To] Disable Restart Your Computer Notification After Installing Windows Update

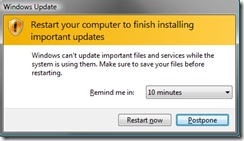
Microsoft Windows automatic updates provides maximum protection against latest security threats and fixes bugs discovered later. Well it is advisable to enable automatic updates or at least install them manually whenever any new update is released. The only annoying thing about Windows Automatic Updates is that it starts displaying a notification to restart your system in regular intervals once it finishes installing the updates.

This notification is even more annoying in Windows XP where we don’t have the option of increasing the time interval.

Windows_XP_Restart Windows-7-restart

Now we can disable this notification. The methods are given below:

1. By using Local Group Policy Editor (gpedit.msc)

Note: Local Group Policy Editor which is not available in Home versions of Windows

Open Local Group Policy Editor. Press Start + R, Type gpedit.msc and Enter.

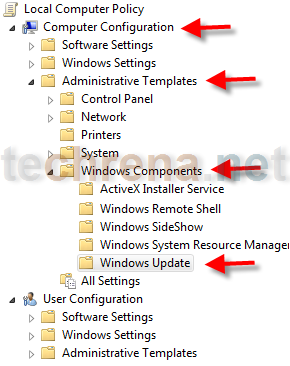
Now go to in the left pane :

Computer Configuration—>Administrative Templates—>Windows Components—>Windows Update

Windows_update

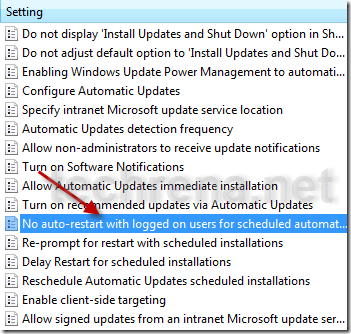
In the Right Pane Double Click on:

No auto-restart with logged on users for scheduled automatic updates installations

no_auto_restart

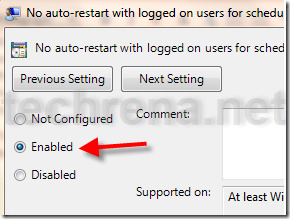
Click on Enabled and press OK.

enable_no_auto_restart

Now the notification has been disabled permanently.

2. By using wuauserv command

Note: This method is applicable for all versions of Windows XP, Vista and Windows 7.

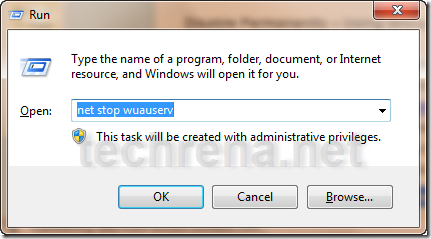
Press Start + R, Type net stop wuauserv and Enter.

net_stop_wuauserv

Stopping_windows_update_service

It will stop the Windows Update service for the current session. It will start again after the system restarts. It is important to note that you have to use this command only after Windows has finished installing the updates and when it starts notifying to restart. Do not stop the service while installing the updates.

If you want to start the service Type net start wuauserv and Enter.

This method stops the notification temporarily, only for the current session.

We hope that now you will not have to press restart later again and again and get hold of the annoying message.

You can subscribe to our RSS feed via email for more tutorials under Windows.

Download Microsoft Windows Malicious Software Removal Tool KB890830

microsoft Windows Malicious Software Removal Tool

The Microsoft Windows Malicious Software Removal Tool May 2010 edition is available for download now. This tool can detect and remove prevalent malicious software like Blaster, Sasser, and Mydoom.

It is advisable that everyone who uses Windows to install this update. This Update is applicable to Windows 2000, Windows 7, Windows Server 2003, Windows Vista, and Windows XP.

Windows Malicious Software Removal Tool – May 2010 (KB890830)

Download size: 1.2 MB (Through Windows Update)

Update type: Important

After the download, this tool runs one time to check your computer for infection by specific, prevalent malicious software (including Blaster, Sasser, and Mydoom) and helps remove any infection that is found. If an infection is found, the tool will display a status report the next time that you start your computer. A new version of the tool will be offered every month. If you want to manually run the tool on your computer, you can download a copy from the Microsoft Download Center(Link Given Below), or you can run an online version from microsoft.com. This tool is not a replacement for an antivirus product. To help protect your computer, you should use an antivirus product.

You may need to restart your computer for this update to take effect.

Manual Download from Official Microsoft Site:

Download size: 9.7 MB

Download: Click Here (From Official Site) – Update: Link expired

Also read about Windows Malicious Software Removal Tool KB890830 for April 2010, and you may also want to read about other updates released by Microsoft in May 2010: KB978542, KB978213.

[How to] Repair Install Windows XP without Data Loss

Have you ever faced any problem like ntldr file missing during the start up of Windows XP? During the cases of critical Windows file gone missing or corrupt, Windows will not Boot and hence cannot start. What will you do in such case where your data is at stake?

There may be many solutions available, but repairing Windows using the Windows XP setup CD will be the best. In repair install your data will be intact and no data loss will occur if everything goes right.

If you install a new copy of Windows then some of your data will be lost.

What is Windows XP repair Install?

In Repair install, all the Windows files and registries will be copied to your Hard drive from the Windows XP installation CD. The installed program files and personal data on your hard drive will not be affected in most cases.

How to perform Windows XP repair Install?

Requirements:

Your Windows XP installation CD and key

Follow the steps below:

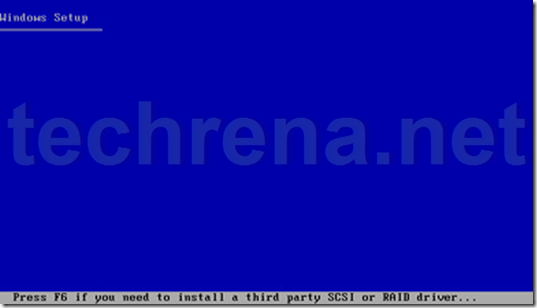
1. Insert the Windows XP CD to your Optical Drive and Start your computer.

Make sure that the computer boots from the installation CD. If it is not booting from the CD try changing your boot options in the BIOS.

While booting from the CD, press any key to start the process.

boot_from_xp_cd

Xp_setup

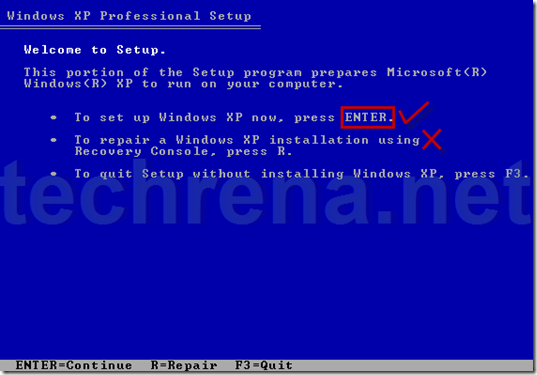
2. Press ENTER to set up Windows XP.

Do not press R. It will start, Recovery Console which is not desirable.

Welcome_ro_setup

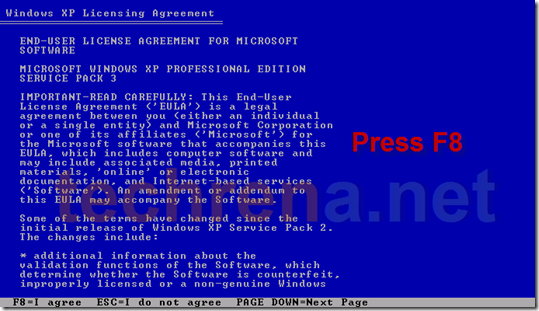
3. Press F8 to Agree the License Agreement.

F8_agreement

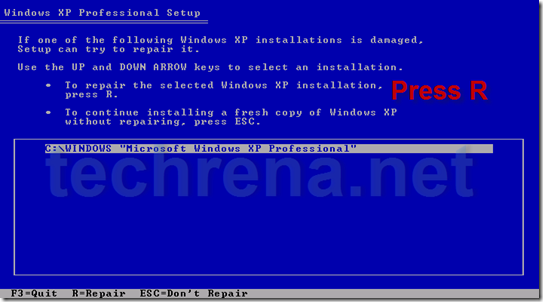
4. Press R to start the recovery install

Select the currently installed Windows XP location which you want to repair. Press R to repair the installation.

repair_xp

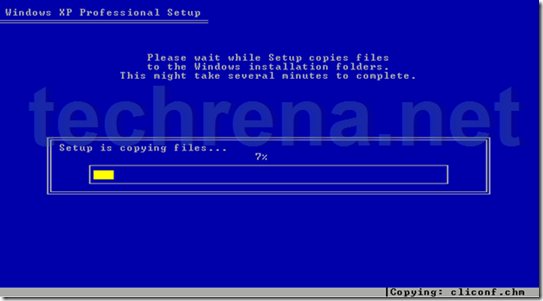
Now it will copy the files.

copying_files

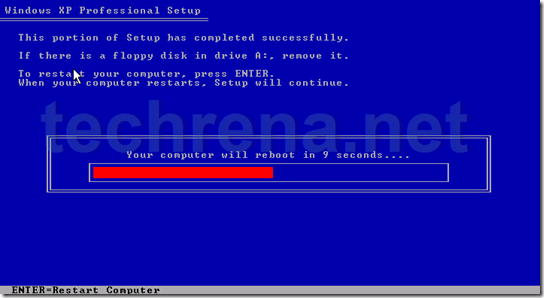
5. Press ENTER to reboot or else wait until it reboots by itself

Setup will continue after restart.

reboot

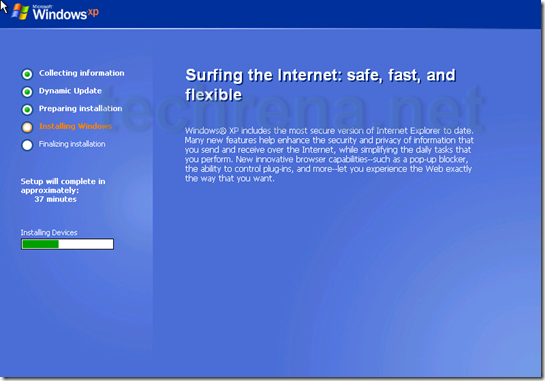
6. Do not boot from the CD after start up

After booting up from your hard drive it will continue installation. Follow the normal installation process.

installing_windows

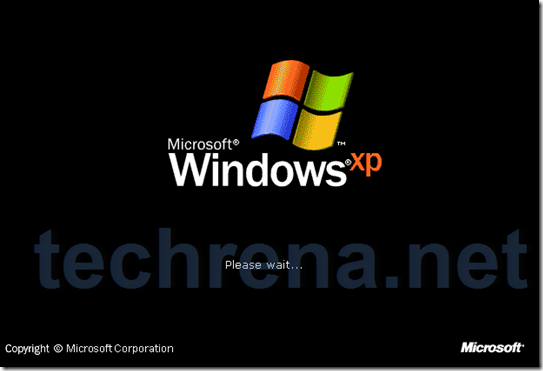
After successful installation, your computer will restart once again. It may take some time during the first startup.

first_boot

Now your desktop should be accessible. In case of any problem do leave a comment.
You can subscribe to our RSS feed via email for more tutorials under Windows.