Transliterate Any Web Page With Google Script Converter

Google India has announced an online Script Converter tool to transliterate text into 17 languages.This comes after Google’s initiative to provide Google Transliteration IME in 14 languages.

Google Script Converter tool, a Google labs feature will convert any given web page or piece of text given as input from one language script to another meaning that it will just transliterate it but will not translate.

This tool will be useful if you know how to speak a language but can’t read it.Say for instance you can speak and understand Hindi, but you can’t read it.So you would rather like to read the script in a language which you can read to understand it.You know what it means when you say नमस्कार but you can’t read it in Hindi.So what will you do? Go to Script Converter, type the text in Hindi to transliterate it to an easily readable English script, the output would be namaskar.
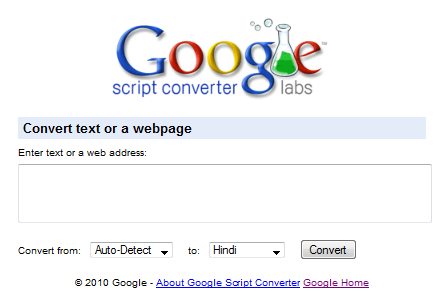
google script converter

Screenshot: A Techrena post transliterated to Hindi and Telugu.
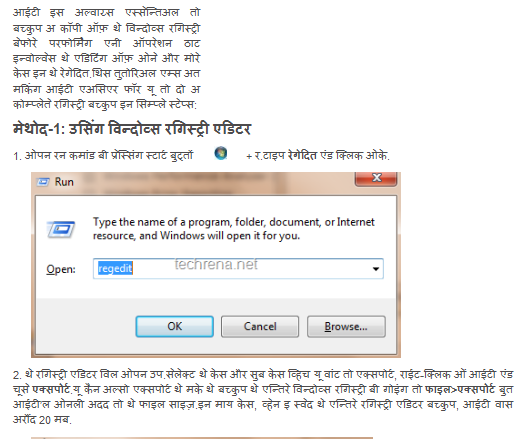
google script converter web page screenshot

google_script_converter_telugu

The question is who needs this tool? Yeah, all of tech freaks like us who on constantly use gadgets like mobiles, iPod, iPad, internet every thing in English and who have almost forgotten the native Indic script.

List of supported languages (17):

Bengali,
English,
Greek,
Gujarati,
Hindi,
Kannada,
Malayalam,
Marathi,
Nepali,
Persian,
Punjabi,
Russian,
Sanskrit,
Serbian,
Tamil,
Telugu,
Urdu.


Backup Your Windows Registry In Simple Steps [How To]

Windows logo

It is always essential to backup a copy of the windows registry before performing any operation that involves the editing of one or more keys in the regedit.This tutorial aims at making it easier for you to do a complete registry backup in simple steps:

Method-1: Using Windows Registry Editor

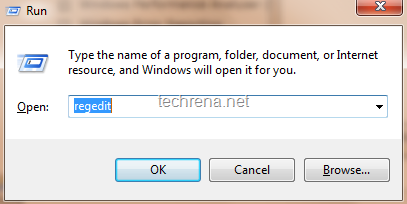
1. Open run command by pressing Start button windows start button+ R.Type regedit and click OK.

regedit run command

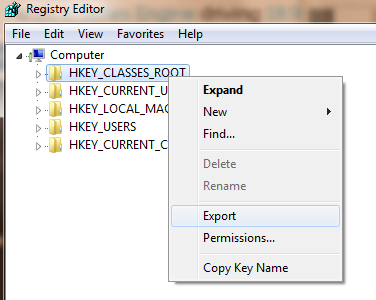
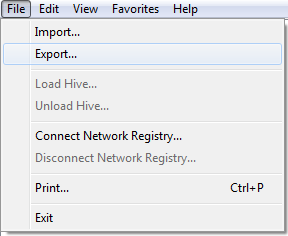
2. The Registry Editor will open up.Select the keys or sub keys which you want to export, right-click on it and choose Export.You can also export the make the backup the entire Windows registry by going to File>Export but it’ll only add to the file size.In my case, when I saved the entire registry editor backup, it was around 20 MB.

Export regedit keysexport option in regsitry editor

3. Save the registry backup to your local drive.

save regedit backup file

Method 2: Using ERUNT

ERUNT stands for The Emergency Recovery Utility for NT can be used in Windows NT/200-/2003/XP, Windows Vista & Windows 7 to backup the entire registry editor.

Download ERUNT for here and follow the following steps:

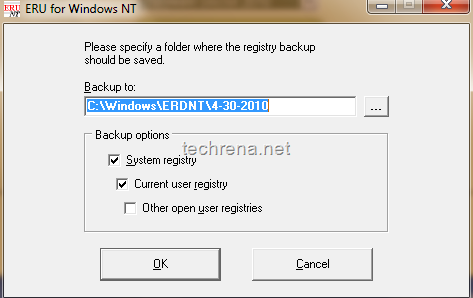
1. Run the ERUNT

ERUNT save backup

2. Set the location where you want to save the entire registry backup file and click OK.

ERUNT in action

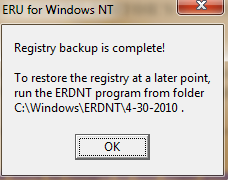
Click OK on the dialog box which you’ll see when the registry backup operation is completed.

registry backup complete in ERUNT

With this, The registry hives (Config, SAM, Security, Software, System) gets backed up on the path that you have selected.

All the 2 methods mentioned above will work on Windows XP, Windows Vista and Windows 7.

[How To] Save And Manage Google Chrome Sessions

google chrome logo

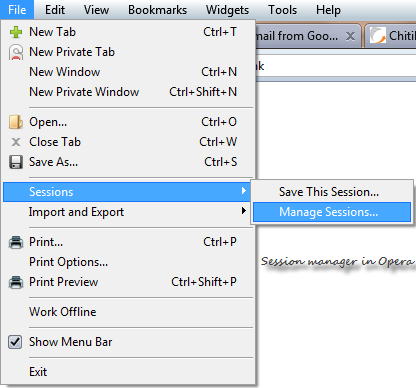
Almost all the browsers off late are coming up with an option to save and manage the browsing sessions.What it means is that you can save the entire session for later reading when you are in a hurry.For instance in Opera, you’ll find this option under File> Sessions>

session manager in opera

But where is such option in Google Chrome?

Ans: It isn’t there at least as of now.This is one of the most requested feature in Google Chrome.I wish the developers considers this in their future releases.

Tip #1: Even though, Google Chrome hasn’t got a default Sessions manager, it does however offer to save your currently opened tabs.For this, go to Wrench > Options > Basic tab> On Start up

Select “Reopen the pages that were open last”

This will save the current session and opens it up as it was when you last closed your Chrome.

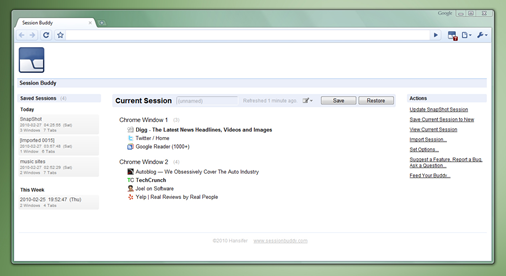
Tip #2: There are some good extensions available, through which you can manage your sessions in Google Chrome.One such extension is Session Buddy.

With Session Buddy, you can view all of your tabs in each window of a current or saved session.

Session buddy

The extension also makes it possible to access saved crash recovery sessions automatically after a Chrome or OS crash.

You can also edit each saved session by deleting individual tabs or windows.

Entire session can be exported into a text or CSV format file.

Install Session Buddy

More Google Chrome resources:

Hide Most Visited Sites from New Tab in Google Chrome in Easy Steps

Enable GreaseMonkey User Scripts in Google Chrome

How to Download Video From YouTube in Google Chrome

Reopen or Recover Recently Closed Tabs in Google Chrome

[How To] Configure AutoPlay In Windows 7

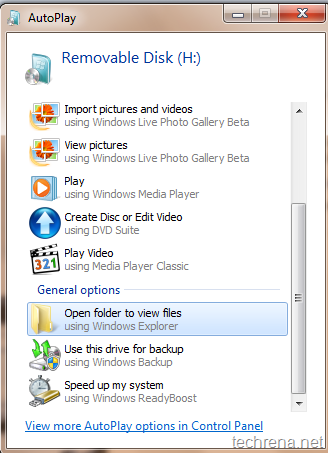
AutoPlay in Windows 7

We are here with yet another tutorial.In this tutorial, I’m going to discuss about how to disable AutoPlay in Windows 7 and Windows Vista.[AutoPlay for CDs/DVDs and AutoRun for USB flash drives or for any removable flash drives.]

AutoPlay (and AutoRun) is disabled by default in Windows 7 and Vista.That’s why Windows gives you an option to choose the possible actions that you  can take without directly playing the DVD in media player.Start reading the following tutorial to learn how to enable or disable AutoPlay .

Tutorial: How to enable/ disable AutoPlay

Covers: Windows 7/ Vista

User level: Intermediate

Complexity: Easy

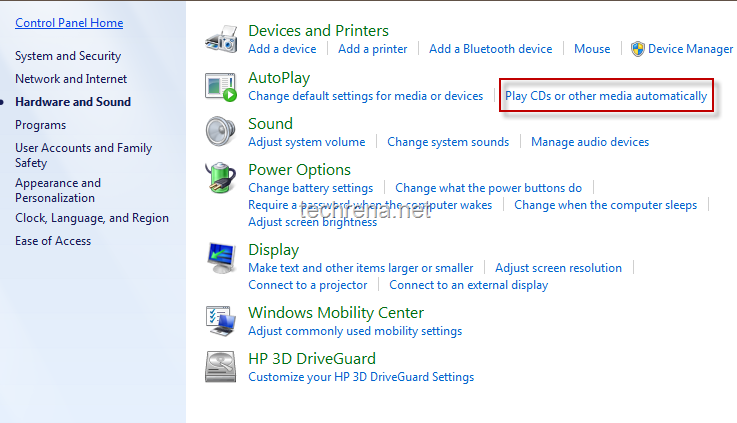
1. Go to Control Panel, and choose “Hardware and Sound” options.

Under AutoPlay, click  Play CDs or other media automatically.

Autoplay in Hardware and Sound

2. Now AutoPlay options window will open.Under uncheck under “Choose what happens when you insert each type of media or device” to completely disable AutoPlay globally for all types of devices.

choose_autoplay_options

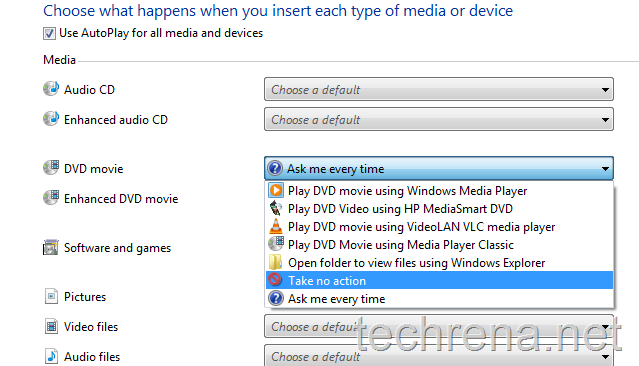
3. If you want to disable AutoPlay for particular devices like  DVD movie instance, select the “Take no action” under the DVD Movie options.

disable_autoplay_for_single_type

Likewise you can also configure auto play for USB devices and other plug and play devices.

Using Group Policy Editor [For Business/ Ultimate Editions] :

This methods works only for Business and Ultimate versions of Windows 7 and Windows Vista.

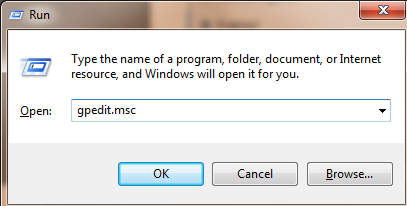
Go to run command by pressing Start button + R.Type gpedit.msc in the text field and click OK.

gpedit run command

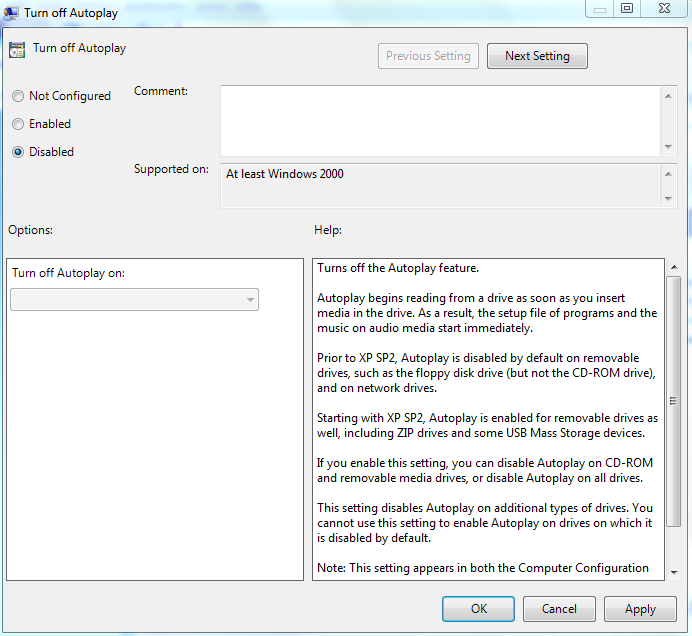
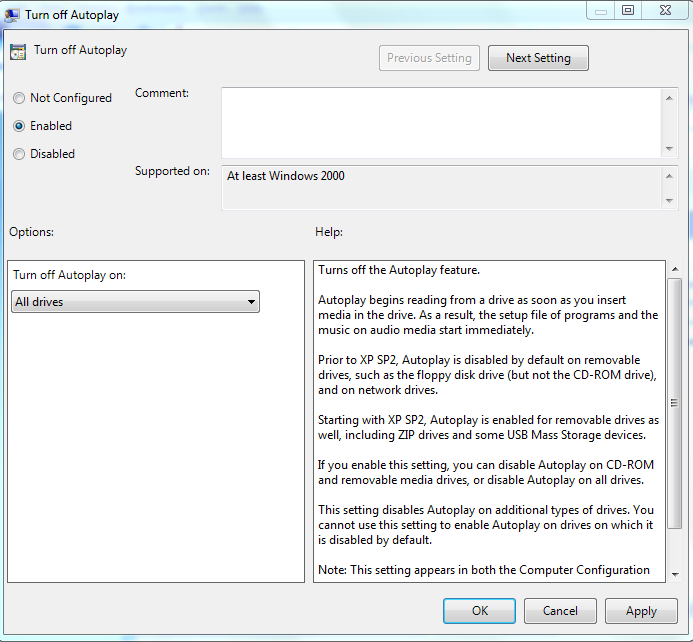
From the Group Policy Editor window, navigate to Computer Configuration\ Administrative Templates\ Windows Components\ Autoplay Policies\ Turn off Autoplay, you will see the “Turn off Autoplay” window as in the screenshot.

To enable the AutoPlay, just change the value of “Turn off Autoplay” to Disabled.

autoplay gpedit enable settings

If you want to completely disable the AutoPlay for all types of devices for default, change select the value Enabled under Turn off Autoplay.

disable autoplay gpedit settings

[How To] Enable Automatic Updates In Windows 7

Windows logo

This is a small tutorial dealing on how to enable or disable automatic updates in Windows 7 or Windows Vista.This is basically intended for beginners who have just installed Windows 7 or Windows Vista in their systems and looking for assistance.

User level: Beginner

Complexity Level: Easy

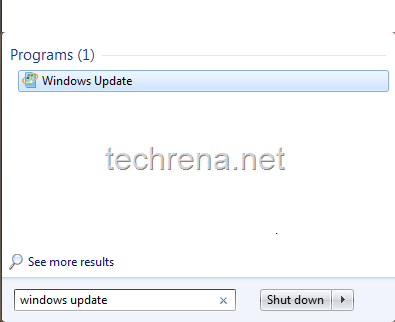
1. Go to Start menu and type windows update in the search box.Click the Windows Update program in the search result.

windows update start menu search

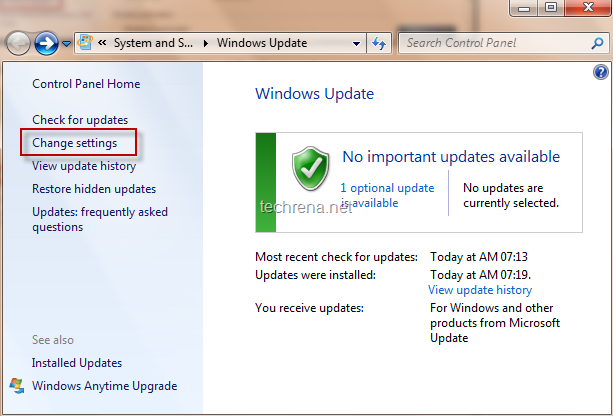
2. Now the Windows Update window will be opened.On the left pane, find “Change Settings” and click on it to open the Windows Update Settings page.

windows update page

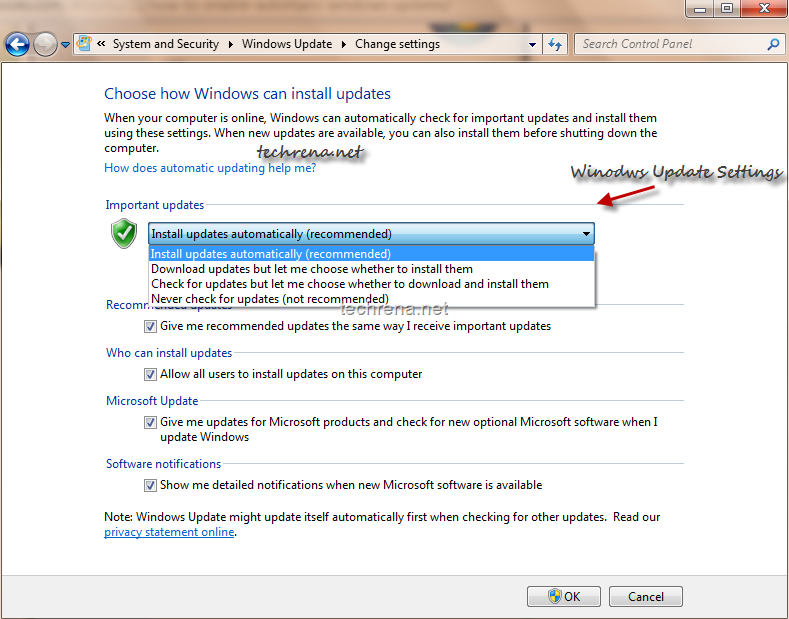
3. In the Windows Update Settings window, as you can see there are basically 4 options to choose from.

  • #1 Install updates automatically (recommended)
  • #2 Download updates but let me choose whether to install them
  • #3 Check for updates but let me choose whether to download and install them
  • #4 Never check for updates (not recommended)

change windows update settings

It is always recommended that you choose the option #1 “Install updates automatically” to install updates that address various vulnerabilities and keep your Windows up-to-date.

Option #2 is also OK, given that it makes your Windows to download the updates automatically as and when they are available but will install them without your permission.

Options #3 and #4  are recommended only if you are using an interconnection with limited data usage (like  using mobile phone to connect to internet).If these options are chosen, your Windows will not automatically download or install the updates.

BenQ E1260 HDR Digital Camera

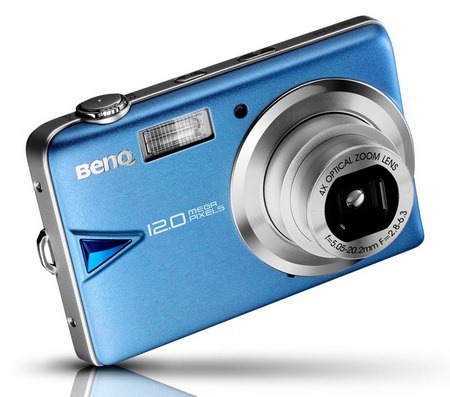
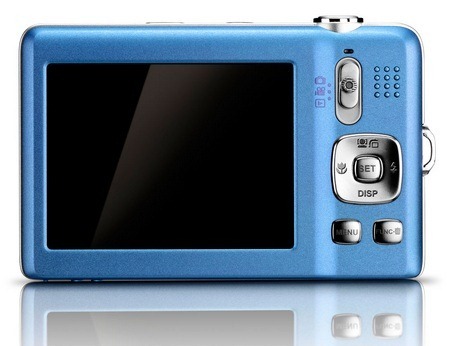
BenQ has announced brand new digital camera BenQ E1260 HDR (High Dynamic Range).Besides sporting a 12 megapixel camera with 4X optical zoom, the device offers a chance to record videos at 720p HD mode.With HDR imaging technology, you can now apply the effect on the photos for a more stunning look with just a click.

BenQ E1260 HDR Digital CameraBenQ E1260 HDR Digital Camera

Features:

BenQ HDR Image Enhancement Technology
28mm Wide-Angle Lens
720p Movie Recording
Advanced Smart Scene Modes
Ultra Intuitive for Easy and Quick Access
Smart File Management
Automatically Rotate Your Photos with G-Sensor

BenQ E1260 Specifications:

Dimensions 91.6 x 57.8 x 16.6 mm
Weight 100 g
Sensor 12 Mega Pixels, 1/2.3 inch CCD
Zoom Digital: 4X Wide Angle
Digital: 5X
Lens f = 5.05 ( W ) ~ 20.2 ( T ) mm
F= 2.8 (W) ~ 6.3 (T)
Image Resolutions 12M / 3:2 / 8M / 5M/ 3M / HD 16:9 / VGA
Movie Recording 720p (16:9 ; 1280 x 720 ; Interpolation) / 640 x 480 / 320 x 240 @ 30 fps
Shutter speed 1/2000 sec
Weight Balance Auto / Daylight / Cloudy / Tungsten / Fluorescent H / Fluorescent L / Manual
Flash Auto Flash, Auto Anti Red-eye, Force On, Slow Sync, Forced Off
Battery 700mAh Rechargeable Li-ion Battery
Memory Inbuilt: 11MB
External: 4GB SD / 32GB SDHC
File formats Image: JPEG
Video: MPEG
Audio: WAV
Output USB 2.0 compatible
AV Output- NTSC/PAL
PictBridge compatible
Colors Metallic Gun-Metal Gray
Metallic Blue
Launch May 2010

Price:

The price of BenQ E1260 point-shoot camera hasn’t been announced yet, though the device is set to hit the markets by My 2010.

Find The Last ShutDown Time Of Any Windows PC

At times may be you allow somebody, take for instance your kid to use your computer but strictly warned him or her to shut it down by midnight.But you don’t really know till what time they had used your PC as you can’t figure it out easily by just looking at your desktop Smile.

Luckily you need not worry much, if your system runs Windows.If you want to know how to do that in your PC, follow the steps briefed below:

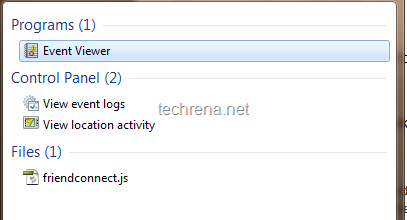
1. Open Event Viewer in your computer:

Windows 7 ot Vists users: Go to start menu and type “Event Viewer” in the search box and open the Event Viewer.

Windows XP users: Go to run command from Start> Run or by pressing Windows+R and type eventvwr.msc in the field and hit enter.

event viewer from start menu

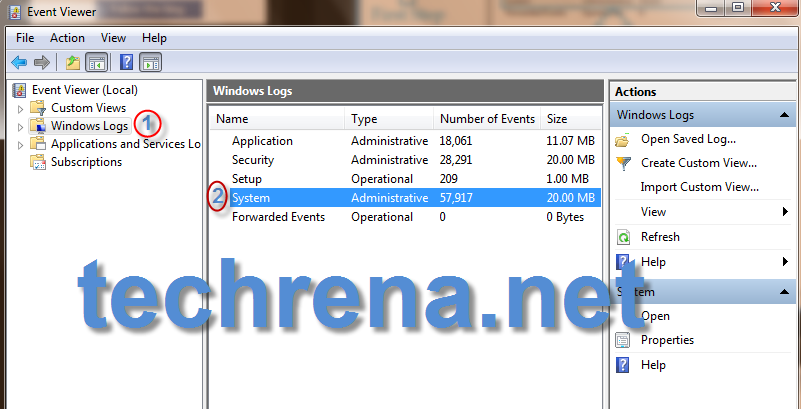
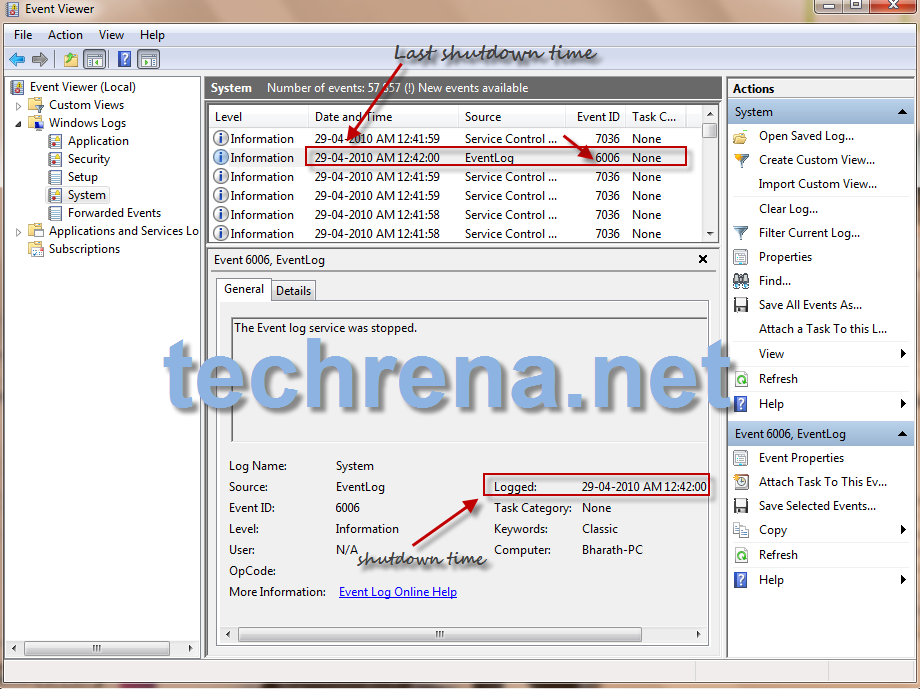
2. In the Event Viewer, On the left side pane click on “Windows Logs” and in the right pane, click on the item “System”  [See the screenshot below].

Windows Logs in Event Viewer Windows 7

3. Now on the right pane, you will find all the system logs information basically divided into 3 tabs: Information,

Date and Time,

Source,

Event ID

Find the column corresponding to the Event ID 6006, the date and time displayed in this column is when your computer was last shuttedDown.

last shutdown time in event viewer

In the above screenshot, the time shown is 29-04-2010 12:42:00 AM, so this is the last shutdown time of the PC used here.

Nokia X2 Launched In India: Full Specifications

Nokia logo

Well, it’s been a great month this,  for Nokia folks who have been launching new mobile phone models one after another every week, they have now announced a total of 7 new handsets in April 2010.It was just 2 days ago that Nokia drew the attention of all the mobile enthusiasts with the announcement of Nokia N8, now guess what, here’s another new model lined up.The newest entrant to their list is the all new Nokia X2.Nokia X2 will be initially launched in India earlier than its global release.

Nokia X2, member of Nokia X-series will run on Series 40, yet offering a host of features making it worth every penny.Features include a 2.2 inch QVGA screen, 5MP camera with flash & video recording, 16GB microAD support, Bluetooth 2.1, USB 2.0, 3.5mm Nokia AV connector, music management via Ovi Player ot Windows Media Player 11, direct access to Facebook & twitter from the home screen, Ovi store, Nokia Messaging 2.0, direct image upload to Flickr & Ovi Share.Also the camera flash can be used as a torch as well similar to the Sony Ericsson phones.

Checkout exclusive full specifications, pictures and price details of Nokia X2.

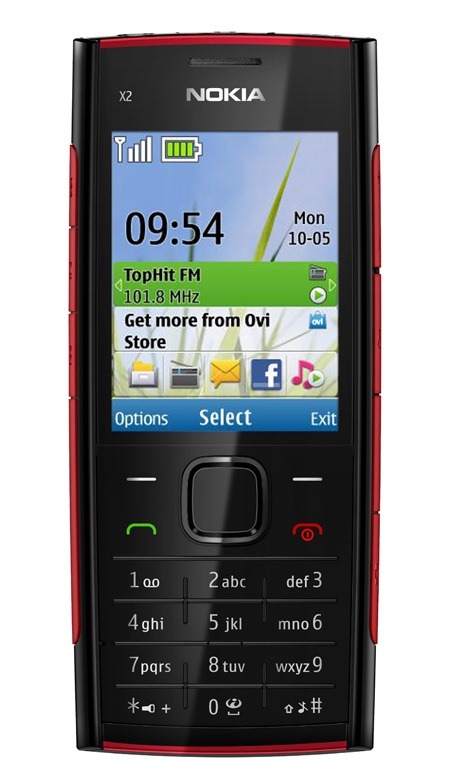
Nokia X2 Picture:

Nokia X2  full specifications and price in india

Nokia X2 Full Specifications:

Network GSM 850/ 900/ 1800/ 1900 (2G)
Dimensions 111 x 47 x 13.3 mm
Weight 81 g
Display – 2.2” QVGA
– 240×320 pixel
– 262K colors
Camera 5 Megapixel with flash
– 4x smooth zoom
– Camera flash usable as torch flashlight
Memory – Inbuilt: 48MB
– External: up to 16GB microSD
Connectivity – Bluetooth v2.1 with A2DP, EDR
– microUSB 2.0
– 3.5 mm audio jack
Playback formats MP3, MP4, AAC, eAAC+, WMA
Battery Nokia Battery BL-4C
Talk time Up to 13hrs 30 mins
Standby time Up to 25.8 days
Colors available – Black/Red
– Silver/Blue
Release Q2 2010

Nokia X2 Price:

Nokia X2 will hit the markets in the last week of June 2010 and will be priced approximately around Rs.5000 Rs.5727 in India, or at €85 in Europe, or at around $112 in US/ Globally.

First Impression:

Nokia X2 specs look cool at least on paper, this will appeal strongly to those who have a penchant for cameras/photography but couldn’t afford to buy big camera smartphones.

What’s Hot?

5 Megapixel camera, upto 16GB microSD support, 13hrs long talk time

What’s Missing?

3G

Other phones in X-series: Nokia X6, Nokia X5

[How to] Pin or Unpin The Contents Of a Folder in Windows 7 Taskbar

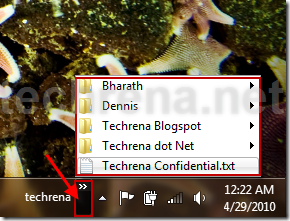
Have you ever thought of adding a shortcut of your favorite folder in the taskbar. Well you can do it in Windows 7. Here we will show how to pin a folder in the Windows 7 taskbar.

Any folder can be pinned to the task bar as a New Toolbar in the Task bar of Windows 7 with a small or large icon and with or without text of the folder name.

Point to be noted:

When we pin a folder, we can see only the only the contents of the folder in the task bar. It is like the folder is already opened and displayed in the taskbar. So it is not that the folder’s shortcut is pinned to the task bar, but its just that the shortcut of the contents of the folder is created in the taskbar.

Now just follow the simple steps below to pin the contents of a folder to the task bar.

Pin a folder to the taskbar.

Add a new toolbar in the task bar:

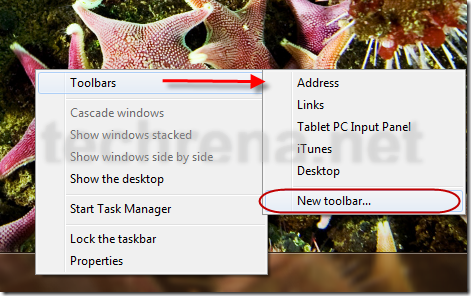
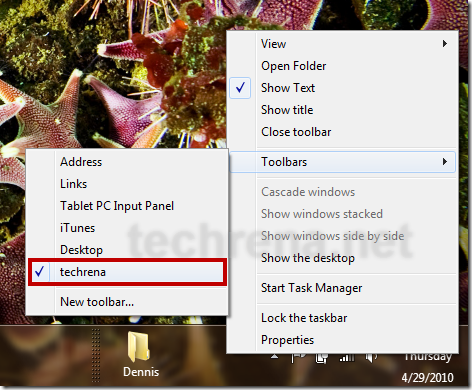
Right Click on the taskbar, go to Toolbars and select New toolbar.

Add_new_toolbar_taskbar

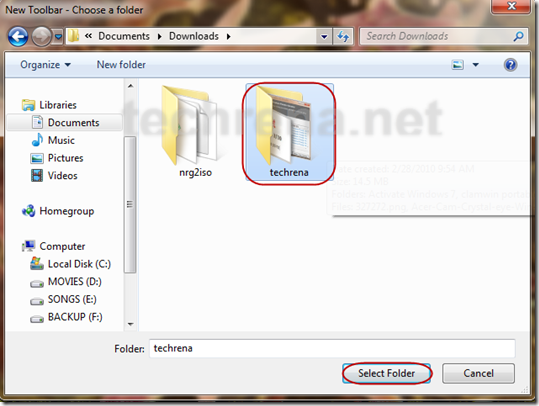
It will ask to select the folder. Select the parent folder which you want to add so that the contents of the folder is shown in the taskbar.

select_toolbar_folder

Now you can see the folder name in the taskbar with its content.

taskbar_toolbar_opened

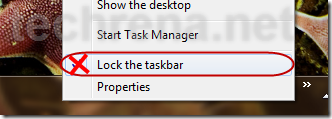
Unlock the Taskbar to modify the positions and settings if its locked

Right Click on the taskbar and select lock taskbar to uncheck it.

unlock_taskbar

Changing the settings of the toolbar:

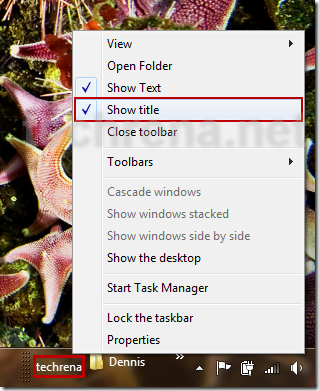
If you don’t want to name of the folder to be displayed but only the contents, then right click on the folder name in the taskbar and uncheck Show Title.

Show_Title

If you want to move the toolbar to the left side, yo have to drag the divider to extreme left to the Start menu.

Drag_divider_to_leftToolbao_divider

If you want to move it back, drag it back to right.

Now, if you want to show bigger icons of the content in the toolbar, Right click on the toolbar, go to view and select Large Icons.

View_large_icons

Now after doing all the changes you can lock the taskbar again if you wan to.

Unpin the folder from taskbar:

Now to unpin the folder, right click on the taskbar and go to Toolbars and unselect the folder name. You can also right click on the toolbar and select close Toolbar.

close_toolbar

Now you have successfully learnt how to pin and unpin a folder to the taskbar in Windows 7.

Apple iTunes 9.1.1 [Downloads]

Apple has  release updated version of the iTunes, version 9.1.1.This is an update mainly addressing and fixing the various issues.The various issues addressed by this update are listed below.In addition to those,  previous version for the 64-bit versions of Windows Vista and Windows 7 dealing with a third-party software conflict that could cause iTunes to close the program unexpectedly.

iTunes new version 9.1.1 available

iTunes 9.1.1 Improvements:

  • Addresses several stability issues with VoiceOver
  • Addresses a usability issue with VoiceOver and Genius Mixes
  • Addresses issues with converting songs to 128 kbps AAC while syncing
  • Addresses other issues that improve stability and performance

iTunes 9.1.1 free download

Direct Download Link

Download iTunes 9.1.1 – 93 MB  (Windows XP, Windows Vista or Windows 7 32-bit)