[Tip] Enable Secure “HTTPS” In Facebook

Facebook logo

Facebook has just announced the availability of HTTPS/SSL all the time on the Facebook. If you enable HTTPS mode, all the data beginning from the password you type at the login page would be encrypted when it travels between the browser and the Facebook server, offering a more sophisticated security for your stay on Facebook. HTTPS mode isn’t new, you might have seen this while doing any transactions on the internet. A similar HTTPS/SSL mode is also optional on Gmail and Hotmail.

# Who Should Consider HTTPS Secure Mode For Facebook?

Facebook suggests that if you frequently use your account at public internet access enabled places coffee shops, restaurants, airports, libraries and schools etc.

# How To Enable The HTTPS Mode In Facebook?

Open your account settings page and click on the “Account Security” section. You will find the “Secure Browsing (https)” option and check against “Browser Facebook on a secure connection (https) whenever possible” and click Save.
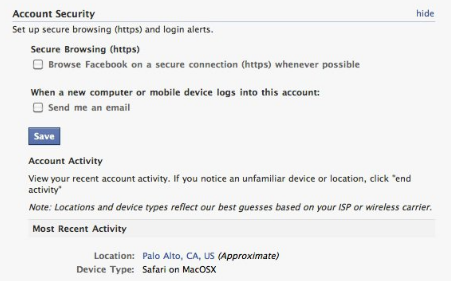
Facebook account security settings

Can’t find the option in your account? You may have to wait! Facebook will rollout the option for all the users in the coming weeks starting from today.

When you enable the HTTPS mode and log back into the Facebook, you will see this in the address bar.

Facebook https connection

# What Are The Downsides?

While you press hard for enabling more secure HTTPS mode, you might have to compromise on the page load speeds part. Facebook alerts users that enabling encryptions mode means that pages take longer than usual time to load. Also many third-party applications are currently not supported in HTTPS mode.

# Social Authentication

Besides this, Facebook has one more interesting feature announcement about using Social authentication. Facebook is now testing this feature which now lets users to authenticate by using pictures of their friends (like the one shown in the screenshot):

Facebook social authentication

[Via] The Facebook Blog
[How To] Disable System Beep Sounds In Windows 7

Windows system beep sounds turn up when your perform some invalid action (ex: pressing a wrong key or clicking or choosing a invalid button on window etc.) or when some error dialog appears. The beep sound also appears when you are using volume control.

(Click the Play button to listen to the sound; requires QuickTime Player plugin)

While the use of such beep sounds can be dated back to olden days when computers didn’t have sound cards but just built-in speakers producing various beep sounds to notify the troubleshooters help diagnosing the issues. Well, the times have changed, even though the desktops and laptops ship with internal speakers producing beep sounds, they are hardly useful when you are using advanced operating systems like Windows 7 as we have more sophisticated diagnosing mechanism to troubleshoot the OS issues. Too many beeps, you would easily get annoyed. Follow these steps to disable the system beep sounds in Windows 7.

This can be done in either of the two ways:

>> Method-1:

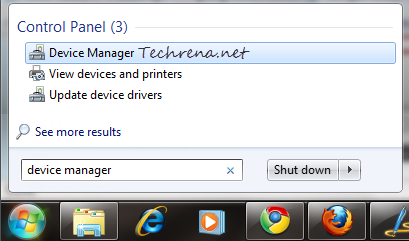
1. Type “device manager” in the Start Menu search box and open the Device Manager from the results under “Control Panel” items.

device-manager-start-menu-search

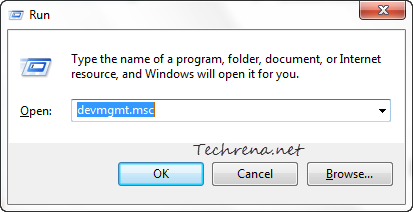
Alternatively, press Windows key + R to open the Run command. Type “devmgmt.msc” and hit enter to open the Device Manager.

device management run command

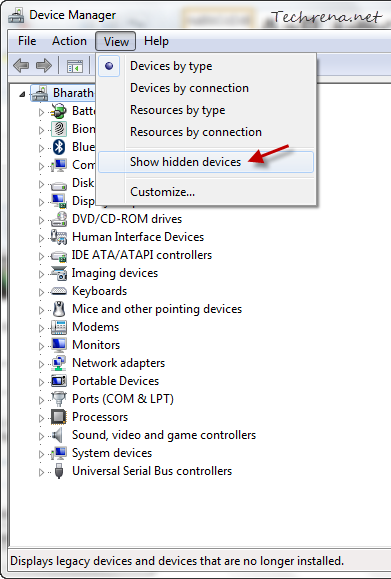
2. From the Device Manager window, choose “Show Hidden Devices” under “View” menu.

Show hidden devices in Device Manager

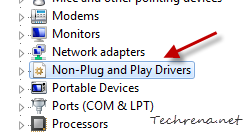
3. Scroll down the list until you find “Non-Plug and Play Drivers” and click on it to expand.

Non-Plug and Play Drivers in Device Manager

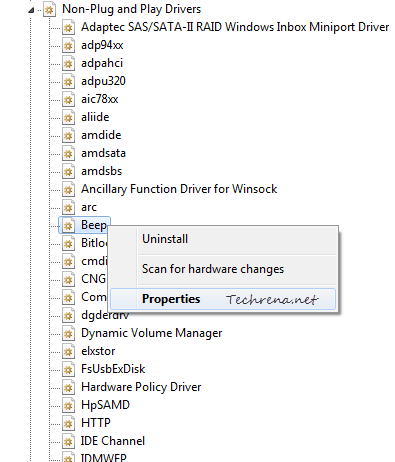
4. Right-click on the Beep item and choose Properties.

beep sound in device manager

Warning: Do not click “Uninstall” as the option will completely remove the beep sounds from your Windows 7, you might find it hard to reinstall the same again.

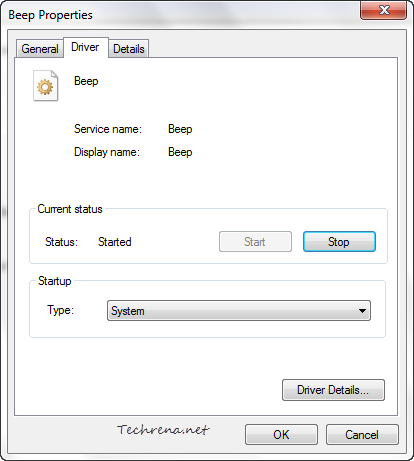
5. In the Beep Properties, click on the Driver tab

beep properties driver

From the Start up type, choose “Disabled” from the list.

Click OK to apply and save the settings. You need to restart the system for the changes to take effect. To enable the beep sounds again, just choose “System” from the list in the step-5.

>> Method-2:

We can also achieve our desired result from the Control Panel, let’s see how to do it.

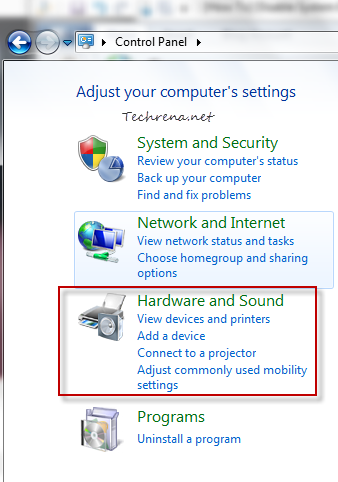
1. Open the Control Panel and click on the Hardware and Sound item link from the list.

Hardware and sound section in Control Panel

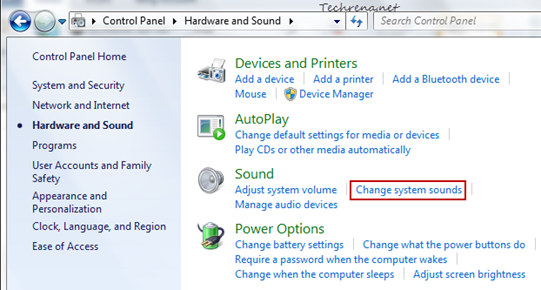
2. Click on the Change system sounds link under the “Sound”.

hardware and sound in control panel

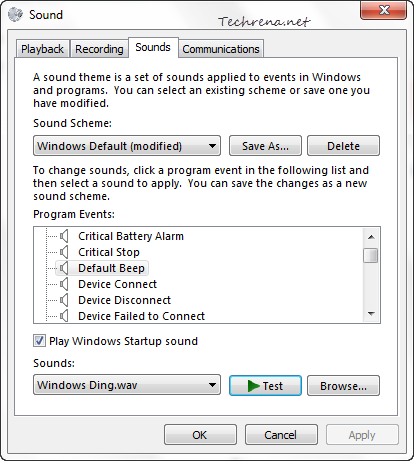
3. Under the Sounds tab, scroll down to find “Default Beep

Sounds in Control Panel setting

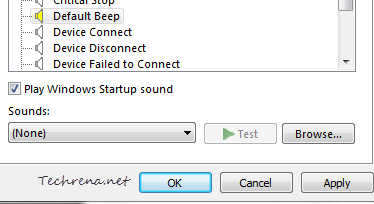
Choose “None” from the list under Sounds and click OK to save the settings.

Default Beep sound settings

You are done! But please not note that these are the settings for current sound scheme for your Windows 7. In future if you change the settings, the default beep sound may be enabled again automatically. Hence we suggest you to use method-1 if you completely want to disable the internal speakers system beep sound.

[How To] Create a Shortcut To Clear Your Clipboard

Whenever you copy anything while using your computer,  the computer uses a special place known as Clipboard to place the data. Suppose you copy some text from a text file, the information(data) gets copied into the Clipboard. Then when you paste the text to your desired location, the data is transferred from your clipboard. The clipboard is used for any type of copy action done.

Now, you have copied some data and hence it is now present it in your computer’s clipboard. Suppose the data you are handling is a sensitive one and hence you don’t want to leave any trace, even in your clipboard. So how do you do it? Here is the simplest answer known.

Steps to create a shortcut to clear your clipboard:

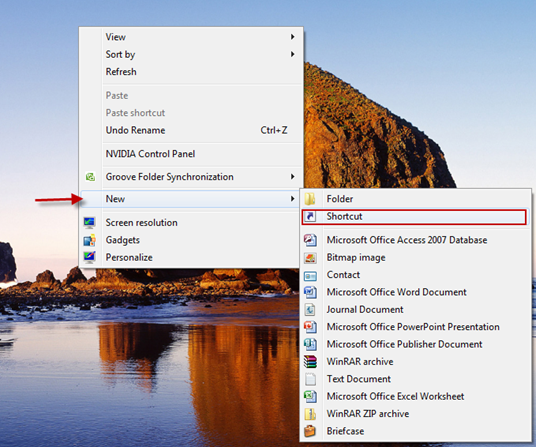
1. Right click on your desktop, go to New—>Shortcut.

Create a Shortcut

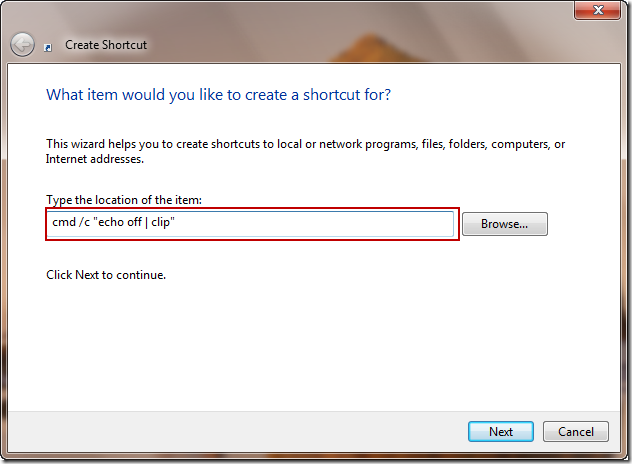
2. In the New Shortcut window, Type

cmd /c "echo off | clip"

and press Next

Clear clipboard shorcut

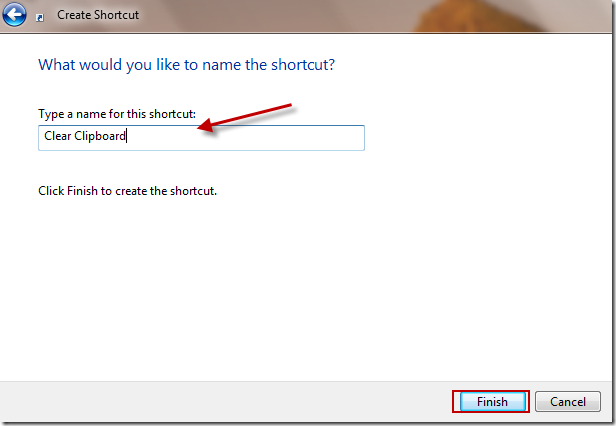
3. Type in a Shortcut Name of your choice and Finish.

Shorcut name

Now you can click on the shortcut anytime you want to clear your data off the clipboard.

[Tip] Get Warned Before Closing Multiple Tabs In Google Chrome

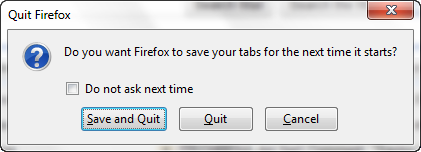
If you are used to Firefox browser for long, you might be aware of the warning message or confirmation message that appears when you try to close multiple tabs as you can see in the following screenshot:

Quit firefox confirm

This is quite useful when you hit the close button accidentally with multiple tabs opened. Unfortunately such feature isn’t there in Google Chrome by default. But thanks to “Chrome Toolbox” extension developed by Google itself, the extension adds this missing feature and can be configured from the extension settings.

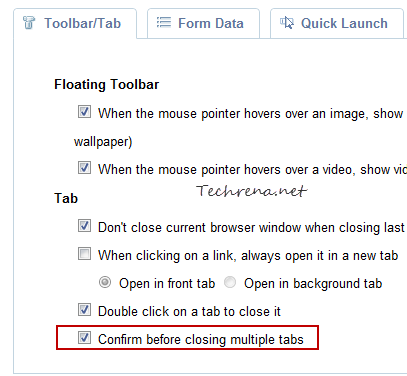
To get started, just install the Chrome Toolbox, and open the extension options. Check against the “Confirm before closing multiple tabs” and that is it. Now you will get a confirmation message like below when you try to close multiple tabs in Google Chrome.

chrome toolbox confirm before close

chrome warning before closing multiple tabs

Chrome Toolbox Options is really an interesting extension which is aimed to increase the user’s productivity. You can many find various handy options which you would otherwise feel missing in the browser. For instance when you enable “When the mouse pointer hovers an image, show image floating toolbar” options, you get additional options for each image on a page to view the original image in its natural size, or to use a magnifier or to use it as your wallpaper etc. There are plenty other useful options as well. We recommend that you install this extension from the Chrome extensions gallery to enhance your browsing experience in Chrome(link added below).

Install Chrome Toolbox

[via]

Delay Services In Windows 7 To Speed Up The Boot Time

delayed start programs in Windows 7

Is your Windows starting up too slow even after performing the suggested optimizations? Wonder what more you can do to save on your computer’s boot up time? Consider delaying the non-essential services so that they can be run once the system has completed the booting and has enough free time to load these services. Windows services are the ones that are needed by various programs installed on your PC. Even though some of the services need to run along with the Windows boot, some may be delayed to start so as to reduce the high activity during the start-up. Delaying the Windows services was introduced for the first time in Windows Vista and is now available in Windows 7 as well. By default Windows automatically sets some services like Windows update, Google update (if installed), Windows Font cache etc. to start delayed.

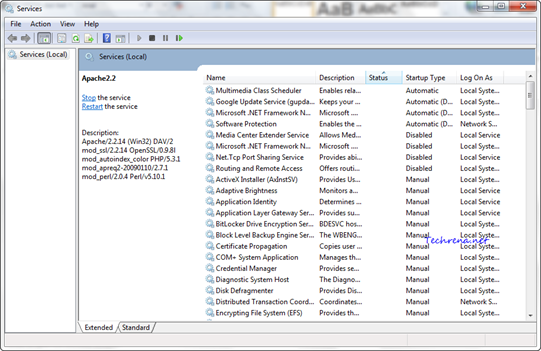
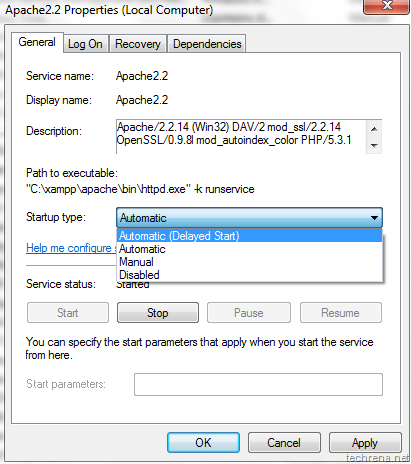
But you might want to consider delaying other third party services to boot your Windows even faster. Take the following screenshot for instance, you don’t need to run the “Apache web server service” along with boot, you can safely delay it so that your Windows gets loaded a touch quicker.

Apache service in windows

>> To see all the services installed on your Windows, type “services.msc” in the Start Menu search and open the services.msc from the results.

Services.msc from Start Menu

Alternatively press Windows button + R to open the RUN command and type services.msc and hit enter to open the Services window.

Windows 7 services

>> To see all the services which are already set to “Delayed Start”, first click on the “Startup Type” column and then click “Status” column. All the delayed services will be shown as “Automatic (Delayed Start)” next to them under the Startup Type.

Delayed start programs

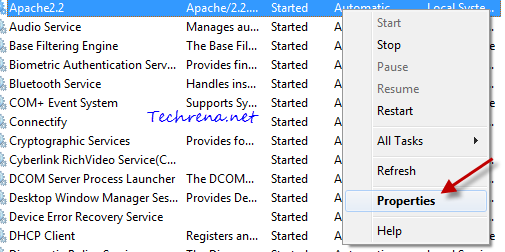
>> To delay start of any service (for instance Apache2.2 in this case), just right-click on the service and choose “Properties

Services context menu

>> In the Properties window, choose “Automatic (Delayed Start)” from the drop down menu under Startup Type filed.

Editing properties of service

Click “OK” to apply the settings and close the properties window. Now the startup of the selected service would be delayed. You can safely set “manual” and “disabled” services to delayed startup, however you should be careful while handling important services like Windows related services which are set to start automatically by default .

Search Gmail Labs Features As You Type

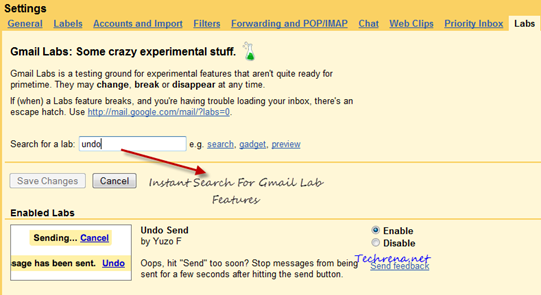
Gmail is great, and so are its labs features that would come handy for most of the Gmail users. To enable a particular lab feature in Gmail, users just had to go to the “Labs” tab under the settings page and choose the required lab feature from the list. But over the time, what happened was a huge in the number of such labs features added to the Gmail. As such now there are more than 50 labs features available under Gmail Labs section. Finding and selecting the item needed from them is just getting troublesome for few users like. Agree that there is always the built-in search feature (using CTRL + F) feature available in all the browsers to narrow down your search, it would have been better had Google, the giant search engine had added a small search engine to their Labs section to avoid scrolling. Gmail engineers have now responded quick enough to add not just a search feature but with Google Instant-like “search-as-you-type” feature.

Gmail labs instant search

If you haven’t really figured it out, go try it and enable this Google HD Video chat option from the Gmail Labs.

[Download] Google Goggles 1.3 For Android

Google Goggles

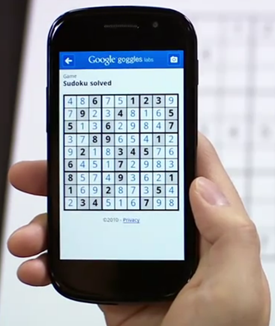
Google Goggles app for Android and iPhone devices has just been upgraded to a newer version. Google Goggles 1.3 for Android can now scan barcodes faster, and recognize print ads in popular magazines across US and finally it can also solve any Sudoku puzzle if you scan the puzzle with your camera. While the improved barcode scanning is available for the Android client, the other two features, recognition of  print ads and Sudoku solver are available for  both Android and iPhone versions of the client.

Google Goggles Sudoku solved

Google Goggles for Android (and iPhone via Google Mobile app) is touted to solve Sudoku puzzles faster than a Sudoku champ. If you make a mistake somewhere while solving a Sudoku puzzle and just stuck there for hours, just scan the picture of the Sudoku puzzle using the app from your Android or iPhone and the solution will be there just in case you wanted a hit to proceed further. To test it yourself, grab the app now and see how quickly it solves the Sudoku puzzles or how it accurate information about the print ad scans are.

Download Google Goggles 1.3:

>> Android users: Download from market place or visit this link from the browser: http://market.android.com/details?id=com.google.android.apps.unveil

>> iPhone users: Visit the iTunes app store link to install the Google Mobile app

[via] Google Mobile blog

[Tip] Voice Search For Google Chrome

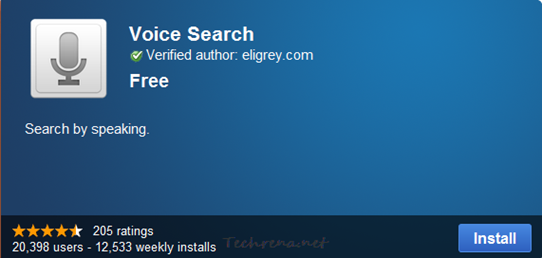
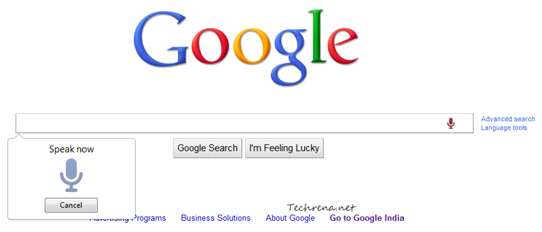
Voice Search for Google Chrome is a useful extension that lets you to quickly search the web using your voice input.

Voice search Google Chrome extension

Google Voice search feature is nothing new, Google has been offering this feature for various Android, iOS and other smartphones for a while but I don’t why they haven’t really tried getting this handy feature for PC users. The extension of course is not built by Google. You need to have a built-in or an external microphone to use this feature. The extension comes with preloaded search engines like Google, Yahoo, Bing, WikiPedia, Wolfram|Alpha, DuckDuckGo, YouTube etc. The extension also integrates a speech button into all the HTML5 search input boxes. Just enable your microphone say a word like for instance “Sony Ericsson Arc” just add the search engine name before your query, like “Google Sony Ericsson Arc” to search in Google.

Google Voice search for Chrome

This is experimental feature and the voice input may not be accurate. Also, English is the only supported language for now. The extension is also missing a keyboard shortcut to activate the voice search. Though the extension is not so impressive but it is a good start, we hope Google comes out with an official app for Chrome, until then try using this.

Install Voice Search for Google Chrome [from Google Chrome web store]

Track Stolen Laptops With Quick Heal Free Laptop Tracker Service

Track stolen laptops with Quick Heal laptop tracker

Do you own a laptop? Do you worry about its security? Here is a good news for you! Quick Heal Technologies has launched a free laptop tracker service (available in India only). This is a very good initiative from the PC security software maker Quick Heal, I would say.

Quick heal logo

The good thing about this free service is that anyone can use this service free of cost irrespective of whether they use Quick Heal software or not. But if you are a Quick Heal user, it just gets better and much easier. The tracking service makes use of the MAC IDs of the laptops to locate them with IP address and it has also made it easier for law enforcement authorities to check if the laptops they found are on the reported stolen laptops list.

How To Use Laptop Tracker Service:

The prerequisite for using the service is you must have your MAC address for at least one of your various network cards. For starters, MAC address is [Quote from Wikipedia]:

A Media Access Control address (MAC address) is a unique identifier assigned to network interfaces for communications on the physical network segment.

We had already covered a detailed guide to find the MAC address of your computer’s NIC(Network Interface Card). Please go through it and note down MAC addresses for all of your network cards (LAN, Wireless, Bluetooth etc.) and carefully note down and store them for future use.

1. Go to www.trackmylaptop.net

2.

>> If you are already a user of Quick Heal anti-virus or Internet Security suites, just register yourself for the laptop tracker service by providing the Quick Heal product key and other details as required. The advantage for the Quick Heal users here is that they don’t need to provide the MAC ID manually. The MAC IDs will be automatically obtained and stored in the database during Quick Heal activation or update.

>> If you are a non Quick Heal user and have your MAC ID of your stolen or lost laptop with you, go to this page and fill-in the required details and click “Register Now”. Quick Heal will regularly search through its database and will notify you in case it finds a match.

If your laptop was stolen, and if you’ve got the MAC ID of it, you can register your MAC ID with this free tracker service and hope that the your stolen laptop gets connected to internet one day or the other. One more advantage of using this service is that you can also get to know whether a used laptop that you are planning to purchase is a stolen one.

Watch CES 2011 Live Online

CES 2011

The 2011 international Consumer Electronics Show (CES 2011) is scheduled for January 6 through January 9, 2011. With the kickoff just few hours away, the gadget lovers would be gearing up to watch the event live (live on CBS on TV as well as on CBS radio station in association with CNET). All the new and upcoming innovative gadgets that are slated for release this year will feature in this biggest annual tech show. CES 2011 is going to be crucial for Android as almost all the manufacturers (HTC, Samsung, LG, Motorola) are coming up with tablets and smartphones based on Android OS. The show is not just about tablets, smartphones and notebooks there are digital cameras, camcorders, gaming devices, TVs, and lots more to watch out for. If you are not able to make it to Las Vegas Convention Center (that’s where the event is happening) or not at home to watch the updates on TV, don’t worry, we have some links here for you to watch the CES 2011 proceeding online.

Live Streaming And Updates Links:

>> Watch CES 2011 updates on CNET Live

>> Stickam CES 2011 live stream:

>> Microsoft has a dedicated page for covering the Steve Ballmer keynotes and other CES 2011 updates.

>> Skype press conference at CES’11 (by Tony Bates, CEO)

>> Ford Keynote live stream (by Alan Mulally, CEO)

>> Samsung keynote live show

For live streaming of keynotes of other biggies like Sony, Panasonic, Toshiba etc. head over to ustream.tv, you might see their live broadcast videos there.

Other coverage:

Engadget

Gizmodo

UbderGizmo

www.cesweb.org (official website)

Twitter tags: #CES2011, #CES

Mobile updates: m.cnet.com