[How To] Easily Embed MP3 File Into A WordPress Blog Post

Embed Mp3 into WordPress post

This tutorial deals with how to embed a Mp3 audio file into a WordPress post so that it can be played right inside the post in players like Quicktime.This saves the time for your readers as they need not download the file to listen to it. Follow these simple steps to learn how you can do it.

Steps:

1. Star composing a new post by clicking on “Add New” under posts section. Next to Upload/Insert option, click on the music icon to add (upload) audio to the media library.

Upload audio file to the WordPress media library

2. Click on the Select Files and chose your audio (mp3) file and click Ok.
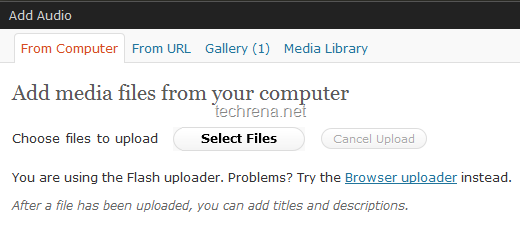
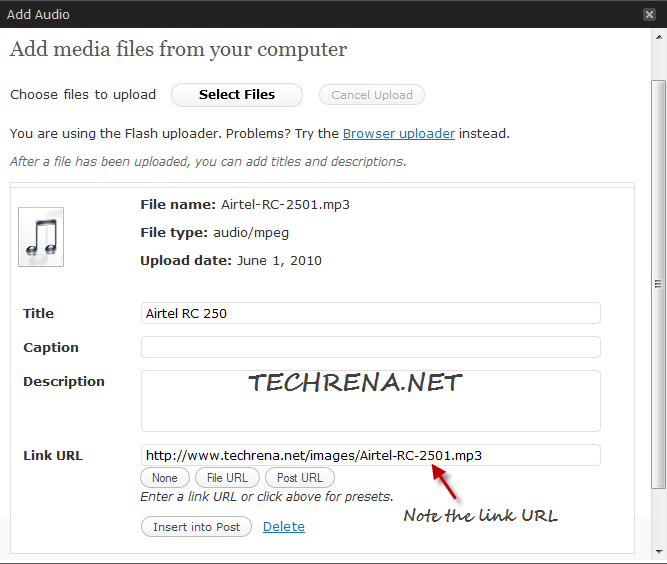
Add media files from your computer to the WordPress media library
Wait until the upload gets over. Copy the link URL to notepad.

Media file uploaded to WordPress library

3. Now go to back the post editor, and click on the small video file like icon (see in the screenshot). New “Insert / edit embedded media” popup will open.

Click on this to embed media into the WordPress post
Under the File/URL filed, enter the URL that you have just copied to the notepad in the previous step. You can now customize the Quciktime player by setting your preferred dimension (I had chosen 300 x 15 in the screenshot). You can preview the audio file by playing it under the “Preview” section.
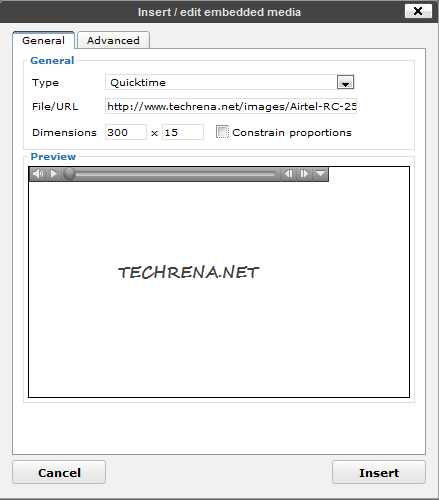
insert_embedded_media

4. Now go to Advanced tab and uncheck “Auto play”. Auto play, if checked plays the audio file automatically when the page loads, many of us may not want this, hence it’s better to keep it unchecked. Click Insert to embed the audio file into the post.
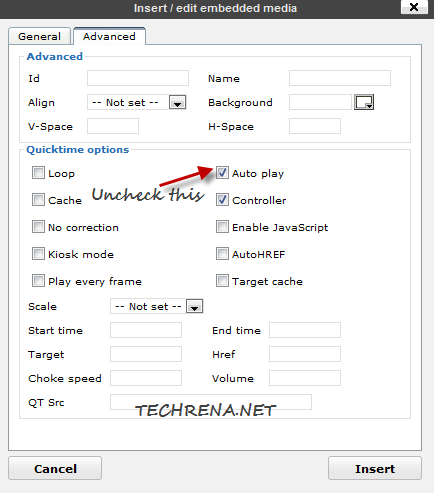
Uncheck Auto play in embedded media settings

5. The audio file (mp3) will now be embedded into your post and this is how it looks like in your WYSIWYG editor.

Mp3 file embedded in WordPress post editor

6. Publish the post and you will now see the mp3 file embedded into the post as shown in the below screenshot:

Mp3 embedded into a WordPress post

Automatically Log On To A User Account In Windows 7

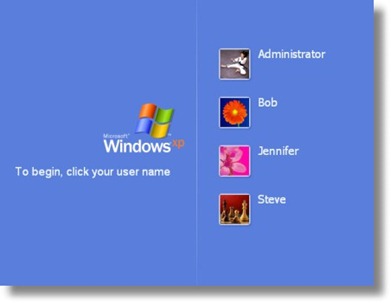
Windows welcome screen with multiple user accounts

Windows 7 by default will ask you to select your user account manually from welcome screen (log on screen) to log on to that particular account. If you have multiple user accounts, but use only one main account most of the time, you may want to save some time by letting your Windows automatically logged on to your default account rather than choosing the account manually.

This tutorial helps you to enable “Automatically Log on” feature in your Windows 7. Follow the steps outlined below to enable this feature on your Windows 7 system.

Steps:

1. Click on Start button, enter netplwiz in the search box and hit the Enter key, or open the netplwiz from the results under Programs category. This will open Advanced User Accounts section from the Control Panel items.

Windows_search_netplwiz

Windows_search_netplwiz_results

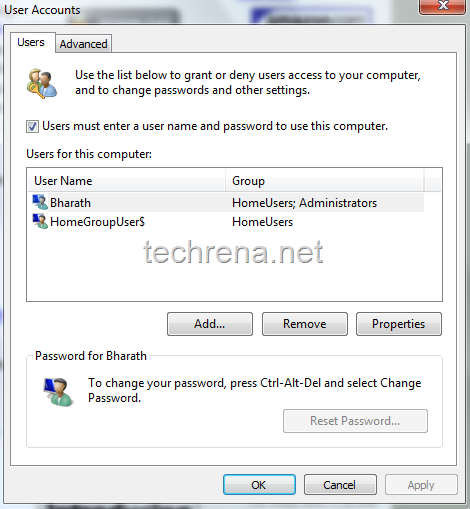
2. The Users tab may look like as shown in the below screenshot :

Windows user accounts

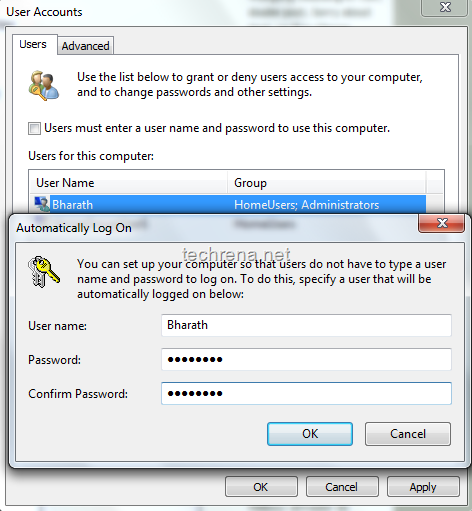
3. Now uncheck “Users must enter a user name and password to use this computer” and click Apply. You will be asked to confirm user name and password.

You can set up your computer so that users do not have to type a user name and password to log on. To do this, specify a user that will be automatically logged on below:

Just leave the password field blank if the user account doesn’t have a default password associated with it.

Automatically log on in Windows 7

4. Click OK and close the window.

From now on, you will be automatically logged on to Windows without manually selecting the user account.

For more tips on Windows 7, you can subscribe to Techrena.net’s RSS feed via email.

Note:

This method works well on Windows 7 as well as on Windows Vista.

You may not want to select this on a public computer for security concerns.

[How To] Make Gmail More Secure By Using HTTPS Instead Of HTTP

“If you sign in to Gmail via a non-secure Internet connection, like a public wireless or non-encrypted network, your Google account may be more vulnerable to hijacking. Non-secure networks make it easier for someone to impersonate you and gain full access to your Google account, including any sensitive data it may contain like bank statements or online log-in credentials” – Google

In order to avoid such kind of security risks we should enable HTTPS(Hypertext Transfer Protocol Secure) which is a secure protocol that provides authenticated and encrypted communication and the interceptors will not be able to tap the information.

You might have seen HTTPS being used in the banking and payment websites. So by using HTTPS for your Gmail, you will be able to a secure you mailbox.

In order of enable HTTPS protocol follow the steps below:

1. Sign in to Gmail

3. Check If your Gmail is secure?

Check if you have a https://mail.google.com url. If not then follow the steps else not required as it is already enabled.

gmail_url

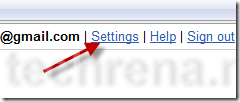
3. Click Settings at the top of any Gmail page.

gmail_settings

4. Set Browser Connection to Always use https

always_use_https

5. Click Save Changes.

save_gmail_settings

6. Log out and Login.

7. Now find a secure login

You can see https://mail.google.com in the url.

gmail_https_url

Now you Gmail is as safe as you internet banking site. But never forget to Logout your account if you are using a public computer.

Notes:

  1. Using HTTPS may slow down a bit the speed of accessing your Gmail, so if you trust the security of your network, you can turn this feature off at any time
  2. “Always use https” will prevent you from accessing Gmail via HTTP
  3. Currently Gmail has enabled HTTPS by default. For the old users you can follow the method.

[How To] Copy A File Or Folder Path To Clipboard Without Any Software

Windows7_Logo

Are you using any third party software or any registry hack to copy the path of any file or folder in windows? Do you know that Windows 7 allows you to copy the full path of any file right from the context menu itself? Here’s how you can do this:

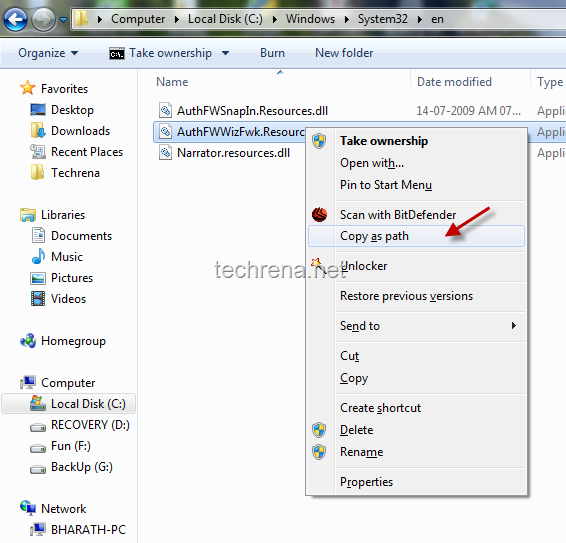
Use Shift + Right-Click on any file or folder and you will find “Copy as path”.

Copy as path in windows

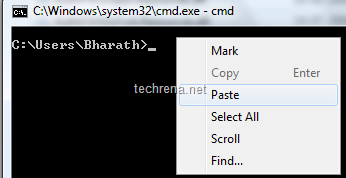
You can now use the copied file path from the clipboard anywhere including in a command prompt DOS window:

paste file path in cmd

file path copied in cmd

This is very helpful if you are using some commands via the Windows command prompt (DOS windows) that needs the full path of the files on which the DOS commands are used.

Hope this tip helps you.You may also subscribe to our RSS feed via email for more tutorials under Windows 7.

Add Or Remove Items From Windows Context Menu

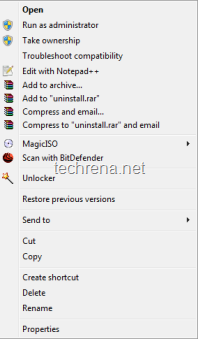
messy windows context menu

Context Menu appears when you right-click on any Windows folder or a file.When you install programs, it is very common that they fight with each-other to occupy the content menu.This context menu list will just keep on increase as you install new programs in your PC.But it is very unlikely that you use all such programs from the context menu, then why have it there? It is very annoying in such cases and you might want to get rid of all such menu items.Read on to get the possible solutions..

Using Registry Editor:

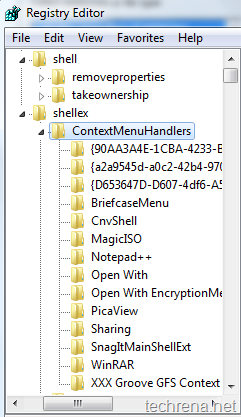
You need to find two items in registry editor which pops up by typing Regedit in your run command area.

In the registry editor, find the following items:

HKEY_CLASSES_ROOT\Directory\shell

HKEY_CLASSES_ROOT\Directory\shellex\ContextMenuHandlers

Shell Context Menu Handlers in regedit

As shown in the above diagrams, you will find most of your context menu items under shellex, which you can edit to hide or disable.

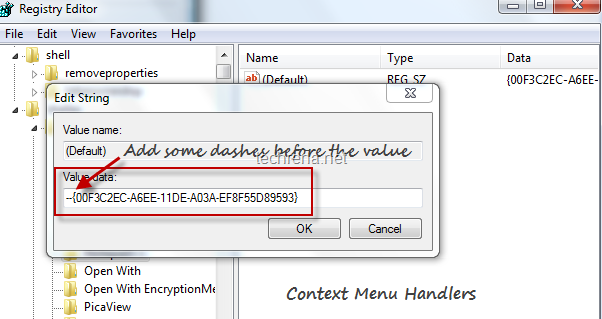
Regedit shell context menu handlers

To hide any context menu item, just right click on the key> choose Modify data?> just add some dashes before the Value data filed, this will hide that particular item for appearing in the context menu handlers.

Well, working with registry values is always going to be dangerous particular if you edit some other key values instead of the correct one.So I always prefer using simple programs available for obtaining the same result in a easier way.

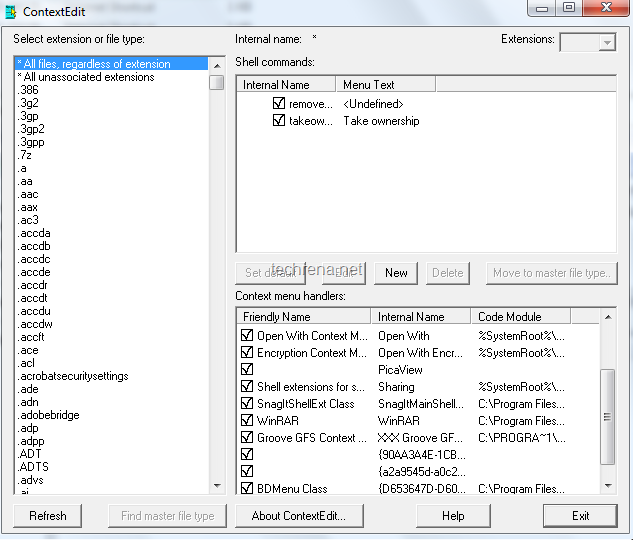
ContextEdit:

ContextEdit displays list of static context menu handler items that appear when you right-click on any folder or file.You can easily disable them by unchecking against it.

ContextEdit

Download ContextEdit (487 KB)

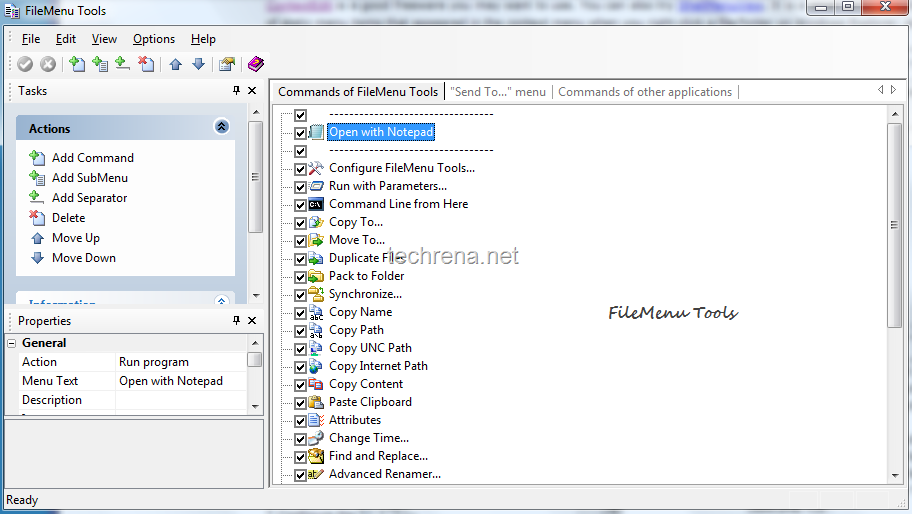
FileMenu Tools:

FileMenu Tools, is another great free utility which allows you add, delete or manage the context menu items, you can even choose move a particular context menu item down (or up).

FileMenu tools

Download FileMenu Tools (7.4 MB)

[How To] Disable or Enable Registry Editor In Windows 7

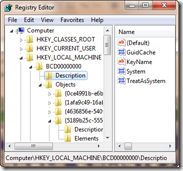
regedit

With viruses trying to attack your system and change the registry, why don’t we try disabling the registry editor now itself before the viruses do it?

Yes, this question is a clear one and why don’t you disable the registry editor by yourself before someone changes your registry and mess with your computer.

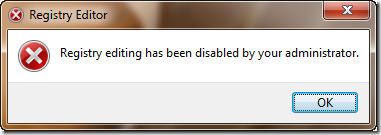
regedit_disabled Well we have a lot of methods to disable or enable the registry editor. Some of the easiest ones are given here.
1. Disable or enable Registry Editor using Registry Enabler & Disabler 3

Registry Enabler & Disabler 3 is a freeware which can be used to enable or disable Windows Registry editor. It is a safe program.

Download: Registry Enabler & Disabler 3

Size: 276 KB

Registry_Enabler_Disabler_3

By using this program, you can directly enable or disable the Windows registry editor.

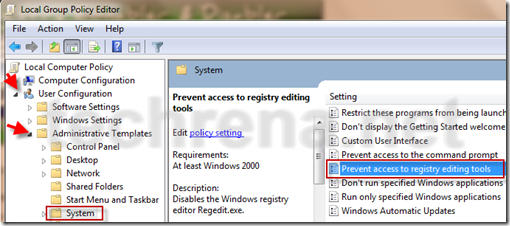
2. Disable or enable Registry Editor using Local Group Policy Editor

Press Start + R and type gpedit.msc and press Enter.

In the Local Group Policy Editor go to the location:

User Configuration—> Administrative Templates—> System

Under System, find Prevent access to registry tool. Double click on it and set Enabled to disable access to registry editor.

disable_registry_editor

Set it to Disabled to enable access to Registry Editor.

Note: Local Group Policy Editor which is not available in Home versions of Windows

3. Enable Registry Editor Using VBS script.

This method is given in techrena.blogspot.com. To read more visit:

How to enable Registry Editor (REGEDIT)

You can subscribe to our RSS feed via email for more tutorials under Solutions.

[How to] Repair Install Windows XP without Data Loss

Have you ever faced any problem like ntldr file missing during the start up of Windows XP? During the cases of critical Windows file gone missing or corrupt, Windows will not Boot and hence cannot start. What will you do in such case where your data is at stake?

There may be many solutions available, but repairing Windows using the Windows XP setup CD will be the best. In repair install your data will be intact and no data loss will occur if everything goes right.

If you install a new copy of Windows then some of your data will be lost.

What is Windows XP repair Install?

In Repair install, all the Windows files and registries will be copied to your Hard drive from the Windows XP installation CD. The installed program files and personal data on your hard drive will not be affected in most cases.

How to perform Windows XP repair Install?

Requirements:

Your Windows XP installation CD and key

Follow the steps below:

1. Insert the Windows XP CD to your Optical Drive and Start your computer.

Make sure that the computer boots from the installation CD. If it is not booting from the CD try changing your boot options in the BIOS.

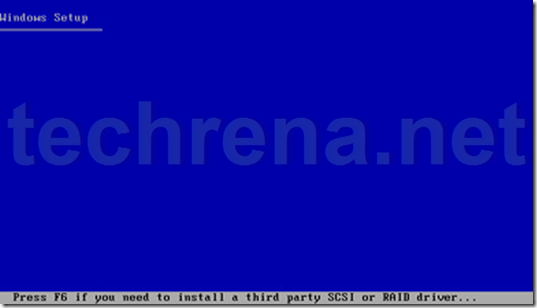
While booting from the CD, press any key to start the process.

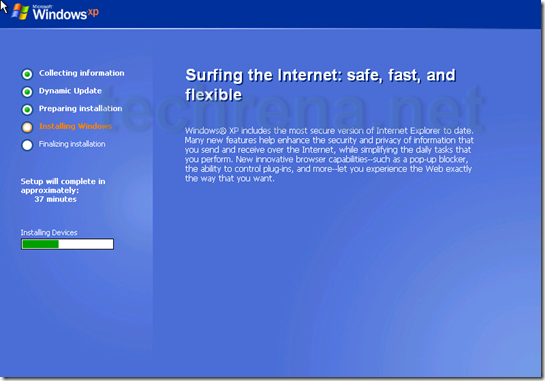
boot_from_xp_cd

Xp_setup

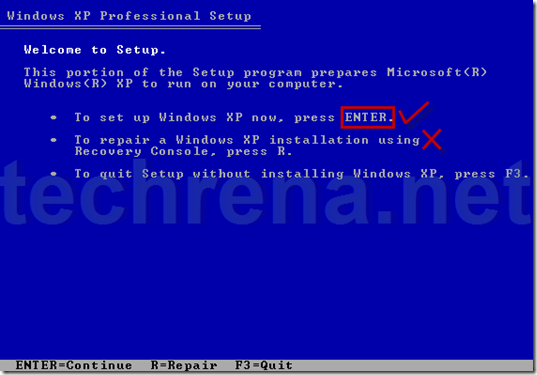
2. Press ENTER to set up Windows XP.

Do not press R. It will start, Recovery Console which is not desirable.

Welcome_ro_setup

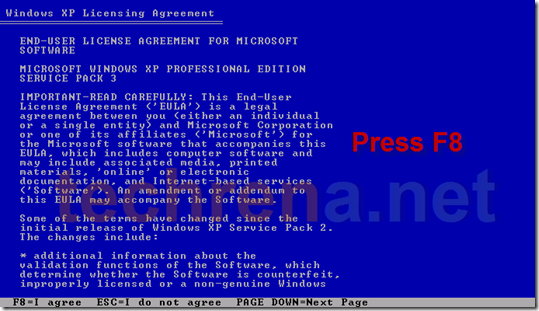
3. Press F8 to Agree the License Agreement.

F8_agreement

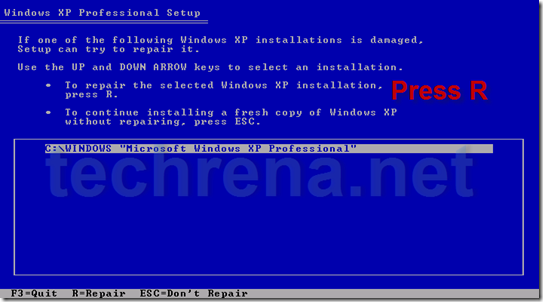
4. Press R to start the recovery install

Select the currently installed Windows XP location which you want to repair. Press R to repair the installation.

repair_xp

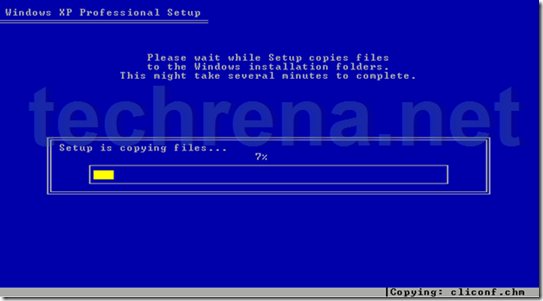
Now it will copy the files.

copying_files

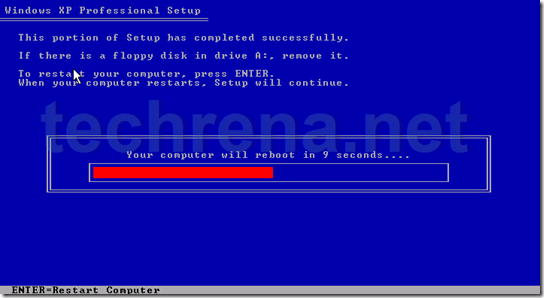
5. Press ENTER to reboot or else wait until it reboots by itself

Setup will continue after restart.

reboot

6. Do not boot from the CD after start up

After booting up from your hard drive it will continue installation. Follow the normal installation process.

installing_windows

After successful installation, your computer will restart once again. It may take some time during the first startup.

first_boot

Now your desktop should be accessible. In case of any problem do leave a comment.

You can subscribe to our RSS feed via email for more tutorials under Windows.

[How To] Stop or Disable Hotlinking and Bandhwidth Theft using .htaccess file

We found out that many of our copyrighted popular posts have been copied by many of the bloggers. But with so many traffic hungry bloggers around, it is impossible to track and warn each of the bloggers.

Now, our main concern is that many of our copyrighted images are not only copied to other blogs but also hotlinked. This is a serious issue with every popular blog where hotlinking results to bandwidth theft. Now if you are having similar problems of hotlinking or not, you should disable hot linking for sure.

What is Hotlinking or Inline linking?

Inline linking (also known as hotlinking, leeching, piggy-backing, direct linking, offsite image grabs) is the use of a linked object, often an image, from one site into a web page belonging to a second site. The second site is said to have an inline link to the site where the object is located.[wikipedia]

This is when you insert an image to your blog from an image URL of someone else’s site instead of uploading the image to your server. Many people with limited server storage size tend to do this.

How to stop Hotlinking and Bandwidth theft using .htaccess file?

In order to disable hotlinking follow the steps below:

1. Open your .htaccess file by saving it.

.htaccess file is present in the public_html folder of your blog. This can be accessed by using the ftp client like FileZilla. Hope all webmasters know this. Save the file and open it using notepad.

dot_htaccess

2. Add the code to disable hotlinking of your images

Add the following code to your .htaccess file and save it back to your public_html folder.

RewriteEngine On
RewriteCond %{HTTP_REFERER} !^http://(.+\\.)?yoursite\\.com/ [NC]
RewriteCond %{HTTP_REFERER} !^$
RewriteRule .*\\.(jpe?g|gif|bmp|png)$ http://imagehostsite/warning.jpeg [L]

Change the orange colored code according to your need as shown in the example below.

Example: [Click to Enlarge]

disable_hotlinking

The RewriteCond can be added according to your purpose. If you have any other blog where you want to use the images, then add another line with the site’s address as we have done in the example.

Important notes:

1. Backup your .htaccess file before doing the changes.

2. in the RewriteRule line, you cannot use a warning image uploaded to your site because the warning image itself will be blocked. So upload the image to some other servers like blogger or other image hosting sites

3. The RewriteCond can be added according to your purpose. If you have any other blog where you want to use the images, then add another line with the site’s address.

Now after performing the changes, you can check the other site where your images are hotlinked. An example is given below where our most popular post Reset Windows XP, Vista, 7 Password Using USB Drive or CD was copied.

hotlinking_blocked

Hope you have seen something like ours. Any feedback will be appreciated.

You can also see how to protect your wordpress internal files using .htaccess.

You can subscribe to our RSS feed via email for more tutorials under Blogger Tips.

Tip: Close All Your Open Applications At Once In Windows

Windows logo

Are you the one who extracts the most of the multitasking from your computer by simultaneously opening too many applications and switching back to one another.But when it comes to closing all application, it’s a bit difficult to close the each application one by one , isn’t it?

What about closing all the open application windows at once with a single click ? Yes, that’s what the tiny program “CloseAll” from ntwind has too offer.

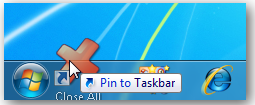
Just download the latest version of CloseAll from the links given at the bottom of the post and extract it to the program files (C:\Program Files\) on your hard disk.For easier access drag the CloseAll.exe to your desktop or Quick Launch Bar pin to the taskbar in your Windows 7.

CloseAll drag to taskbar

Now just click on this shortcut to close all application windows that are currently open.You calso make use of the advanced option to exclude certain programs to be closed by CloseAll, by adding a exclusion list,

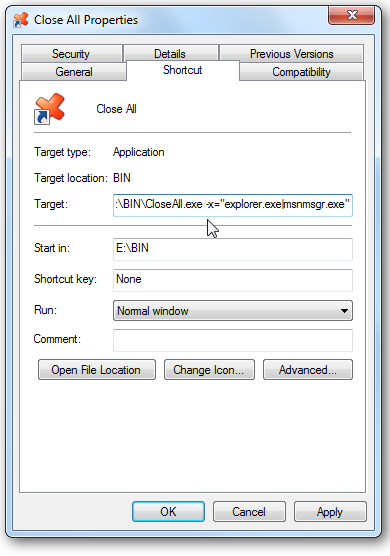
to add a simple exclusion list, go to the CloseAll shortcut properties and go to Shortcut tab, find Target under this tab.Add -x="app-to-exclude.exe": for example:

-x="explorer.exe|firefox.exe|msnmsgr.exe"

CloseAll properties

Click OK and save the settings.So now if you click CloseAll, all application windows except the Windows Explorer, Firefox and MSN Messenger will be closed.

Download CloseAll (Zip file, 36 KB)

Speed Up Windows Boot Up and Startup Using gpedit and DPS

In Windows PC, slow boot up and slow startup is one of the major problem we face. During the starting of Windows, it may take a lot of time to come to the logon screen and then to the desktop. This kind of problem is common in PCs which are older and a lot of programs are running.

One method we have already posted to speed up your Windows PC is by using MSCONFIG. Here, we will be solving the slow boot up problem using Windows Boot Performance Diagnostics of Diagnostic Policy Service(DPS).

Diagnostic Policy Service (DPS) will detect Windows Boot Performance problems and attempt to determine their root causes. These root causes will be detected and corrective actions will be taken to solve the problems.

Follow the steps below to enable Windows Boot Performance Diagnostics.

1. Open Local Group Policy Editor

Press Start + R and Type gpedit.msc and press Enter. Incase of

2. Go to Windows Boot Performance Diagnostics

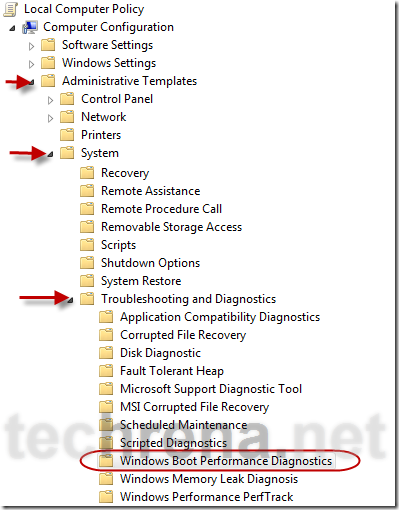
In the Left Pane of  Local Group Policy Editor go to the location:

Computer Configuration—>Administrative Templates—>System—>Troubleshooting and Diagnostics—>Windows Boot Performance Diagnostics

Windows_Boot_Diagnostics

3. Open Configure Scenario Execution Level of Windows Boot Performance Diagnostics

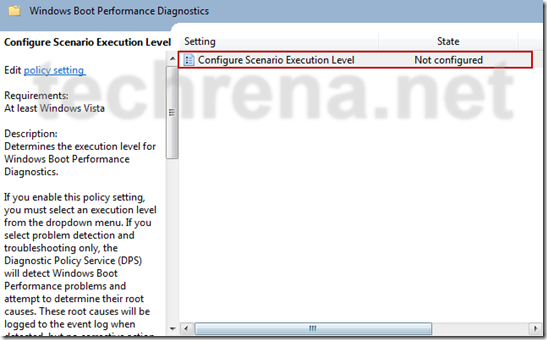
Now in the right pane Double Click on Configure Scenario Execution Level.

Configure_Scenario_Execution_Level

4. Enable Windows Boot Performance Diagnostics

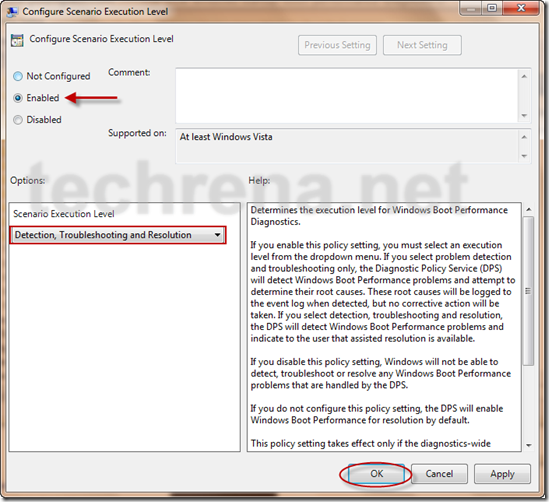
Now Click on Enable and Select Scenario Execution Level as Detection, Troubleshooting and Resolution. Click OK

Enable_Windows_Boot_Diagnostics

If you select Detection and Troubleshooting only then  the root causes will be logged to the event log when detected, but no corrective action will be taken.

Now Windows Will Diagnose your Startup problems and try to fix them for a faster boot and startup.

Important Notes:

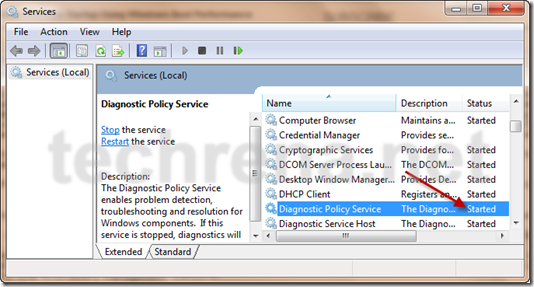
Note 1: Windows Boot Performance Diagnostics is a part of the Diagnostic Policy Service(DPS). So DPS should be running in your computer in order to successfully diagnose the problems. To check whether the service is running or not, Press Start + R and Type services.msc. Check out for Diagnostic Policy Service.

services

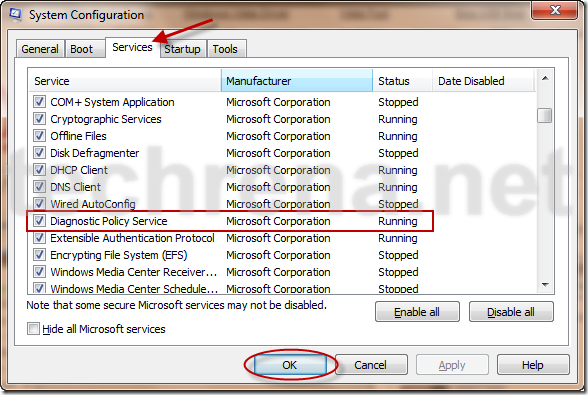
Incase if it is not started, you have to start it using MSCONFIG. To do that, Press Start + R and Type msconfig. Go to Services tab and Check Diagnostic Policy Service. Press OK.Note 1:

msconfig

Note 2: This service is available only in Windows Vista and Windows 7. And Local Group Policy Editor (gpedit.msc) may be available only with versions like Professional or higher.

You can subscribe to our RSS feed via email for more tutorials under Windows.