[Tip] Show Additional Windows Clocks

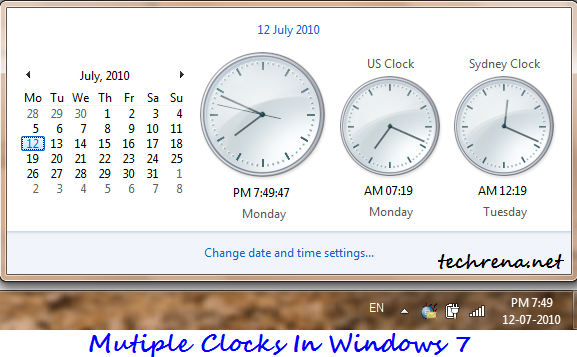
Mutiple clocks in windows 7

Windows by default shows one clock next to the calendar, based on your location in the world. Sometime you might want to see the what’s the time in your best pal’s place located somewhere in other part of the globe. This tutorial explains how you can show multiple or additional taskbar Windows clocks.

Steps:

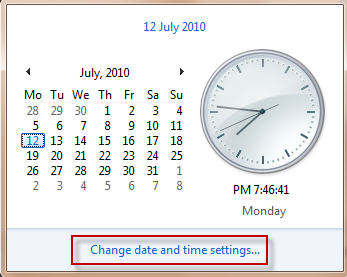
1. Open the Windows calendar by, click on “Change date and time settings..”.

Windows 7 clock

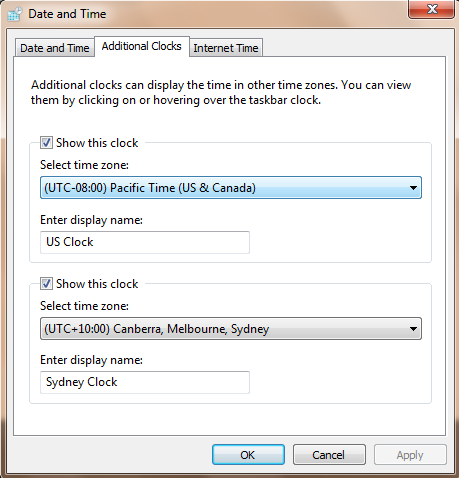
2. Under date and time settings, click on “Additional Clocks” tab. Here you can select one or more additional clocks from different cities across the world. You can also name the clocks as you would want them to be.

Additional clocks in date and time settings

3. Click OK and close the window. Now you can see the additional clocks popping up when you click on the date and time area in your Windows taskbar.

That’s it. Please note that this tutorial also applies to Windows Vista.Find out for more how-to tutorials from us on Windows 7, or subscribe to our RSS feeds via email.

Add Images To Your Gmail Signatures

Gmail has recently launched a new feature that lets you add rich HTML signatures right inside your Gmail without needing to any hacks. Until now Gmail didn’t have a built-in support for rich text HTML signatures, if you had to add a signature, it used to look like something as shown below;

gmail_old_signature

Now that Gmail has official support for rich text HTML signatures, you can create a more customised signatures like the one shown below:

Gmail html signature

To start using this feature in Gmail, follow the steps:

1. Login to your Gmail and go to settings page.

2. Find the signature section under settings

3. You can see a much familiar rich text editor that you would normally see while composing a mail using Gmail.

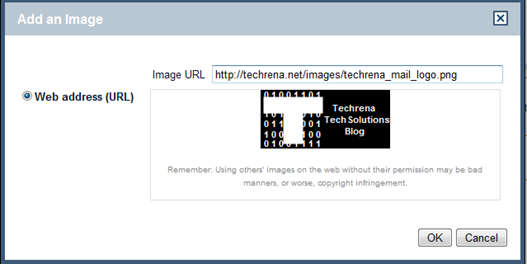
4. You can even add images and link them to your profiles on various social networking sites.Click on the “image” icon to start uploading a image.

add images in Gmail signatures

The only issue here is that you can only upload images that are already present on the web, however you can’t upload images directly from your computer. That being said, one need not bother much about it because images can be easily uploaded to Flickr or Picasa for permanent storage and faster access. You can also resize the image to three different sizes (small, medium or large).

5. You can even change your font size, style, color etc. using the rich text editor. Click on the “save changes” to save your signature.

[Tip] Install Two Different Versions Of Firefox On The Same Computer

firefox logo

Today I wanted to install and test the latest Firefox 4.0 Beta 1 version on my laptop where I had already installed Firefox 3.6. I didn’t want to loose all my customised addons and other preferences that I have been using in Firefox 3.6, at the same time I should also test the latest Firefox 4 beta version. The option to use portable version of Firefox, is obsolete here. So in short, my PC should have both the Firefox builds installed and should be able to run both independently. I looked for a possible solution, and I think I was successful in  accomplishing the task, hence I’m sharing it here:

Steps:

1. First download and install the new Firefox version (Firefox 4.0 Beta 1 in this case). Don’t worry Firefox will keep your old installation as such and will install Firefox 4.0 Beta 1 in a separate folder.

2.  Now go to run (by pressing Windows button + R) command, and click “Browse”.
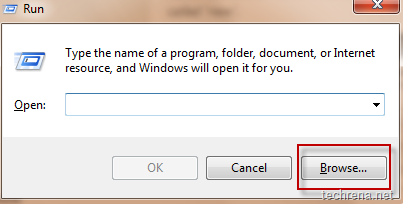
run windows browse

3. Locate the “firefox.exe” from the program files and click “Open”. It will show

"C:\Program Files\Mozilla Firefox\firefox.exe" [If you are not able to see backslashes “\”, see the image below:

Firefox.exe shortcut path

in the run command filed.

4. Just append “-p -no-remote” to it and click OK.
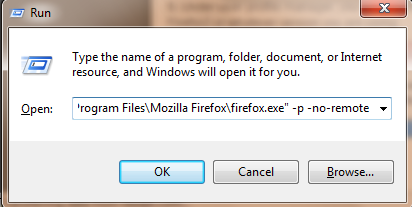
run program path

It will open Profile Manager.

5. Under user profile manager, you will just find an entry called “default”. Rename it to something like Firefox3 or whatever version you are using.
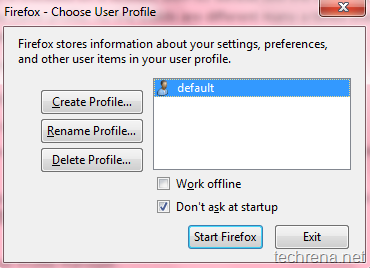
Firefox User Profile Manager

6. Now create a new profile (something like “Firefox4”) through the “Create Profile" Wizard”.

7. So by now you will have two user profiles for Firefox.
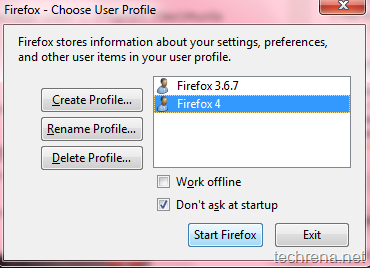
choose user profile

8. Now create two separate shortcuts for both the versions on your desktop.

Firefox desktop shortcuts two different builds

Right-click on the shortcut for the older version and under shortcut target append the following line:

-p Firefox3 -no-remote

[ replace “Firefox3” with whatever your profile name that you had given].

So the shortcut will look like this after editing:
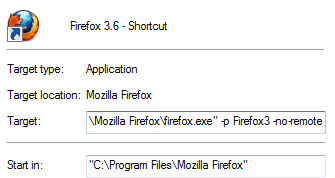
Firefox 3.6 shortcut profile name

Add the following line to the shortcut for the new version (Firefox 4.0 Beat 1 here):

-p Firefox4 -no-remote

[Replace “Firefox4” with whatever profile name that you have chosen]

The shortcut now appears as shown:
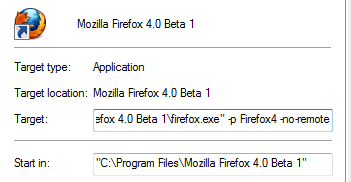
Firefox 4 Beta shortcut with profile name

Save the shortcuts and give them appropriate names so that you can distinguish them.

Now you can use these shortcuts to open either of the Firefox versions at ease. However, please be noted that you cannot run the two different versions/builds at the same time.

The trick involved here is all about using Firefox user profiles.Without using profiles, if you try to open the Firefox 3.6 version with Firefox 4.0 beta 1 also installed, then it’ll only going to launch Firefox 4 instead of the other.
[How To] Configure Parental Controls In Windows 7

computer lock

[Photo credit: Flickr]

Are you worried about your kids misusing your PC ? Want to impose some restrictions on how they use the computer, when they use it and what programs they use ?

Windows 7 has some excellent in-built parental controls under the control panel settings. Here is a tutorial on how to configure and use the parental controls in Windows 7 to the perfection to control your child’s activity on the computer. You must first set up another account (Type: Standard user) .

Steps:

1. Go to start menu and type “Parent’ in the search bar. Click on the first result under the “Control Panel” section.
Parental controls in start menu search result

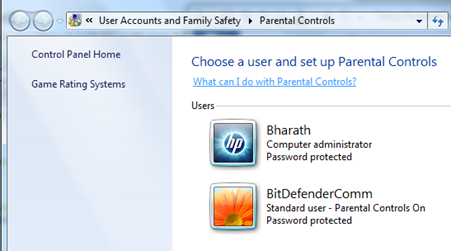
2. Click on the account for which you want to setup parental controls. Please note that you can’t apply parental controls to an administrator account, so that’s why you need to create a new account of “standard user” type to perform this step.

Parental controls home screen

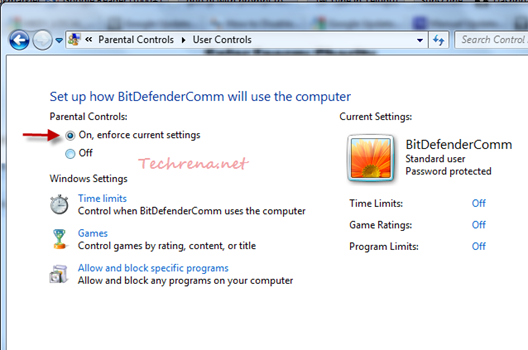
3. Select the first radio button (“On, enforce current settings”). Now you have enabled the parental accounts for the user account.

Enforce parental controls
Now you can configure the parental controls for various categories:

Setting Access Time Limits:

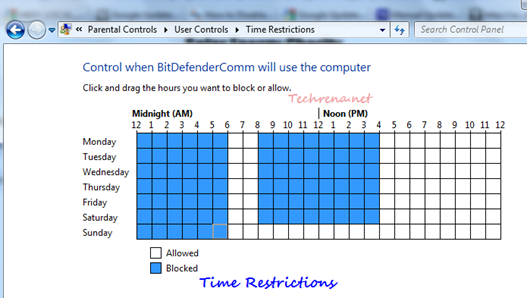
You can set the time of the day during which the user (your kid) can access the computer from “Tome limits” section. You can check or uncheck the time blocks (as hours) in the time grid under this section to allow or block the access during particular time of the day. Usually you may restrict the access to the PC during school hours and night times as shown in the screenshot below:

Time restrictions in parental controls windows 7

Game Controls:

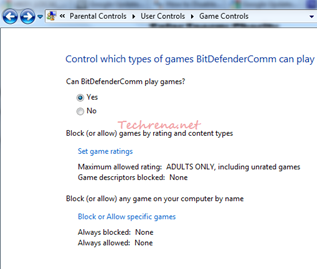
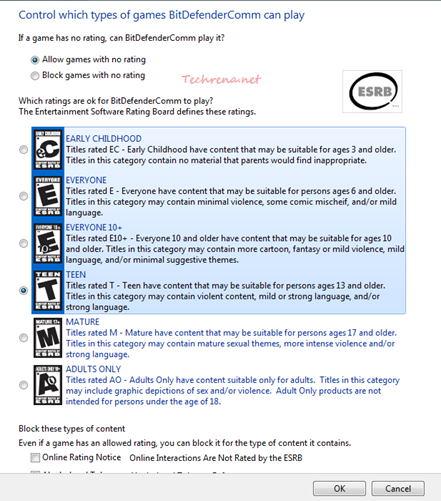
You can either restrict the user account from playing all the games or you may also specify which games can be played using that account. Click on “Games” to set these controls. You can block games based on their rating (Early childhood, every one, everyone 10+, teen, mature etc.)

Game controls under parental controls windows 7

game restrictions in parental controls

Block Specific Programs:

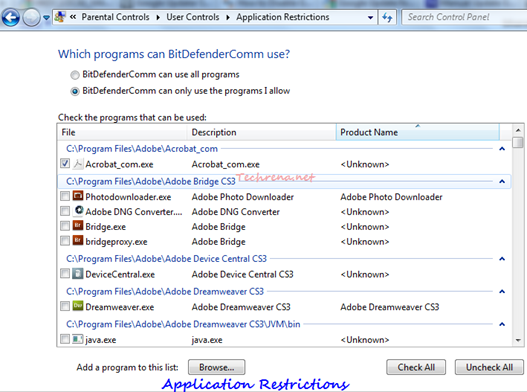
Click on “Allow and block specific programs” to set which programs can be run by the user. You can select from the list of applications installed on the computer.

application restrictions under windows 7 parental controls

If you have liked this tutorial, you can subscribe to our RSS feed via Email to receive more updated Windows 7 tutorials.

How To Stop Internet Explorer To Stop Asking You To Remember Passwords ?

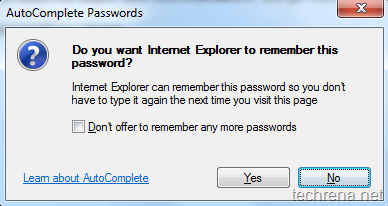
AutoComplete passwords

Microsoft Internet Explorer has a default “AutoComplete Passwords” feature that lets you save passwords for different login pages while browsing the internet. But if you are using a shared public computer with many users working on it, you might want to disable this feature for privacy concerns. Follow the steps below to make Internet Explorer stop asking for you to remember passwords.

Steps:

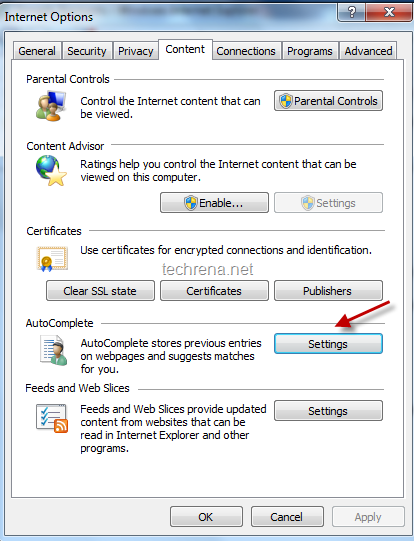
1. Go to Tools > Internet Options, switch to “Content” tab. Click on “Settings” under “AutoComplete” section.

ie content settings

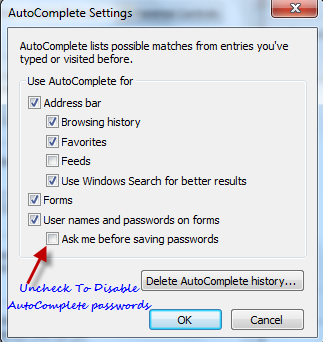
2. Uncheck the “Ask me before saving passwords” option in the AutoComplete settings window.

AutoComplete settings

3. Click OK and close the settings window.

From now on, your Internet Explorer will not offer you the AutoComplete passwords dialogue. To re-enable this feature at any later time, just check the same option in the third step.

[How To] Hide The Windows 7 System Tray Icons

Windows 7 logo

Notification area or system tray icons in Windows 7 has been enhanced when compared to the earlier Windows versions like Windows XP. However, for some reasons if you want to disable the notification area and save some space (?) on your taskbar, here is what you need to do:

Registry hack:

Follow the registry path given below: (Registry code for hiding tray icons )

registry key notepad screenshot

HKEY_CURRENT_USER\>>Software\>>Microsoft\>>Windows\>>CurrentVersion\>>Policies\>>Explorer  and set  “NoTrayItemsDisplay” DWORD value to 1.

NoTrayItemsDisplay in windows 7

Third-Party Software:

If it’s looks complicated for you, just try this small app Hide SysTray to hide the notification area automatically.

Hide Systray

If you run the app, you can disable your notifications area like this:

notification area disabled

Note: You need to have .NET Framework version installed on your computer to run this application else you’ll end up with the following error.

Hide systray .net error

Tip: Always Run A Program As An Administrator By Default

Windows 7 as a security measure doesn’t allow you run any program as an administrator by default. But sometimes you might need to run a program a program far too many times that requires elevated privileges, and it’s really annoying if to see that you are being asked to run it as an administrator each and every time you run it. However, there is a way to run the program as an administrator by default in Windows 7 (and Vista) that many of us aren’t aware of. Here is how you can do it :

Steps:

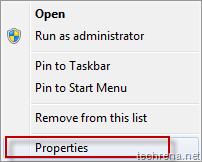
1. If you wish the program to run as an administrator by using the shortcuts of a program, you need to right-click on the shortcut, select “Properties”,

Windows 7 right click context menu on shortcut

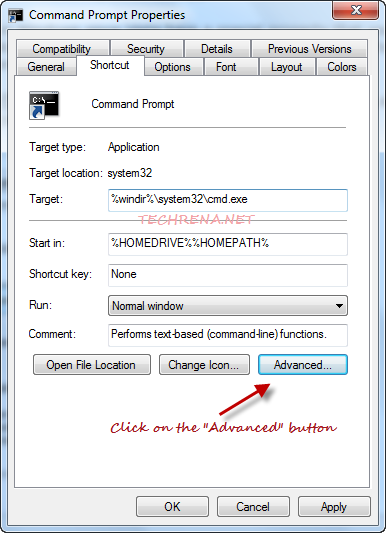
2. Now click on the “Advanced..” button under the “Shortcut” tab of the properties window.

Windows_7_advanced_properties_shortcut

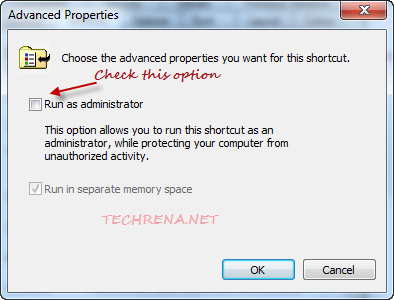
3. Select “Run as administrator” option under “Advanced Properties” window and click OK. Apply the settings and close all the properties window.

advanced_properties_exe

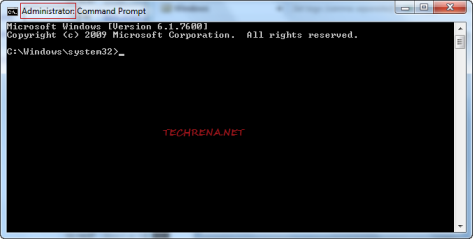
4. Now run the program again and you will see that it’s running as administrator (See the screenshot of the Windows Command Prompt, and observe the string “Administrator” in the title of the program)
CMD as administrator in Windows 7

For more tips and tutorials on Windows 7, you can subscribe to our RSS feed via Email.

Change Drive Letters In Windows 7

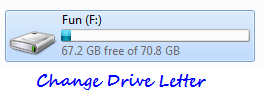
Change drive letter post image

Windows automatically assigns letters to drives by default. Most users are happy with the letters that Windows chooses and they don’t complain about it. But for some reasons, if you didn’t like a letter assigned by Windows to one your new drives, you might want to step-in and select your desired letter for that drive instead of the one chosen by Windows 7. Here is a tutorial on how you can accomplish it.

Please note that you must be logged on as an administrator to perform the steps mentioned below.

Steps:

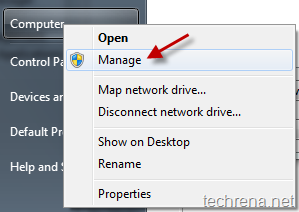
1. Right-click on “Computer” and click on “Manage” to open “Computer Management”.

Windows 7 Computer management shortcut

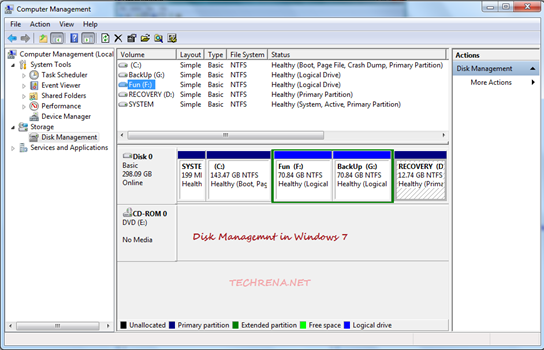
2. In the Disk Management windows, click “Disk Management” under the section “Storage”.

Windows 7 Computer management

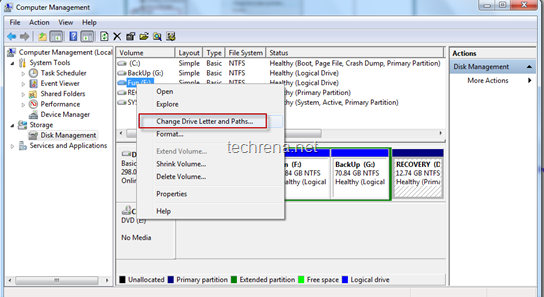
3. Right-click on the drive or partition that you want to change, and then select “Change Drive Letter and Paths”.

Windows 7 Disk management

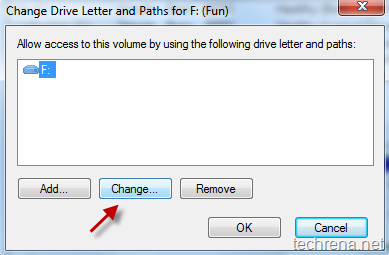
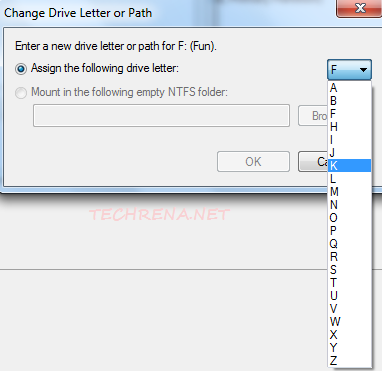
4. Click on Change and then click “Assign the following drive letter” and select the drive letter that you want.

Change Drive letter and paths

Change Drive letter and paths selection

Similarly if you want to remove a drive letter, click “Remove” in the previous step and click Yes to confirm.

Close the Computer Management window and checkout the changes that you have made.

Change Address Bar Search Provider In Firefox

Firefox logo

Address bar search is the feature that allows you to search for a keyword entered in the address bar (location bar) without entering the search engine homepage. Firefox by default will look for the keyword entered in the address bar in Google search as it is usually set as the default search engine to manage address bar keywords.

However, you might want to change it to suit your personal interest. It may sometimes can also be a case of hijacking: You install some programs that they change your search bar address bar search provider without asking for your permission (ex: so many toolbars like Alexa, Yahoo etc.). For some reasons, if you want to change the Firefox address bar search provider, you can do it by following the steps below:

1. Type about:config in the Firefox address bar. You will be presented with a warning, if you are using Firefox 3.5 + version, just click “I’ll be careful, I promise”!” to continue to the about:config page.

Firefox_about_config_warning

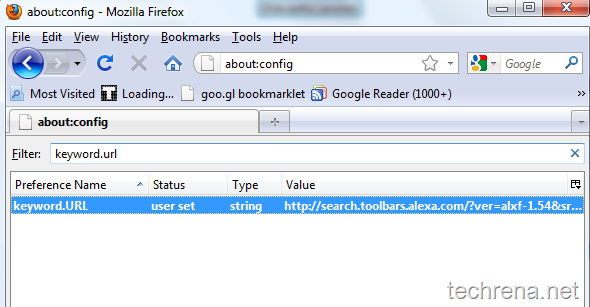
2. In the Filter search box, type “keyword.url” and the result returns only one result as shown in the screenshot below.

keyword.url_firefox

And as you can see here, the address bar search engine provider in my case has been changed to Alexa, when I installed it’s toolbar sometime back. Now I want to change it to a different provider, back to Google may be, or Bing? Well I can even test how it works with Twitter search.

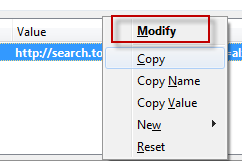
3. Right-Click on the field value and click “Modify”.

change_firefox_keyword.url_string_1

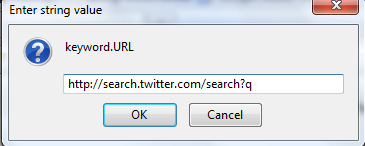
You will now be asked to enter a string value for the keyword.URL, choose the values according to the provider, as listed in the table below.

change_firefox_keyword.url_string

List of  string values of various search engines:

Google http://www.google.com/search?ie=UTF-8&oe=UTF-8&sourceid=navclient&gfns=1&q=
Yahoo http://search.yahoo.com/search?p=
Bing http://www.bing.com/search?q=
Ask http://www.ask.com/web?q=

Click OK to save the settings and checkout the result yourself with typing a keyword in the address bar of the Firefox.

Automatically Log On To A User Account In Windows 7

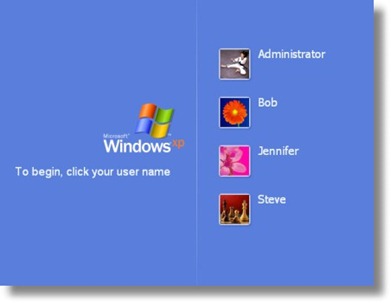
Windows welcome screen with multiple user accounts

Windows 7 by default will ask you to select your user account manually from welcome screen (log on screen) to log on to that particular account. If you have multiple user accounts, but use only one main account most of the time, you may want to save some time by letting your Windows automatically logged on to your default account rather than choosing the account manually.

This tutorial helps you to enable “Automatically Log on” feature in your Windows 7. Follow the steps outlined below to enable this feature on your Windows 7 system.

Steps:

1. Click on Start button, enter netplwiz in the search box and hit the Enter key, or open the netplwiz from the results under Programs category. This will open Advanced User Accounts section from the Control Panel items.

Windows_search_netplwiz

Windows_search_netplwiz_results

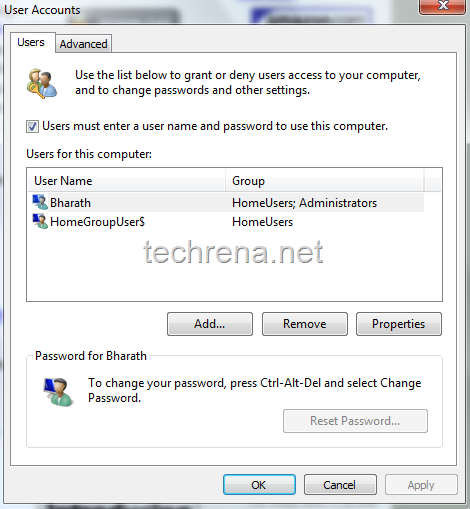
2. The Users tab may look like as shown in the below screenshot :

Windows user accounts

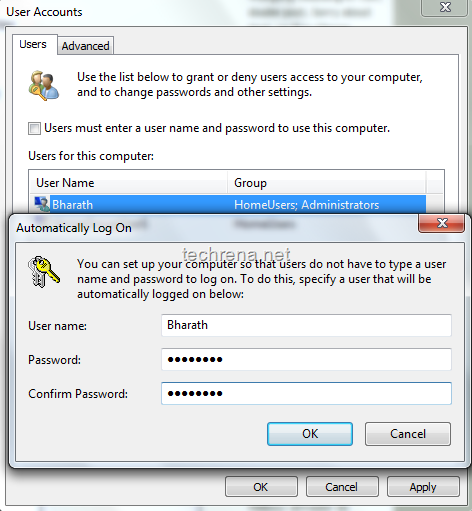
3. Now uncheck “Users must enter a user name and password to use this computer” and click Apply. You will be asked to confirm user name and password.

You can set up your computer so that users do not have to type a user name and password to log on. To do this, specify a user that will be automatically logged on below:

Just leave the password field blank if the user account doesn’t have a default password associated with it.

Automatically log on in Windows 7

4. Click OK and close the window.

From now on, you will be automatically logged on to Windows without manually selecting the user account.

For more tips on Windows 7, you can subscribe to Techrena.net’s RSS feed via email.

Note:

This method works well on Windows 7 as well as on Windows Vista.

You may not want to select this on a public computer for security concerns.