How to send webpages from Google Chrome to your phone?

Do you have multiple  devices that you work on and want to continue reading  a web page that you are reading on your PC ? We already have multiple extensions in Google Chrome to achieve the same. How about having this feature  in-built in your Google Chrome browser? That’s exactly what Google has done to your favourite browser. Google has started rolling out update to Google Chrome which will bring this handy feature across multiple platforms. This means that you don’t have to worry about switching webpages across all your devices without worrying about working on technalities to get this job done. This is pretty straight forward and doesn’t require any third party extension. Let’s see how we can send a web page from your PC or Mac to your Android/iPhone or Vice-versa!

Step 1: update your Google Chrome browser right away.

Step 2: open any page from your Chrome. 

Step 3: now go to the address bar and highlight the URL. 

Google Send this Page Icon

Step 4: You will find a small ‘Send this page’ icon towards the right extreme corner of the address bar.

Send this to your devices

Step 5: Clicking on the icon will open the list of devices on which you are using Google Chrome with your account and you can send your current page to any of them. Viola !

Send the webpage from Google Chrome to iPhone

As you can see from the above, the tab has been received from my Google Chrome on PC to Google Chrome on my iPad. I can now continue reading the webpage on my iPad from whete I left off on my PC previosuly. It works seemlessly.

Windows 8 Pro Download, Upgrade, and Clean Install FAQs

In my last post you had seen how to download the newly released Windows 8 Pro version from Microsoft. Yes, there are a lot of other question on how do we install it etc. But first of all let me clear some questions which I had in my mind for all of you to see.

Will Microsoft allow Installation of the Upgrade version to any other PC instead of the Windows PC you used while buying the Upgrade key?

YES! Well it is very good in the part of Microsoft that they allow you to keep both Windows 7 and Windows 8 PCs! The FAQs in the Upgrade Offer page says:

“The upgrade offer is tied to a Windows 7 PC purchased between 2 June 2012 and 31 January 2013, but you can choose to redeem the offer and install the upgrade on any compatible Windows-based PC with a qualifying base operating system.”

The last part says “with a qualifying base operating system.” Well this is not necessary when you go for a clean install using the backup media. FYI, the base operating systems Microsoft is talking about is Windows XP, Vista, and Windows 7

Selecting “Keep Nothing” while running Windows 8 Upgrade program mean Clean Install?

NO. Clean install means installing the Windows to a formatted partition, meaning there will be no Data present before. “Keep Nothing” is an option during the Upgrade install where none of your Apps or files will be retained while Upgrading to Windows 8 from your previous Windows.

I selected Keep Files or Keep Apps instead of Keep Nothing while purchasing the Key. Will I be able to do a clean install from the backup media?

YES. Those options are valid only if you upgrade using the Windows 8 Upgrade program. Once you choose to create media instead of Install, those options are no longer  relevant.

I want a 64-bit Windows 8 Pro, but my eligible PC is running 32-bit Windows. Will I be able to get and Install a 64-bit with the upgrade key I purchased?

YES. The upgrade is common for both 32-bit and 64-bit, meaning it works for both. You can download a 64-bit Windows 8 Pro with your key but only from a 64-bit Windows PC. This is because the Upgrade/Setup program will downloads the version which is only compatible to your Base OS. You can follow my last post on How to download Windows 8 Pro.

If you have any other questions while Installing or upgrading to Windows 8, do let me know. Just leave a comment below.

[How To] Download Windows 8 Pro 32/64-bit from Microsoft with Upgrade Key

The new shiny Windows 8 featuring Tiles and all is here. Windows 8 was officially launched last week on October 26 along with Microsoft’s Surface Tablet which runs Windows RT. Windows 8 seems to be getting good reviews from users except from few. Well many of us are still thinking whether to upgrade or not.

For all those who are not aware of the Windows Upgrade program, Microsoft is offering you a Windows 8 Pro (32/64-bit) for only $39.99 (USD). This offer is valid for many countries. The criteria is you should be running Windows XP, Vista, or Windows 7. Additionally if you bought a Windows 7 PC after June 2, 2012 you can get it for $14.99.

Windows 8 Logo

Well for those who are aware and have already purchased Windows 8 key(s), you might have already downloaded it or you might be still waiting to download. We just wanted to inform everyone through this post that you need not worry about the download. You can do it whenever you are free or if you are in a limited internet plan, you can do it during your next billing cycle.

Requirements to Download Windows 8 Pro Legit from Microsoft:

# Operating System: Windows XP, Vista, or 7
# Of course an internet connection and
# Your Windows 8 Pro Upgrade Key you purchased earlier

Step 1: Download Windows8-Setup.exe from here. it is 5.2MB in size.

Step 2: Decide which Windows Pro version you want – either 32-bit or 64-bit. Well do note that you can install 64-bit only if your processor supports it. you can check if your CPU supports 64-bit OS here.

Step 3: Run the “Windows8-Setup.exe” you have downloaded  from a PC which has a 32-bit Windows if you want to download Windows 8 Pro 32-bit. Similarly run from a 64-bit PC if you want 64-bit version.
Size Details:
# 32-Bit Windows 8 Pro: 2.01GB
# 62-Bit Windows 8 Pro: 2.63GB

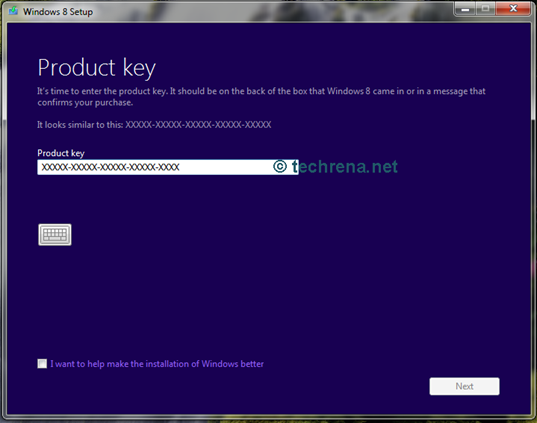
Step 4: When the Setup program starts, it will ask for your Windows 8 Pro key. Just enter your keys and viola, your download will commence.

windows 8 download

windows 8 download2

Step 5: After the download is completed, before installing the upgrade, we suggest you to create an iso or a USB drive backup for future setups. You can exit the setup program after that. Don’t loose the backup!

Windows 8 Pro Install

Step 6. While closing the setup program, it automatically creates a desktop icon(if it doesn’t you can re-start the program and it will start where you left off). So if you want to install Windows 8 as an upgrade to your existing OS, you can proceed to ‘Install’. But if you want a clean install, make use of the iso or USB drive backup. I personally recommend clean install over any upgrade install. Its up to you.

Windows 8 Pro Install by media

Important Notes:
# The back up you created to a USB drive or a DVD after download is similar to a retail version, meaning it is not linked to any key. You can use it for installing to any compatible system with any other legit key.
# The same product key can be used for downloading ether 32/64-bit Windows 8 i.e. the key is common for both versions.
# The Upgrade program will ask for your choice if you want to keep files, apps, or none. This choice is irrelevant if you are going for a clean install using a media device (USB/DVD)
# The language will depend on your location. You can install your preferred languages after installing windows 8.

If you have any questions or updates please leave a comment.

[How To] Track Your Train in Google Maps In India with Rail Radar

Indian Railways is one of the largest rail networks in the world it operating more than 10,000 trains everyday. Today Rail RadarTM has been launched in order to make Rail travelling a little easier. The  new web app uses Google Maps to track trains on a real-time basis. Currently the service is only available on 6,500 trains.

Rail Radar for Indian Railways

To find out where your train is, simply visit railradar.trainenquiry.com and search for your train name or number and Rail Radar will spot it for you with the exact location details. You can also find trains by entering the name of the station.

For example I searched for the Howrah Chennai Mail Train No 12839, you can see the result below.

Howrah Chennai Mail Rail radar

As you can see my train is currently at Vishakhapatnam and it is On Time.

Blue highlights indicate trains that are on time while red means it’s behind schedule. If you click on a train, it’ll show its entire route from start to finish.

We are thankful to the railway ministry and Indian railways for working together to bring up such nice technology up-to-date project. We hope Indian Railways should also launch a mobile application soon so that we can beat the train on the go.

[Download] Microsoft Internet Explorer 9 Security Fix (KB2744842) – Critical Update

We had issued and advisory earlier that the Internet Explorer 9 and lower versions are facing a security flaw where the attackers may exploit the bug, targeting hundreds of millions of computers, to infect the PC of somebody who visits a malicious website and then take control of the victim’s computer. Well this issue has been fixed.


Internet Explorer 9

Microsoft promised that the fix will be available by Friday, 21 September. Well they kept their promise but with some variations. Microsoft had said that this is an easy fix and it will not even require a reboot. Well that’s not true. The Critical update details say:

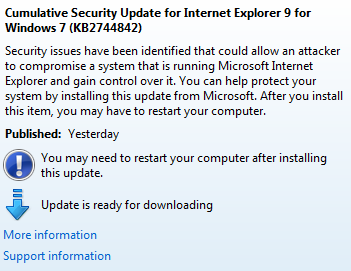
Security issues have been identified that could allow an attacker to compromise a system that is running Microsoft Internet Explorer and gain control over it. You can help protect your system by installing this update from Microsoft. After you install this item, you may have to restart your computer.

windows-security-update

The Cumulative Security Update for Internet Explorer 9 for Windows 7 (KB2744842) will be fixing the issue. This update is available in Windows Update. You can directly update it from your Windows PC.

If you don’t use Windows Update service. you can still  download it from Microsoft. Choose the correct Windows Version while downloading.

Download from Microsoft

[How To] Check if your CPU Supports 64-bit OS or not–The Easy Way

Well we use to program for an 8-bit microprocessor, then 16-Bit some years back. Currently most of the CPUs are 32-Bit architecture. Now the latest one is the 64-Bit CPU. With this advancement of technology in the hardware sector, certain advancements needs to be done in the software sector that will be running on these CPUs.

Here we are talking of System Software that is the Operating Software in your computer, which are the basis for all other user level application software to be installed. If we come to the latest version of Microsoft’s Windows OS, now we see Windows 7. Windows 7 has two versions in terms of hardware compatibility, one for 32-bit architecture CPUs and another for 64bIt architecture CPUs. All 64-bit CPUS can be installed with 32-Bit OS but not vice-versa.

Suppose you have a PC running 32-bit Windows 7, and you want to know if your CPU will support the 62-bit Windows 7, then how will you find it out the easy way? Well we will tell you how.

You can follow the steps:

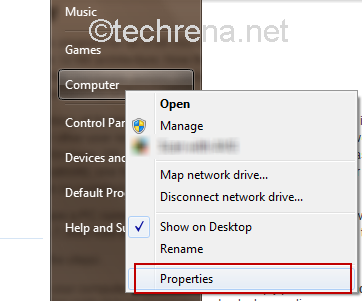
Step1 Open your computer properties. You can simply press the Windows Key + Pause/Break or you go to start then right click on Computer and select properties.

open-Computerproperties

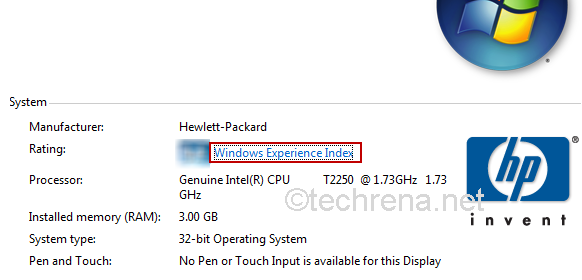
Step2 In you’re the computer properties, click on “Windows Experience Index”. You can find this under System –> Rating

Windows-computer-properties

Note: First two steps can also be performed via Control Panel as “Control Panel –>Performance Information and Tools” (You can see this option if you set the “View By” as “Large/Small Icon” only)

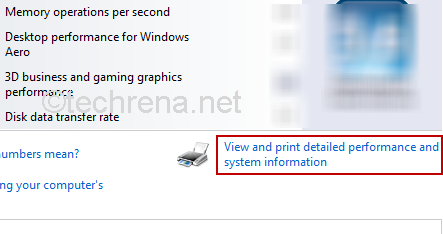
Step3 In the windows experience index windows, Click on “View and print detailed performance and system information”.

Windows-Experience-index

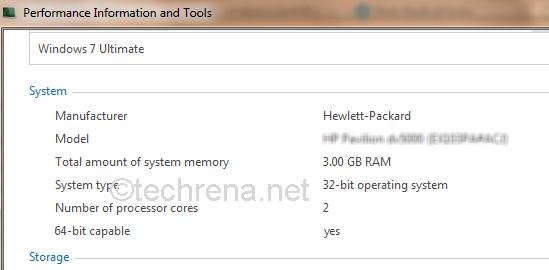
Step4 In the “View and print detailed performance and system information” windows you can find “64-bit Capable” under System. It will be yes if your CPU supports 64 Bit else No.

64-bit-capable-yes

There you are it is as easy as I had promised. Now as you know the capability of your CPU, you can go for 64-bit OS or not!

Microsoft Internet Explorer 9–Security Flaws, Bugs and Fixes? Use or Dump? [Advisory]

The German government urged the public on Tuesday to temporarily stop using Microsoft’s Internet Explorer after a bug was discovered which is yet-to-be repaired. The German government’s Federal Office for Information Security, or BSI, said it was aware of targeted attacks and that all that was needed was to lure Web surfers to a website where hackers had planted malicious software that exploited the bug.

This security flaw in IE may enable attackers to exploit the bug, targeting hundreds of millions of computers, to infect the PC of somebody who visits a malicious website and then take control of the victim’s computer.

ie9-logo

Our advisory in using the IE browsers except IE10 are:

  • Though IE browsers are considered to be most secure ones, we advise for now you look at others
  • The IE big fix will be released in the next few days by Microsoft and will be available for download only then
  • There have been a few attempts to exploit the bug, but German officials claim that this issue can be misused in large scale hacking
  • Users should take proactive actions to ensure that their PCs are well protected
  • For time being we advise all users to download and install the Enhanced Mitigation Experience Toolkit (EMET) version 3.0 which is designed to help prevent hackers from gaining access to your system

Microsoft claims that the Fix will be an easy-to-use, one-click, full-strength solution any Internet Explorer user can install and it won’t even require a reboot of your computer.

We hope that the Fix is releases ASAP and we are sure that Microsoft is working on it.

[How To] Connect Your IDE PATA HDD, CD/DVD Drive to SATA Motherboard and Vice Versa

We all used the Parallel ATA (PATA) Hard Drives or Optical Drives with the IDE interface. With the rapid advancement of technology, currently we shifted to the Serial ATA (SATA) Drives which does not require the IDE Interface and which have faster data rates. This means that all our IDE HDDs, Optical Drives etc. are obsolete to the current world. But, do you need to throw it or dump with your Old Desktops?

The answer is no! Your old 40GB, 80GB HDDs can be still useful now. Here we will show you how to interface these obsolete devices to your brand ne computer using a very cheap interface available in the market.

All you need is the device shown below. It is the “IDE to SATA” or “SATA to IDE” 2 in 1 Converter. It is easily available in the market. You can find one in eBay or Amazon for less than 5 bucks.

IDE to SATA Converter

Connecting Old PATA HDD or IDE Optical Drives to your new SATA Motherboard


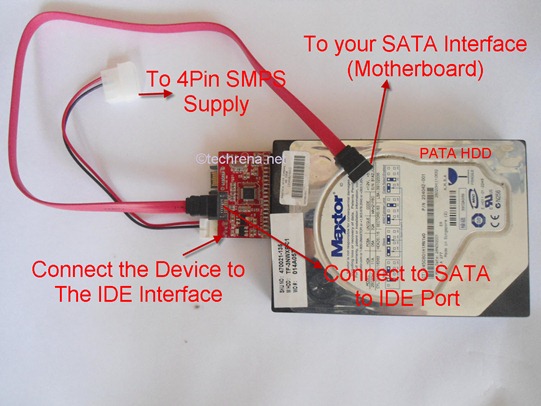
Suppose you have a PATA HDD with IDE Interface, Then connect the IDE interface (Female) to your HDD’s Male interface. Connect the power supplied to the standard 4 Pin supplied. Connect the SATA interface cable to the SATA to IDE marked port in the device. The other end of the SATA cable to your CPU’s motherboard. That’s it, now use can use some extra disk space instead of throwing the HDD. The connection process has been shown as follows.

SATA-to-PATA-HDD

Make sure you do not forget the Power supply to the drive.

SATA-to-IDE

The same procedure is applied for Optical drives too.

Connecting new SATA HDD or Optical Drives to your Old IDE interface Motherboard

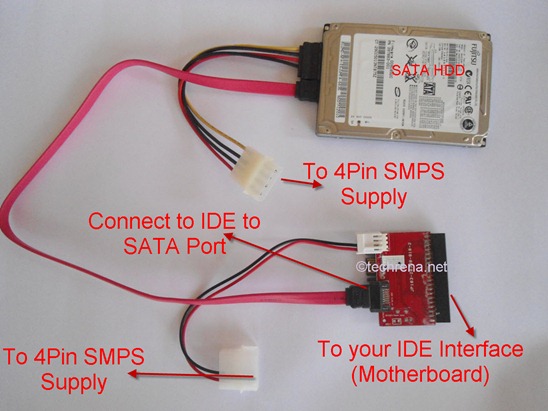
What about the reverse, that is if you have a SATA HDD and you want to connect to your OLD Computer? Then connect the IDE interface (Female) to your Motherboard’s Male interface. Connect the power supplied to the standard 4 Pin supplied. Connect the SATA interface cable to the SATA HDD and the other end to the device’s port marked as IDE to SATA. That’s it, now use can use some extra disk space instead in your old Computer. The connection process has been shown as follows.

IDE-to-SATA-HDD

Note: Please turn off your Computer completely, i.e. even the power plug is to be disconnected in order to prevent any hazard or damages.

We hope you have found this post useful. Like us on Facebook or leave a comment!

[How To] Password Protecting Excel Workbook

Microsoft Excel logo

Welcome back readers, it’s been a while since we posted any tutorial. It’s been a hectic year for me and I’m glad that finally I could find some time to write a yet another tutorial.

Microsoft Office suite does provide all of us with the most brilliant productivity tools that would foster our business/professional growth through their vast line up of dedicated software.

And the Microsoft Excel is a vital part of the office suit which often finds its regular usage among business organizations, educational institutions, government offices, and all other locations where the emphasis will be on storing some important data.

Having known the vital role that the Microsoft Excel plays in the business process, it would really be a big blunder on part of the users who use Excel if they don’t learn the security aspects related to the software. To make sure the data stored in a Excel sheet is opened or used by a competent authorised party, the creator of the Microsoft Excel sheet should take care of certain security measures which are incorporated within the Excel suite.

Any Excel worksheet can be secured in two ways:

1) Protecting the entire worksheet (asks password when the file is opened)

2) Protecting the data inside the worksheet (file can be opened but password will be required to view the worksheet elements)

The second type of the protection is perhaps the most widely known as the option for the same is available within the workbook menu items.

In this tutorial we are concerned with protecting the entire workbook rather than the individual elements inside the worksheet. The reason why anyone would need this kind of protection is simple: they don’t want others to see the worksheets in the first place.

Protecting the Excel Workbook:

Step 1: Open the the Excel workbook for which you want to add password protection.
Microsoft Excel Menu Info options

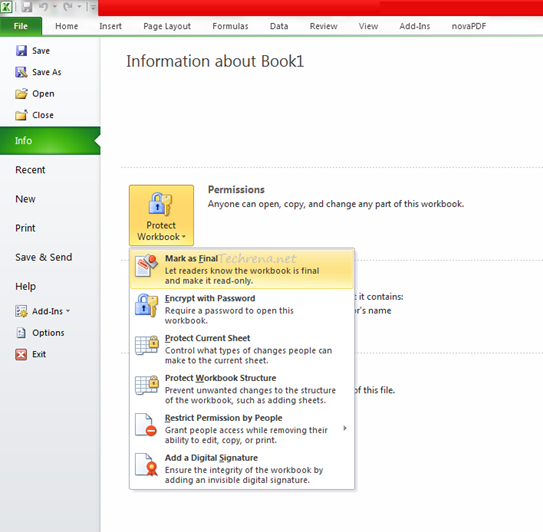
2. Click on the “File” menu item. Locate “Info’ heading under the “File” menu and click on it.

3. Under the “Info” sections, you will have three options: Permissions, Prepare for Sharing and Versions. Click on the item “Permissions” (on the “Protect Workbook” dropdown item).

4. You will be presented with various options. You need to click on the second item on the list i.e, “Encrypt with password”.
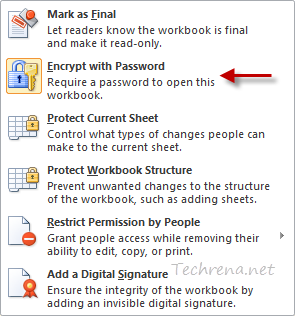
Encrypt Excel workbook with password

5. It will then ask you to enter a password for encrypting the workbook. You may need to reenter the password to affect the change.
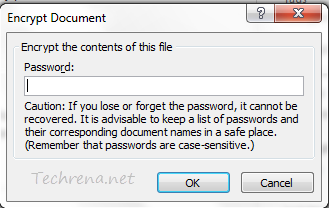
Encrypt Excel document with password

6. Save the workbook and try to open again. It will now show this kind of message and asks you to enter the password.
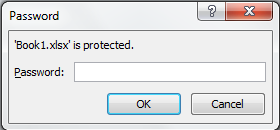
Excel Workbook password open

The same result can be achieved by a slightly different step. Click on the “Save As” button under the “File Menu”. It will now take you to the choosing the location window. Click on “Tools” dropdown menu on the left of the “Save” button.

Under the “Tools” dropdown menu, choose “General Options”.
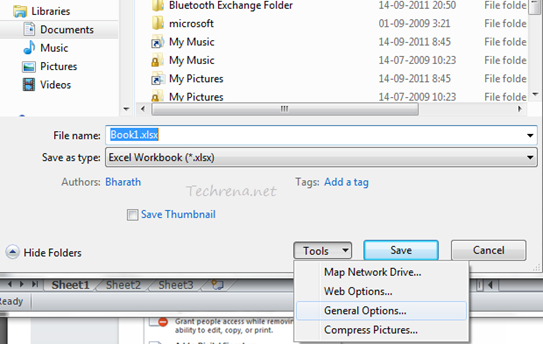
general options tools save as in Excel

It will now ask you to enter a password that needs to be entered to open (or ‘modify’) the workbook.
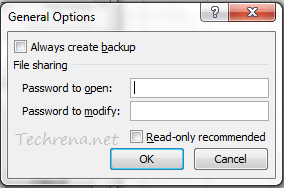
General options open Workbook in Excel

Once entered and saved, the workbook becomes password protected and the same needs to be entered on each instance when trying to open the workbook.

Note: This tutorial is based on Microsoft Excel 2010 earlier version and may not be suitable for earlier versions.

Facebook Timeline Is Now Available For Everyone; Here’s How To Get It For Your Profile

Back in September this year, Facebook announced the new feature called “Timeline” and made it available to the developers initially. Facebook Timeline is basically a new way to list your entire activity of your life in a Chronological order, right from your birth to the present moment. With a neat and visually appealing interface, the Timeline lists all your major events in your life in the chronology. No wonder some call it as your virtual biography (though we differ!).

Facebook timeline

The Timeline, which up until a few days ago was in “beta”, got its public rollout to the users in New Zealand last week. And today the social networking giant has announced that the Facebook Timeline will be available to the users across the globe starting today. The company has also said that those who activate the feature will initially get a 7-day review period during which they can review and choose what content should appear to their friends.


How To Get The Timeline For Your Profile:

We have published a detailed guide earlier on how to activate the Facebook Timeline for your Facebook profile. But this feature was in “beat” stage at that time and it we had to use a hack to get it enabled. Now that this feature is available for all, the process is much simpler and straightforward.

Navigate to this page on Facebook, and click the “Get Timeline” button that you see at the bottom. This will automatically activate the Timeline for your profile.

Get TimeLine

Facebook Timeline View As

The next thing you have to do is to view your Timeline and manage the content that is visible to your friends. To do this, find and click on the gear menu which will be present near your profile name in the Timeline view. Select “View As…” from the dropdown menu. This will show how your profile will appear to a specific friend or public once it gets published.

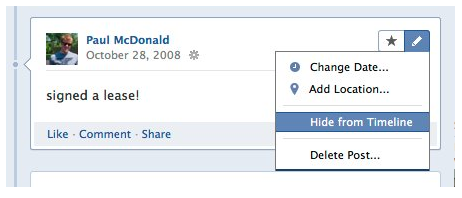
Go through the events/posts on your profile. Should you decide to hide a particular post from your friends (or specific friends) or public, all you need to do is to click on the “Edit” pencil icon right next to that post and choose “Hide from Timeline”.

Hide Post from Facebook Timeline

Supposing that you have activated Facebook Timeline today i.e December 15th, you are allowed to edit, finalize and publish your Timeline to your profile. In case you choose to wait, your Timeline will get published automatically on December 22nd (i.e., on the seventh day). If you feel your Timeline is ready to go public, you can always hit the “Publish Now” button to publish it.

Facebook timeline publish now button

We suggest you watch this video to make yourself acquainted with the features of the Timeline.