[How To] Schedule Emails in Gmail with Boomerang

I would say Google’s Gmail is the best email service. We do not need any introduction to Gmail here.

Well, if you use Gmail this is going to be an interesting post. Here, I am going to write how to schedule your emails. Means you can send or receive your mails at a particular time set by you in prior. Let me explain how it is going to be useful. Say one of your good friend’s birthday is coming and you do not want to miss wishing him. So how do you make it 100% sure that you wish him at midnight? Just write a beautiful email and schedule it to the time you want it to send using Boomerang for Gmail.

Boomerang-for-gmail

Boomerang is an add-on for Firefox and Chrome which lets you to schedule the emails in Gmail.  Follow the following steps to install it and schedule the mails.

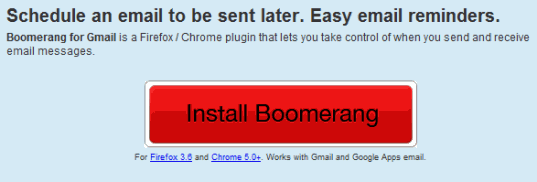
Step 1: Download Boomerang. Click the Install Boomerang button below.

download-boomerang

Step 2: Click on Allow Button to install the Add-on. If you are installing on Chrome, Click the Continue button in the left lower corner of the window. (Click to enlarge the image below).

Install-boomerang

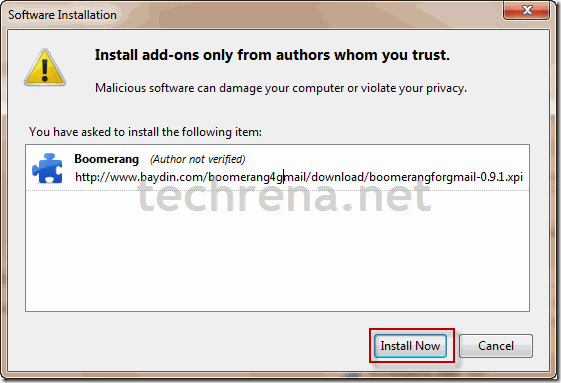
Step 3: Click on the Install Now button to install the add-on.

install-now-plugin

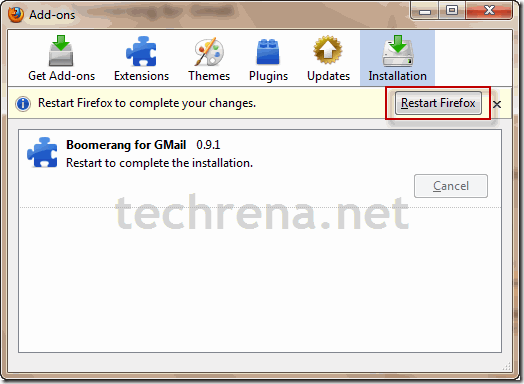
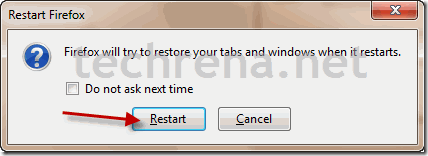
Step 4: After installation, it will ask you to restart the Browser. Restart the Browser to use the add-on.

restart-firefoxrestart-firefox-window

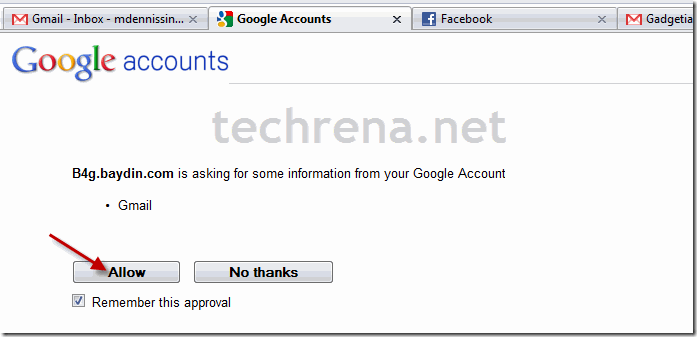
Step 5: Now after restarting the browser Google will ask you if you want to share information to  Boomerang. Click on allow.

allow-information

Step 6: Now you should be able to see Boomerang on the top right corner.

boomerang-installed

As Boomerang is finally installed you can schedule your emails. As follows:

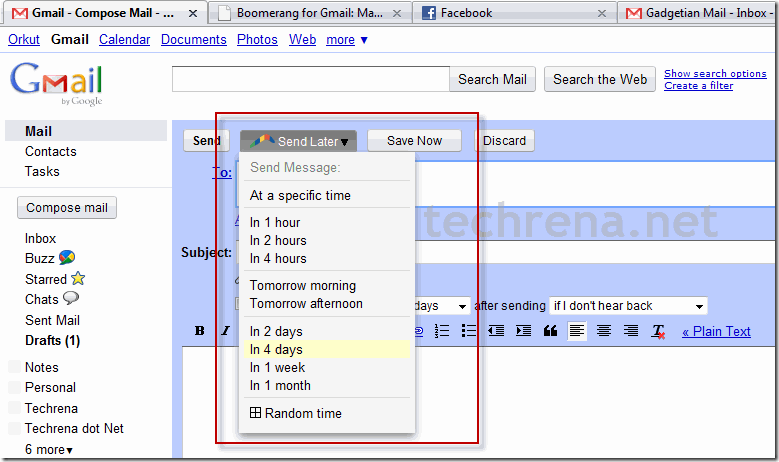
To send a mail at a scheduled time, click on Send Later Button and select any time.

send-email-later

If you select At a specific time, you can enter the exact time and date.

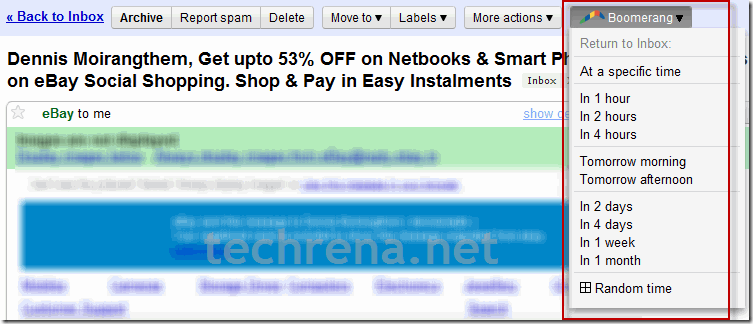
To re-receive an already received mail, click on Boomerang after opening the main and select the time you want it to return to your inbox.

return-to-inbox

I hope that this add-on will be really helpful for all of us.

Download HP Media Card Reader Drivers for Windows 7

Well I have a HP Pavilion dv-5000 series notebook PC. There has been a problem since I had upgraded from Windows XP to Windows 7. The problem is that, my Media Card Reader is not working. I have been trying to find the driver but all in vain, until today.

I have downloaded the driver from HP Website, where they have given the driver is meant for Windows Vista. Well I have tested it in Windows 7 Ultimate and it works perfectly fine.

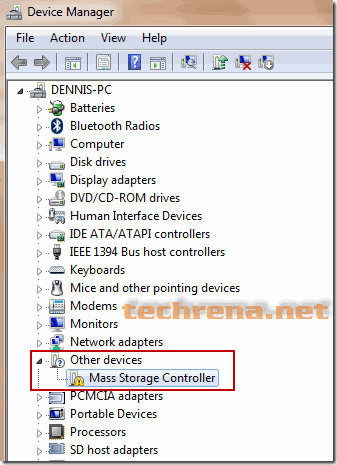
The problem I faced looked like this:

Mass Storage controller

There it is seen that, in Computer Properties->Device Manager->Other Devices, The Mass Storage Controller Driver is missing. The Automatic Driver update eventually fails.

The Solution steps are as follows:

1. Download the Texas Instruments Media Card Driver from the link given below:

Operating System: Windows 7 32 bit
Tested in HP dv-5200tx
Size: 6.31MB
Link: Click here to Download from HP

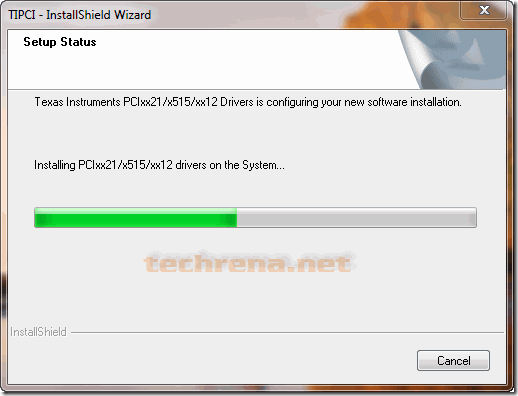
2. Install the driver.

install-texas-instrument-pci-drivers

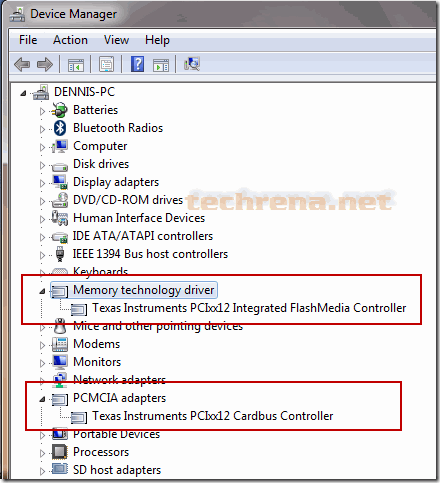
3. Now check the Device Manager. The Missing Driver in Other Devices should be gone. The Texas Instruments PCI Devices should be visible.

texas-instrument-card-bus-controller

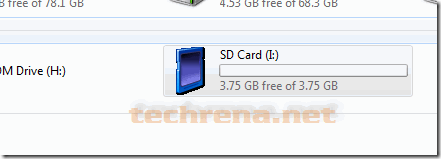
4. Test by inserting a compatible card to your reader.

HP-card-reader

Hope this will solve your card reader problem in your HP Laptop.

[How To] Create a Shortcut To Clear Your Clipboard

Whenever you copy anything while using your computer,  the computer uses a special place known as Clipboard to place the data. Suppose you copy some text from a text file, the information(data) gets copied into the Clipboard. Then when you paste the text to your desired location, the data is transferred from your clipboard. The clipboard is used for any type of copy action done.

Now, you have copied some data and hence it is now present it in your computer’s clipboard. Suppose the data you are handling is a sensitive one and hence you don’t want to leave any trace, even in your clipboard. So how do you do it? Here is the simplest answer known.

Steps to create a shortcut to clear your clipboard:

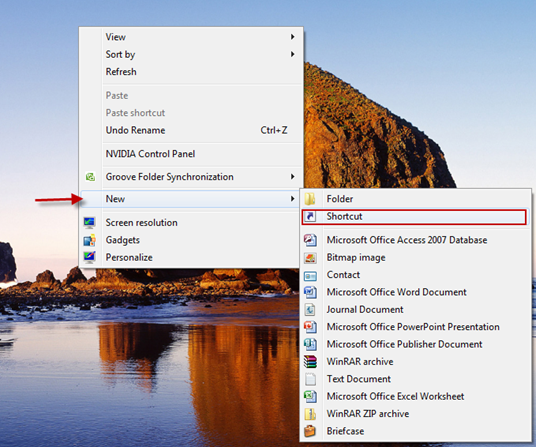
1. Right click on your desktop, go to New—>Shortcut.

Create a Shortcut

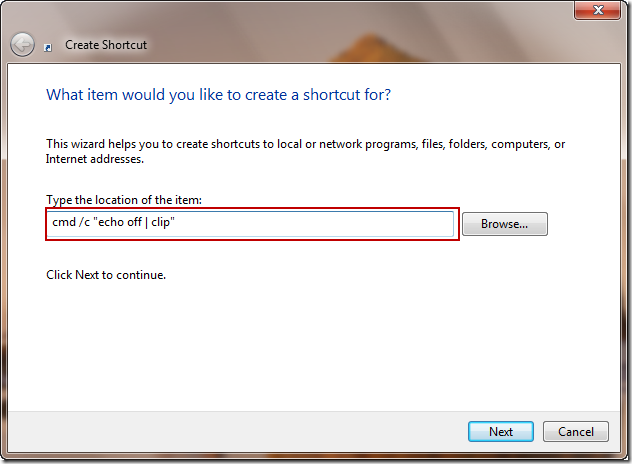
2. In the New Shortcut window, Type

cmd /c "echo off | clip"

and press Next

Clear clipboard shorcut

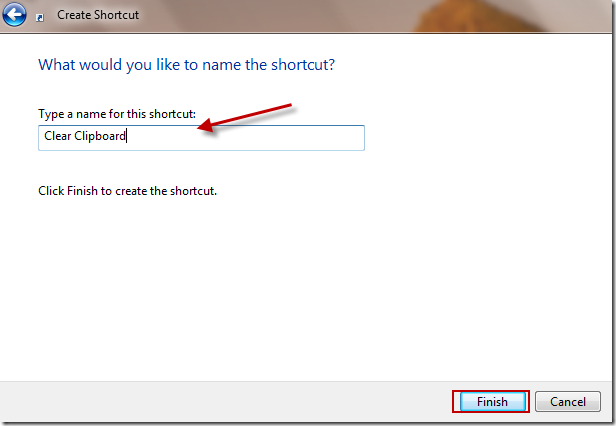
3. Type in a Shortcut Name of your choice and Finish.

Shorcut name

Now you can click on the shortcut anytime you want to clear your data off the clipboard.

[How To] Windows Virtual Memory Configuration

Did you notice an alert anytime saying ”Virtual Memory Low” while running a huge application or a game?  Well all what you need about Windows Virtual Memory and its configuration is explained in detailed here.

First question in your mind will be:

What is Windows Virtual Memory?

Physical memory or you know it as RAM is the vital component of your Windows machine. But Windows is not designed to run on RAM chips alone, no matter how much physical memory you have. In addition to using physical RAM to store programs and data, Windows creates a hidden file on your primary hard disk and uses that file to manage pages of data pulled from scattered sections of the hard disk and used in physical memory when necessary. The page file acts as an extension of main memory which is known as virtual memory.

What is the default Size and File location of Virtual Memory?

Windows creates the page file in the root folder on the same drive that holds the Windows system files. The size of the page file is determined by the amount of RAM in your system. By default, the minimum size on a 32-bit (x86) system is 1.5 times the amount of physical RAM if physical RAM is less than 1 GB, and equal to the amount of physical RAM plus 300 MB if 1 GB or more is installed. The default maximum size is three times the amount of RAM, regardless of how much physical RAM is installed.

Configure Windows Virtual Memory Size and Page file Location

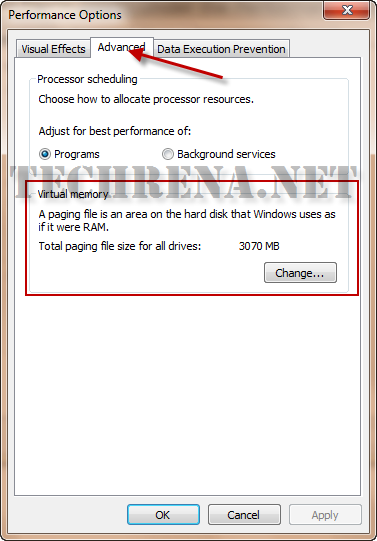
Press Start + R and type systempropertiesadvanced and press Enter. Under the Performance heading, click Settings. In the Performance Window, go to the Advanced tab. Here you will find Virtual Memory Change Option.

change virtual memory

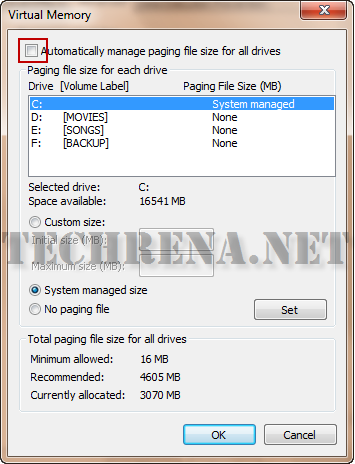
If you click on change, you can find the configuration window where you can change how the virtual memory is managed. Uncheck Automatic manage paging file size to change the virtual memory size.

virtual memory change window

You can have the following options in this window:

  • You can move the page file to a different volume if you have more than one.
  • If you have more than one volume, you can establish more than one page file.
  • For any page file, you can choose between System Managed Size and Custom Size.
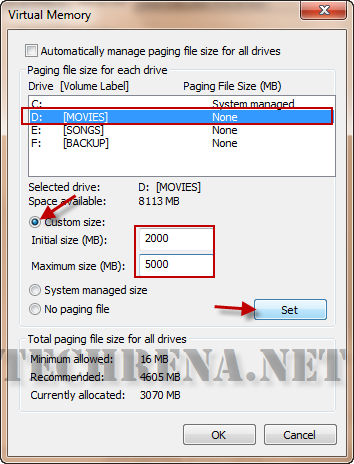
  • If you choose Custom Size, you can specify an initial size and a maximum size.
  • You can remove a paging file from a volume by selecting the volume and choosing No Paging File. (You can even get rid of all paging files this way, although doing so is not recommended, even on systems with a lot of RAM.)

An example configuration is given below:

virtual memory custom management

Should you enlarge your page file(Virtual Memory)?

Most users won’t need to do this. But sometimes you might get a pop up warning telling “Low Virtual Memory”. This happens when you have huge applications and less RAM size. If this is the case you might consider increasing the maximum size of your page file.

[How to] Install Google Android OS In Your PC

Google is giving us the opportunity to use Google Android OS for free in out x86 PCs. LiveAndroid is a live CD or Live USB with which you can try Android even without installing it to your PC. This Live CD/USB is available for free download.

More than that, the LiveAndroid disc image can be used in virtualization software like VMware and Microsoft Virtual PC.

Google LiveAndroid  is an open source project which will allow you to download the different releases and versions of the Google Android Operating System.

LiveAndroid

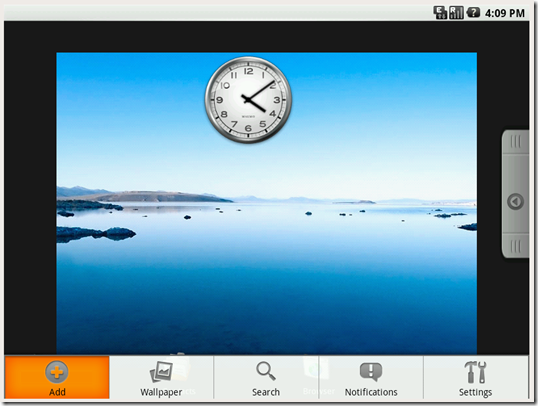
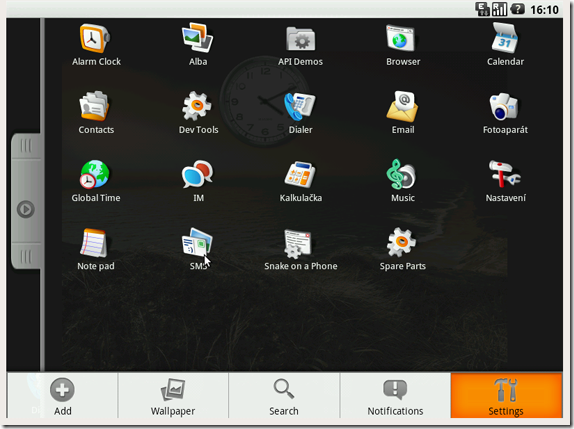
Google Andoid OS in x86

LiveAndroid Screenshot

LiveAndroid Screenshot

To download the Live CD or Live USB visit:

Link: http://code.google.com/p/live-android/

Once you have done downloading the image file you can burn it the Image to a CD or use a USB and boot it in your PC. You can use VMware to use this OS. You can follow the steps given in this post Install and Run Windows XP in Windows 7 Using VMware Player

.

[How To] Type The Rupee Symbol Using Your Keyboard

Indian_Rupee_symbol

With the release of the Rupee symbol (`), everyone in India is excited and curious of how to use this new symbol. Well, here we are suggesting a unique way of how to type this new symbol using your keyboard.

With the release of the Rupee font by Foradian Technologies, it is easily possible to type the new symbol in your computer.

Follow the simple steps below:

Step 1: Download the Rupee font from the link below:

Download: Rupee Font Version 2

Size: 60KB

Step 2: Copy the Rupee_Foradian.ttf file from the location you have saved.

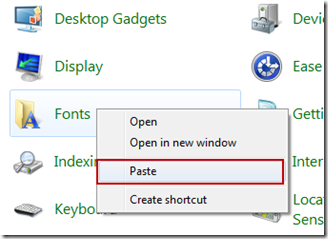
Step 3: Go to Control Panel with non category view. Find Fonts, right click and paste. The font gets installed automatically.

install_font

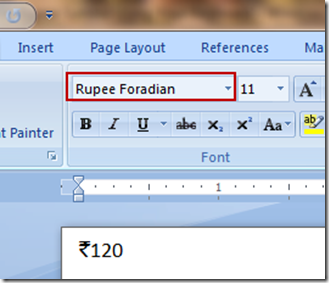
Step 4: Now you can use the ‘~’ key which is in the left of ‘1’ key to type the font. First, whenever you want to type the Rupee symbol, change the font to Rupee Foradian and press the ‘~’ key without shift.

type_rupee_symbol

After typing the symbol, you can change the font to the normal one. We are hoping that this symbol is included in the keyboard soon. Hope you have got to know how to type it now at least for the time being.

Acer Liquid E Ferrari Smartphone Special Edition Unleased: Full Specs

ferrari-logo

Acer is releasing special edition of Liquid e smartphone as a mark to the 800th Formula One race. The Acer Liquid e Ferrari Special Edition will have all the normal features. Some extra features and accessories will also be included. These include

  • A special set of ringtones of the Ferrari engine
  • 5-page home page for Formula 1 Ferrari Car
  • Ferrari images and videos

Acer_Liquid_E_Ferrari

A full listing of the technical specifications of Acer Liquid e Ferrari Special Edition is given below:

Features Details
Network 2G Network    GSM 850 / 900 / 1800 / 1900
3G Network    HSDPA 900 / 1900 / 2100
OS Android OS, v2.1
CPU Qualcomm Snapdragon 8250 768 MHz processor
RAM 256MB
Dimensions 115 x 62.5 x 12.5 mm
Weight 135 grams
Display TFT capacitive touchscreen, 256K colors
Size 480 x 800 pixels, 3.5 inches
Music MP3/WAV/WMA/eAAC+ player, 3.5 mm audio jack
Memory Internal 512MB
External microSD Card expandable up to 32GB
Connectivity GPRS Class 10 (4+1/3+2 slots), 32 – 48 kbps
EDGE Class 10, 236.8 kbps
3G HSDPA, 7.2 Mbps; HSUPA, 2.0 Mbps
WLAN Wi-Fi 802.11 b/g
Bluetooth Yes, v2.0 with A2DP
USB microUSB
GPS Yes, with A-GPS support
Video VGA@20fps, MP4/WMV/H.264/H.263 player
Colors Available Red
Battery Standard battery, Li-Ion 1350 mAh
Talk Time Stand-by    Up to 400 hours
Talk time    Up to 5 hours
Extras Acer UI 3.0
Accelerometer sensor for auto-rotate
Proximity sensor for auto turn-off

Watch the Official Promo on YouTube

We are still clueless about the price.

[How To] Make Gmail More Secure By Using HTTPS Instead Of HTTP

“If you sign in to Gmail via a non-secure Internet connection, like a public wireless or non-encrypted network, your Google account may be more vulnerable to hijacking. Non-secure networks make it easier for someone to impersonate you and gain full access to your Google account, including any sensitive data it may contain like bank statements or online log-in credentials” – Google

In order to avoid such kind of security risks we should enable HTTPS(Hypertext Transfer Protocol Secure) which is a secure protocol that provides authenticated and encrypted communication and the interceptors will not be able to tap the information.

You might have seen HTTPS being used in the banking and payment websites. So by using HTTPS for your Gmail, you will be able to a secure you mailbox.

In order of enable HTTPS protocol follow the steps below:

1. Sign in to Gmail

3. Check If your Gmail is secure?

Check if you have a https://mail.google.com url. If not then follow the steps else not required as it is already enabled.

gmail_url

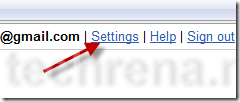
3. Click Settings at the top of any Gmail page.

gmail_settings

4. Set Browser Connection to Always use https

always_use_https

5. Click Save Changes.

save_gmail_settings

6. Log out and Login.

7. Now find a secure login

You can see https://mail.google.com in the url.

gmail_https_url

Now you Gmail is as safe as you internet banking site. But never forget to Logout your account if you are using a public computer.

Notes:

  1. Using HTTPS may slow down a bit the speed of accessing your Gmail, so if you trust the security of your network, you can turn this feature off at any time
  2. “Always use https” will prevent you from accessing Gmail via HTTP
  3. Currently Gmail has enabled HTTPS by default. For the old users you can follow the method.

Google TV Announced, Joined Hands with Sony, Intel and Logitech

Google has come up with the technology to unite Web surfing with channel surfing on televisions. Google has joined hands with Sony, Intel and Logitech International to bring their dream to reality. They have unveiled their much-anticipated Google TV.

Google_TV

For  those who already have a flat-panel TV will be able to plug into the new technology by buying a set-top box made by Logitech or Sony. Both devices will contain the same software and microprocessor as the new TV sets.

Problem during the Announcement of Google TV

The demonstration wasn’t smoothly at a Google conference for about 5,000 software programmers. Many people in the audience were using the conference’s wireless access network that created problems while Google showing how its technology is supposed to toggle seamlessly between the Web and television programming. Ironically Google had to plead with the attendees to disconnect their smart phones from the wireless network.

Google Android 2.2 Froyo Unveiled

Android 2.2 Froyo

Google has announced the latest version of the Android OS version 2.2 named Froyo today. A significant improvement in performance has been explained and list of new features Froyo have been included.

Some of the major changes Android 2.2 Froyo are listed below:

  • The Dalvik JIT Compiler improves the performance to 2x-5x
  • Supports Flash 10.1
  • Onscreen camera keys allows zooming, flash, white balance, geo-tagging, etc.
  • Better memory management for faster app switching and higher performance

Watch the Official video giving the full details of the new Android 2.2 Froyo release: