[How To] Change User Account Picture In Windows 7

This is very basic, easy and straight forward Windows 7 tutorial, intended for the Windows 7 beginners.

User account pictue in Windows 7

You might have noticed that whenever you go to Start Menu or Welcome or logon screen of your Windows 7 PC, you will be shown with some thumbnail picture next to your Windows user account. Windows randomly chooses the account profile picture for you which you can change anytime though. Just follow the below steps to quickly change your user account picture in Windows 7.

1. Click Start Menu and click on your user account profile at the top.

user account in start menu

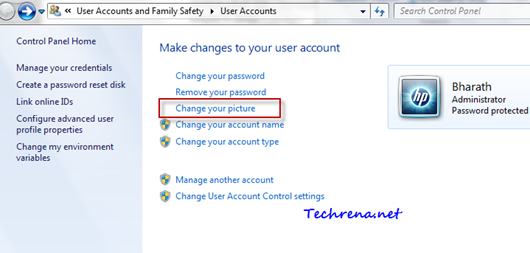
2. It will open the User account manager under control panel. Find and click on “Change your picture” link in this window.

Change your user account picture

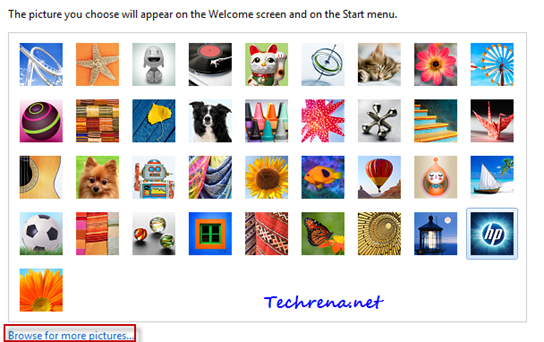
3. You will now be asked to choose your account picture. You can either select one from the handful of preloaded images listed there or you may also browse your computer for more pictures. Click on “Browser for more pictures..” link at the bottom of the window to select a picture from your computer.

Change your user account picture

4. Click on change picture to finish the process and you are done with changing your user account picture.

Although this tutorial is written keeping Windows 7 in mind, the procedure still remains the same for older versions of Windows like Windows Vista and Windows XP.

[Tip] Remove System Volume Information Folders

System Volume Information: Is it really a virus?

Myth: System Volume Information is a virus and it suddenly appears in your Windows XP computer and it doesn’t let you open its contents. It may have virus or suspicious files within it.

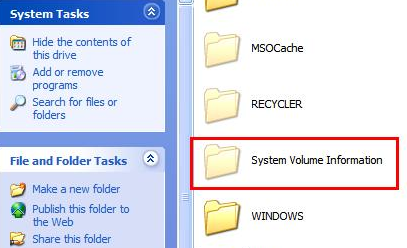
System Volume Information in Windows XP

Fact: System Volume Information (and even “Recycler”) folder is a standard Windows folder. System Volume Information folder stores the restore points data and the Recycler folder belongs to the Recycle bin. So first up, you don’t need to delete them and treat them as virus. These files do exist in later versions of Windows too. Here’s the proof: (Windows 7 screenshot)

System value information folder in Windows 7

These are system folders and are hidden by default. They will show up once you change the settings under “Folder Options’ to show the hidden system files and folders.

Thankfully Windows (Vista, Windows 7) doesn’t give you access to this folder so that averts any probable mess up if at all you access them and change the files inside it. Having said that , a virus can work around this and gain access to this folder to corrupt the restore points and create some .exe files inside it.

So to remove (actually to hide) the folder, just change the settings back in the folder options to not to show hidden system files and folders. However if you still insist on removing the System Volume Information completely (highly not recommended), here’s what you have to do:

Windows XP:

1. Right-click on My Computer and select Properties.

2. Click on the System Restore tab.

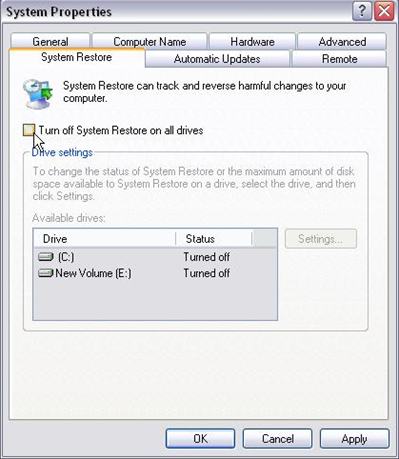
3. Click the Turn off System Restore on all drives check box and click OK.

Turn off System Restore

Windows 7 & Vista:

Read the How to disable System Restore in Windows 7 post written here at Techrena.

[How To] Make Older Programs Compatible With Windows 7

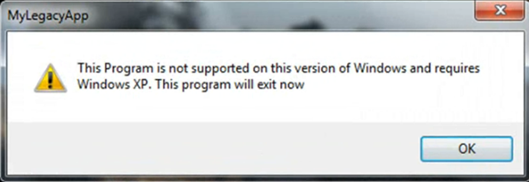
program not supported in Windows 7

Many users still use Windows XP and not upgrading it to the Windows 7, the one reason that we can think of is that they are worried about their favorite programs that they run in Windows XP without any issues might fail to run smoothly in Windows 7. While this may be true to some extent but the truth is that Windows 7 does offer a way to run these kind of programs.

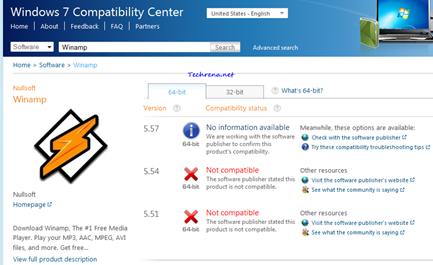
It is always suggested that you check the compatibility of the program that you want to run, at Windows 7 Compatibility Center.

Windows 7 compatibility center program check

Let us look at the alternatives that let us run older software in the newer Windows 7:

1. Run the latest version of the software: It sounds straightforward and easy, the fact that almost all the software makers who produce programs intended for Windows XP upgrade their versions to make them compatible with Windows 7. Hence you should always find the latest version of the software before you decide to run it on your Windows 7 machine.

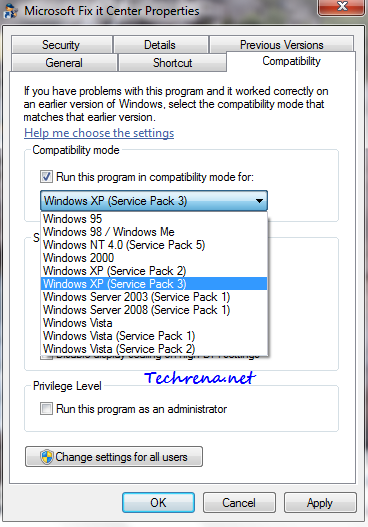
2. Using Compatibility Mode: As I said earlier, Windows 7 does have compatibility mode to run programs in compatibility mode for all the way back to Windows 95 to the Windows Vista (Service Pack. You can easily run any Windows XP based program using this feature in Windows 7.

Run windows xp compatibility mode in Windows 7

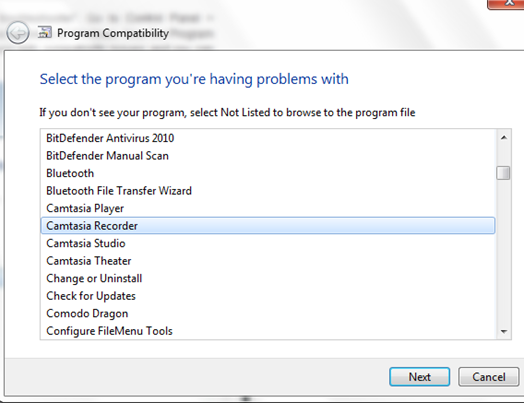
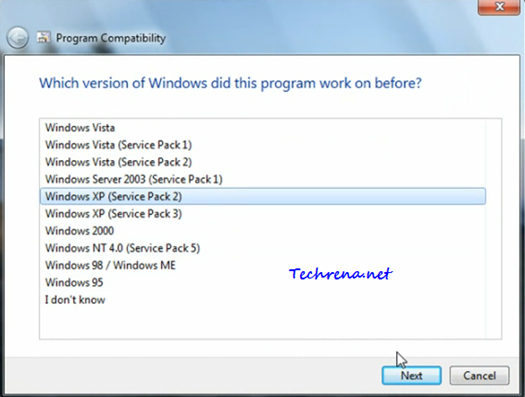
3. Another alternative is to use “Program Compatibility troubleshooter”. Go to Control Panel > Troubleshooting > Click “Run programs made for previous versions of Windows. Now the Program Compatibility wizard opens up and scans for the programs with compatibility issues and you can then select the program for which you want to changes in compatibility settings.

Program Compatibility wizard

Program compatibility in Windows 7

4. Using Windows XP inside Windows 7: Consider this option if all the above alternatives discussed fail. You can use Windows XP along with your Windows 7 in two ways: 1) Install Windows XP in another drive and dual boot it with Windows 7 2) Use Windows 7 Virtual PC and Windows XP mode in your Windows 7 PC.

[How To] Use Google Multiple Sign-In Feature

Google Mutiple sing-in

If you use Google products a lot and that too with different logins (may be one for personal use and other for business purpose etc.), you would be knowing there’s absolutely no way to use both accounts on the same browser. Until recently you need to go through some workarounds or use another browser and keep switching between the two windows often. Times have changed, Google has listened to users like you and enabled this glorious multiple sign-in feature for selected Google products.

You wouldn’t even be knowing that such a feature exists until you open your Google account settings page. This tutorial explains you how to enable and use Google multiple sign-in feature for your account.

To begin with, visit Google account settings page,

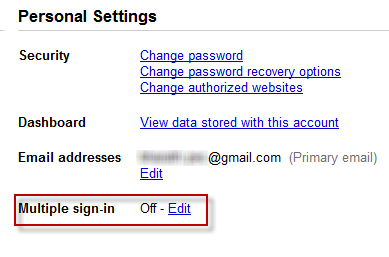
Google account personal settings

Find a “Multiple Sign-in” tab under your personal settings, by default this feature would be set to “Off”, click on the “Edit” link to change the multiple sign-in settings.

You will be taken to multiple sessions page,

multiple google accounts enable

You need to read and understand the four aspects listed there (as shown in the screenshot) before adding a “check” to each one after which you can enable the Google multiple accounts feature. After you checked the each option, the “save’ option would be enabled. Click on it to save the settings and enable the multiple sign-in feature.

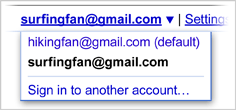
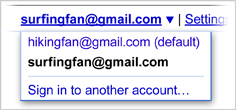
Now the Google multi-login feature gets enabled for you. Open any multiple sign-in supported Google product page(ex: Gmail) and you can figure out a drop down menu next to your Google account username. Click on it to see “Sign in to another account” link and click on it.
multilogin menu sample

You can sign in up to two additional accounts (so in essence, you can simultaneously access up to three Google accounts, while the first being your default account) and you can also open the same product in multiple tabs with different tabs.

Please note that the multiple sign-in option is currently available to only few products listed below and also it is not fully supported for use with Offline Gmail and calendar , for the same reason you wouldn’t want it to enable yet if you use offline Gmail.

Multiple-sign in feature supported Google products:

  • Code
  • Calender
  • Gmail
  • Reader
  • Sites
  • Voice
  • Docs

If you want to use multiple sing in with other products, you still need to either use tricks like using private browsing mode in supported browsers or use another browser as you have been doing all through.

[How To] Install WordPress On Your Local Computer

wordpress logo

Are you a web developer or admin of a network of blogs with WordPress as CMS? Want to test some new features offline before implementing them on your original server online ?

If your answer is “yes” to the above questions, perhaps you have landed on the right page. WordPress is an amazing Content Management System for blogs and it makes everything easy even for not so tech-savvy people. However if you own blogs, you might well be knowing the importance of testing the features like testing some enhancements to your current themes, testing plugins or even testing some third-party scripts on your WordPress blog. At Techrena, which is set to become a network of blogs sooner or later, we understand the importance of this testing. We do a lot of testing on our local computers before finally taking them online. We thought it would be useful if we share how actually we do this kind of testing on our local systems using WordPress. Here we are coming up with a detailed tutorial on installing WordPress on localhost via two methods.

1. Using Xampp Server

2. Using IIS server (on Windows only)

Before we start, while we try to give every detail while posting this please do note that in some cases, we do take things for granted in the sense that we assume that you know some basic things if not more. Let’s get started…

Using Xampp Server:

Requirements: i) PHP latest version (check here) ii) MySQL Database latest version (check here)

Although, PHP 4.3+ version and MySQL 4+ version is sufficient enough to run WordPress, we recommended you to use the latest versions always. One good thing with WordPress is that, it always notifies users when their database version is outdated. So this helps you keeping the updated database version.

Step 1:

Download the XAMPP local server. Run the installer and make sure that the XAMPP server is running on your tray.

Step 2:

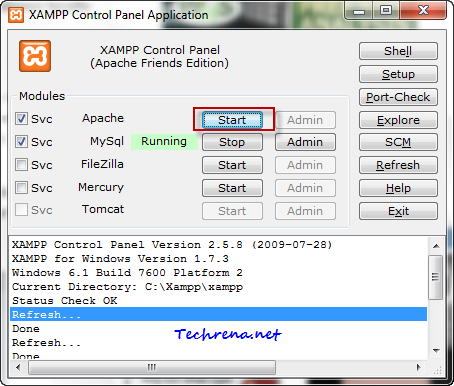
Open the XAMPP Control Panel from the system tray, check the first box (Apache) and click on the “Start” button to start the Apache web server on your local machine.
Xampp control panel start Apache

Step 3:

Now that the local server has been installed we are now left with installing WordPress on our server. Download the latest WordPress zip file and extract the “WordPress” folder to the htdocs folder inside the “xampp” server installation folder.
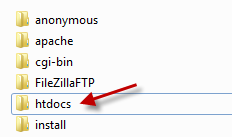
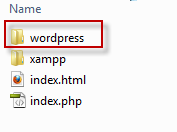
htdocs in xamppWordPress in htdocs

Step 4:

Now you need to create a database table which can be used by WordPress. Go to http://localhost/phpmyadmin/ and create a new database. If you are not able to login to the phpMyAdmin page, go to http://localhost/security/xamppsecurity.php page and edit the MySql SuperUser details and try again.

Enter the new database name (something like “wordpress”) and click “Create” and the new database will be created. Now we need to notify WordPress about this database in the next step.
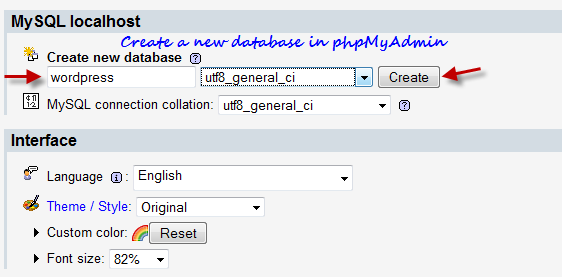
New database in phpMyAdmin

Step 5:

Go to WordPress folder and open the file called “wp-config-sample.php” in any text editor.
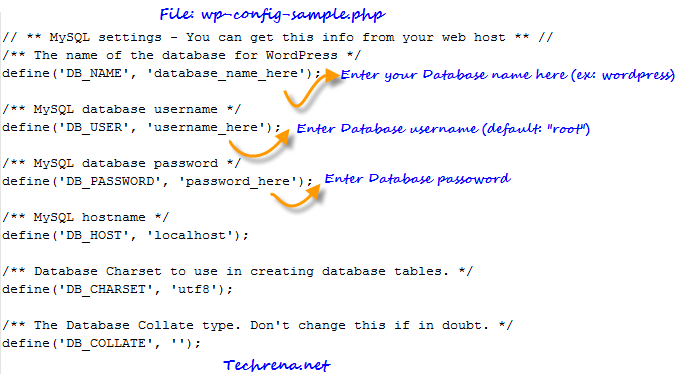
editing wp-config-sample.php file

Make the changes to the file and rename it as “wp-config.php” and close the editor.

Step 6:

Now type http://localhost/wordpress/wp-admin/install.php (the path of the URL may change depending on what name you chose for site or the name of the folder under “htdocs”)
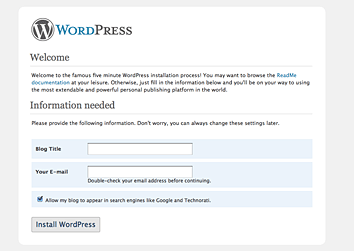
WordPress install page

Choose your local WordPress blog title and leave your email address in there start page and click “Install WordPress”. You will now be given username and password to login to your new blog.

2. Using IIS Server:


Microsoft has made it easier to install WordPress on your Windows based computer just like installing Windows apps, all you need to do is to do a few clicks.

Requirement: You need to enable and run IIS server on your computer.  Read our tutorial on how to activate IIS on your computer.

Step 1:

Download and run Microsoft Web Platform Installer. This is a free software from Microsoft developed to make installing web apps easy for Windows users.

Step 2:

Go to Web Applications > Blogs > click “Most Popular”, select “WordPress” and click Install button. Other tools that are required by  WordPress like PHP and MySQL will automatically be included in the download. You need to accept the licence agreement and then proceed to the download. The total download size should be less than 90 MB in most cases.
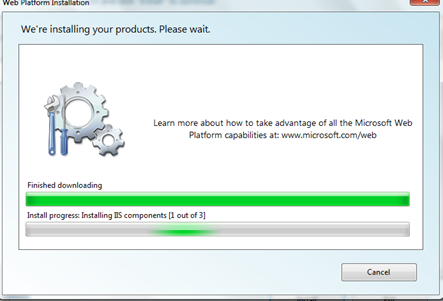
Web platform installer for wordpress

Step 3:

Once the download and installation gets over, you will be asked to enter information about your site in a series of steps:

i) Admin Password for MySQL: By default the database administrator username would be “root” and you need to select a password for the administrator, click “Continue” button once you are done.
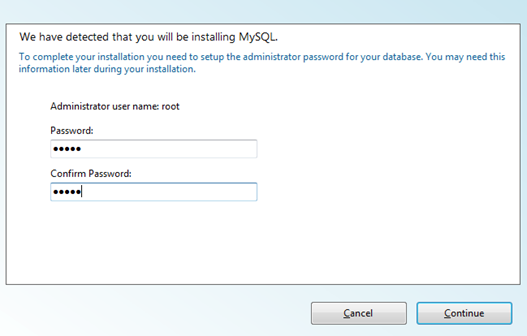
MySQL dayabase admin password web platform

After you enter this, the download resumes for sometime and you will be then asked for some more information about the site.

ii) Application information: You need to enter the Database admin password (which you have set in the above step) and WordPress database password. You will also be asked to enter passphrases to secure your passwords, but the default option here is to leave them blanks and in any case this is not mandatory. You can however change it if you would like to change it.
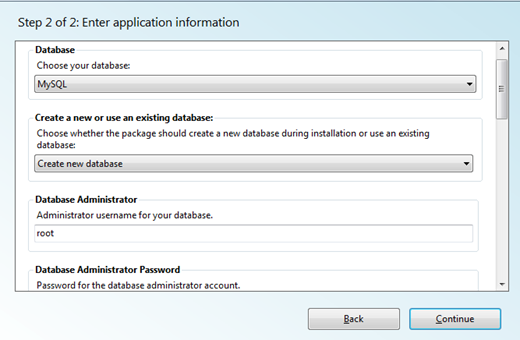
WordPress IIS application info

ii) Site information: In this step you just need to enter the WordPress application name. You might not want to change the other details which are set to default already. Click “Continue” button and let the Web Platform installer install the application for you.

Step 4:

This is the last step of the installation. You will be shown the list of product installed on the window.
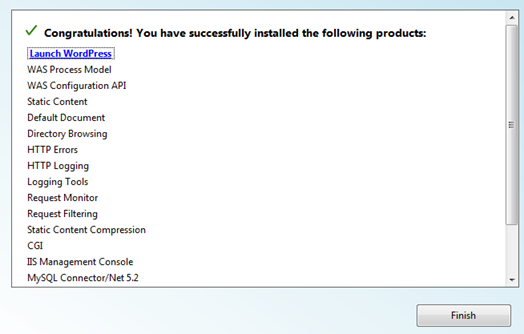
WordPress_web_platform_install_done

Click “Launch WordPress” to launch your WordPress blog. You can alternatively access it via http://localhost/wordpress/. You can find the WordPress installtion usually inetpub> wwwroot folder.

Still facing any problems during the installation ? Let us know through the comments.

Note:

1. The above two methods have been tested and found to be working well on Windows 7 machines.

2. While the method 2 is relatively simpler and quicker, we have however found that if you delete some sites from your IIS Manager, the WordPress installation getting corrupted. It may not be the same case for all but surely for some. We hence advise you to not to touch anything inside Internet Information Service(IIS) Manager unless you are sure about what you are doing.

[How To] Windows Virtual Memory Configuration

Did you notice an alert anytime saying ”Virtual Memory Low” while running a huge application or a game?  Well all what you need about Windows Virtual Memory and its configuration is explained in detailed here.

First question in your mind will be:

What is Windows Virtual Memory?

Physical memory or you know it as RAM is the vital component of your Windows machine. But Windows is not designed to run on RAM chips alone, no matter how much physical memory you have. In addition to using physical RAM to store programs and data, Windows creates a hidden file on your primary hard disk and uses that file to manage pages of data pulled from scattered sections of the hard disk and used in physical memory when necessary. The page file acts as an extension of main memory which is known as virtual memory.

What is the default Size and File location of Virtual Memory?

Windows creates the page file in the root folder on the same drive that holds the Windows system files. The size of the page file is determined by the amount of RAM in your system. By default, the minimum size on a 32-bit (x86) system is 1.5 times the amount of physical RAM if physical RAM is less than 1 GB, and equal to the amount of physical RAM plus 300 MB if 1 GB or more is installed. The default maximum size is three times the amount of RAM, regardless of how much physical RAM is installed.

Configure Windows Virtual Memory Size and Page file Location

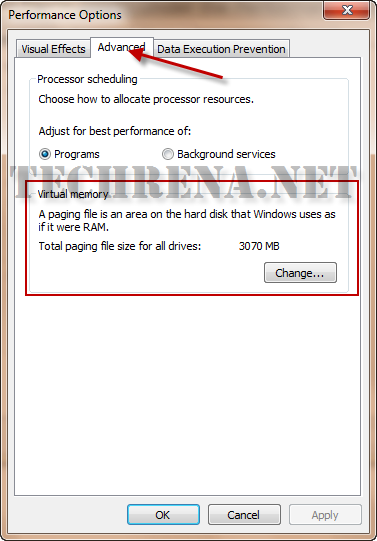
Press Start + R and type systempropertiesadvanced and press Enter. Under the Performance heading, click Settings. In the Performance Window, go to the Advanced tab. Here you will find Virtual Memory Change Option.

change virtual memory

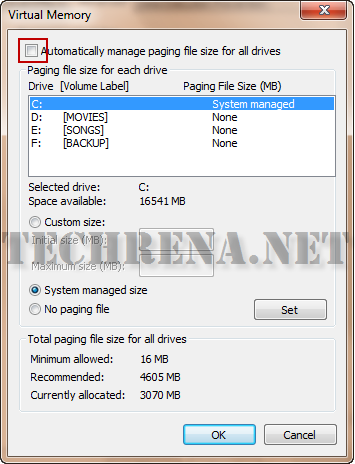
If you click on change, you can find the configuration window where you can change how the virtual memory is managed. Uncheck Automatic manage paging file size to change the virtual memory size.

virtual memory change window

You can have the following options in this window:

  • You can move the page file to a different volume if you have more than one.
  • If you have more than one volume, you can establish more than one page file.
  • For any page file, you can choose between System Managed Size and Custom Size.
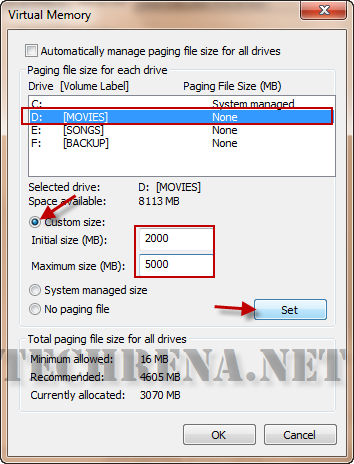
  • If you choose Custom Size, you can specify an initial size and a maximum size.
  • You can remove a paging file from a volume by selecting the volume and choosing No Paging File. (You can even get rid of all paging files this way, although doing so is not recommended, even on systems with a lot of RAM.)

An example configuration is given below:

virtual memory custom management

Should you enlarge your page file(Virtual Memory)?

Most users won’t need to do this. But sometimes you might get a pop up warning telling “Low Virtual Memory”. This happens when you have huge applications and less RAM size. If this is the case you might consider increasing the maximum size of your page file.

[How To] Type The Rupee Symbol Using Your Keyboard

Indian_Rupee_symbol

With the release of the Rupee symbol (`), everyone in India is excited and curious of how to use this new symbol. Well, here we are suggesting a unique way of how to type this new symbol using your keyboard.

With the release of the Rupee font by Foradian Technologies, it is easily possible to type the new symbol in your computer.

Follow the simple steps below:

Step 1: Download the Rupee font from the link below:

Download: Rupee Font Version 2

Size: 60KB

Step 2: Copy the Rupee_Foradian.ttf file from the location you have saved.

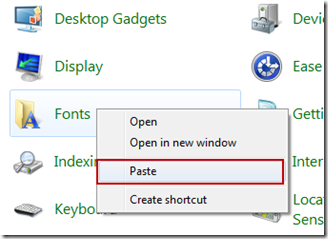
Step 3: Go to Control Panel with non category view. Find Fonts, right click and paste. The font gets installed automatically.

install_font

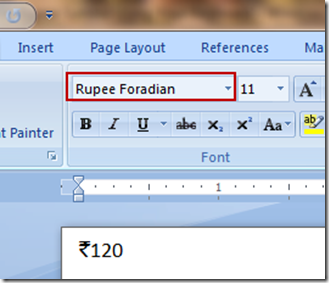
Step 4: Now you can use the ‘~’ key which is in the left of ‘1’ key to type the font. First, whenever you want to type the Rupee symbol, change the font to Rupee Foradian and press the ‘~’ key without shift.

type_rupee_symbol

After typing the symbol, you can change the font to the normal one. We are hoping that this symbol is included in the keyboard soon. Hope you have got to know how to type it now at least for the time being.

[Tip] Get Free Gmail Email Alerts Via SMS

Gmail via SMS logo

If you want to get all your new Gmail messages to your mobile phone via SMS text messages, there are already enough no of services and tools have been developed to serve the purpose for which you need to share your Gmail password. Even though most of these services are genuine, still you might not always want to share your Gmail personal credentials with those services for security concerns. Here I’m coming up with an alternative where you need not give access to your personal Gmail to any unreliable third-party service. All you need is an Gmail account and a Windows Live Mail (Hotmail account). If you still haven’t got an account at Live Hotmail, get a new account here. Now follow the steps mentioned below:

Steps:

1. Connect a mobile device to your Hotmail account and set up Hotmail Email SMS alerts.

2. Login to your Gmail account, go to settings page.

3. Go to Forwarding and POP/IMAP tab, find the “Forwarding” tab.

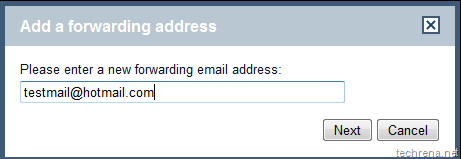
4.  Add a new email address to your forwarding list by selecting “Add new email address..” option for the drop down box. Enter the new forwarding email address. It should be something like username@hotmail.com

Add new email address Gmail forwarding

forwarding_address_gmail

5. Click Next and complete the verification process. Enter the verification code that you receive via SMS.

Verfiy forwarding mail in Gmail

6. Now that you have successfully verified your new forwarding hotmail address, you will now receive each and every mail from your Gmail inbox to the new forwarding hotmail address (we selected “keep Gmail’s copy in the inbox” option). As you had also setup your Hotmail Email alerts to be sent to your mobile via SMS, in effect you get all your new mails in your Gmail inbox directly to your mobile.

7. But some operators in India like Airtel have a limit on the number of free text messages that you can receive through Hotmail (The current limit for Airtel is 300 !). So you might want to filter out some unimportant mails to wasting these free messages count. Luckily we have “filters” in Gmail that makes this task easier for us.

8. First of all disable the forwarding under your Gmail’s “Forwarding and POP/IMAP” settings.

disable forwarding in gmail

Now go to Filter tab and create a new filter:

Filters tab in Gmail

9. Under the filter settings filter out Emails based on senders or words or based on subjects of the mail that you receive. I have chosen not to receive alerts for mails from Facebook alerts, Twitter alerts etc. You can setup your own criteria for filtering the mail.

Creating Filter in Gmail

Click on “Next Step” once you are done.

10. Now select the fifth option i.e “Forward it to:….@hotmail.com”. And click “Create Filter”.

forwarding using Gmail filter

That is it. You are done with configuring your Gmail inbox to receive SMS alerts for important mails in your Gmail.

Note:

Windows Hotmail Email SMS alerts is currently available only in few countries. This tutorial is based on the such service offered in India,and thus this trick may not work for you if you are located in a country where Hotmail SMS service is currently not available.

[How To] Configure Windows 7 Action Centre Warning Messages

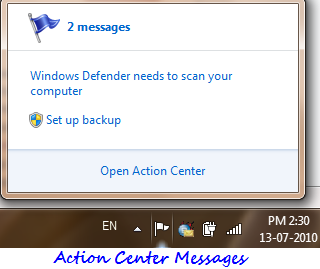
Windows 7 Action Center messages

Action Center in Windows 7 offers warning messages relating to your computer. You can find these messages in your notification area in the form of a flag. They include important security messages, virus protection alerts, Windows Update, Internet security settings, Spyware and related protection, User account control, troubleshooting, windows backup etc.

It is highly recommended that you keep these messages enabled as they include some important security issues as well. However you might not want to see Windows Backup warning messages when you are using an external third-party backup software. And you do check for updates according to your convenience. In such cases you might not want to get annoyed by warning messages about these simple things. This tutorial explains how you can configure the settings for these messages or even to completely turn off (not recommended) these action center messages in Windows 7.

Steps:

1. Click on the flag icon in your notification area or type “action center” in the start menu search box and open the Action center.

Action Center Windows 7 home

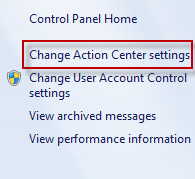
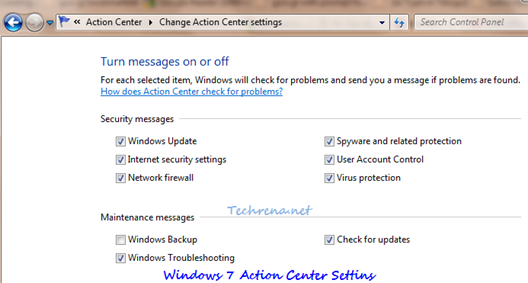
2. Under the “Action Center Settings”, you can choose for which categories Windows Action center needs to check for problems. Uncheck all to completely turn off the entire Action Center alerts which is obviously not recommended.

Windows 7 action center settings

Click OK and close the window. You will no longer receive warning messages from the categories you have unchecked in the previous step. The white flag icon however stays there without any warning messages.

[How To] Block A Website Using Content Advisor In Internet Explorer

site blocked

Blocking certain websites that may not suit the audience mainly in the case of children or workers has always been one such compulsory feature. In case you haven’t spotted yet, there’s one such option in Internet Explorer too. Here are the steps to block any website in Internet Explorer using IE’s content advisor.

Steps:

1. Go to Tools > Internet Options in the Internet Explorer.

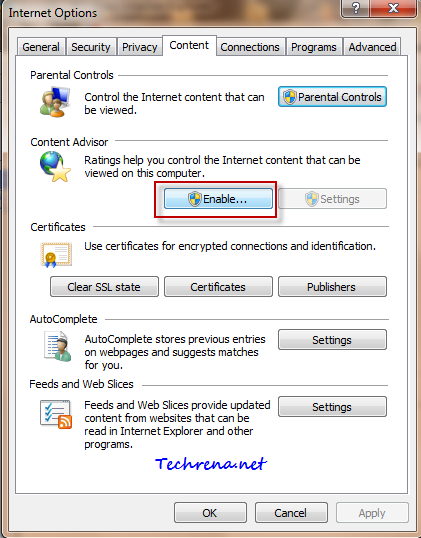
2. Go to “Content” tab under the Internet Options. Find “Content Advisor” under this tab. By default it would be set default. Click “Enable” option opposite to it.

Content advisor in Internet Options

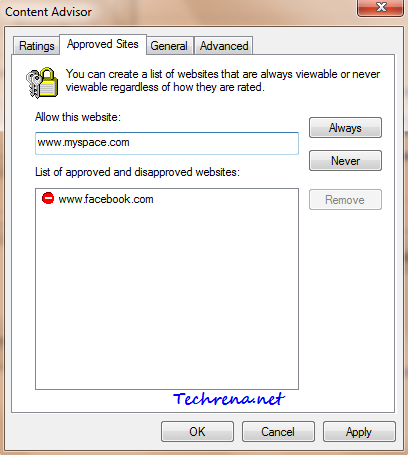
3. Go to “Approved sites” tab in the Content Advisor window. Type the URL of the website that you want to block in the text box and clock “Never” button. See the screenshot below:

Approved sites in Content advisor

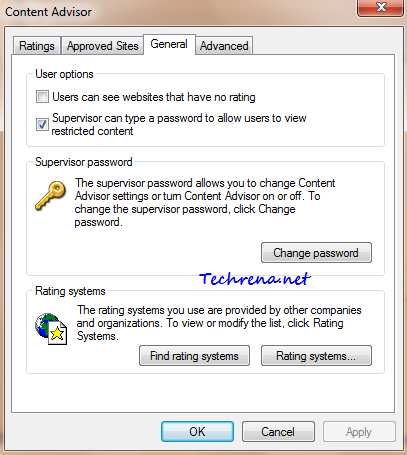
4. Click “Apply” once you are done and then go to “General” tab. Here you can choose whether to password protect the blocked sites that you added. Once configured, click “OK’ to close the window.

Content advisor General options

You will now be asked to enter the supervisor password for the content advisor settings.

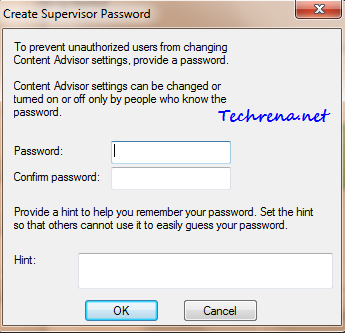
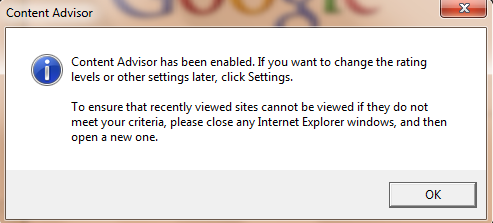
5. Create a supervisor password and add a hint (recommended) which is helpful in case you forget the password in future. Close the window once you have done that.

Supervisor password for content advisor

Content Advisor settings done

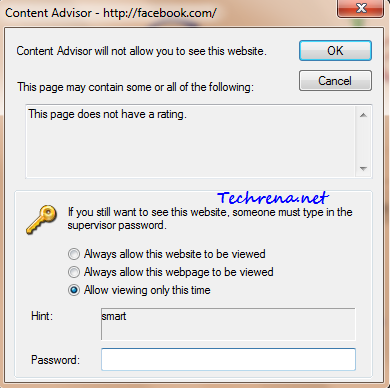
6. Now try to open any website that you have added in the block list. You will see the following prompt window, asking for you to enter the supervisor. User can view the website only if he knows the supervisor password.

Content advisor prompt window

7. You can disable the content advisor any time by clicking the “Disable” button under the “Content Advisor”. You will however need to authorized to do that by validating through the supervisor password.

For more tips on software, subscribe to Techrena’s RSS feeds via email.